 Enrico Miglino
Introduction
The project idea is making a relatively low-cost system to monitor plants and cultivation areas to detect the grown state as well as potential parasite and damaged plants.
The device can be easily installed on a semi-autonomous UAV to cover large areas of terrain, as well as installed on a ground robotised device. The use of a UAV represents the most flexible solution compared to the ground mobile unit.
Some of the most challenging issues if adopting the ground mobile solution:
- Difficulty to move on the non-regular terrain
- Limitations due to the kind of plants
- Slower and more difficult mobility
- Reduced field of operation
- Slower back-to-home maneuvres
The video below shows the first fly of the flying prototype acquiring and pre-processing images real-time, installed on a Dji Mavic 2 Pro drone. The flying unit has a weight of about 250 gr (including batteries) while the payload of the drone is about 1 Kg.
This project is co-sponsored by Elegoo for the 3D printers and printing material.
Making the Prototype
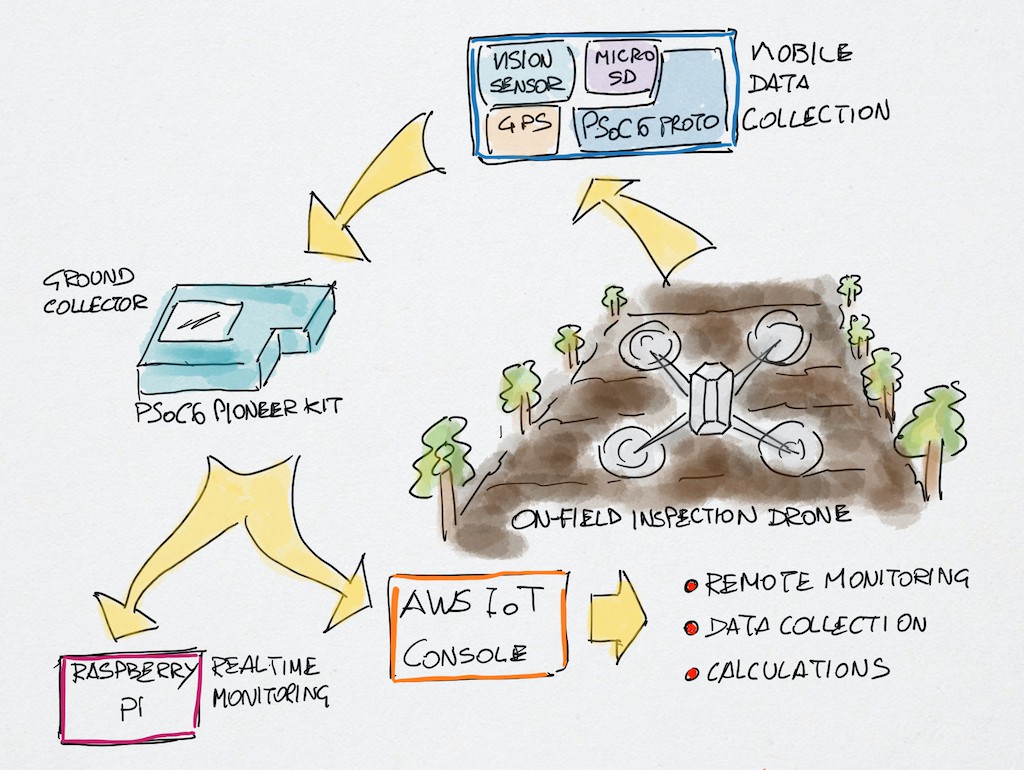
The Nanodrone prototype is divided in two parts: a flying moduyle that will be installed on the Dij Mavic 2 Pro drone used in this project and a ground module that receives real-time the data from the drone and send them to the AWS IoT cloud, based on the PSoC6 Pioneer Kit.
The two modules are connected via a couple of Arduino MKR1300 LoRa Wan linked peer-to-peer. I have decided to adopt the LoRa protocol for the communication to support a wider range of operation. With about 30 minutes of flying autonomy the drone can collect image data from large areas, process them in real-time and send a feed to the ground module. The LoRa protocol makes possible to keep a stable connection at a considerable distance: the expected covered area can be up to 1.000 square meters.
Flying Module
- A drone with onboard the collection/inspection device will move along a field following a predefined path.
- The collected information – including visual data – coming from several sensors are integrated realtime and saved locally on a microSD card.
- The device has a GPS to save the acquisition points, independent by the drone navigation system
- The information are updated real-time from the flying unit installed on the drone, sent to the PSoC6 of the ground station using a LoRa connection by two Arduino MKR1300 LoRa Wan.The inspection set of retrieved data are sent to the AWS IoT Console via MQTT by the PSoC6 Pioneer Kit ground station integrated with the sensors of the PSoC6 device.
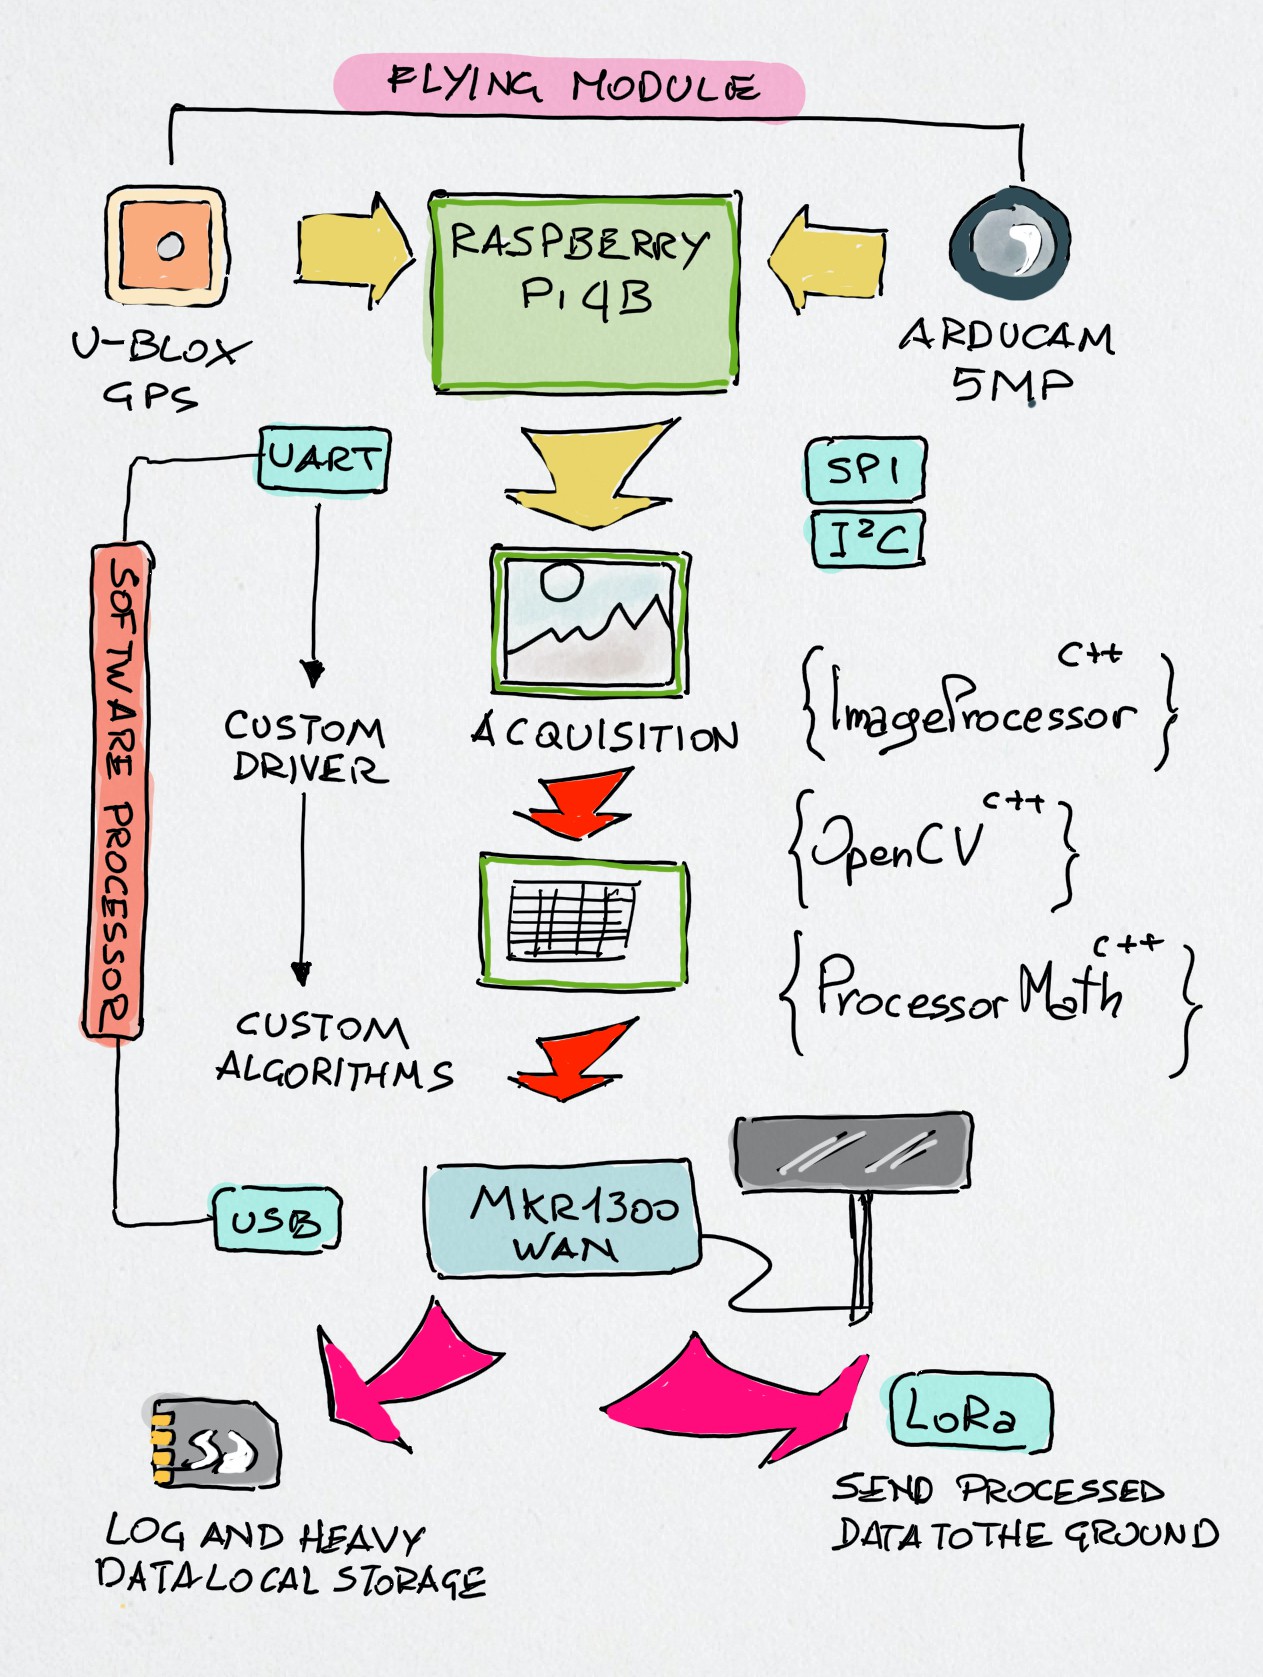
More details on the software and the Raspberry Pi custom shield in the log notes.
Ground Module
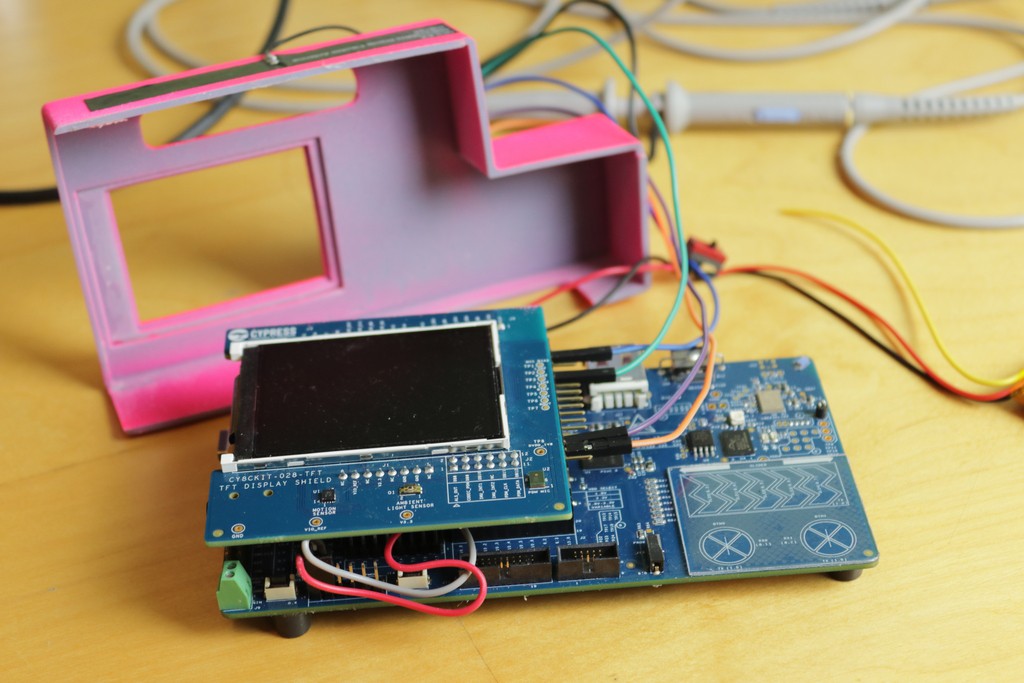
The Ground Module is based on the Cypress PSoC6 Pioneer Kit connected to the WiFi and to an Arduino MKR1300 LoRa Wan acting as the receiver. Having already developed on the PSoC6 both the WiFi Connection and the AWS IoT cloud data interfacing through the MQTT protocol, I have not considered the difficulty to connect it to the Arduino via the UART port.
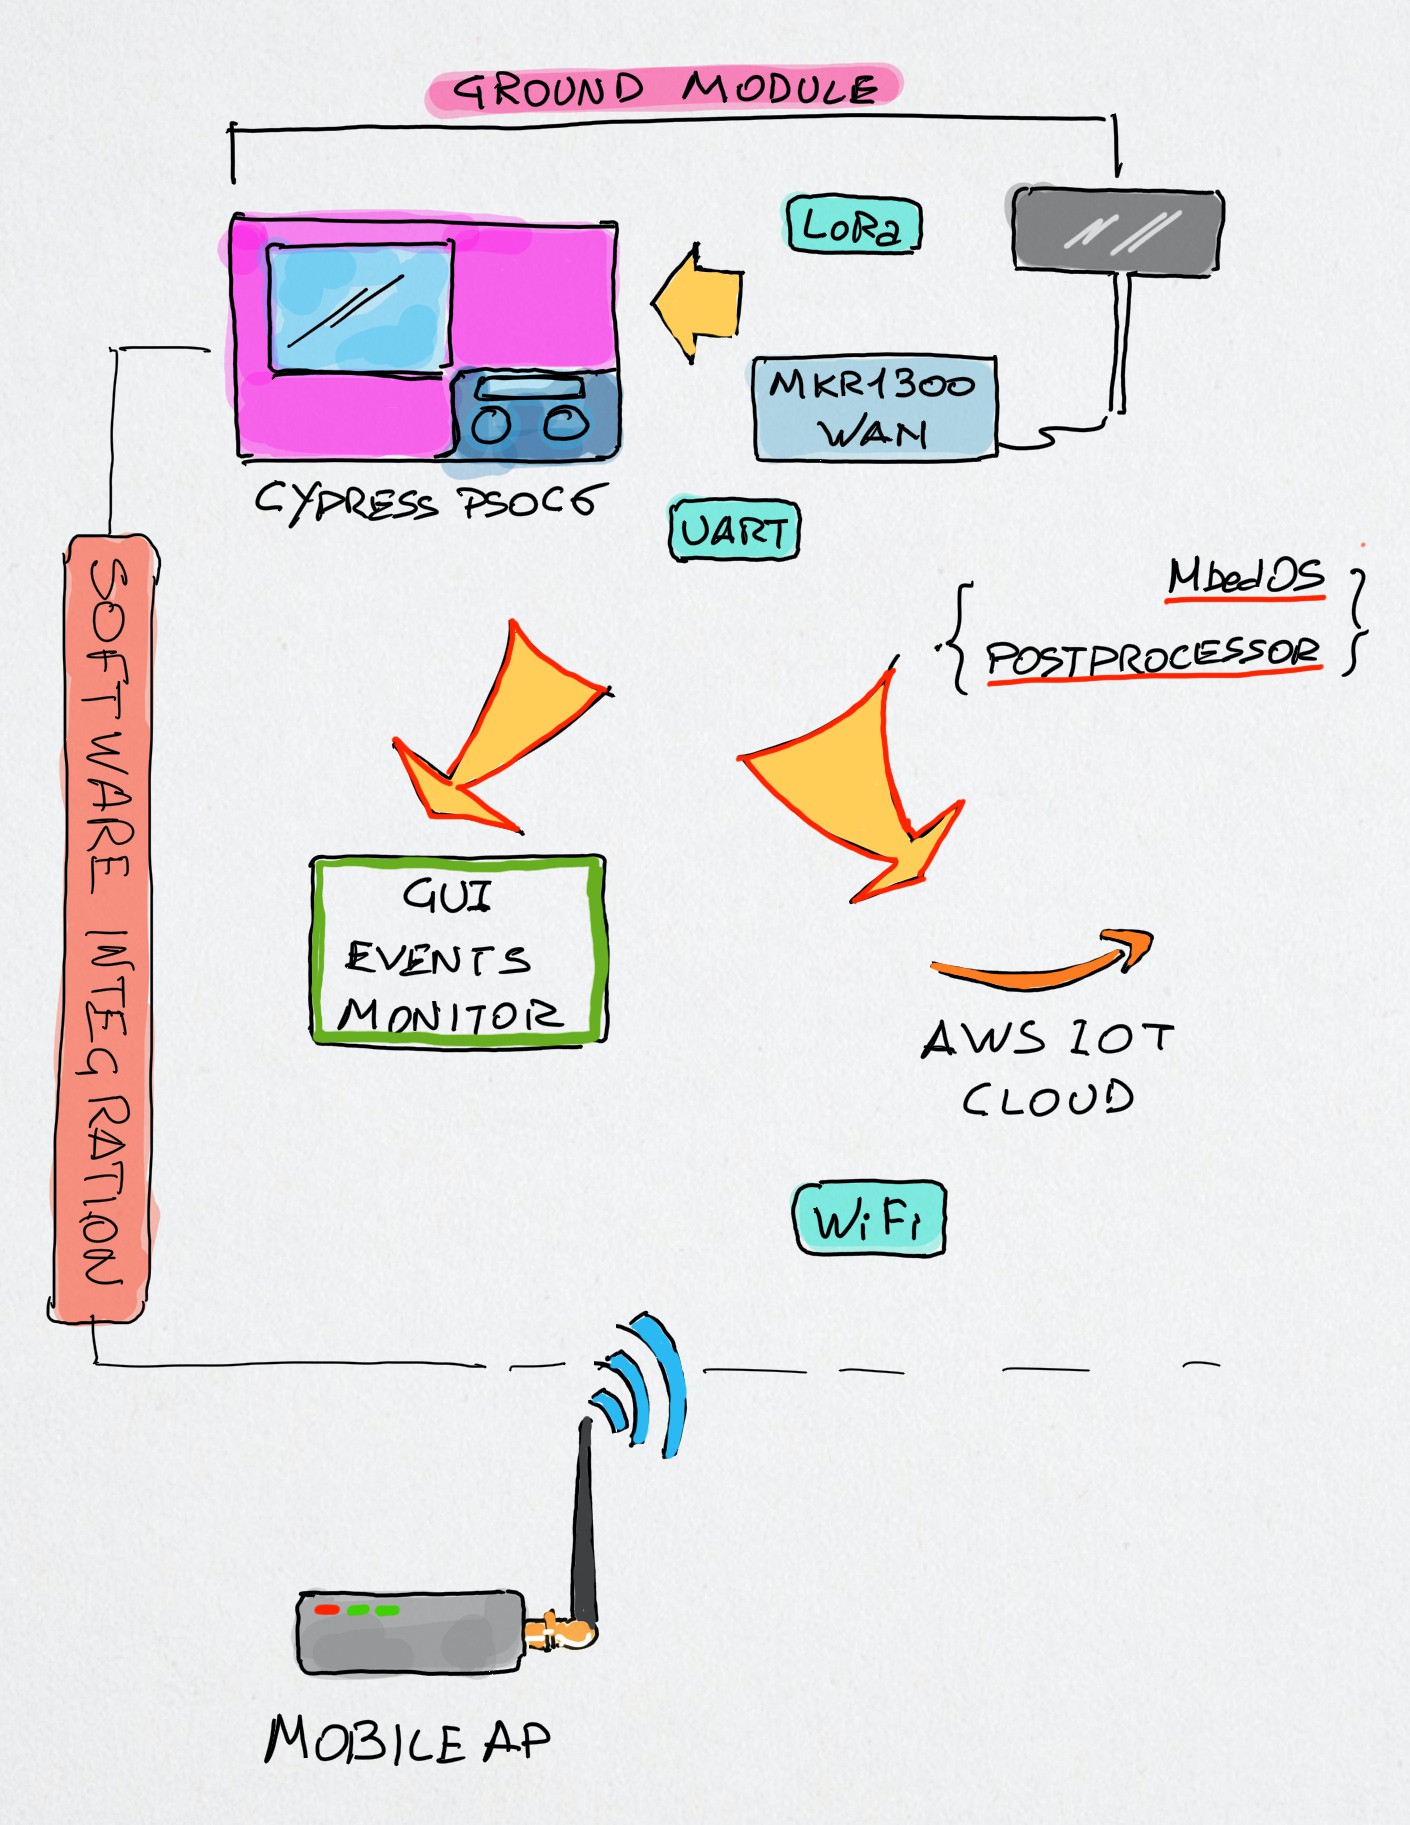
The above image shows the functional schema of the ground module application; one of the aspects I more appreciated of the PSoC6 architecture kit was the availability of may different kind of interfaces, including the USB host mode. In fact, the original software idea was to connect the MKR1300 LoRa receiver to the PSoC6 through the USB host port. Unfortunately, things were not so easy as I figured reading the hardware specifications of the PSoC6 Pioneer kit.
The USB UART example shown in the Modus Toolbox, as well as all the other examples I found on the Cypress site and GitHub refers to the USB-C connector (beside the USB host); the communication works perfectly only if on the other side there is a PC or any other device able to provide a USB host connection. But here I need to connect an Arduino!
I spent a lot of time investigating this (first) issue - I should thank the friend @Jan Cumps that helped me a lot investigating and suggesting tests to solve the challenging problem of connecting the PSoC6 to the Arduino. The idea of using the USB host connection has been definitely abandoned when I found on the Cypress Community forum this post: https://community.cypress.com/thread/50730?start=0&tstart=0 It seems that this feature of the MCU is not yet supported by Cypress.
The Arduino MKR1300 specifications (on the official site Arduino.cc) mentions the board has two serials – but only one is listed - the USB Virtual serial used for programming the board and a physical UART on the pins 13 and 14. But the problem was far to be solved.
After a week of tests and investigations, I can conclude that as a matter of fact, the only viable option to use one of the UARTs of the PSoC6 – at least with the PSoC6 Pioneer kit – is to use the block SB5. This programmable block can manage the conventional UART, I2C and SPI but according to the pinout of the board (shown below) all the available connections on this block are used. In particular the block SB5 is populated by the TFT display and the sensors.
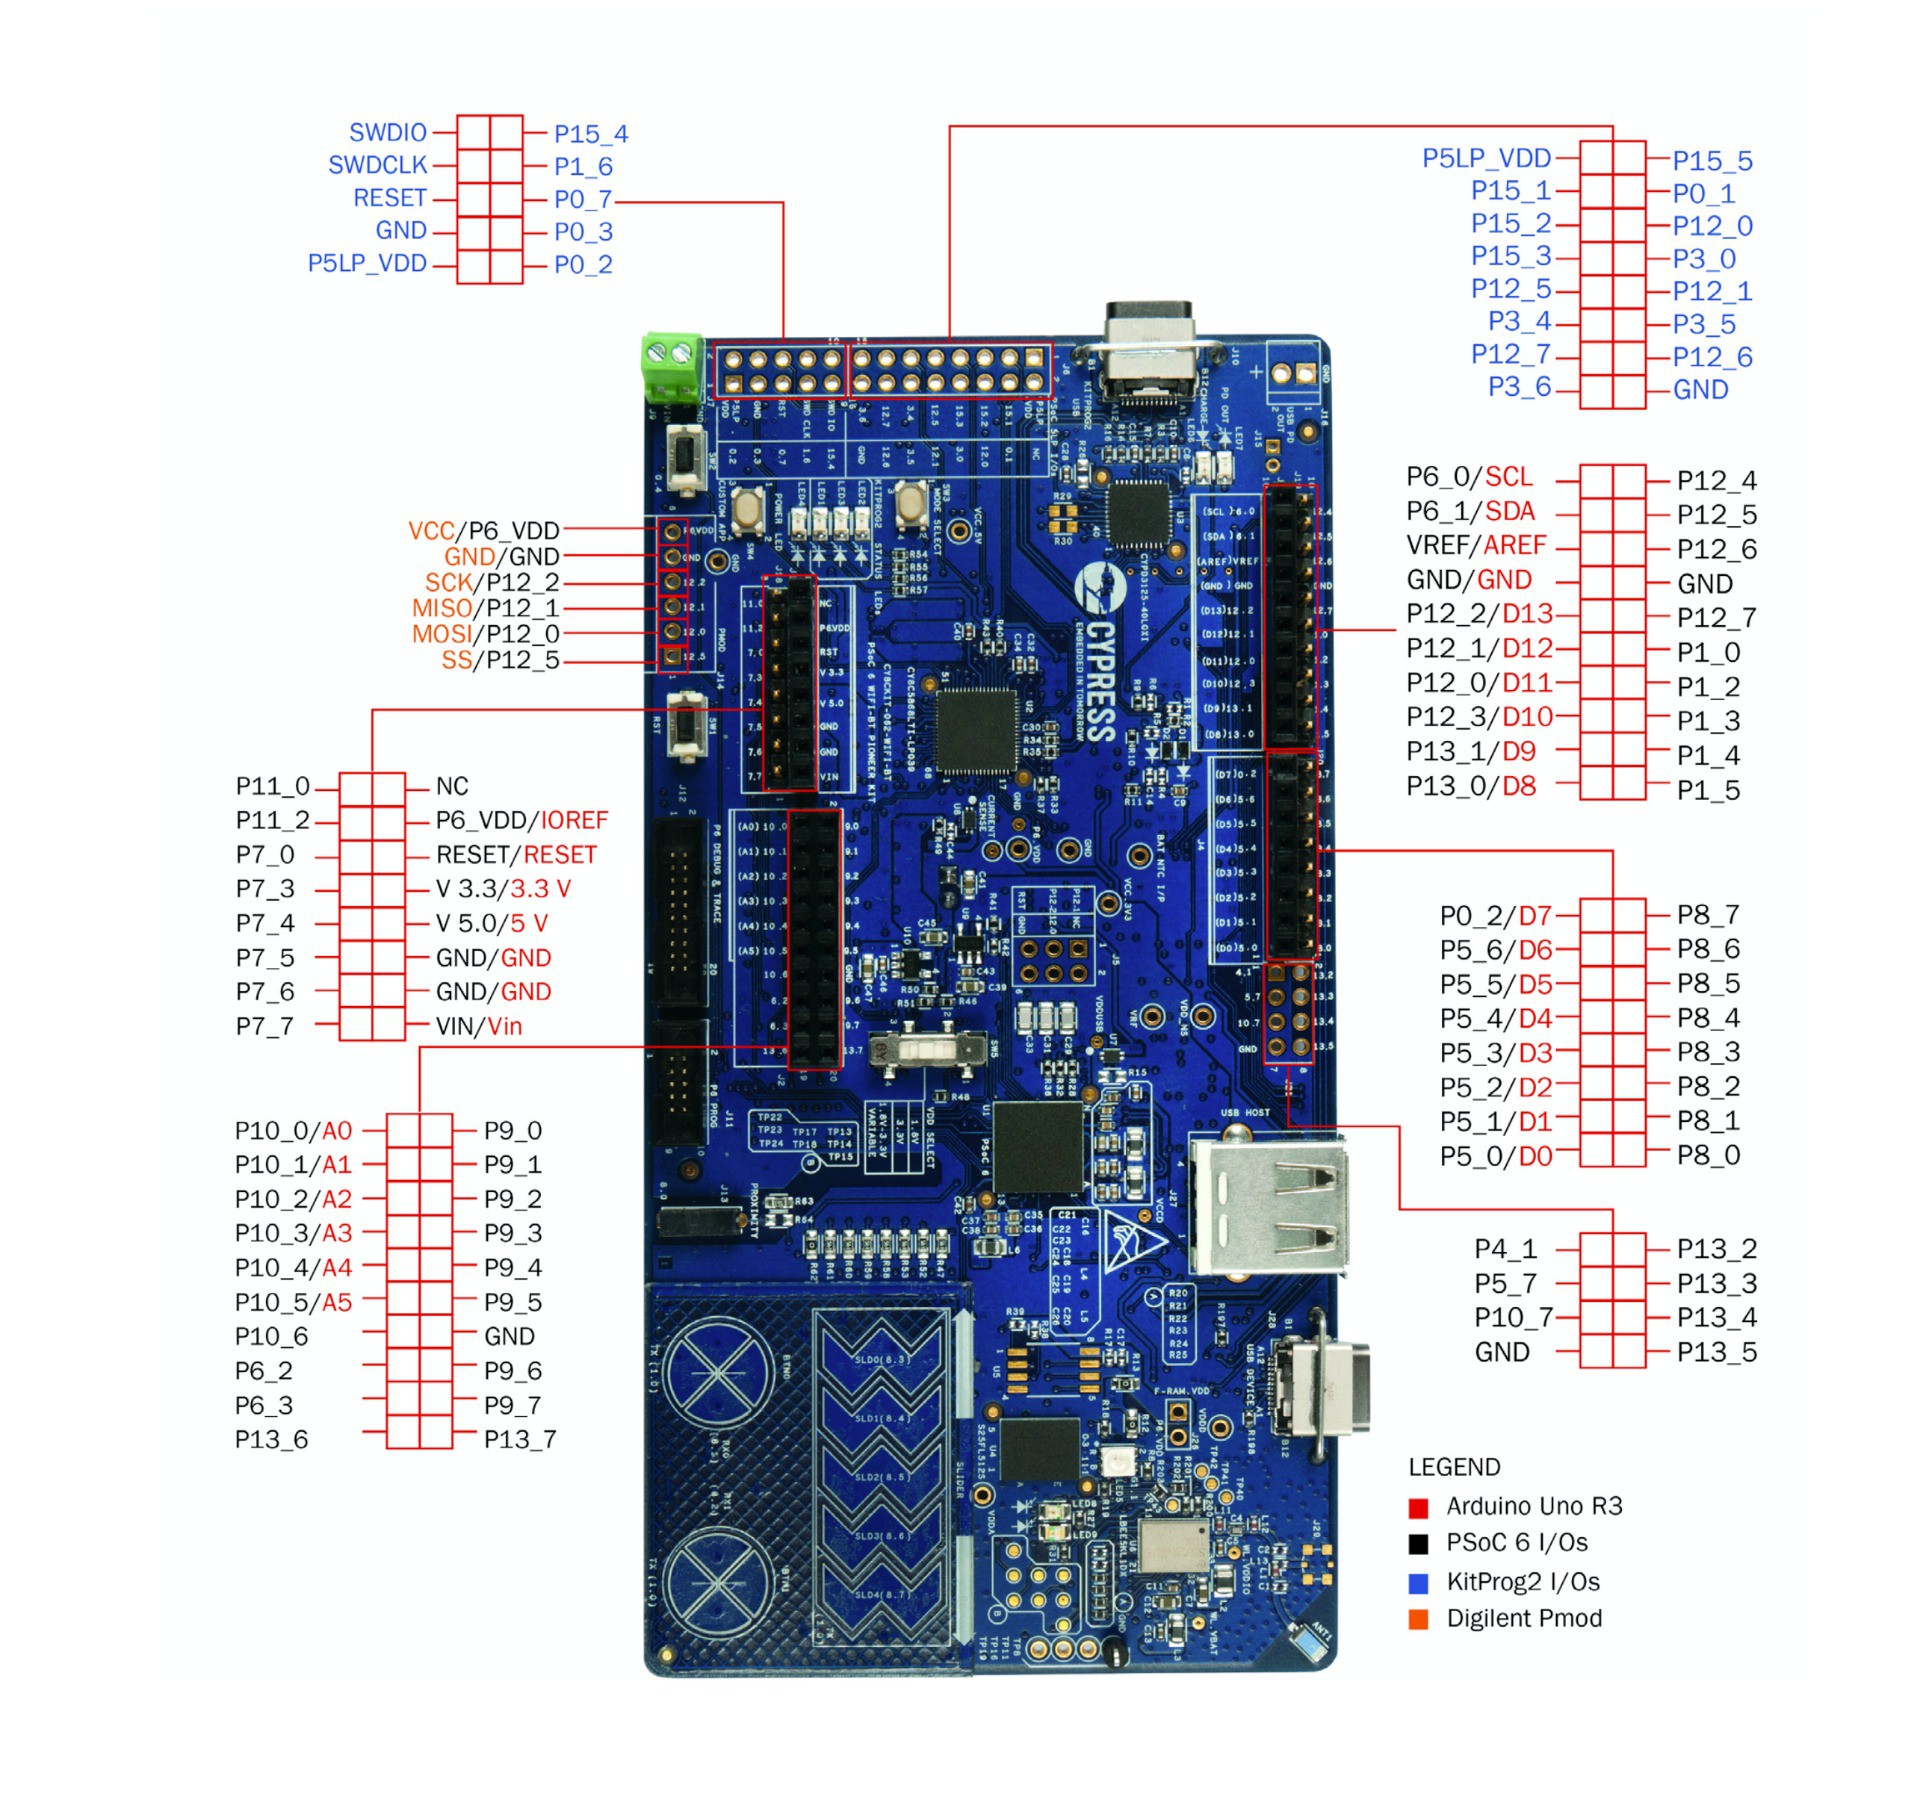
The example available on the Modus Toolbox showing how the UART works uses the SB5 block pins 5.0 and 5.1 These two pins are routed on two pins of the Arduino compatible connector, where is plugged the TFT shield. After all the tries to route the UART to a different block corresponding to one of the (few) available connectors on the PSoC6 kit failed I revisited the connection strategy. The still working UART pins 5.0 and 5.1 (Rx/Tx) are occupied by two pins of the TFT connector, but these pins should be not used by the shield else it is not possible the UART demo will work.
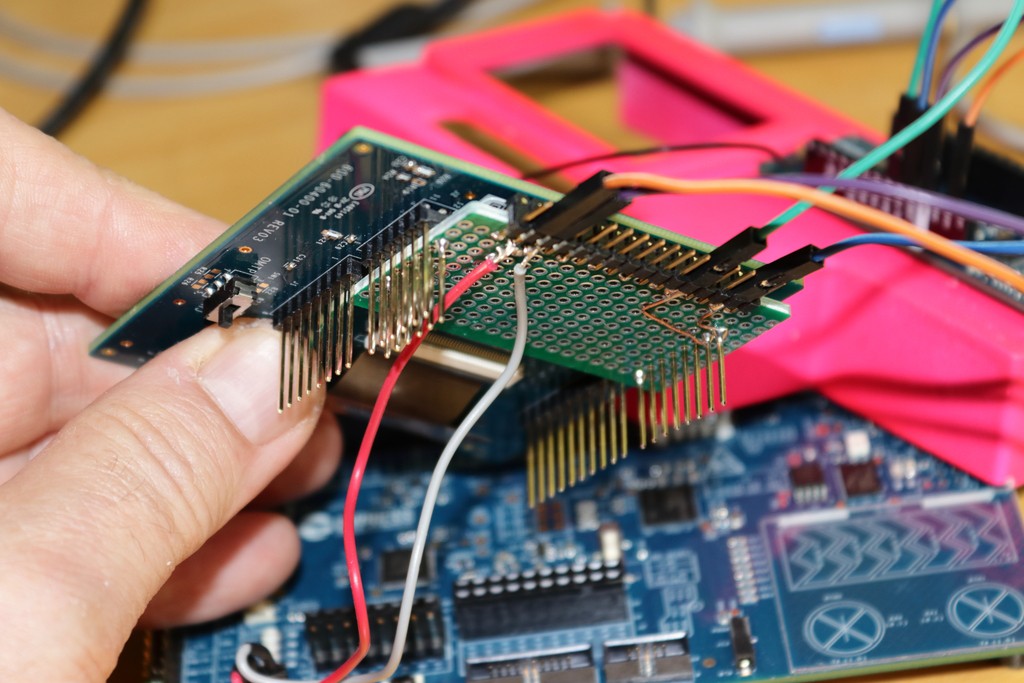
As shown in the below images, I hacked the TFT shield and created an horizontal connector to wire the UART to the Arduino MKR1300. And it worked!
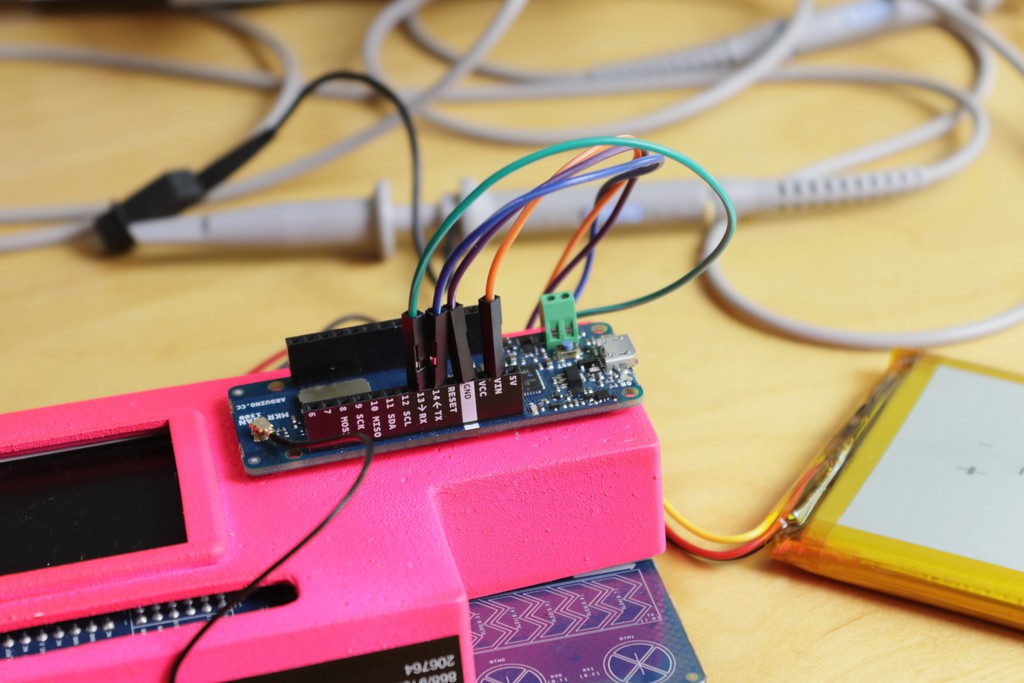
A detail of the Arduino MKR1300 connected to the PSoC6 kit. The board is fixed on top of the case while the antenna is on a side of the case, for a good LoRa link with the Arduino MKR1300 counterpart on the flying module.
The side connector with the wires to the Arduino MKR1300, providing the 3.3V power and the Tx/Rx UART connection
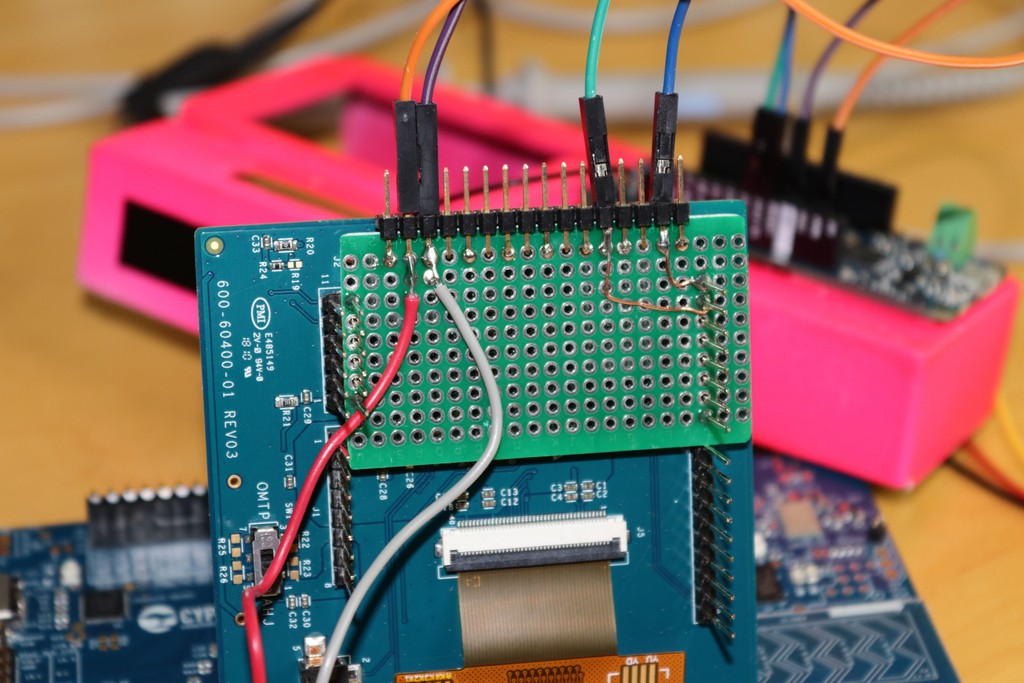
Bottom of the TFT shield with the extra prototyping PCB to take the two signals and the power supply lines.
Detail of the soldered prototyping board and connector to the bottom side of the Cypress TFT shield included to the PSoC6 Pioneer kit.
Sending Data to the AWS IoT Cloud
This project finds application in the real-world. There are several fields of application for which the project can be easily adapted with a few changes to make it available in specific environments but the primary aim of the idea behind the Nanodrone project is the small and medium agricultural cultivation. By the way, the prototype will be tested on field during the months of September and October 2020 to monitor and follow the evolution of the field of pumpkins you see in the cover image of this page (the image is of the 2019 season).
I have not thought what to do to use proficiently the sponsored devices and the AWS IoT Cloud but happened exactly the opposite. This contest got me the opportunity to make an advanced version – able to be tested in a real environment – of a project I am working on and, as mentioned in the introduction, I have already faced with less components and less potential with a smaller drone.
As well as the choice of the PSoC6 Pioneer kit as the ground control device, also the adoption of the usage of the AWS IoT services represent the opportunity to simplify the development job producing better-organized and more detailed results. According to this short foreword, the integration of the data flow shown until now in the AWS IoT cloud should answer to two fundamental questions:
- Why the AWS IoT Cloud
- What are the improved aspects
Answering to the first question is easy; I explored several other opportunities in the past, as well as following the evolution of the AWS IoT Cloud Services and I have already done my choice. At the actual date I own by about ten years an EC2 server where – together with my official site and blog we-are-borg.com I have most of My developed software, Linux tools I use to develop networked projects, from a private Git repository up to some Php servers like a license generator, a user management system, a software distribution mechanism etc. and I am following the evolution of the AWS IoT Cloud services.
So, let me explain what are the improvements to this project sending the raw data to the AWS IoT Cloud.
Also in a small agricultural reality, proceeding to a systematic da collection that tells us information on the state of the cultivations risk to drive us to a no-exit way. As the collected data represent a health status of the fields, the real problem is the treatment of this quantity of information on a seasonal base; this mean we need at least a database. To this we should take into account we need a good way to manage these data to get strategical information for which a local non-structured processing maybe not sufficient or anyway more and more complex (requiring a long development and test phase).
Sending the data collected from the ground station to the AWS IoT Cloud services, not only mean a secure MQTT transmission with most of the issues solved by the Cloud architecture – tailored to do this job in the best way. When we send the data we only cover the first part of the job; behind the AWS IoT Cloud there are other services that simplify the life (and dramatically reduce the costs) applying easily data analysis and formulas.
And this is the reason I followed this approach in the Nanodrone project.
The AWS IoT Cloud Approach
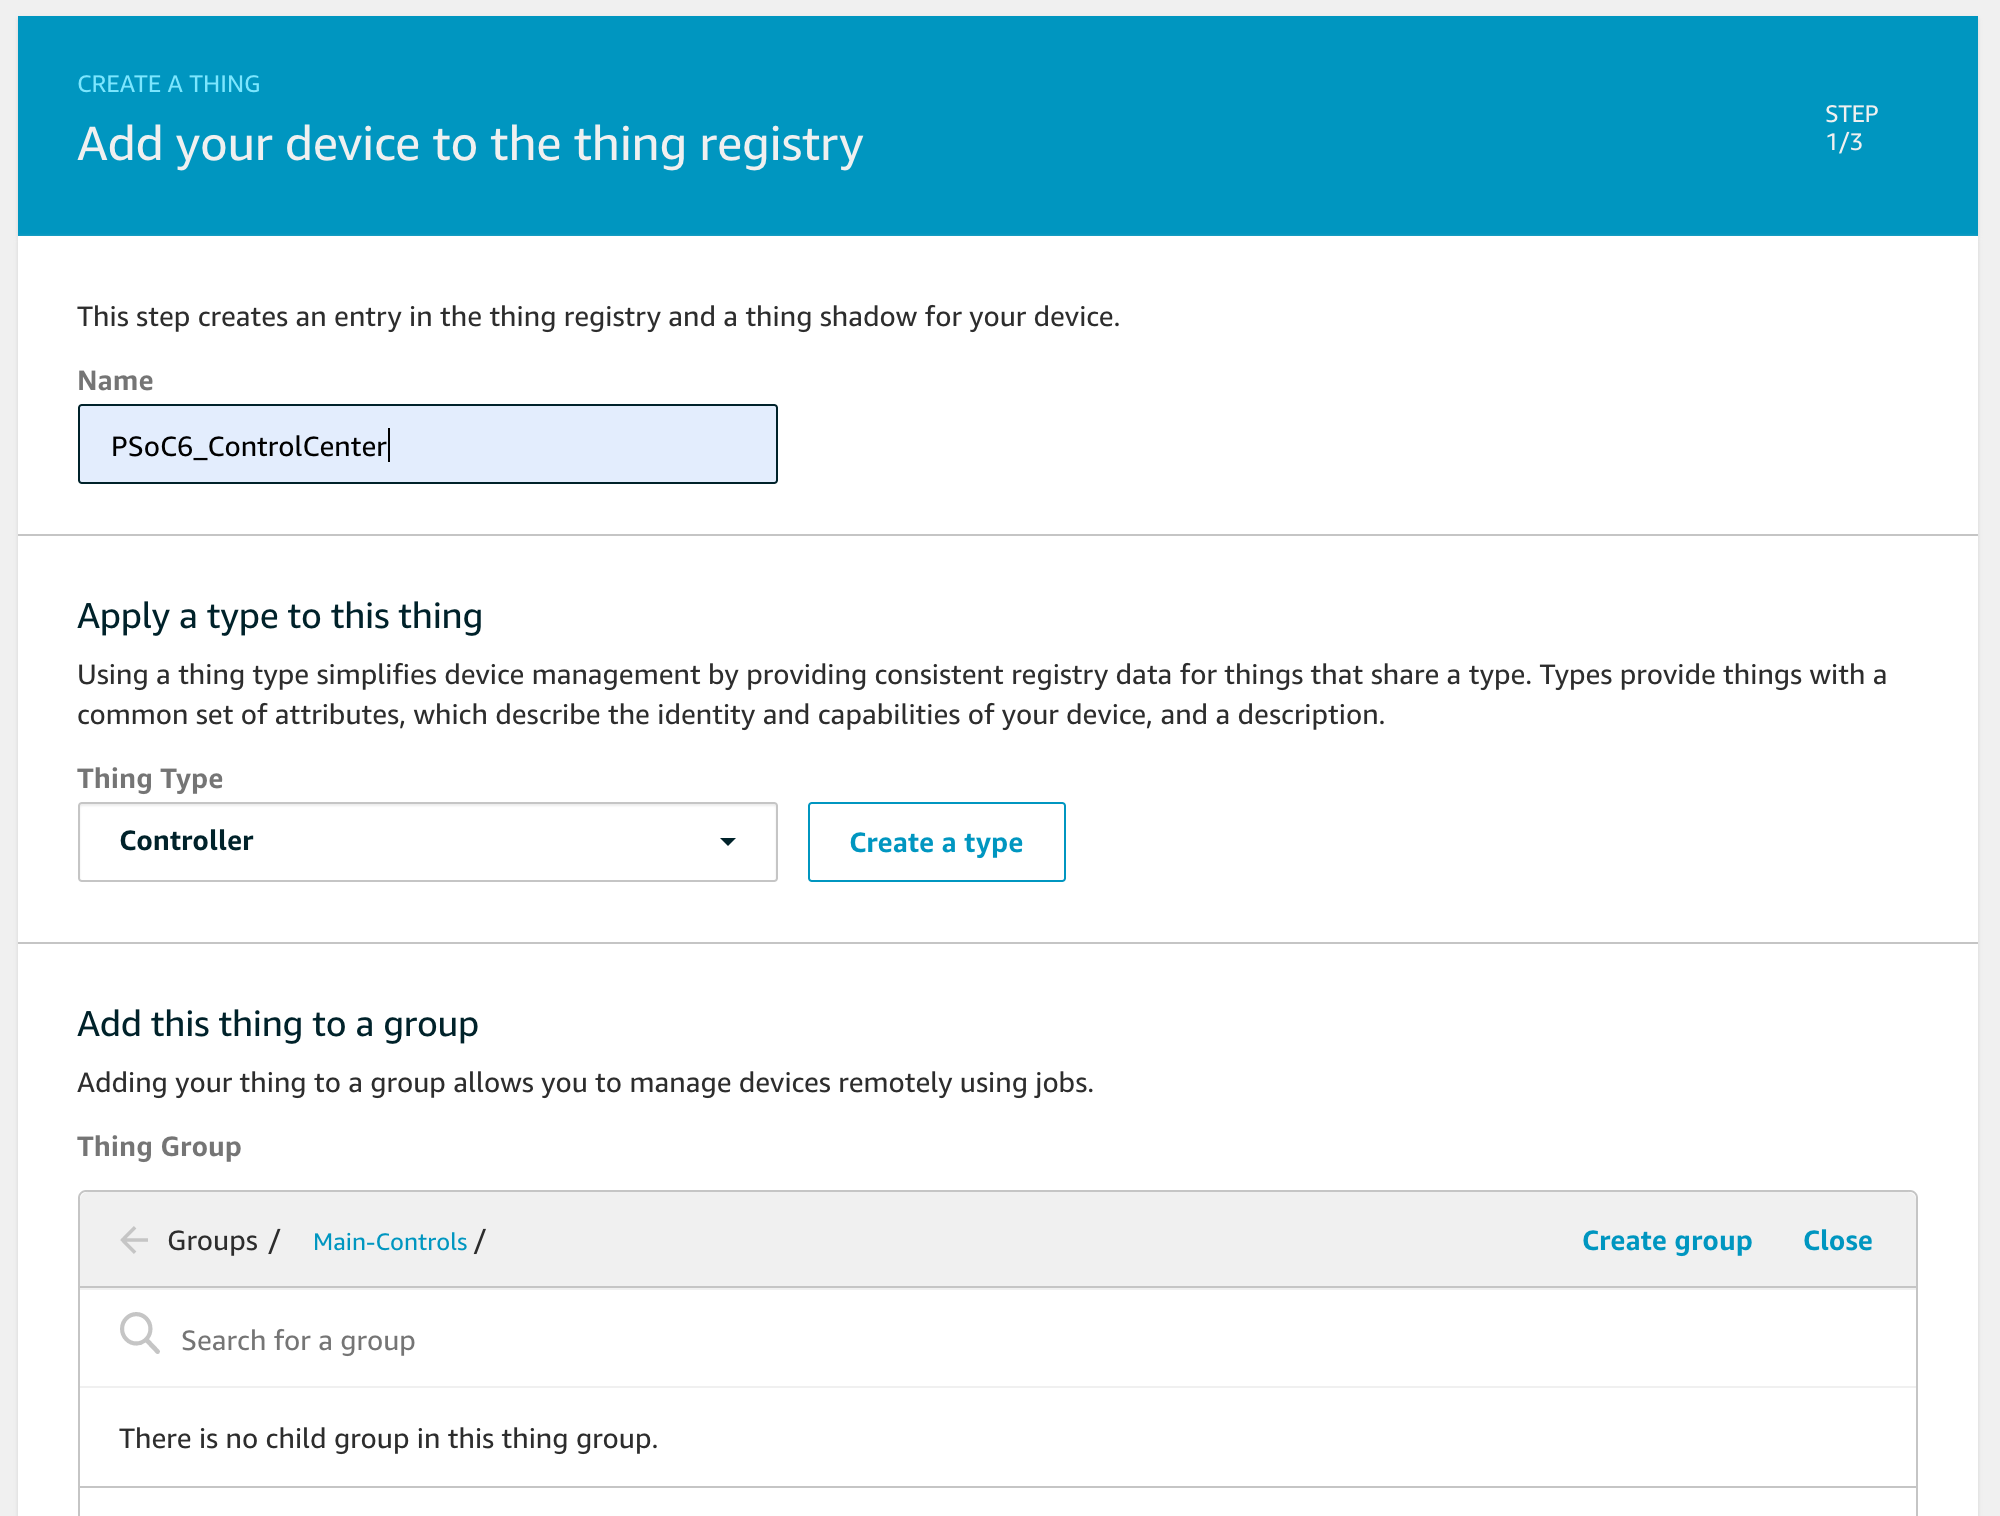
The scheme below shows The fundamental stapes to face to establish a connection and send some kind of raw data from the PSoC6 to the AWS IoT Console Reported for completeness, the first three steps are needed only if you do not yet own an AWS account and have not created your thing in the AWS IoT domain associated to your account.
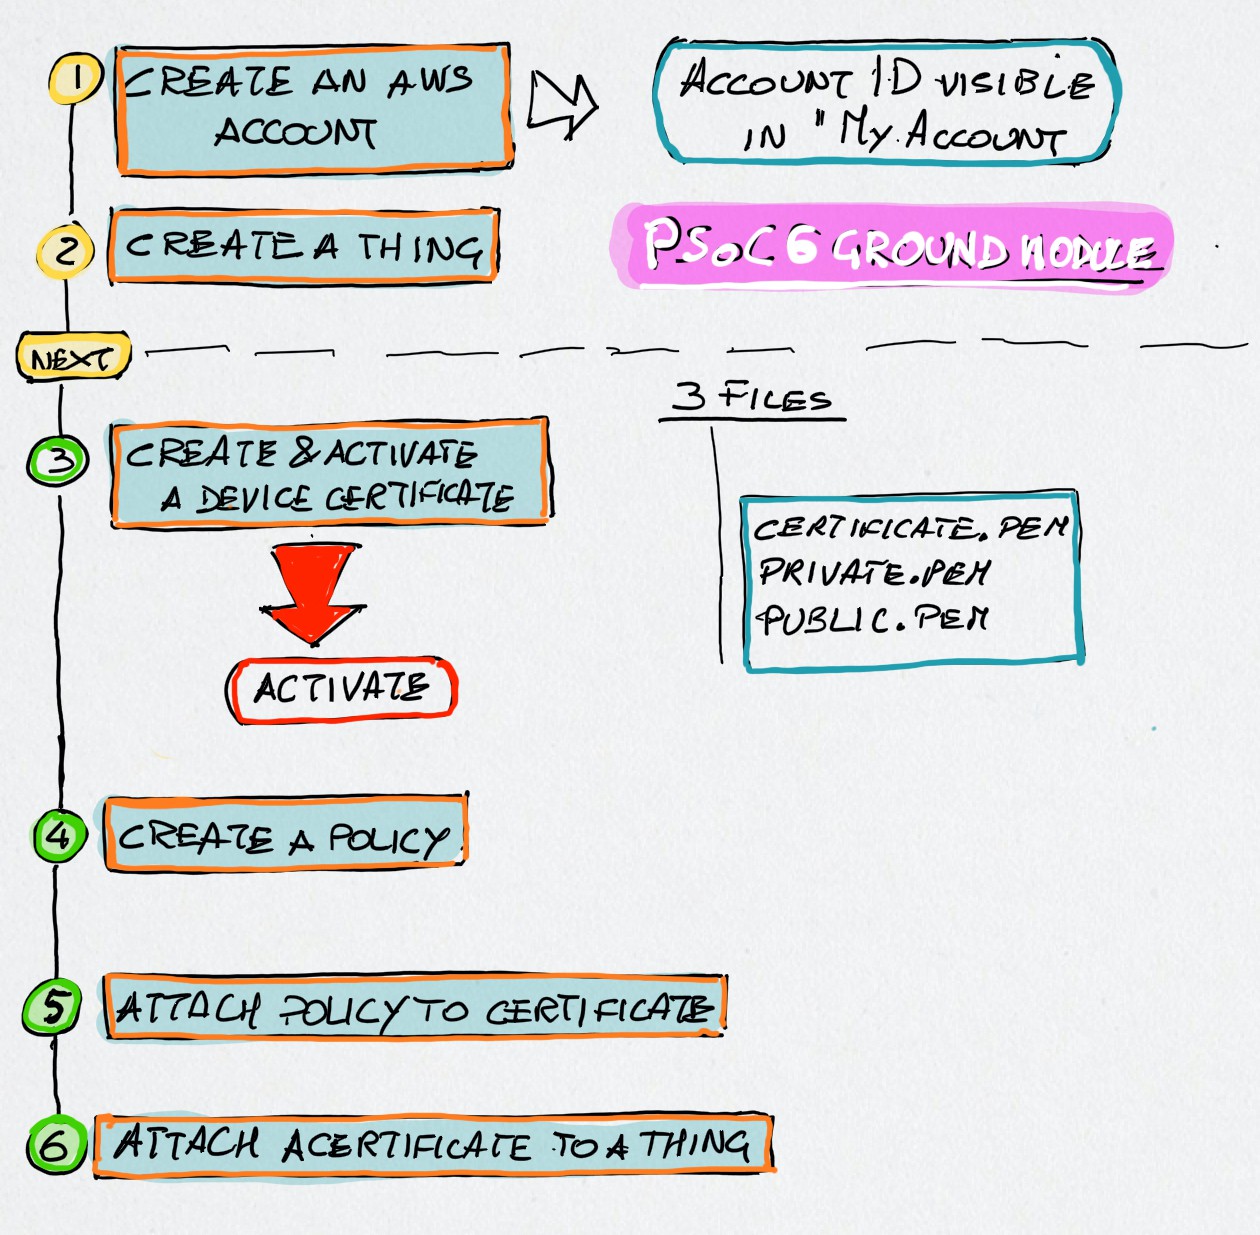
As told before, this is only the first step. As a matter of fact, when we send a set of raw data to the AWS IoT console, organized through a thing we are storing out data on an AWS cloud database.
The screenshot below shows one of the things I have created to host the data sent from the Nanodrone ground control.
The real benefits of the AWS IoT console is instead when the information are more structured, organized in shadows. The raw data coming from the flying module images are essential colour distributions graphs reduced to focus on the only colour variations I need. For example to see the growing stage of the vegetables in a field. The comparison of the data, as well as the analysis of the trend of the variation along a period (for example a season, or comparing the same period during different years), need calculations.
Based on their characteristics, instead of creating a simple thing to which pass the information (e.g. a set of sensors detection) I have created a model that can be organised in shadows in the AWS IoT Console.
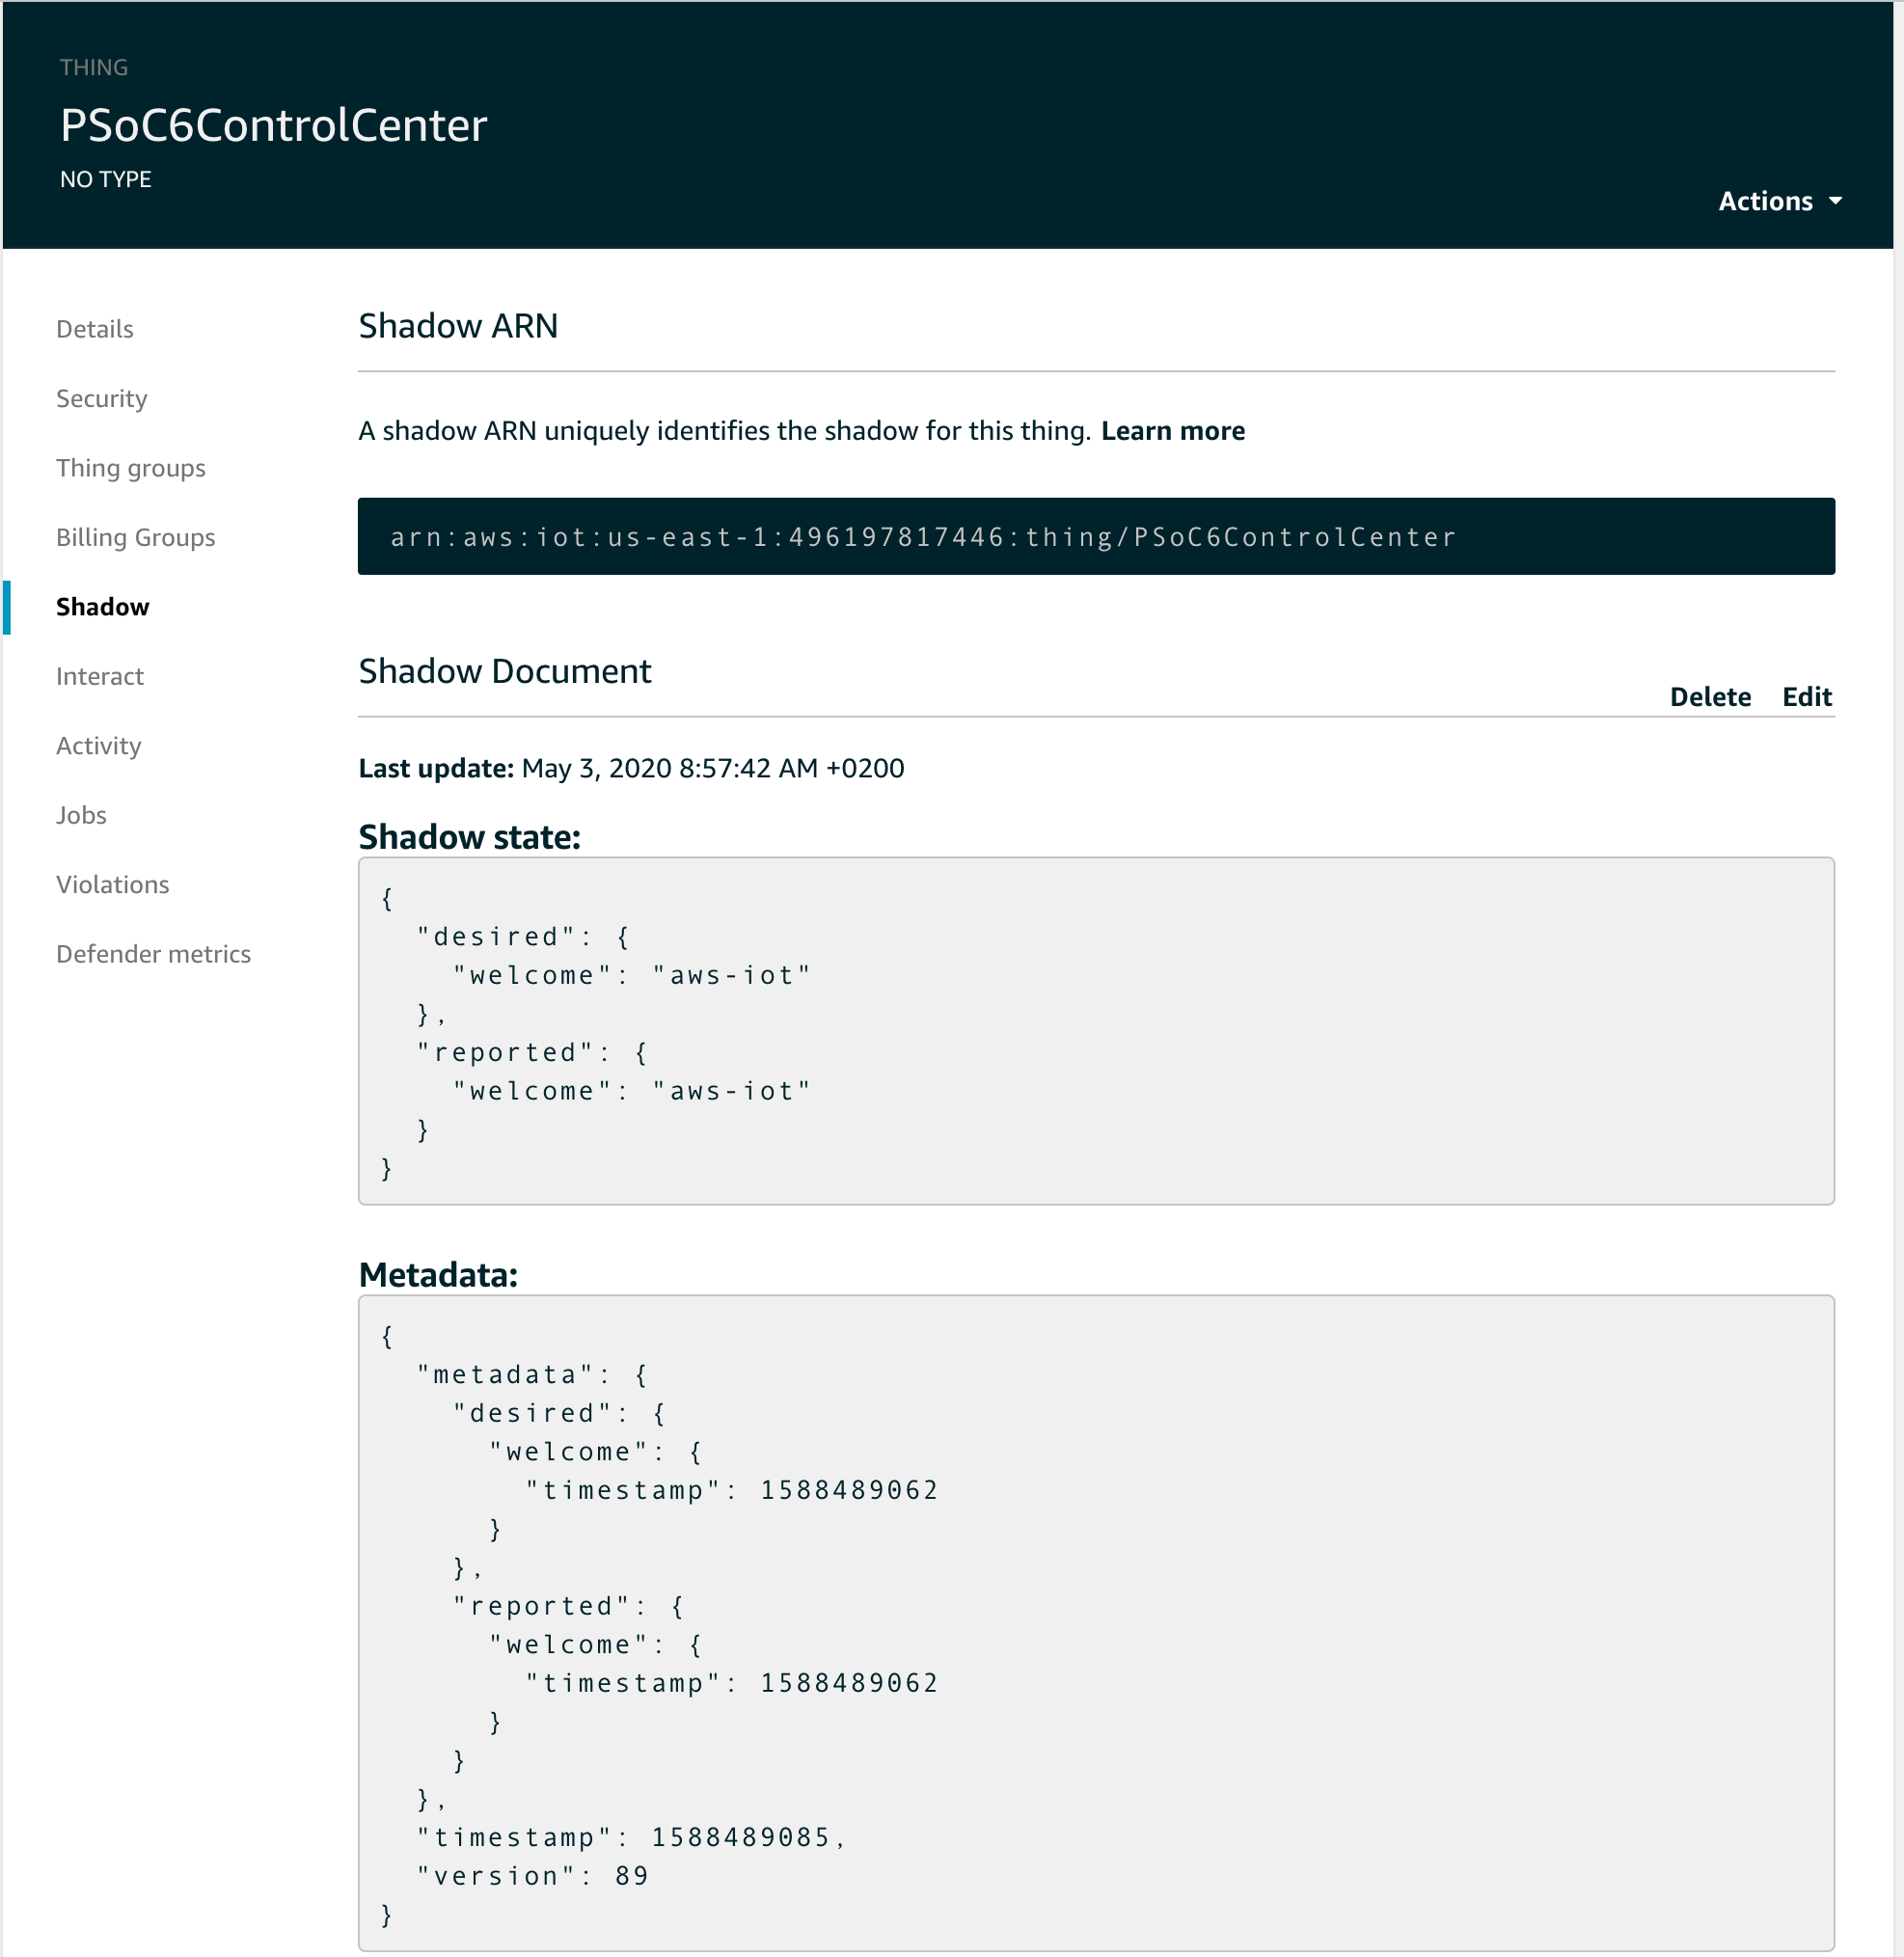
In few words, a shadow for a thing (the connection to the physical object) can be considered the model of a homogeneous group of data that will be managed separately by other groups.
Creating a SiteWise Portal
These differentiated groups of data not only are collected but can be managed in a flexible and structured way, with the possibility to analyze their relationships, as well as their reciprocal influence.
To do this I opted for what I think it is the best solution between the IoT services offered by AWS. Creating a SiteWise Portal it is possible to acquire the different data models defining a different Asset associated to its corresponding shadow.

As shown in the above screenshot, in the definition of an asset associated to a set of structured data I have not only collected the information for the visualization of the trend but I have also created a counter; in fact, in the assets it is possible to define formulas, calculations, data transformations and – more important for an automated analysis – the creation of triggers: the generation of automatic notifications when the data received reach a certain configuration.
I have not yet experimented all the possibilities offered by this tool but I a sure it is a game-changer in scenarios like the data produced by the Nanodrone prototype. The flexibility of the representation model represent a strategical feature especially in cases like this where the best data integration and analysis should be tested through different experiments.
Without the need to change a single line of code!
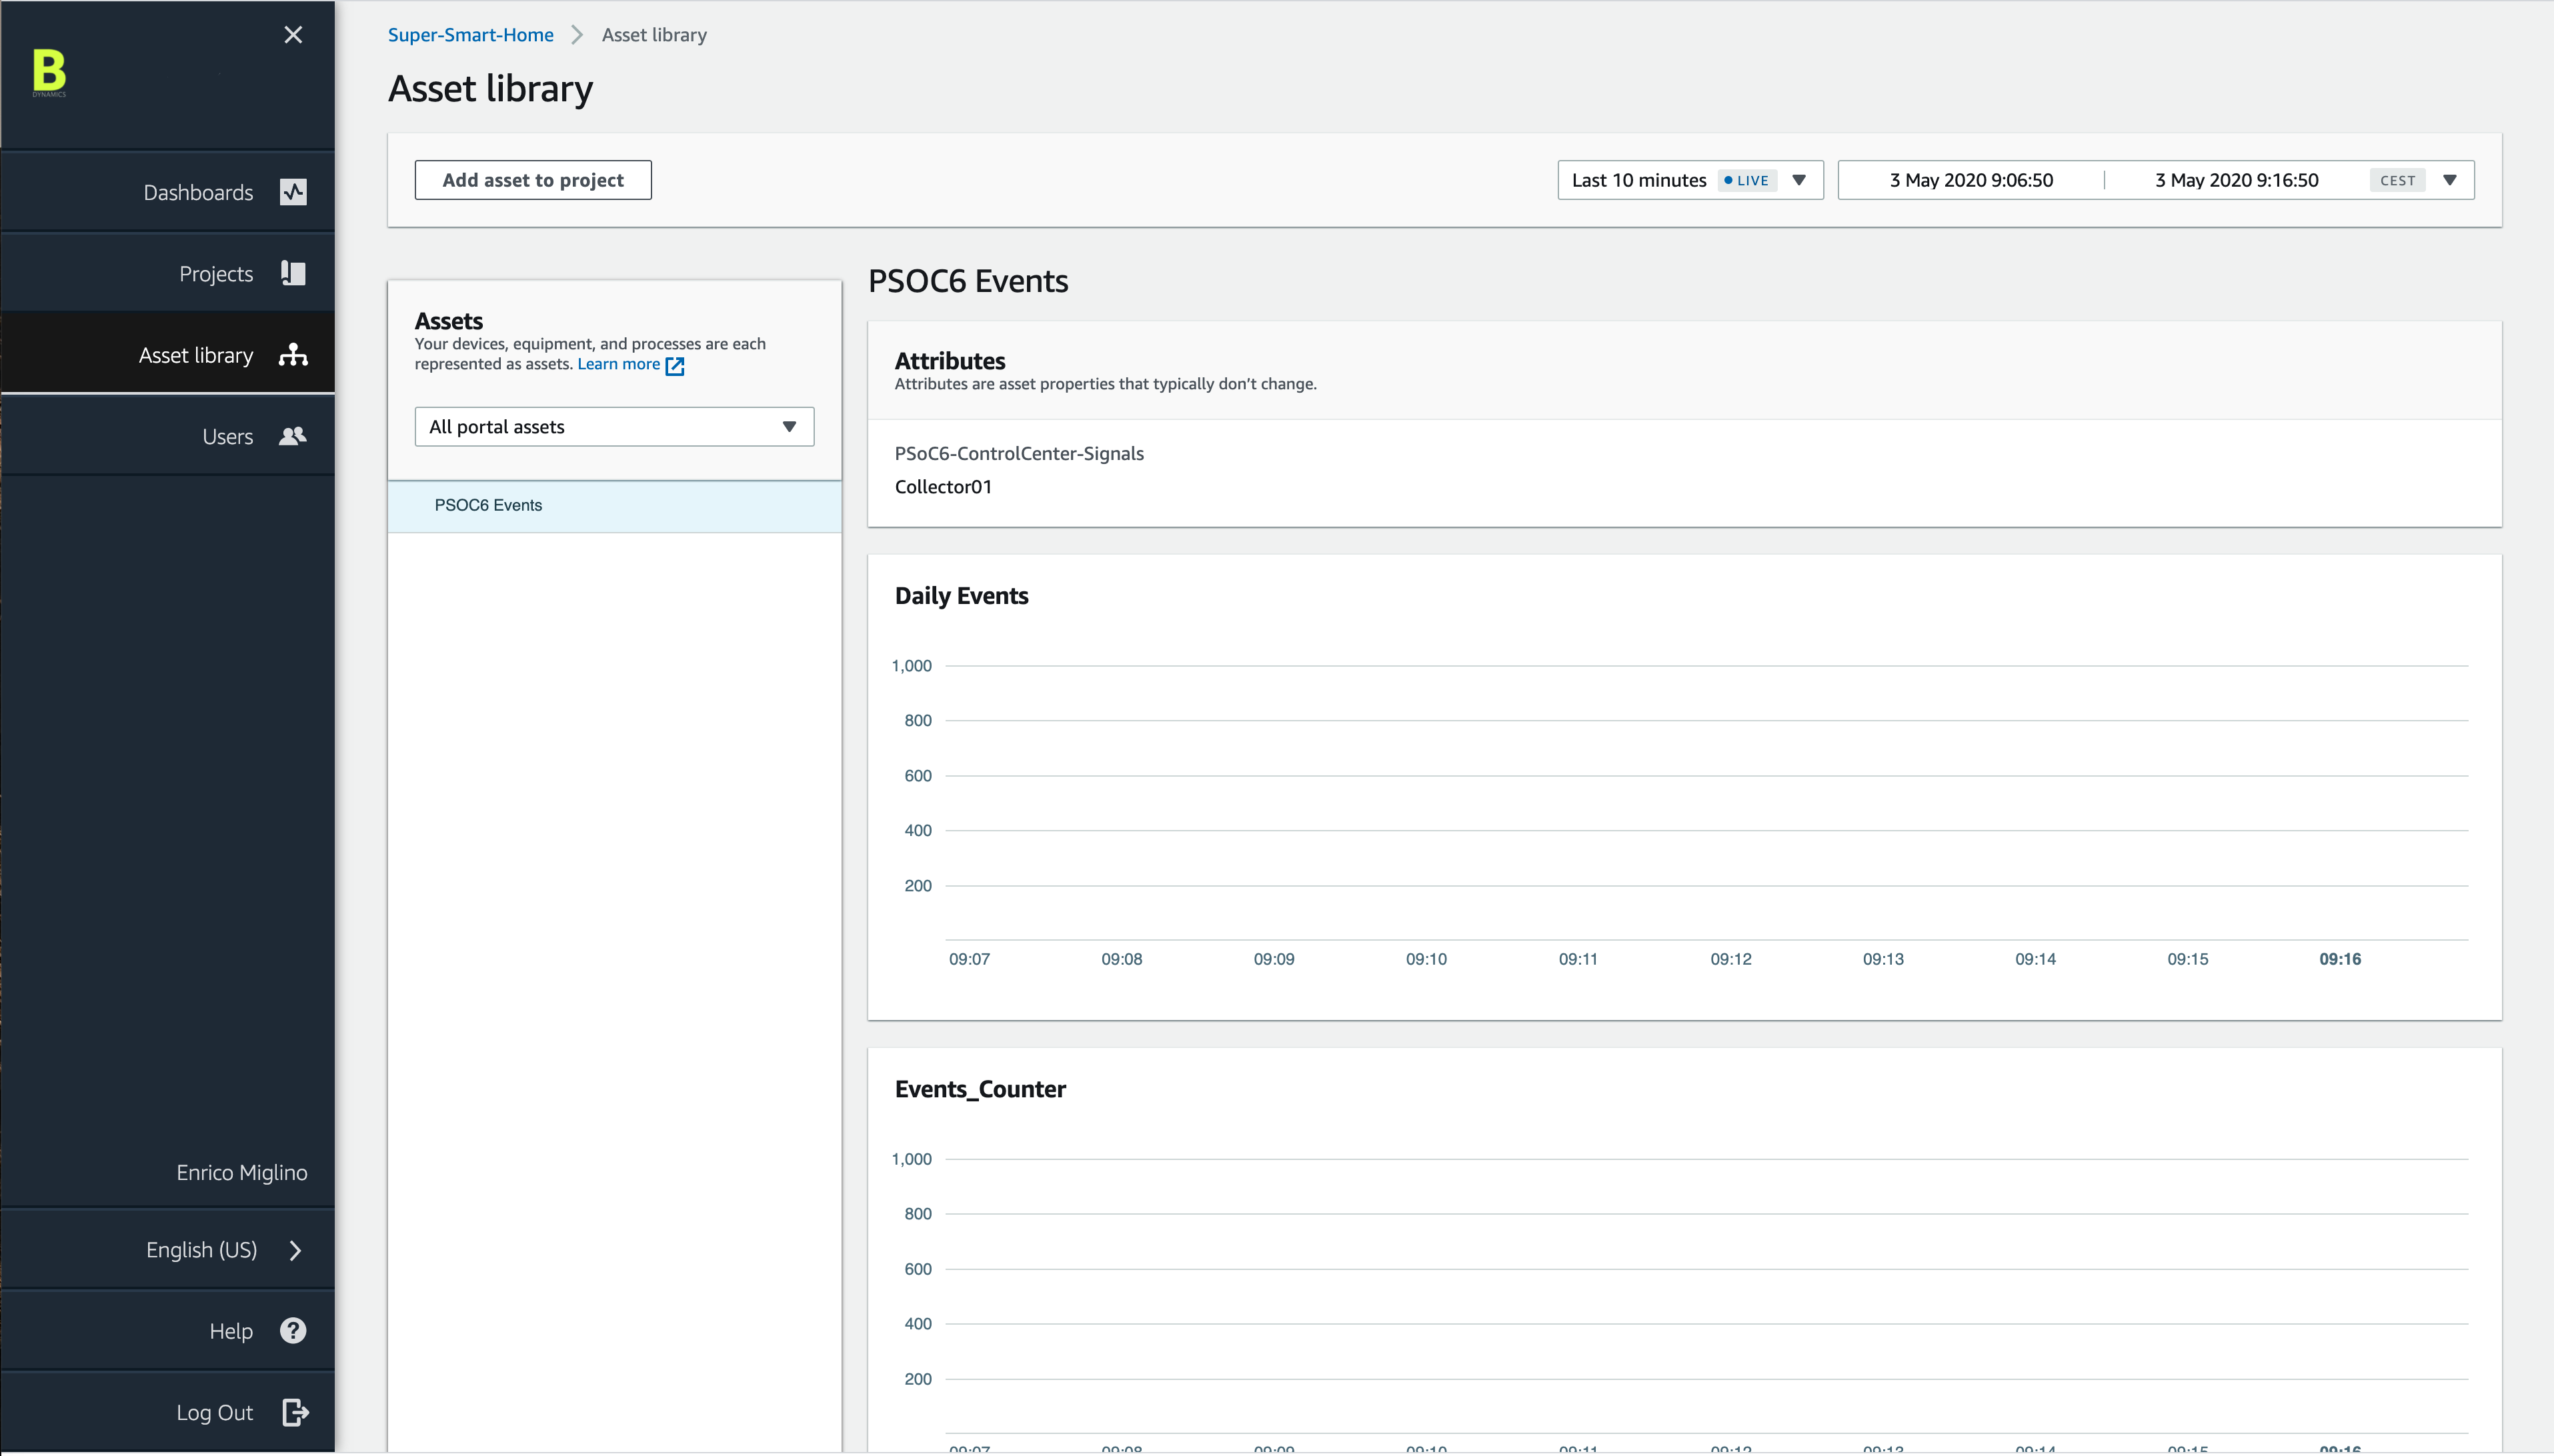
I work a lot with relational databases in many different environments and I am aware of how time-consuming is the creation of a good web user interface for the presentation of the data, as well as this part of the development is an essential element for usability of an entire system like this. Another powerful feature of the SiteWise service is the portal creation feature. In a few minutes the assets can be organized automatically in a web portal (see the screenshot above) with a lot of visualization options, including the graphical representation.
Real-World Project Applications
Accordingly to the kind of data it is possible to acquire and the position repeatability of the sampling there are at least three main areas of application of this project, that in my opinion can offer the opportunity to grow the prototype to a product level:
- Plants and cultivated trees inspection for small and medium-size farming
- Architectural structures variation on time and deformation analysis.
- Environmental impact changes
Agriculture inspection
Pest, parasites, growing stage of fruits and grasps, and more can take advantage from this kind of local, medium-range inspection where – in a similar way – satellite specific-range visual information are acquired for large terrain areas, wildlife zones etc.
Integrating the visual inspection information together with the environmental conditions (temperature, humidity, etc.), weather conditions, and time-of-day it is possible to track growing curves of the evolution of some phenomenons curves that for some reason are impacting the productivity level of the cultivations.
Sensors data collected can be integrated locally (on the ground Raspberry Pi machine) with drone photos acquired in the same position to provide more specific and detailed information, as well as a visual history of the acquisition. The core information collected and pre-processed by the PSoC6 Pioneer Kit ground unit instead, are sent to the AWS IoT Console for changes over time analysis.
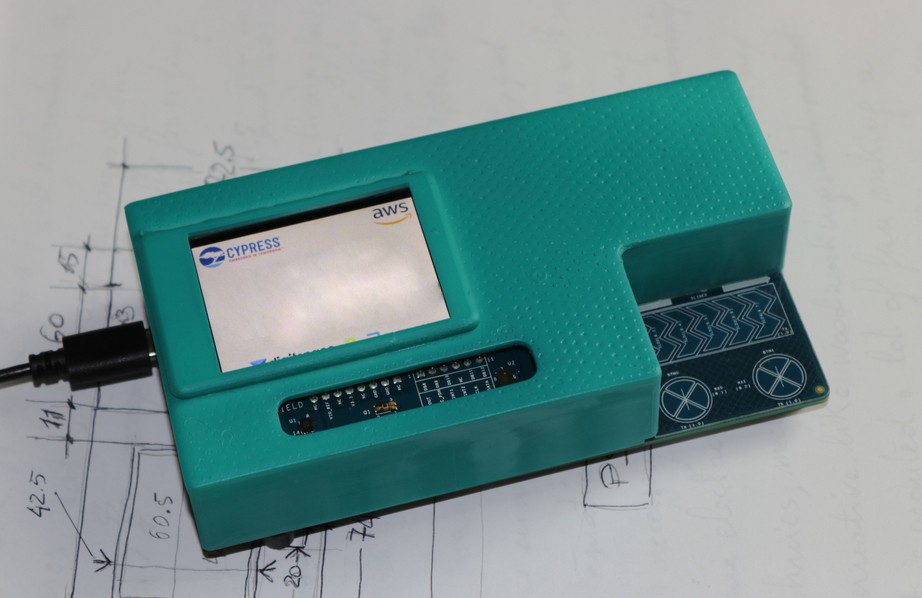
Above: the PSoC6 Pioneer Kit box case designed with Fusion360 and 3D printed with the Elegoo LCD Saturn 3D printer.
Structural Variations and Environmental Impact Changes
The possibility to precisely repeat along a timeline (maybe daily lot less frequent, depending on the kind of inspection) gives the nanodrone project the possibility to acquire comparable series of data during periods. Based on this critical phenomenons and events can be followed at a reasonable cost.