Nicola Wrachien
Introduction
Last year I presented a simple hand-held platform game, based on uChip, a 16-PDIP-sized development board, featuring an ATSAMD21E18 (Cortex M0+).
Despite the good results (dual playfield, parallax scrolling, 16-bit colors, at 40 fps), I wanted an even more challenging project with uChip. About games, of course!
What about a VGA-based console?
VGA signal generation represents quite a heavy constraint, as it must be performed in software on an ATSAMD21E18, and precise timings are required. In fact, the ATSAMD21E's DMA is not connected to the port pins, therefore software bit banging is required. Furthermore, even if the DMA were connected to the port, I would still have to generate the graphics on-the-fly, because there is no enough RAM for a framebuffer.
Software bit-banging means that the CPU is busy in generating the signals for the majority of its time, leaving only few milliseconds per frame, for actual game logic and console I/O handling.
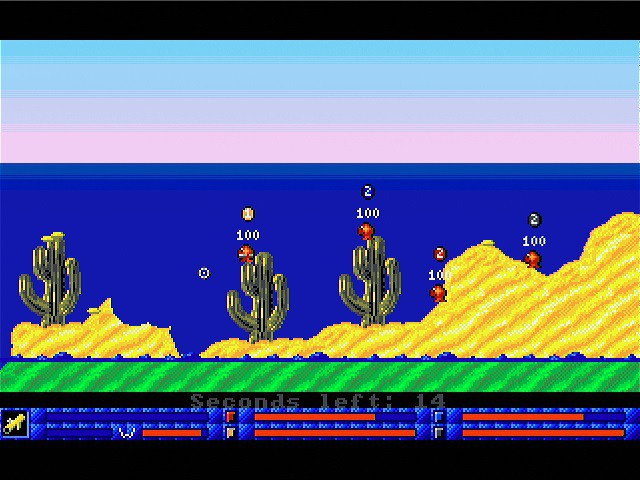
Actually, to show uChip's potentialities, last year I implemented a very rudimentary VGA-based Tetris console, but later I realized that I still got a good deal of margin, for fancier graphics.

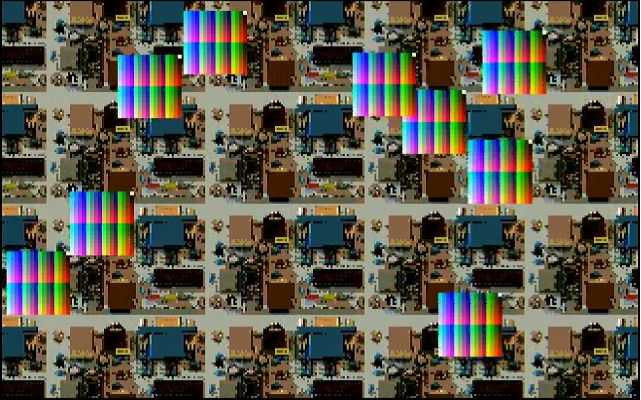
Of course, due to memory, speed and I/O pin limitations we must forget about 16 bit graphics, so I will have to limit myself to only 256 on-screen colors. Still, check the differences between the old and the new version of tetris!

In a big surge of fantasy, I have named this simple uChip-based VGA console as "uChip Simple VGA console" or uSVC...
So, let's see some details of this 9-bit retro-gaming console!
A 9 bit console?
Gaming consoles were once classified by their number of bits. 8 vs 16 vs 32 (and later vs 64). The higher the number of bits, the more powerful they were (at least from the marketing viewpoint...).
As we will see later, this console, despite the 32-bit 48 MHz Cortex M0+ (much more powerful even than the Genesis 68k processor), cannot compete with any of the 16-bit consoles of the early '90s. This is because consoles had custom hardware that allowed not only to generate the video/audio signals, but also handled 2D graphics, and mostly important, they had hardware sprites. Everything here must be done in software.
Still, as we will see later that, in some cases, this console is more powerful than an 8-bit console of the '80s. In particular, we have a higher resolution, more on-screen colors and a bit of more memory and CPU "residual" speed (see later).
Therefore neither 8, nor 16 bits, just 9!
The specs
Here is an incomplete list of specs!
- CPU: ATSAMD21E18 @48MHz
- RAM: 32kB
- Flash: 256kB (232 for games due to bootloader + game loader)
- Games stored in SD and moved to Flash when you switch between games.
- Modular USB Host to support standard USB peripherals.
- Native support for standard USB Gamepads and keyboards.
- Up to 256 on-screen color (256 color palette, RGB 332 color space)
- Standard resolution of 320x200, at 57 Hz (30kHz horizontal frequency. These can be changed, but will leave less time for the CPU. All the VGA monitors and LCD TV sets I tested include 30kHz support). 400 vertical lines can be easily supported. Some effects already support 400 lines for better graphics.
- 8-bpp or 4-bpp Tile-based modes. 4bpp tile mode include a inline color changing engine, which support arbitrary color changing for each vertical scanline.
- 2-bpp bitmapped mode. The palette can be changed at every 8 horizontal pixels, allowing up to 256 simultaneous on-screen colors.
- Tile-based modes support sprites.
- More than 64 onscreen sprite (8x8 pixel size) in tile modes. Larger sprites are automatically handled, no need to create smaller sprites.
- Sprite 90-180-270° rotation and X-Y mirroring.
- Partially transparent sprites on 8-bpp, for explosions, lights, ghost, etc.
- Tile and sprite priorities.
- Configurable video-ram size for tile-based modes.
- Smooth X-Y arbitrary scrolling for tile-based modes.
- Line remapping for split screen, mirror and other effects.
- Per-line and per-tile horizontal scroll, for water deformation or parallax effects.
- 4 8-bit 30-ksps PCM audio channels mixed down to a 10-bit mono channel output. Each channel has a separate volume control.
VGA Signal Generation
As said before, the VGA signals must be created by software. We must forget about C for this task, therefore we need to write an assembly routine.
How much CPU computing power is required? We can use the image below to get how much free time we have.
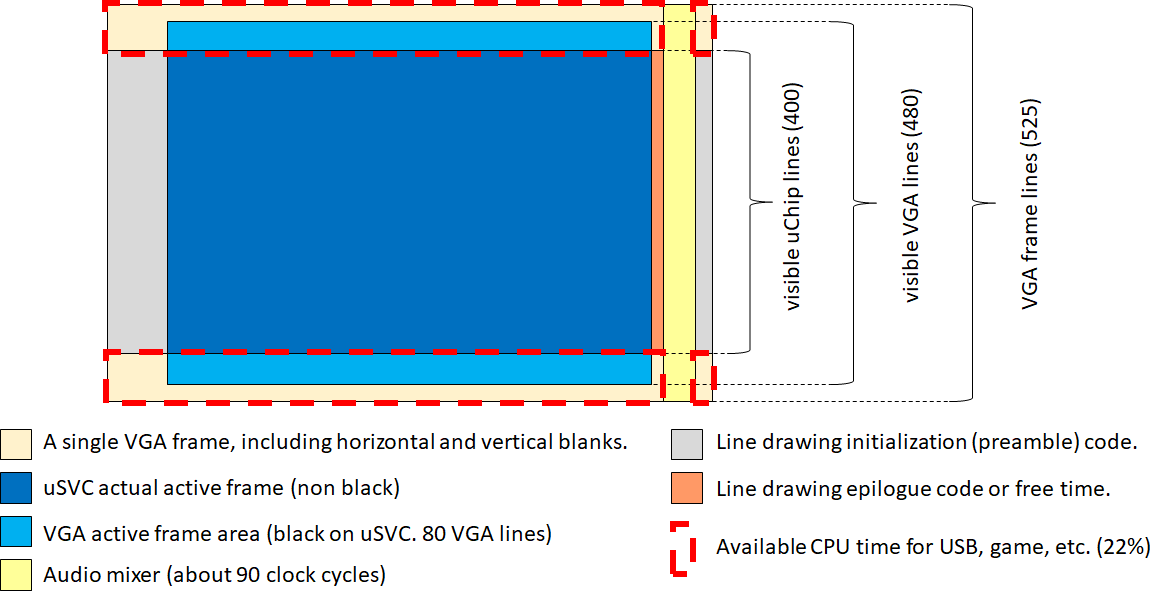
Long story short, of the 48 MHz, we have only about 10 MHz for "everything else" except video signal generation and audio mixer.
What is it "everything else"? Here is a brief list:
- Graphics
- Game Logic
- USB Handling
- Sound generation
Let's explain them, and how they impact.
Graphics
Hey, but aren't you already using about 4/5 of the CPU power for the VGA signal generation?
Yes, but this is just to generate the video signals. We actually need some graphics to show! Therefore everything (block image transfer, sprites, etc.) still has to be handled by the Cortex M0+.
In particular, sprites handling is the most heavy task, both in terms of CPU and RAM.
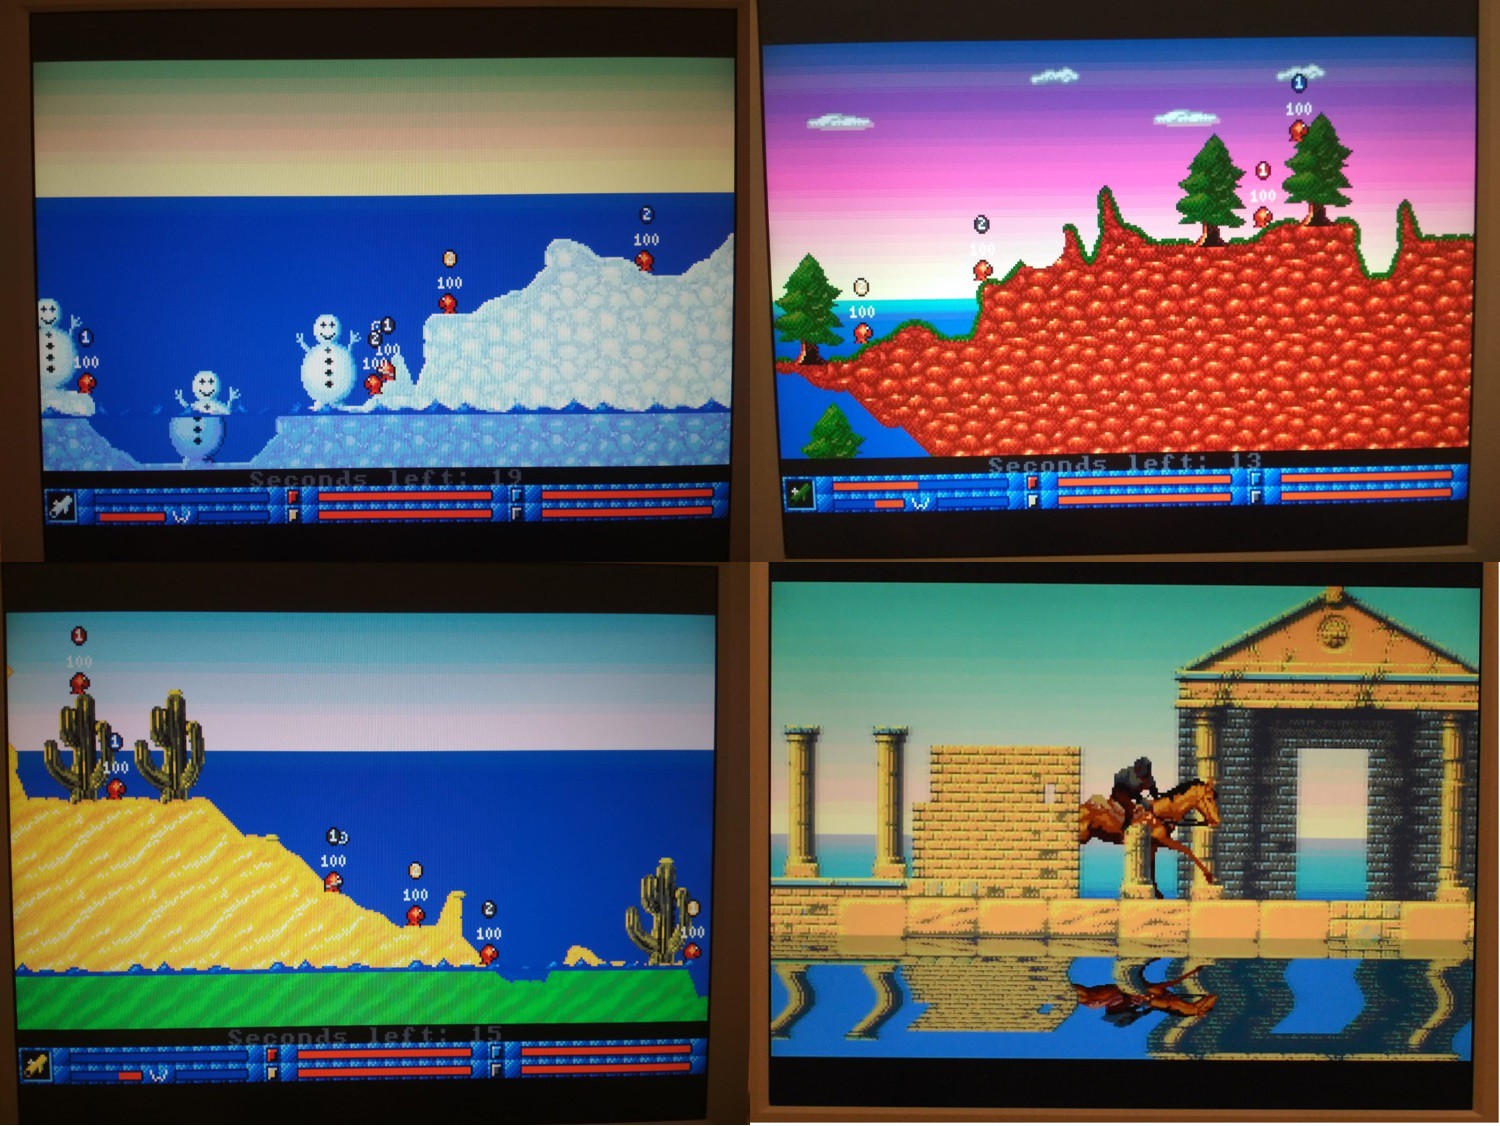
Some games (see Fig. 4 below), might include other effects not directly implemented in the uSVC kernel. For instance, one might want to implement a dual playfield, or tile animations, and this requires to copy some data from Flash to RAM, taking some more CPU time.
At the end, graphics, typically, is by far the most time consuming part, which in commercial consoles was performed by dedicated hardware.
Game Logic
This is typically one of the less heavy tasks, still it has to be managed by the CPU. More advanced game logics (especially, but not limited to, AI) will also have heavier impact.
USB Handling
uChip features a native USB host port. Why not use it for standard gamepads and keyboards ? This is very cool, but still requires a non negligible amount of CPU to handle USB communication with the peripheral. The USB host is modular and works with drivers, which might be easily added. By default, uSVC includes standard gamepad and keyboard HID drivers. The USB host and the standard drivers reside in the game loader. Additional driver must be implemented in the game project. Both low speed (typically, wired devices) and full speed devices (typically wireless devices) are supported.
Sound Generation
If you look at Fig. 3, you might notice that already some time is used by the audio mixer (essentially during the horizontal blank).
However, the audio mixer is rather simple: for each channel, the mixer gets the current sample value and increments the sample address pointer according to the sample rate. The mixer also automatically handles if the sample must be played only once or as a loop. Each channel has its own volume, so the sample value is multiplied for the specific 8-bit volume value. After each sample value has been calculated, the mixer sums the four values, and normalizes them back to 10 bit, to feed the DAC. Before this step, an optional global software low-pass filter can be activated. The cut-off frequency is per-frame software selectable.
However, how to decide which sample must be played? Here comes the sound generation engine, which is too big to fit the small horizontal blank window. Simple sample playback would be quite easy to implement, but what about music playback (e.g. midi?) Instead of reinventing the wheel, I have used the sound engine of the extraordinarily excellent open source Uzebox project, a "retro-minimalist game console", by Alec Borque. This engine has been ported and modified to fit uSVC specs and requirements. I have dropped the support for the noise channel, however now all the other 4 channels are capable of producing PCM audio.
The Hardware
As its name tells you, uSVC is uChip based, it's simple and it uses VGA monitors.
uChip-based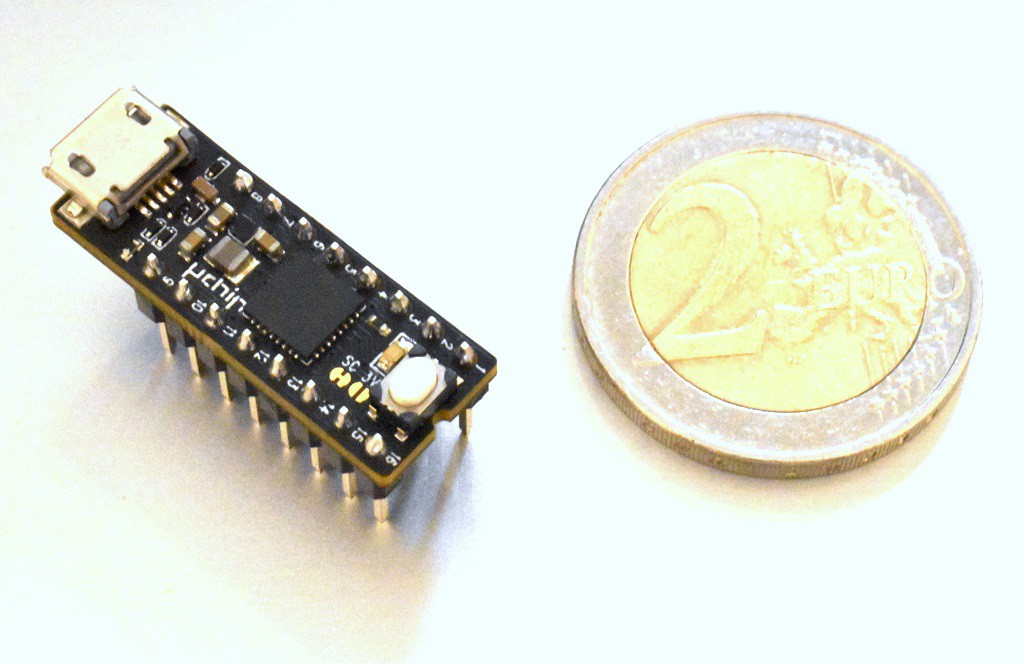
This project is based on uChip, the open-source small board produced by Itaca-Innovation.
It features 14 I/O pins, USB, and a ATSAMD21E18, which is a 48 MHz Cortex M0+ with 256 kB of Flash and 32 kB of RAM. The board has a built-in LED for status, etc, a reset button and two switching DC/DC converter (one Buck and one Boost).
It's Simple
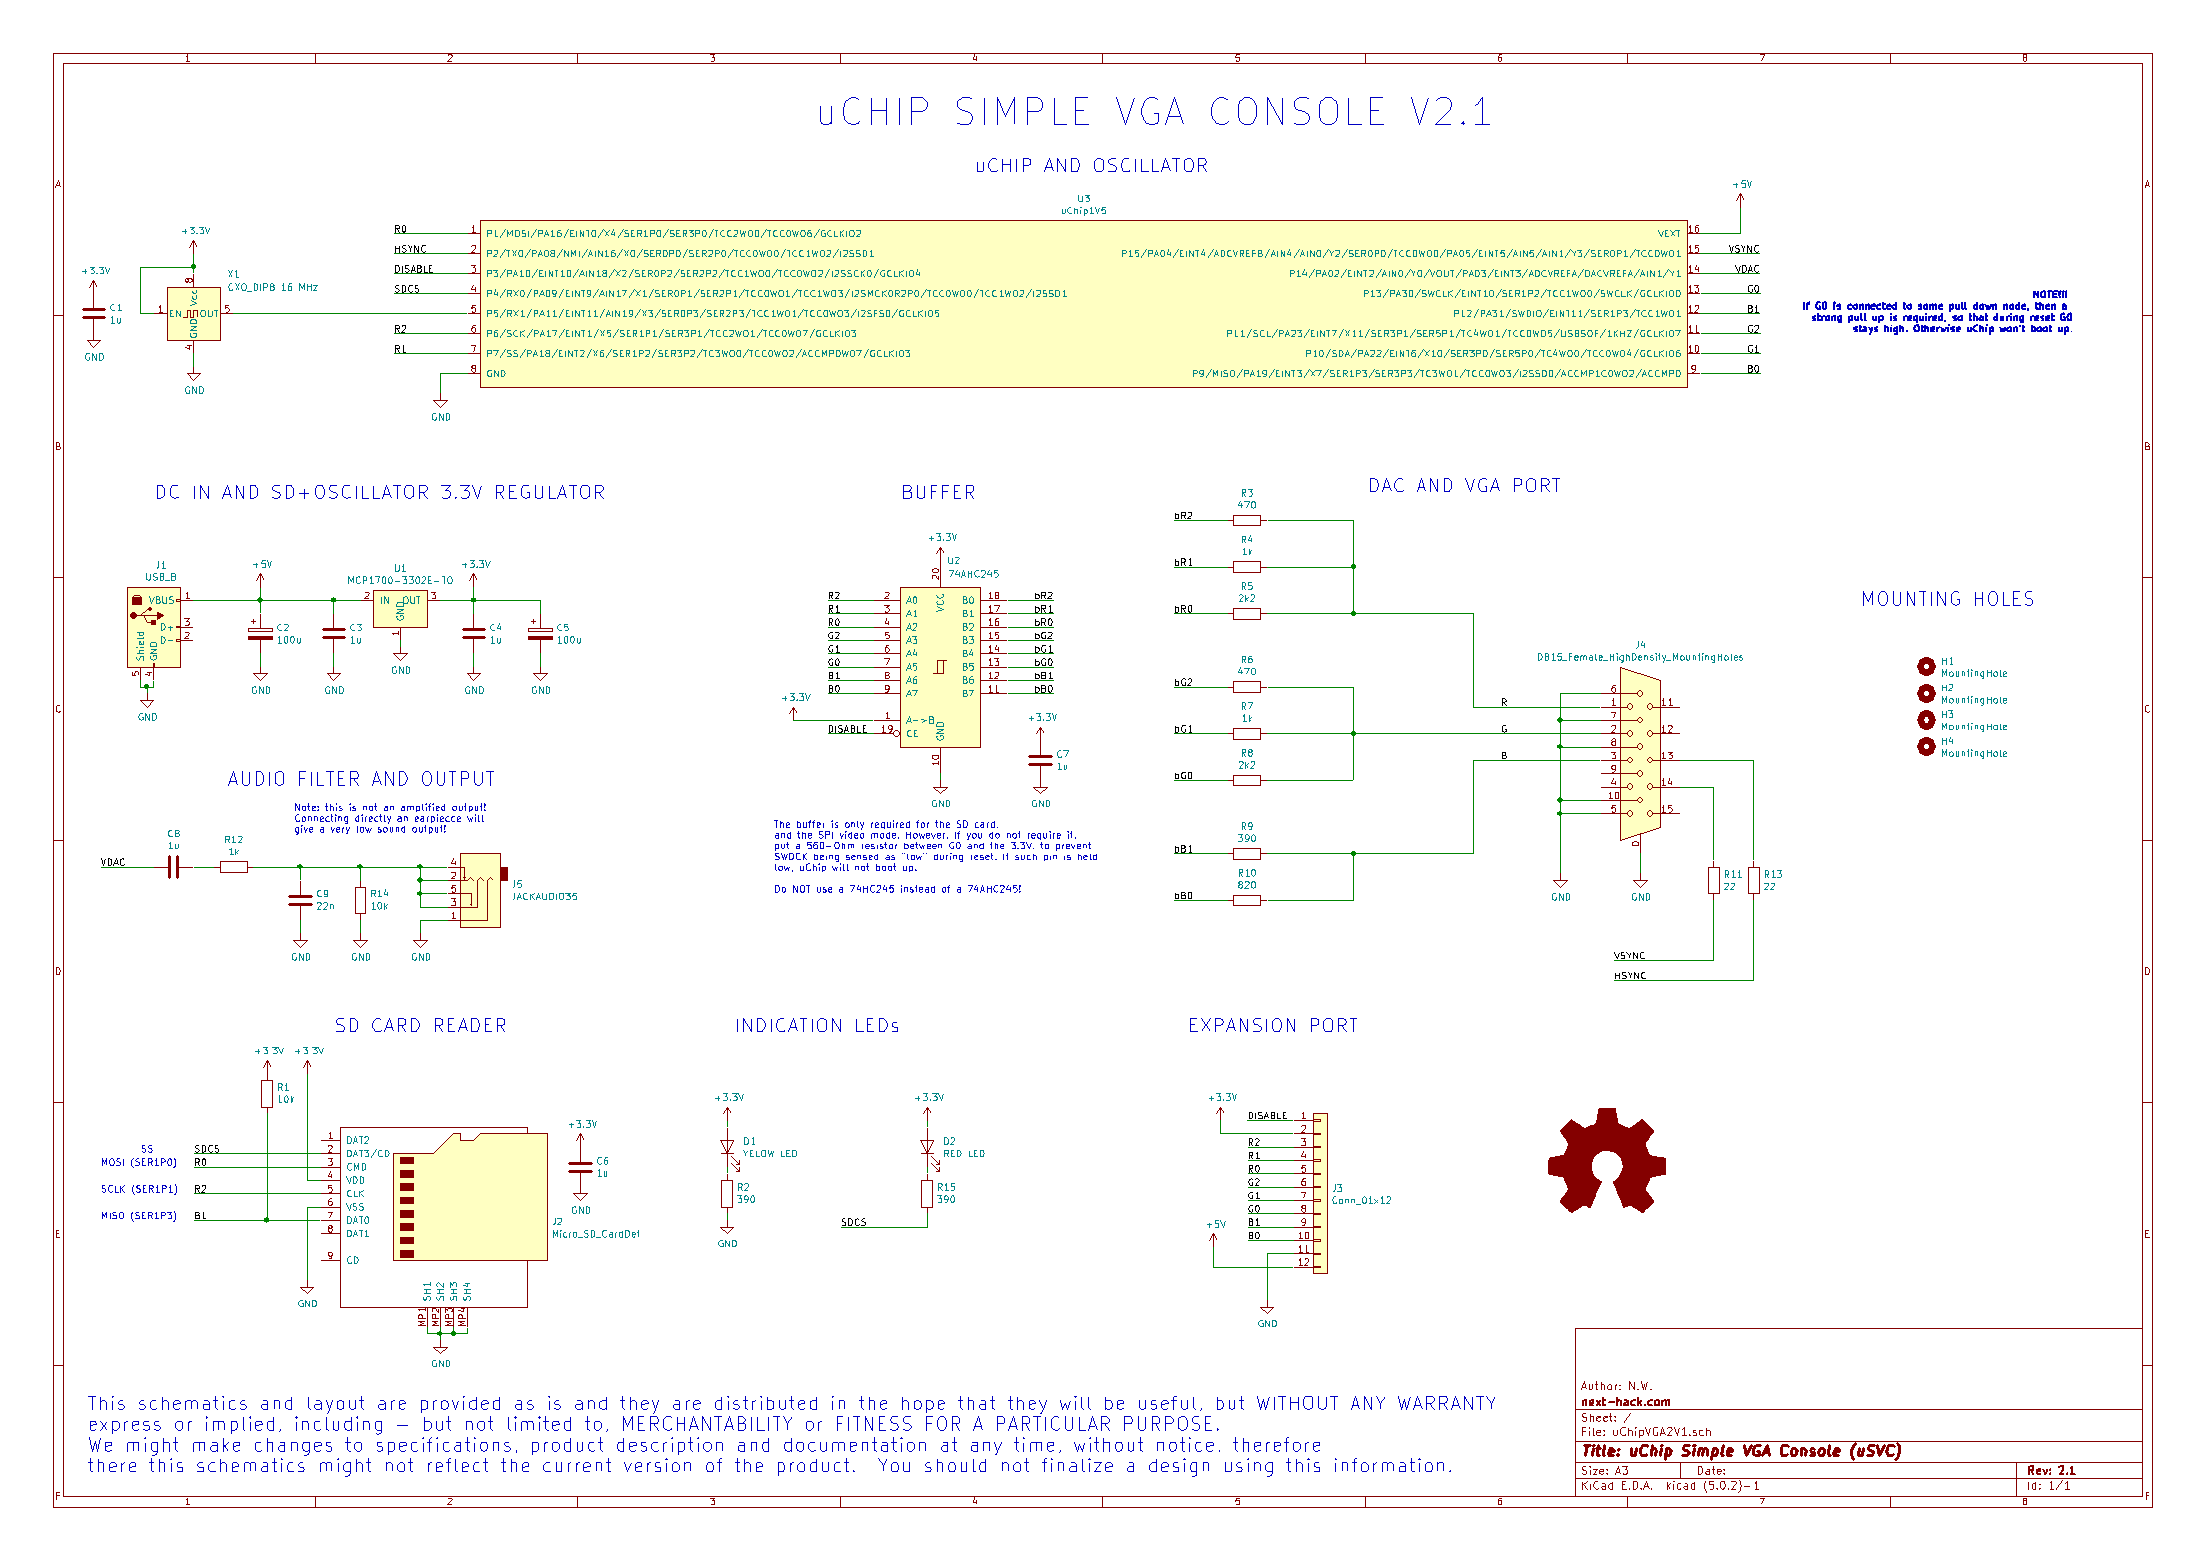
We will come back to this, but here is the current schematics of the whole board!
As you can see, besides uChip, a crystal oscillator, and a bus driver, there is nothing special.
It uses VGA monitors
As you can see from Fig. 7. a 15 Sub-D female connector (VGA) is used. The VGA requires the 3 analog RGB components and the vertical and horizontal synchronization signals.
uSVC Hardware Working principle
Let's start with the heart of this project: uChip. Everything is handled by this little board. VGA color signals are generated by bit-banging, whereas internal timers and the event system deal with synchronization.
At its left, we find a crystal oscillator. Why? Doesn't uChip have a built-in 32768 Hz crystal? Indeed, it has, but the ATSAMD21E PLLs, while good enough to generating the CPU for general usage, they introduce an unacceptable jitter on time-critical tasks such as VGA signal generation, if their input frequency is less than 1 MHz (more details about ATSAMD21E clock jitter here). Such jitter would produce an unacceptable image instability, very annoying especially if texts are drawn.
Going below, we find the USB-B connector and a low power 3.3V LDO regulator, to provide power for the crystal oscillator and the micro-SD card.
Next we find a 74AHC245 bidirectional buffer driver. Actually, a '244 would have been enough, but it wasn't that much cheaper, and it also provides a bad pinout arrangement for our task. In fact, input and outputs are mixed on both sides, whereas the '245 IC has the two I/O sides separated in the two rows.
I used the AHC version because it is fast enough (and has enough output current). I didn't try an 'HC counterpart, but I suspect that the video signal quality would be poor.
The purpose of this buffer is to separate the VGA signals, when the SD card is accessed during the vertical blank. VGA signals should be in fact at the black level (0V) during horizontal and vertical blanks. Due to lack of I/Os, the SD (and expansion port) shares the VGA digital color signals. This means that the SD can be only accessed during vertical blanks. This is not an issue, as still we must have exclusive RAM access during VGA signal generation, therefore reading (even with DMA) the SD during the frame could not occur, even if we had separate SD and VGA signals (e.g. using a larger ATSAMD21 version).
At the right of the 74AHC245, we find a resistor-based DAC and the output VGA port.
Under the 3.3V regulator, we find the audio part, which consists of a simple coupling capacitor (to remove the DC component) and a first order low pass filter, to filter the abrupt steps of the DAC.
Finally, we find the microSD card, two status LED (power and SD card access signal) and an optional expansion connector. The latter can be used, for instance, to add support for standard NES controllers, or to drive RGB LEDs, or other things.
The schematics and PC layout of uSVC can be found in the download section here.
The Software
From the software viewpoint, this project has/needs several parts.
Firmware:
- uChip Bootloader
- Game Loader
- uSVC Kernel
- The Games
Software required:
- The C IDE/Compiler (I used and strongly suggest Atmel Studio 7. You can use any IDE you want, with GCC support).
- The uChip Game Map Editor
- Some graphics and audio tools.
- BOSSA/BOSSAC.
Let's first discuss briefly the firmware, i.e. the code that runs on uChip.
The uChip bootloader uses the first 8kB of Flash, and it is used to upload the game loader code. This bootloader is pre-programmed in uChip, but you can use an SWD programmer too, to change it.
The game loader code uses the next 16 kB of Flash, and it is used to load games from SD and store them in the Flash. Since it uses SD and USB peripheral, this game loader provides also USB and SD support for games. In this way, the game code does not have to include the USB stack and SD+Fat file system, saving about 10-12 kB of precious Flash.
The uSVC kernel must be included in all the games. It features a software implementation of the uSVC console: VGA signal generation, sprites, audio, etc. Part of the kernel resides in the game loader (USB, SD), but if you want to create a standalone game, which does not use the game loader (e.g. to develop and debug it) then you can force the inclusion of the USB and SD parts too.
Now let's consider the Software required, i.e. the programs that run on a PC.
I used Atmel Studio 7, and all the sources will be released as Atmel Studio 7 projects. In my opinion it is quite a decent and easy to use IDE.
To create games I improved the uChip Game Map Editor I mentioned last year for the handheld platform game. It allows map creation, sprite and tile data exporting, midi conversion, etc. You can learn more about uChip Game Map Editor (and download its source code) from here. This editor is open source and Java based, so you can run it even on a Mac or linux based system.
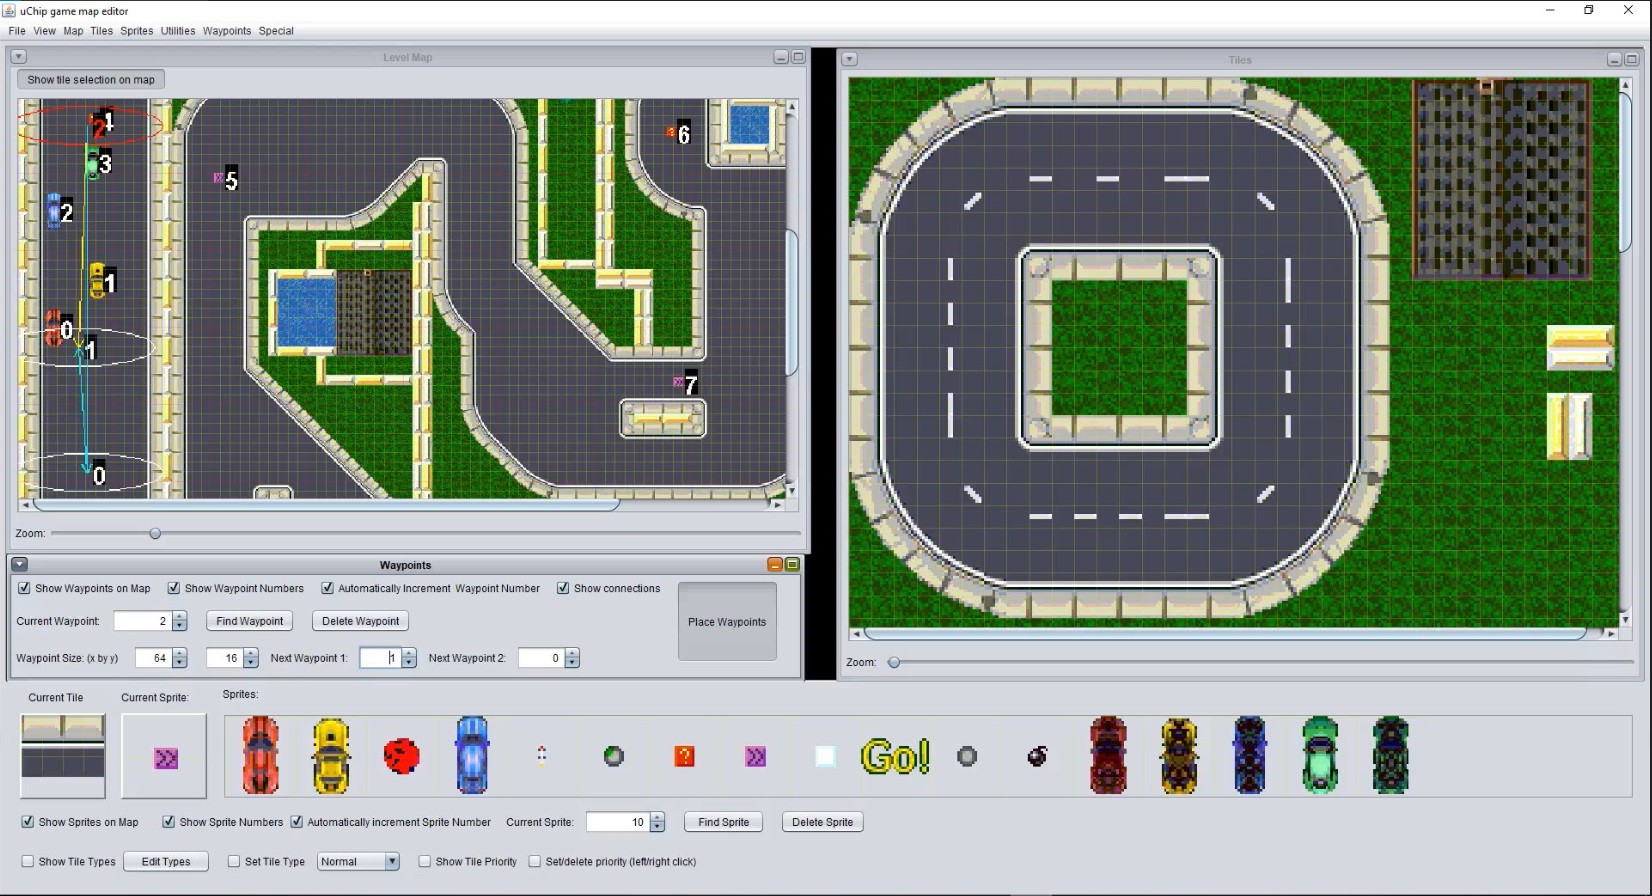
The uChip Game Map editor, however does not create graphics and sound. You need some programs (e.g. GIMP for graphics, and Audacity, Anvil Studio, LMMS for sound). I have used the aforementioned tools.
Finally, while using the game loader you do not need any programmer, to develop games you need to install BOSSAC, which is used to upload the code, without having every time to create the game package and put the game in the SD card.
Cost of software
It's open source, it's free!
Not only uSVC is full open source, but it has been developed using open source or at least free to use software (Atmel Studio is free, but not open-source). I have developed for now three simple games, and three demos. These will be released soon as open source too.
The link to the sources will be coming soon! The source code for the uChip Game Map Editor is already available here.
Cost of Hardware
This project is open source (and the hardware has been developed using the open source KiCAD), and I designed it to keep the cost of the bare hardware at a very low value, so everyone might be able to do it. Actually, the PCB is not even required, one could easily implement it on a breadboard too (all the components are breadboard friendly. For the SD reader one might use any breakout board easily available on the market). Probably you might even have already at home all the components for this project!
The most excruciating part, as always is shipping. Unluckily, if you want to self produce uSVC with its PCB, you will have to make 3 orders, from at least 3 different companies:
1) PCB manufacturer.
2) Two distinct Component Distributor (as far as I know, there is no a single component distributor that has all the required components).
Assuming a bargain 10$ shipping fee for each one, you'll probably end up at 30$ of just shipping fees, and this does not even count the price of goods.
Luckily, these prices are really amortized even for small batches: if you make 30 boards, the cost of each one will be much smaller, even counting the shipping fees. Then you should find other 29 people interested in uSVC :).
For this reason Itaca-Innovation, which covered the material costs for my prototypes, opened a crowd-supply campaign, which has the goal to make uSVC affordable.
A CrowdSupply Campaign
As said before, a uSVC CrowdSupply campaign has been opened, allowing everyone to get uSVC as a kit. The microSD socket is already soldered, being a relatively difficult SMD component. All the other parts are through hole, so even beginners can solder it without problems.
Current Status
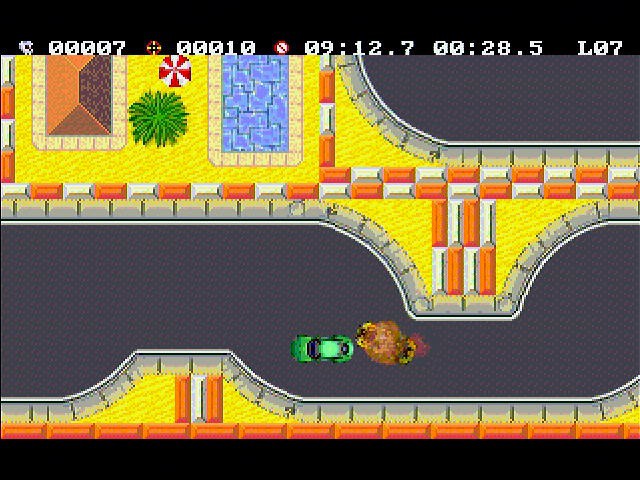
I think a video or some pictures are better than 1000 words.
Here are some other pics of demos and games I created so far (I won't repeat the other pictures show before).