Close
0%
0%

FaceLock: A Facial Recognition Door Lock

An ESP32 based IoT project.

Public Chat
Similar projects worth following
The goal of the project is to create a digital lock that can recognize the face of the user and determine whether to open the lock or not based on the recognition result. The project’s local client is built around the ESP32 platform and uses Amazon AWS for server and cloud computing. The result produced by the final product was successful as a proof-of-concept level prototype. Further development is necessary for it to gain full functionality and to be production-ready.

My idea of creating a face recognizing door lock first emerged due to the campus dorm I live in. The security of the dorm is relatively safe, but for some reason, the dorm staff often enters my room to perform their duty without notification of any kind. It feels especially uncomfortable when I come home and discover someone has been here and altered certain things to, for example, lock down the air conditioner as Winter comes. So it came to me that it would be nice to have another layer of door lock to prevent them from entering. To make it fancy, and utilize my computer vision and biometrics knowledge I learned from the last quarter, I decided to create a face recognition smart lock. Unfortunately, I cannot actually implement such a system in my dorm, surveillance on my neighbors and dorm stuff in the hallway and potentially breaking their assets will certainly land me some trouble. So this project, for now, will just remain as a proof-of-concept prototype.

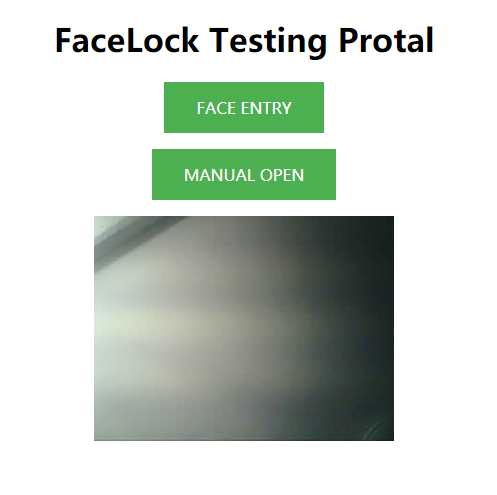
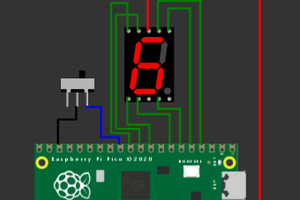
The final set of functions implemented in the system is performing face recognition, turning the lock based on the result, web page control, manual button control, and sensor-based control. You can find out more detail about the way the system acts in the sections below. 

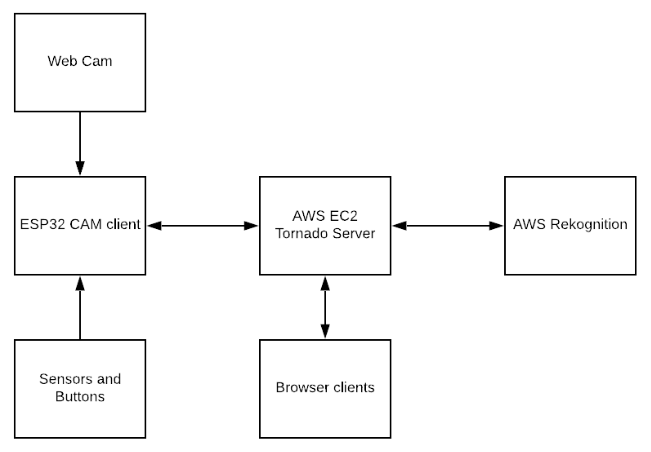
Figure 1. Block diagram of the system

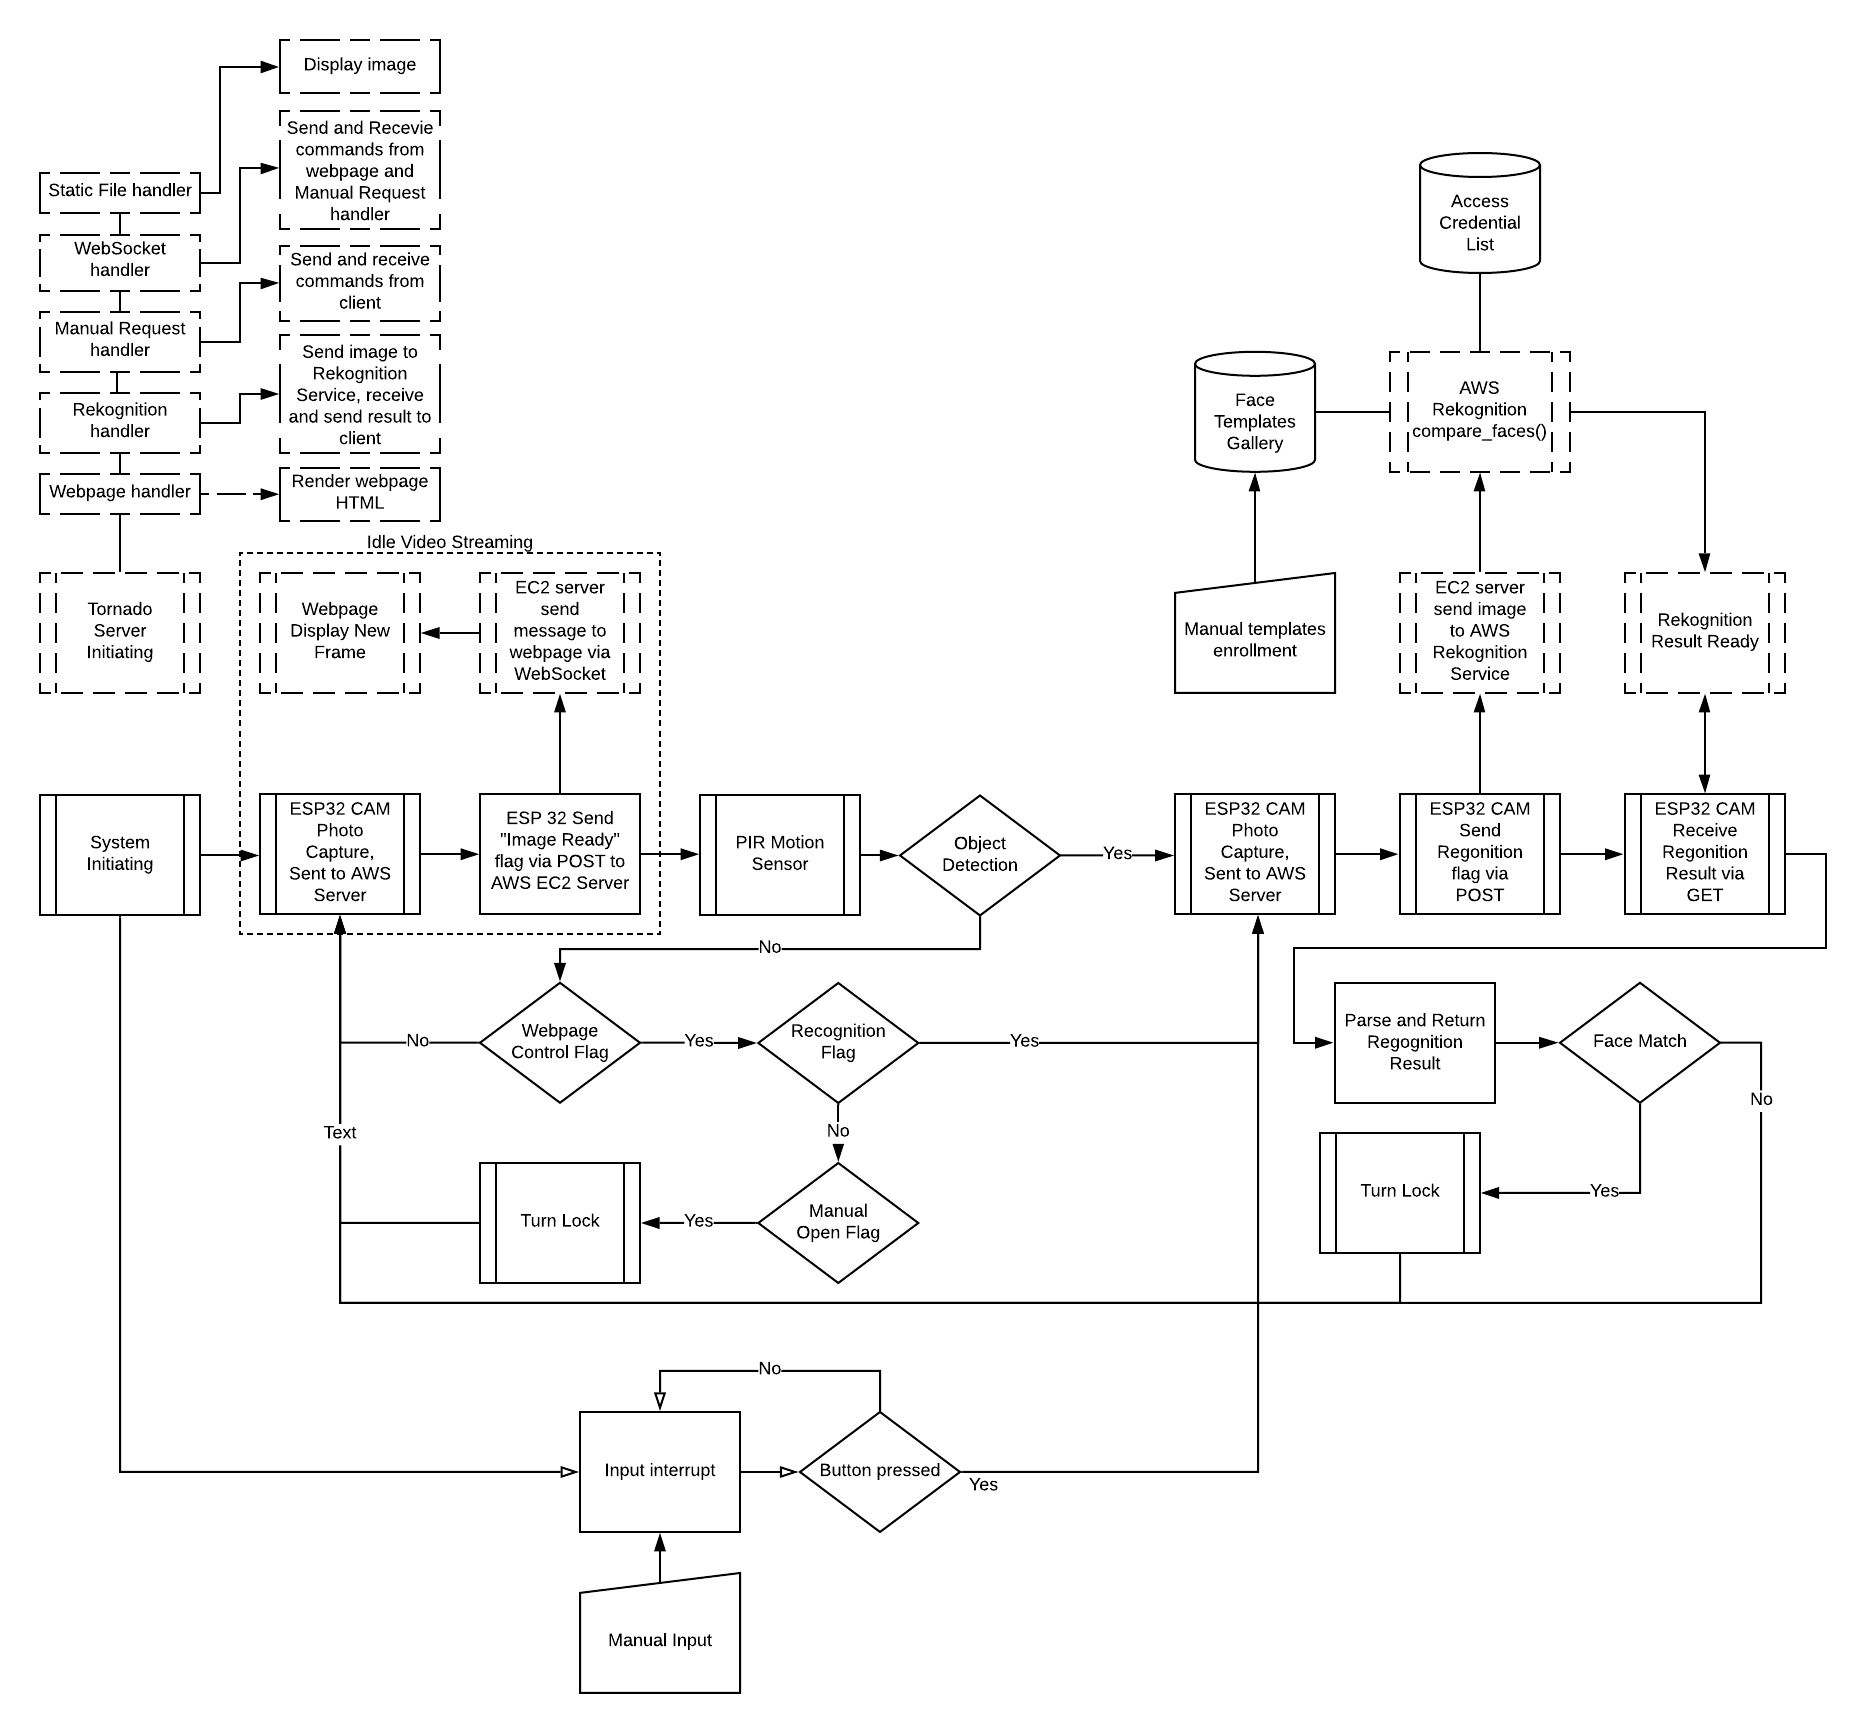
Figure 2. Detailed block diagram of the system (still being worked on)

faceLock.cpp

The client file, it is still being worked on.

cpp - 8.66 kB - 06/10/2020 at 21:00

Download

serverfiles.rar

Tornado server files plus the HTML web page.

RAR Archive - 2.53 kB - 06/10/2020 at 20:57

Download

block2.png

More detailed block diagram, it is still being worked on.

Portable Network Graphics (PNG) - 74.20 kB - 06/10/2020 at 20:52

Preview
Download

block1.png

Block diagram of the system.

Portable Network Graphics (PNG) - 21.79 kB - 06/10/2020 at 20:51

Preview
Download

  • 1 × ESP32 CAM Module
  • 1 × DRV8825 Evaluation, Demonstration Kits, Boards and Modules / Evaluation Kits, Boards and Modules
  • 1 × 28BYJ-48 Stepper
  • 1 × HC-SR501
  • 1 × GP2Y0A41SK0F IR Distance Sensor

View all 8 components

  • Webpage Testing portal

    xli8906/10/2020 at 21:21 0 comments

    To give the user the ability to see who is at the door and the ability to do some manual controls, a web page that displays the camera capture was made. For now, it only has a video stream and two buttons, one for manually beginning the face-recognition entry, and the other one for simply manually opening the lock. 

    This web page serves as a WebSocket client that communicates with the WebSocket request handler in the tornado server. Upon receiving a message sent from the tornado server, which is the flag of receiving an image from the POST request, the source of the image will be refreshed to show the new frame. By doing this, a continuous video stream can be created from individual images. The two buttons are both scripted to send a flag to the tornado server so that the GET request from the client end will receive the change and perform certain action based on flag value.

    var ws = new WebSocket("ws://*****************/ws");
            var button = document.getElementById("click");
            var state = 0;
    
            ws.onopen = function() {
            ws.send("Hello, world");
            console.log("HI");
            };
    
            ws.onmessage = function(evt) 
            {
                var image = document.getElementById('img');
                image.src = "image.jpg";
            };
    
            button.onclick = function(){
                ws.send(JSON.stringify(1));
            };
            entry.onclick = function(){
                ws.send(JSON.stringify(2));
            }


  • Using the AWS Rekognition Service

    xli8906/10/2020 at 21:19 0 comments

    To use the AWS service, the boto3 library must be installed on the server. The boto3.client() will initialize an AWS client based on the parameter inputs. Usually, the type of service one wishes to use, their AWS access key, secret access key, and AWS server region are needed for initializing the client. I have stored my AWS access keys in a CSV file so that others won’t easily see my access keys. Many AWS services are not free, leaking one’s AWS access keys can cause a variety of trouble. It is better to keep them secured.

    The tutorial about using Rekognition made by YouTuber PyLenin has helped me a lot during the quarter. Check out his Rekognition tutorial playlist for more information.

    https://www.youtube.com/watch?v=Jtr0gyM9rCI&list=PLqEbL1vopgvv1gkA2Gz-yQzKUyja4D2ew 

  • Initializing HTTP Client and Send Requests with ESP32

    xli8906/10/2020 at 21:16 0 comments

    The local ESP32 client only uses HTTP client to communicate with the server. I chose not to use WebSocket due to some early include errors. The error has been resolved later, but the code for both the HTTP server and client has already been completed.

    To establish an HTTP client on ESP32, the HTTPClient.h library will be needed. One can also use the lower level esp_http_client.h. It offers more flexibility but also more complexity.

    // Just use one of them
    #include 
    #include "esp_http_client.h"

     Initializing an HTTP client only takes one line of code with the HTTPClient library. Simply declare an HTTPClient class and that is it.  

    HTTPClient http;

     When trying to use the client, call HTTPClient.begin() first to parse the server URL for future use. HTTPClient.GET() and HTTPClient.POST() function is very straightforward to use as well. POST() function takes either a string or a pointer to a binary value and its length as input and returns the HTTP code of the POST request. GET() function takes no parameters and returns the HTTP code of the GET request. To get the payload from the server, HTTPClient.getString() should be used. After the desired request has been made, HTTPClient.end() function should be called to free up resources. 

    // POST Request example
    http.begin(post_url);  
    http.addHeader("Content-Type", "image/jpg");
    int httpResponseCode = http.POST(fb->buf,fb->len);   //Send the actual POST request
    http.end();
    
    // GET Request example
    http.begin(post_url);
    int httpcode = http.GET();
    if (httpcode > 0) 
      { 
        //Check for the returning code
        String payload = http.getString();
        const char * p = payload.c_str();
        Serial.println("HTTP RESPONSE CODE:");
        Serial.println(httpcode);
        Serial.println(payload);
        if (strstr(p, "UnmatchedFaces"))
        {
          Serial.println("Unmatching Face Detected, Entry Denied.");
        }
        else if(strstr(p, "FaceMatches"))
        {
          Serial.println("Matching Face Detected, Entry Approved.");
          turnLock();
        }
        else
        {
          Serial.println("No Face Detected, Please Try Again.");
        }
        }
    
    else 
    {
        Serial.println("Error on HTTP GET request");
        Serial.println(httpcode);
    }
    http.end();


  • Taking a picture with ESP32

    xli8906/10/2020 at 21:12 0 comments

    The project has already been worked on for about a quarter now as a electronic system design course project by me. I will try to post things I did so far and some important notes here.

    Taking a Picture

    Taking a Picture with ESP32 CAM Module is a relatively simple procedure. All the pin setups are included in the examples they provided. Simply copy that and you will be ready to use the camera. 

    // ESP32 Camera library
    #include "esp_camera.h"
    
    // ESP32 CAM module camera pin definition
    #define PWDN_GPIO_NUM     32
    #define RESET_GPIO_NUM    -1
    #define XCLK_GPIO_NUM      0
    #define SIOD_GPIO_NUM     26
    #define SIOC_GPIO_NUM     27
    
    #define Y9_GPIO_NUM       35
    #define Y8_GPIO_NUM       34
    #define Y7_GPIO_NUM       39
    #define Y6_GPIO_NUM       36
    #define Y5_GPIO_NUM       21
    #define Y4_GPIO_NUM       19
    #define Y3_GPIO_NUM       18
    #define Y2_GPIO_NUM        5
    #define VSYNC_GPIO_NUM    25
    #define HREF_GPIO_NUM     23
    #define PCLK_GPIO_NUM     22
    
    // Camera pin and image quality configuration 
    camera_config_t config;
    config.ledc_channel = LEDC_CHANNEL_0;
    config.ledc_timer = LEDC_TIMER_0;
    config.pin_d0 = Y2_GPIO_NUM;
    config.pin_d1 = Y3_GPIO_NUM;
    config.pin_d2 = Y4_GPIO_NUM;
    config.pin_d3 = Y5_GPIO_NUM;
    config.pin_d4 = Y6_GPIO_NUM;
    config.pin_d5 = Y7_GPIO_NUM;
    config.pin_d6 = Y8_GPIO_NUM;
    config.pin_d7 = Y9_GPIO_NUM;
    config.pin_xclk = XCLK_GPIO_NUM;
    config.pin_pclk = PCLK_GPIO_NUM;
    config.pin_vsync = VSYNC_GPIO_NUM;
    config.pin_href = HREF_GPIO_NUM;
    config.pin_sscb_sda = SIOD_GPIO_NUM;
    config.pin_sscb_scl = SIOC_GPIO_NUM;
    config.pin_pwdn = PWDN_GPIO_NUM;
    config.pin_reset = RESET_GPIO_NUM;
    config.xclk_freq_hz = 20000000;
    config.pixel_format = PIXFORMAT_JPEG; 
    if(psramFound())
    {
      config.frame_size = FRAMESIZE_QVGA; // FRAMESIZE_ + QVGA|CIF|VGA|SVGA|XGA|SXGA|UXGA
      config.jpeg_quality = 10;
      config.fb_count = 2;
    } 
    else 
    {
      config.frame_size = FRAMESIZE_SVGA;
      config.jpeg_quality = 12;
      config.fb_count = 1;
    }
    

     In the camera configuration section, the resolution and quality of the image can be adjusted. To optimize the frame rate of the video stream, the resolution and quality should be set to as low as acceptable. 

    Getting the image frame is done by calling the esp_camera_fb_get() function. This function returns a pointer to the frame buffer. The data structure of the frame buffer is shown in Figure 6. By first declaring an empty pointer to a frame buffer struct, and assigning the returned frame buffer pointer to this pointer, the frame is then obtained. 

    camera_fb_t * fb = NULL;
    fb = esp_camera_fb_get();
    

     The frame buffer struct looks like this:

    /**
     * @brief Data structure of camera frame buffer
     */
    typedef struct {
        uint8_t * buf;              /*!< Pointer to the pixel data */
        size_t len;                 /*!< Length of the buffer in bytes */
        size_t width;               /*!< Width of the buffer in pixels */
        size_t height;              /*!< Height of the buffer in pixels */
        pixformat_t format;         /*!< Format of the pixel data */
    } camera_fb_t;
    

View all 4 project logs

Enjoy this project?

Share

Discussions

Similar Projects

Does this project spark your interest?

Become a member to follow this project and never miss any updates