Mr. Sarful hassan
We are planning to use the NodMcu8266 to automatically log temperature and humidity measurements within the cloud, and show these measurements inside an online dashboard for this we use the DHT11 sensor for Measure temperature and humidity Data in our Environment. We will complete this project by dividing it into several parts.
Part-1:
Required Component :


4.DHT11

5.Breadboard Power Supply Module

Software Required:
The latest version of the Arduino IDE, which you can get from:
http://www.arduino.cc/en/Main/Software
Follow this link to How to Complet Software Setup Installing the Arduino IDE for the ESP8266 | IoT Tutorial
This book will help you to gain more knowledge of the Internet of Things with ESP8266

Part-2:
After Complet your hardware Collection and Software installation now we have to need waring with sensor and esp8266
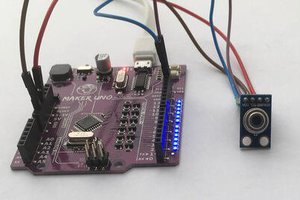
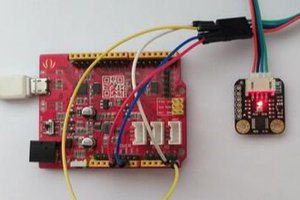
Circuit Diagram sensor Data cloud NodMcu8266:
shows how to connect a DHT 11 sensor to NodMcu8266.

Part-3
Now we went to test sensor work properly or not so we have to need a test for sensor
Testing the sensor:
Now we will simply print the value of the temperature inside the Serial monitor of the Arduino IDE. If it has not been done yet
,
install the DHT sensor library using the Arduino IDE library manager.
This is the complete code for this part:
// Libraries
#include "DHT.h"

// Pin
#define DHTPIN D5

// Use DHT11 sensor
#define DHTTYPE DHT11

// Initialize DHT sensor
DHT dht(DHTPIN, DHTTYPE, 15);

void setup() {

  // Start Serial
  Serial.begin(115200);

  // Init DHT
  dht.begin();
}

void loop() {

  // Reading temperature and humidity
  float h = dht.readHumidity();
  // Read temperature as Celsius
  float t = dht.readTemperature();

  // Display data
  Serial.print("Humidity: ");
  Serial.print(h);
  Serial.print(" %\t");
  Serial.print("Temperature: ");
  Serial.print(t);
  Serial.println(" *C ");

   // Wait a few seconds between measurements.
  delay(2000);

}
if you see like this interface then test successfully done

Code Overview Part-3 Code:
It starts by including the required libraries:
#include "ESP8266WiFi.h"
#include "DHT.h"
To install those libraries, simply look for them inside the Arduino IDE library manager. Next, we need to set the pin that the DHT sensor is connected to:
#define DHTPIN D5
#define DHTTYPE DHT11
After that, we declare an instance of the DHT sensor:
DHT dht(DHTPIN, DHTTYPE, 15);We also define two variables that will hold the measurements of the sensor
float temperature;
float humidity;
In the setup() function of the sketch, we initialize the sensor:
dht.begin();in the loop() function, we make the measurements from the sensor:
humidity = dht.readHumidity();
temperature = dht.readTemperature();
Finally Display data on your serial monitor :
Serial.print("Humidity: ");
Serial.print(h);
Serial.print(" %\t");
Serial.print("Temperature: ");
Serial.print(t);
Serial.println(" *C ");
Part-4
We are now going to see how to Send the temperature and humidity measurements in the cloud. We will use the Dweet.io cloud service here, which is very convenient for sending data online:
Sensor data send to Dweet.io:
Code:
// Libraries
#include <ESP8266WiFi.h>
#include "DHT.h"

// WiFi parameters
const char* ssid = "Mechatronics";
const char* password = "Pa$$word";

// Pin
#define DHTPIN D5

// Use DHT11 sensor
#define DHTTYPE DHT11

// Initialize DHT sensor
DHT dht(DHTPIN, DHTTYPE, 15);

// Host
const char* host = "dweet.io";

void setup() {

  // Start Serial
  Serial.begin(115200);
  delay(10);

  // Init DHT
  dht.begin();

  // We start by connecting to a WiFi network
  Serial.println();
  Serial.println();
  Serial.print("Connecting to ");
  Serial.println(ssid);
  WiFi.begin(ssid, password);
  while (WiFi.status() != WL_CONNECTED) {
    delay(500);
    Serial.print(".");
  }

  Serial.println("");
  Serial.println("WiFi connected");
  Serial.println("IP address: ");
  Serial.println(WiFi.localIP());
}

void loop()...
Read more »
 Arduino KIT
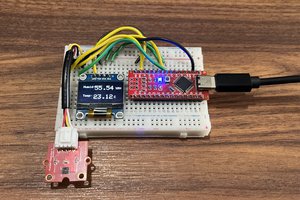
 ElectroBoy