Why Did We Build This?
"Prevention is better than cure" is one of the effective measures to prevent the spreading of COVID-19 and to protect mankind. Many researchers and doctors are working on medication and vaccination for corona.
COVID-19 spreads mostly by droplet infection when people cough or if we touch someone who is ill and then to our face (i.e rubbing eyes or nose). Ongoing pandemic shows that it is much more contagious and spreads fast. Depending on the infection spreading, we have two cases: Fast and Slow spread.
Fast pandemic will be terrible and will cost many lives. It occurs due to a rapid rate of infection because there are no countermeasures to slow it down. This is because, if the numbers of infected people get too large, healthcare systems become unable to handle it. We will lack resources such as medical staff or equipment like a ventilator.
To avoid the above situation, we need to do what we can to turn this into a slow pandemic. A pandemic can be slowed down only by the right responses, mainly in the early phase. In this phase, everyone who is sick can get treatment and there is no emergency point with flooded hospitals.
In this pandemic, we need to engineer our behavior as a vaccine. that is, "Not getting infected" and "Not infecting others". The best thing we can do is to wash our hands with soap or a hand sanitizer. The next best thing is social distancing.
To avoid getting infected or spreading it, It is essential to wear a face mask while going out from home especially to public places such as markets or hospitals.

Source - The Hindu

Idea 💡
The system is designed to detect the faces and to determine whether the person wears a face mask or not. Using the above data, we can decide whether the concerned person can be allowed inside public places such as the market, or a hospital. This project can be used in the hospital, market, bus terminals, restaurants, and other public gatherings where the monitoring has to be done.
This project consists of a camera that will capture the image of the people entering public places and detect whether the person wears a face mask or not using their facial features.
To test the real-time scenario, we deployed it on one of the rooms to test how possibly it could be used and the results were pretty affirmative.
Hardware Build
Step 1: Getting Started with NVIDIA Jetson Nano (Content from NVIDIA)
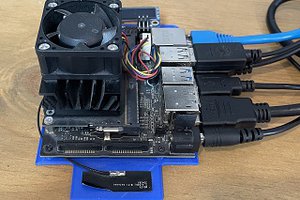
NVIDIA® Jetson Nano™ Developer Kit is a small, powerful computer that lets you run multiple neural networks in parallel for applications like image classification, object detection, segmentation, and speech processing. All in an easy-to-use platform that runs in as little as 5 watts.

Specification- Developer Kit I/Os
- USB
- 4x USB 3.0, USB 2.0 Micro-B
- Camera Connector
- 1x MIPI CSI-2 DPHY lanes
- Connectivity
- Gigabit Ethernet, M.2 Key E
- Storage
- microSD (not included)
- Display
- HDMI 2.0 and eDP 1.4
- Others
- GPIO, I2C, I2S, SPI, UART
You’ll Also Need:
- microSD Memory Card (32GB UHS-I minimum)
- 5V 4A Power Supply with 2.1mm DC barrel connector
- 2-pin Jumper
- USB cable (Micro-B to Type-A)
- USB camera / Pi camera
For a limited time only, bring the Jetson Nano Developer kit home for just $89.
Step 2: Burn NVIDIA Image to the SD card
We will need at least a minimum of 32GB SD card for the Jetson Nano. Download the image from NVIDIA DLI AI Jetson Nano SD Card Image v1.1.1
- Format your microSD card using SD Memory Card Formatter from the SD Association and disconnect once done
- Download Etcher and install it.
- Connect an SD card reader with the SD card inside.
- Open Etcher and select from your hard drive the Jetson Nano Developer Kit SD Card Image
.imgor.zipfile you wish to write to the SD card. - Select the SD card you wish to write your image to.
- Review your selections and click 'Flash!' to begin writing data to the SD card

We can access the NVIDIA Jetson Nano by two methods.
- Directly connecting the Display, Mouse, and Keyboard
- Headless Mode
 Rahul Khanna
 Yuta Suito
 Shakhizat

 Stefan