Close
0%
0%

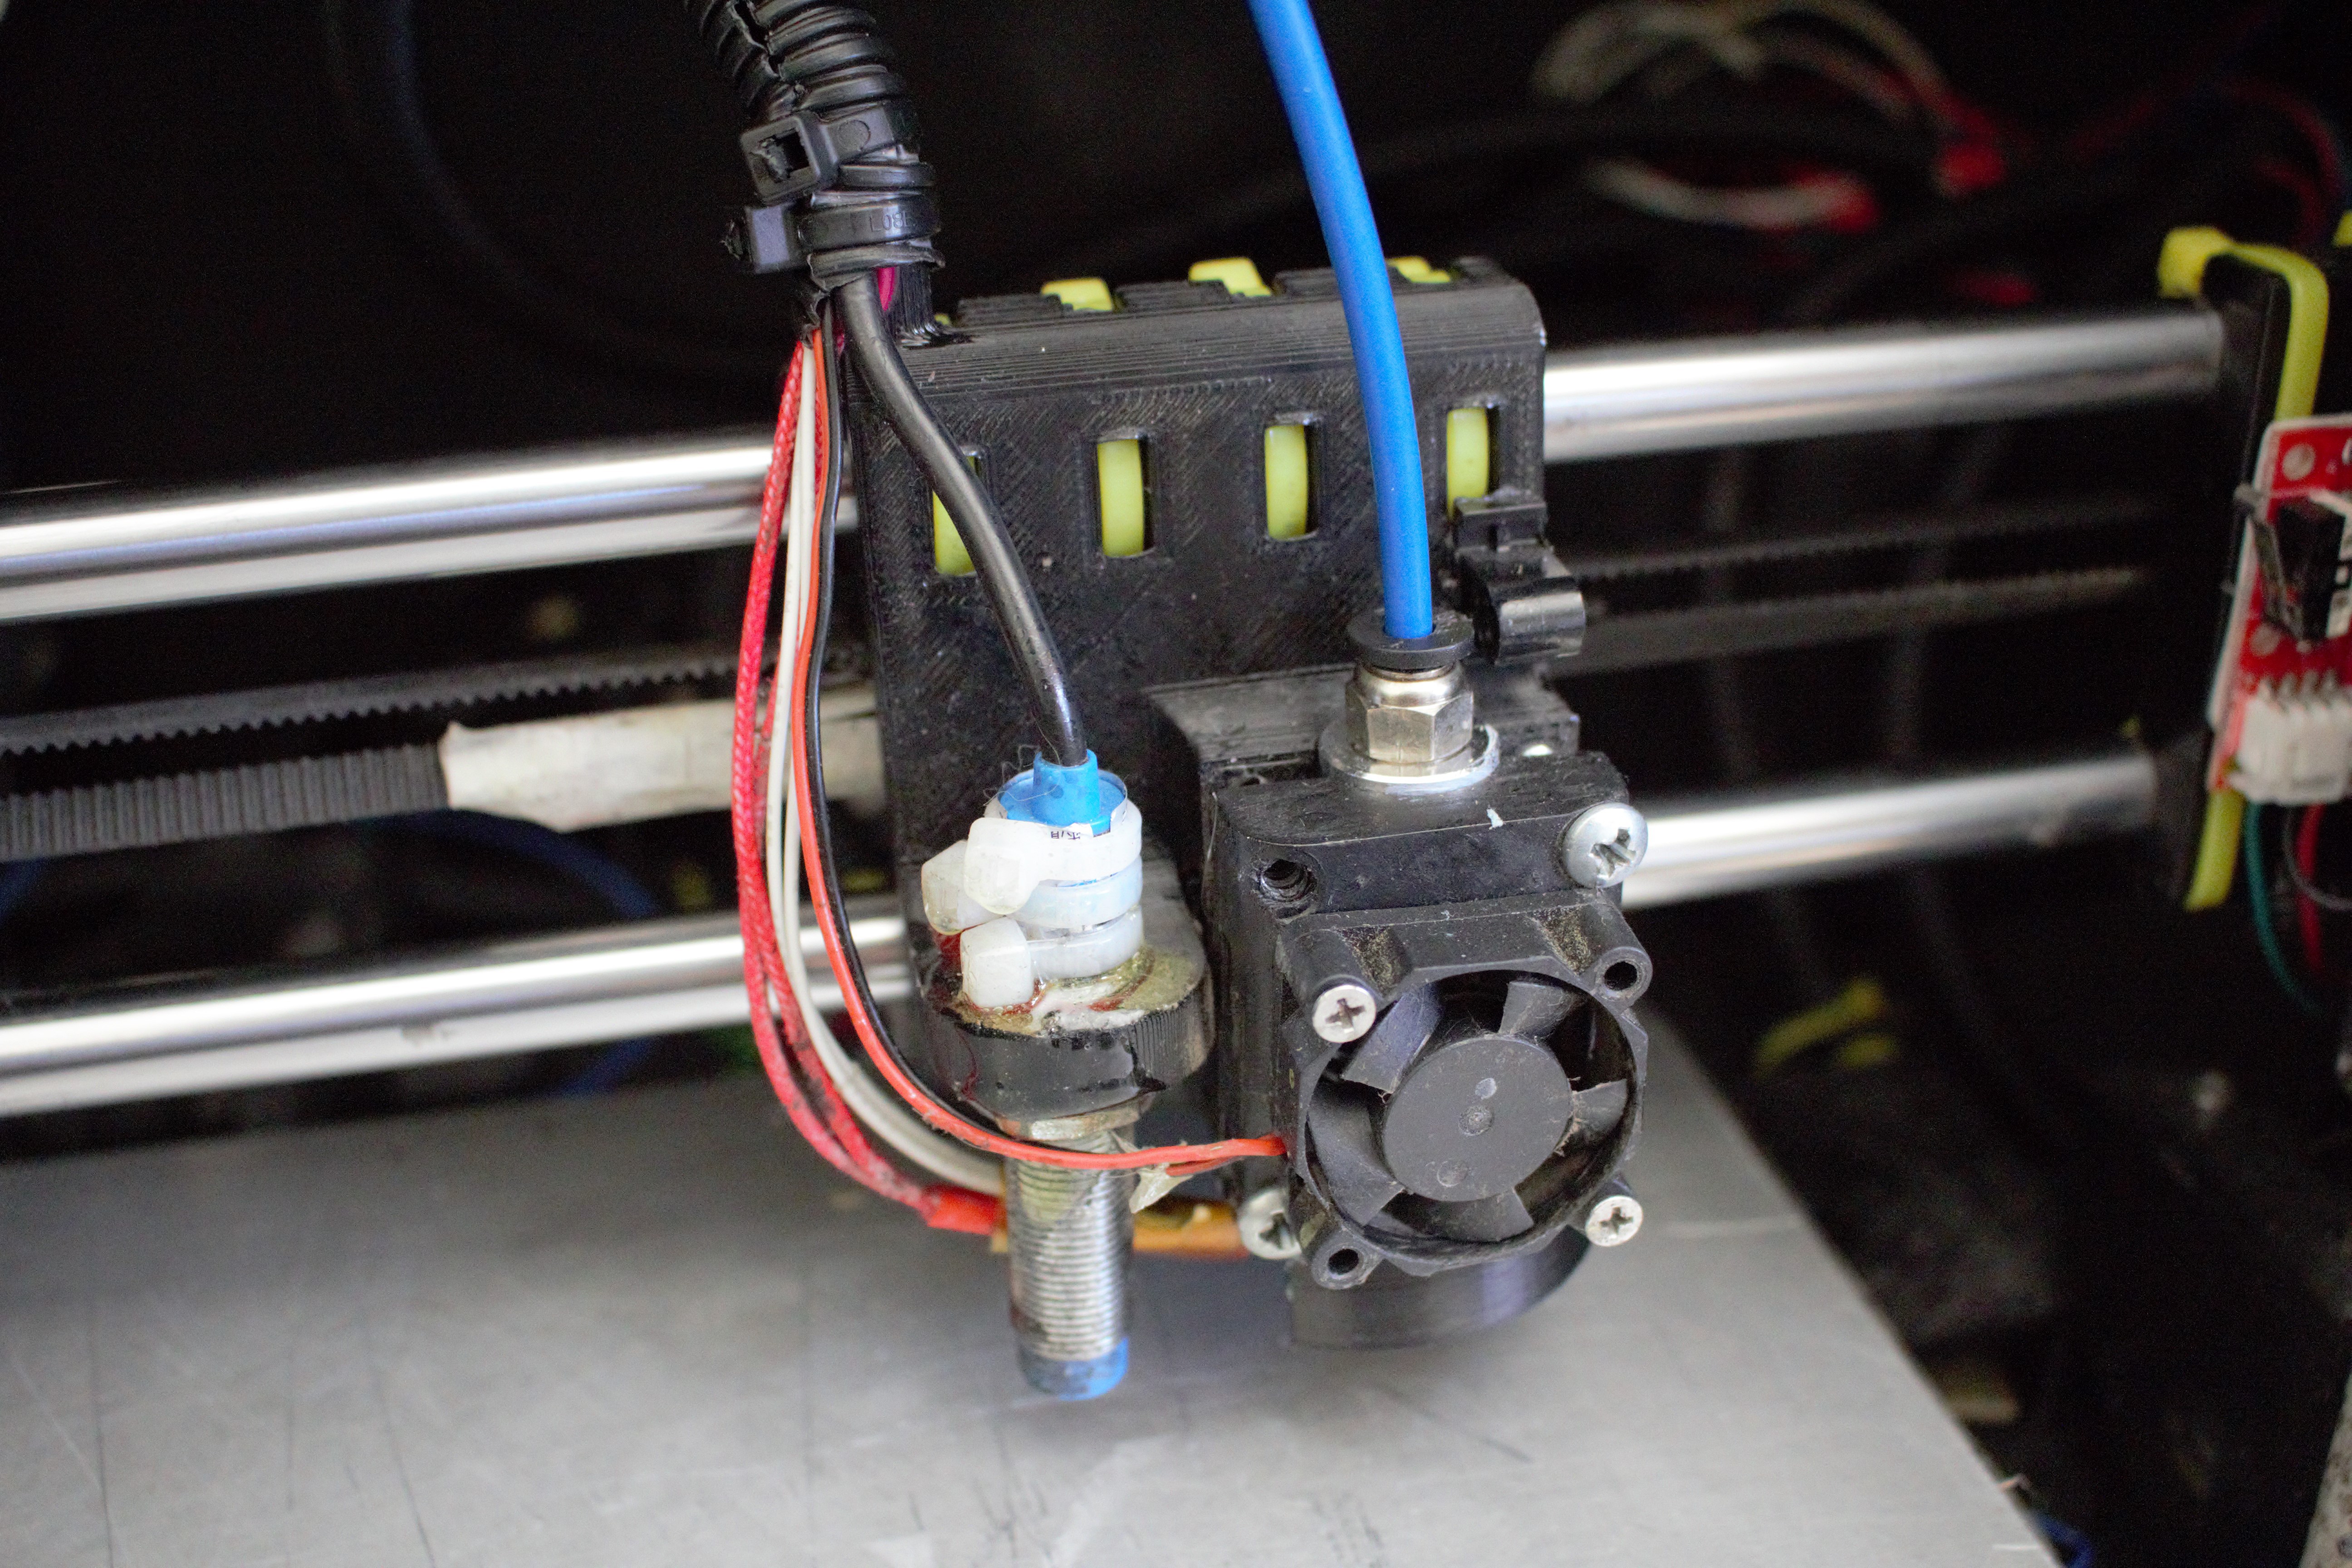
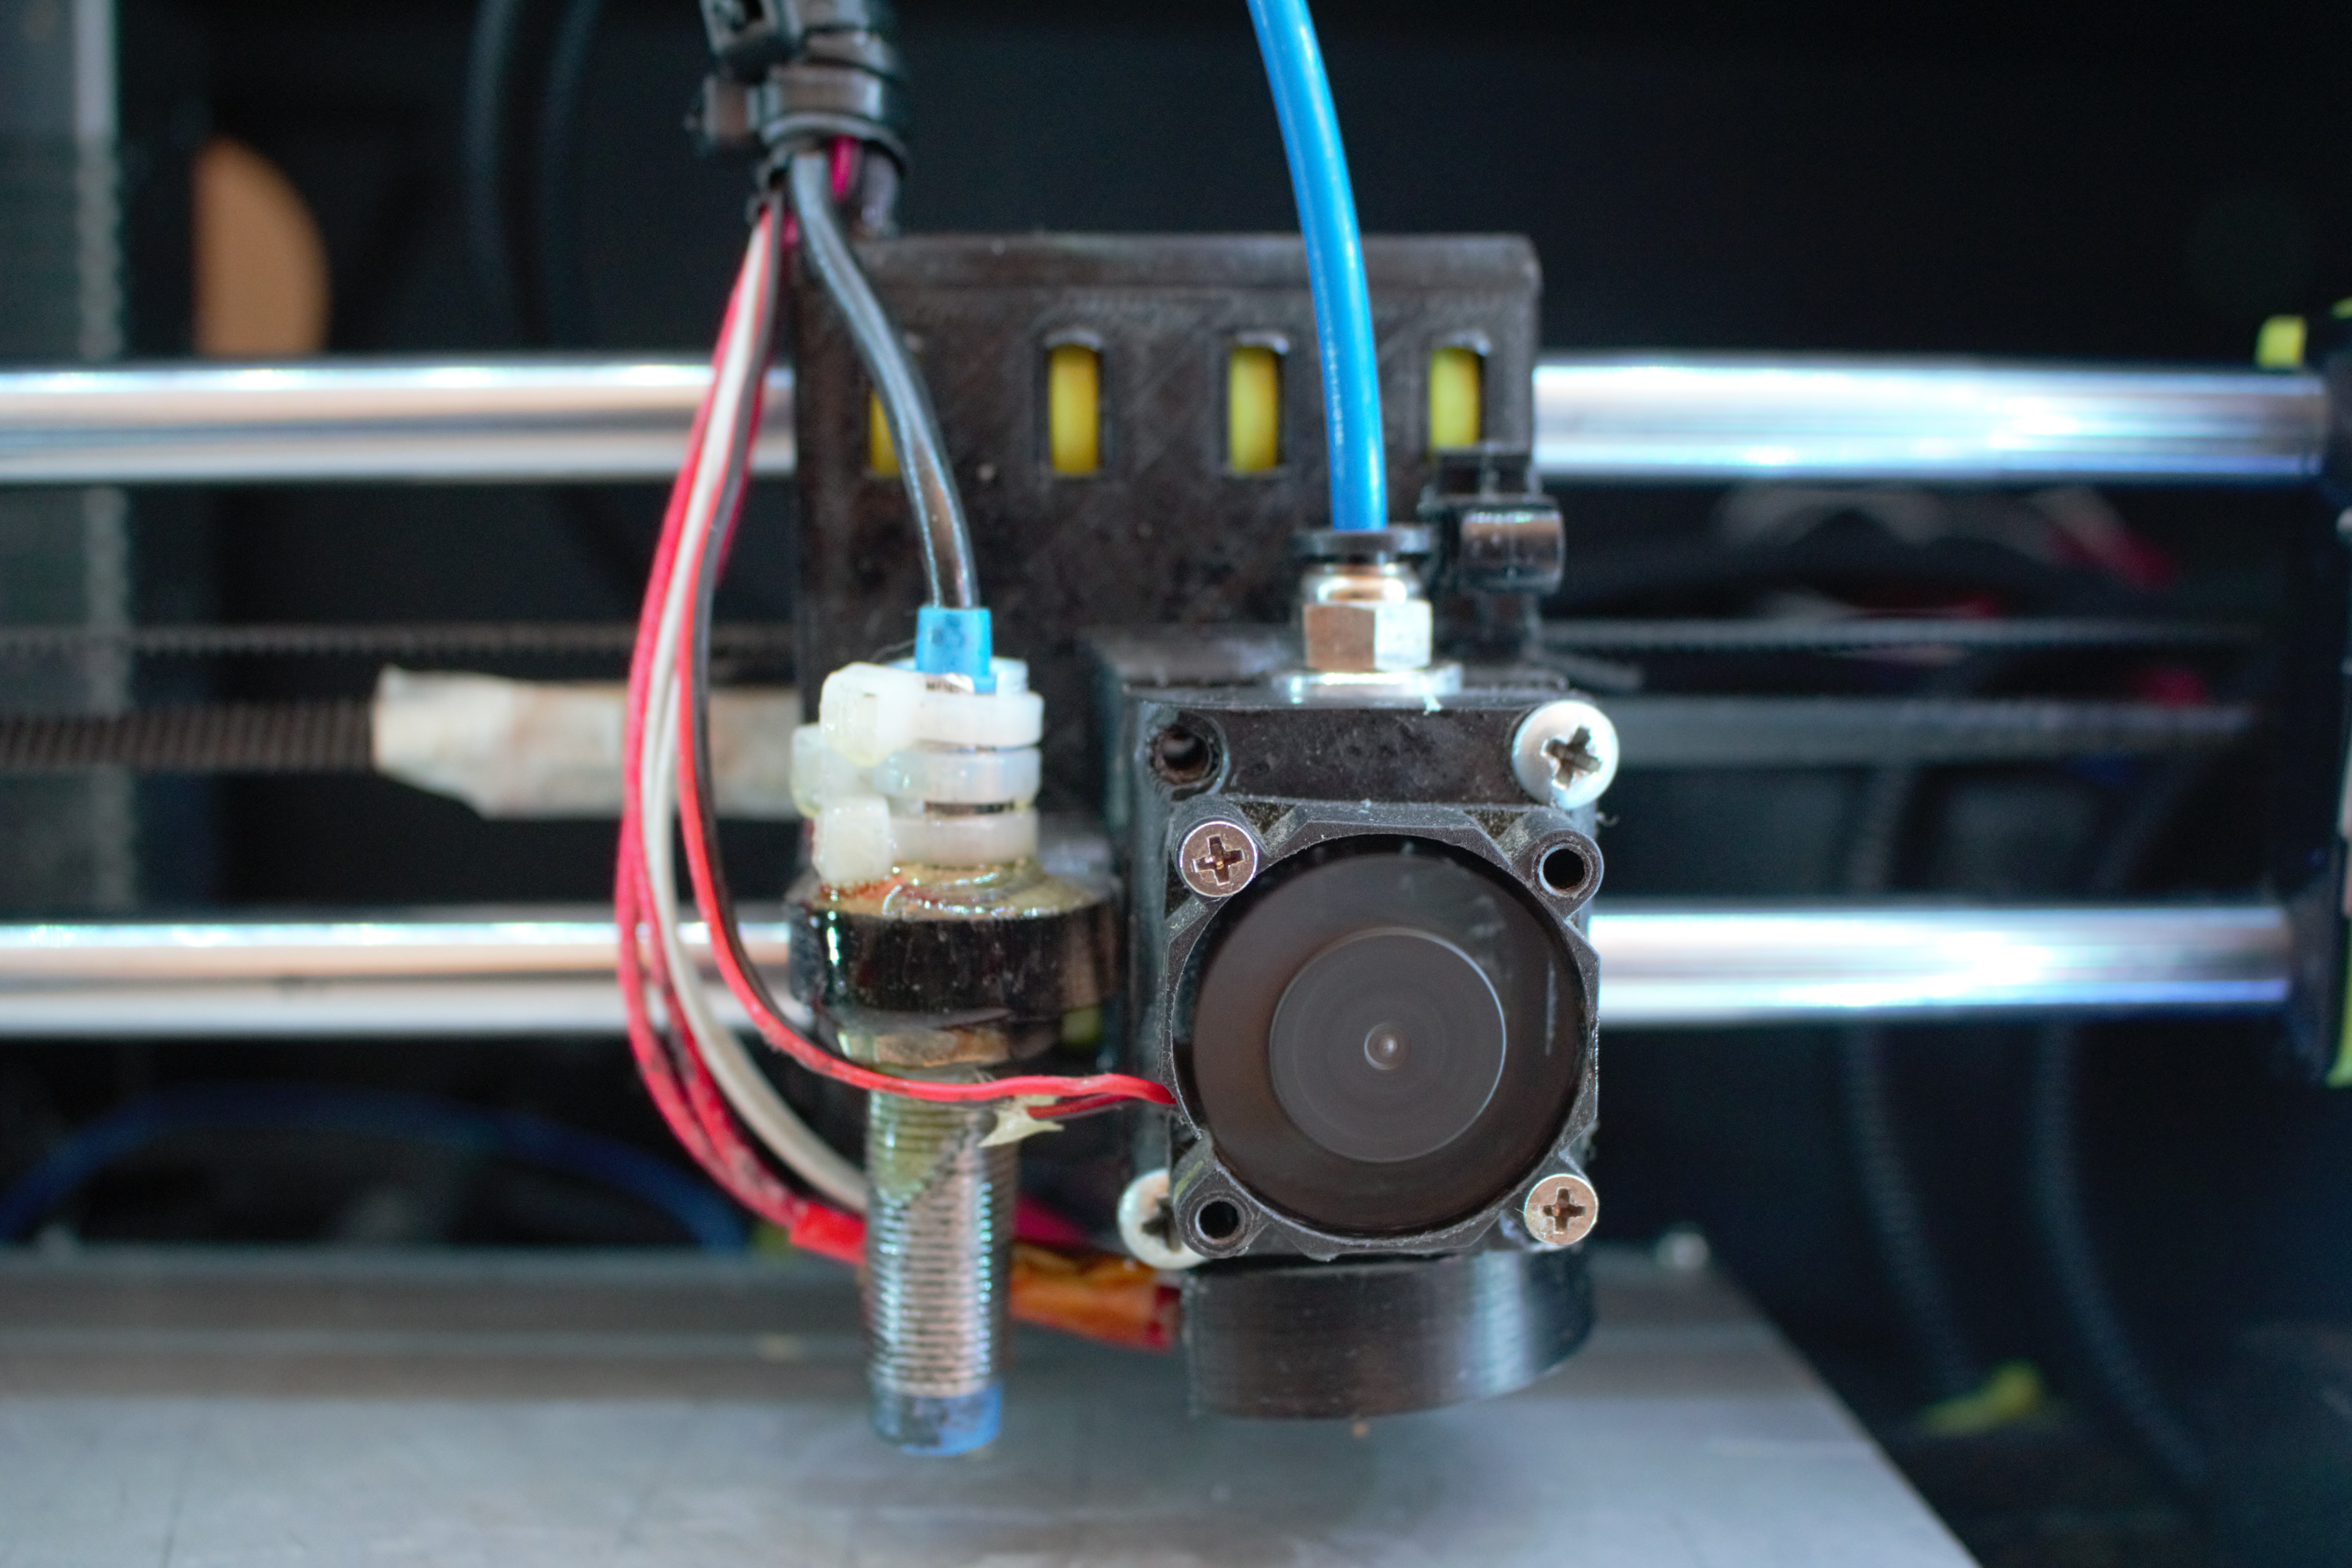
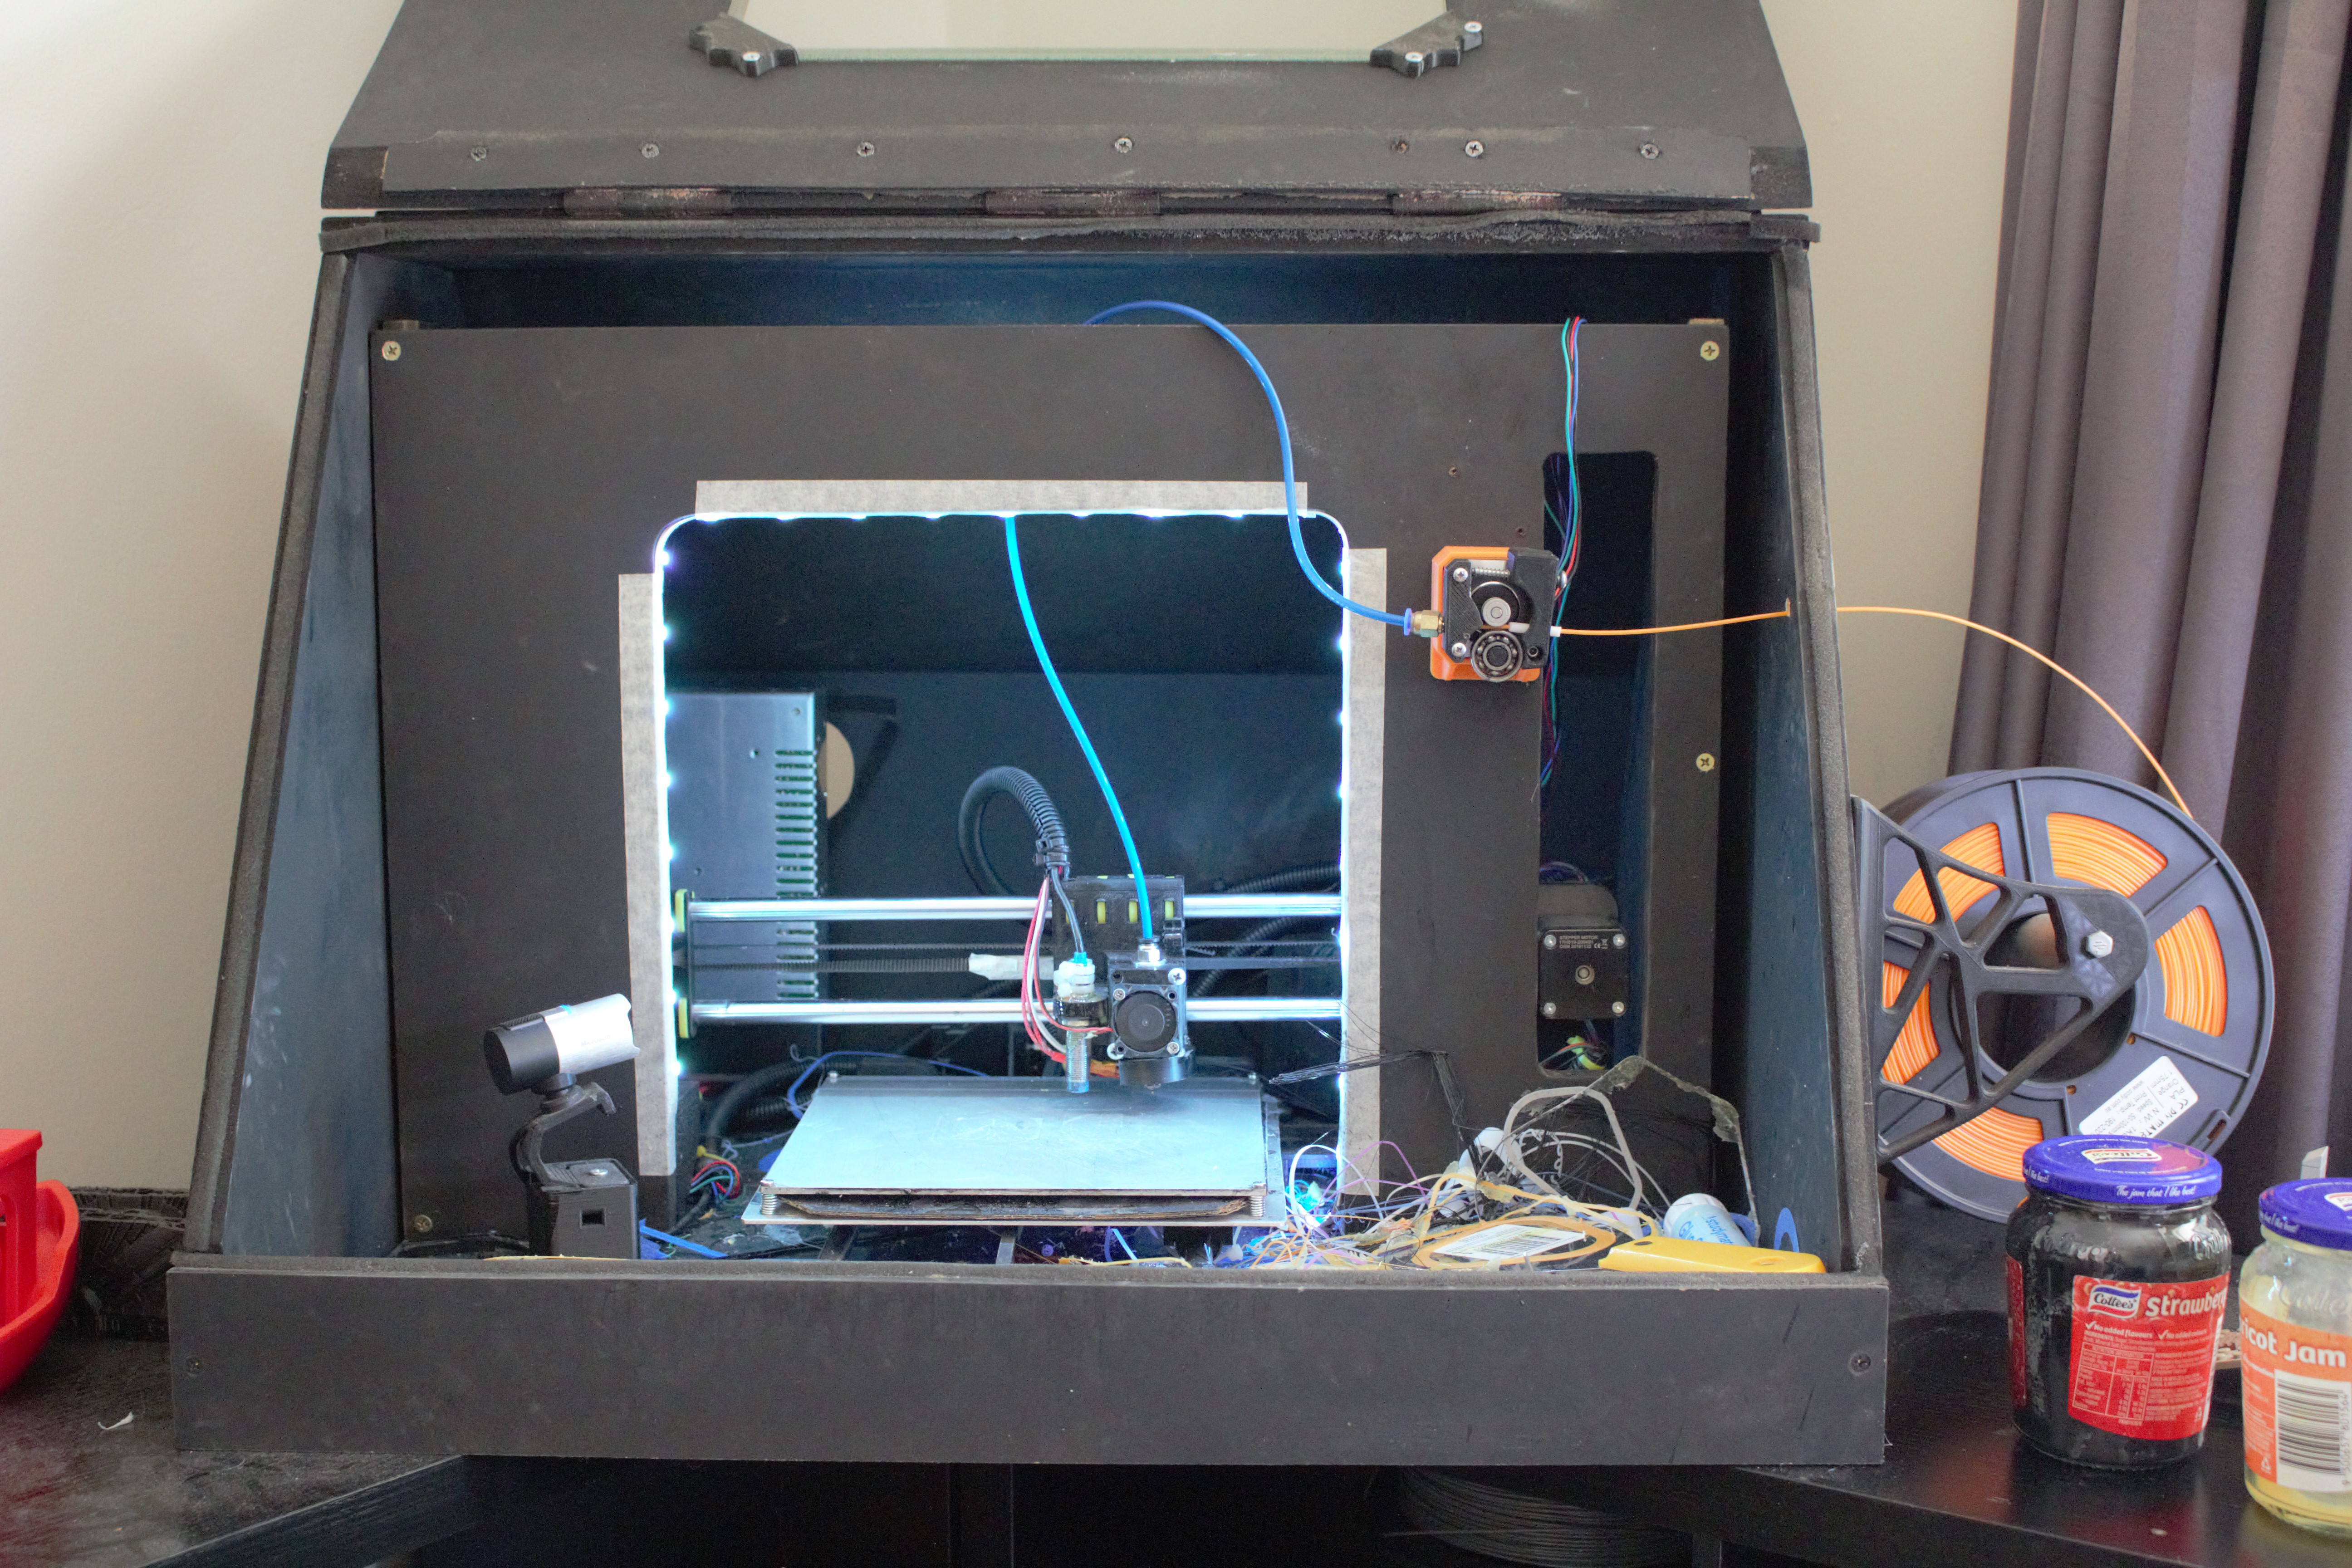
DIY Silent 3D Printer

My experience designing and making a building DIY 3D printer

Public Chat
Similar projects worth following
This is a bit of a build log/guide/personal experience of designing and building a 3D printer. The final product is what I would call decent, not perfect, but fairly good. I am an engineering student who enjoys making all sort of stuff and 3D printing. This is the second printer that I have built, and I thought I might share some of the though process behind the design. This will not be a fully detailed guide on how to build a printer step by step, there are many many videos and guides on stuff like that already. I will try to focus on how to design a “decent” 3D printer. I will also provide enough information for someone to copy the design of my 3D printer (supplemented by other videos and articles).

For design files and further documentation please visit github here. 

https://github.com/FlukeyLukey77/FlukeyFabricator

  • Upgrades and Improvements

    Luke Brandon08/15/2020 at 07:19 0 comments

    Upgrades and Improvements

    Enclosure

    If you ever want to print in ABS you need an enclosure. I occasionally print ABS and wanted to build an enclosure for my printer. Enclosures help trap warmth to allow the printer to print ABS with minimal warping and splitting. The enclosure also helps reduce noise and keeps dust off the printer. The enclosure I built was nothing fancy, just an MDF box with some noise dampening pinboard material lining the inside. I am not sharing how it was built because I don’t think it is worth sharing. There are many better designs out there. I would have a look at some good designs and then adapt it to suit your needs.

    Flexible Build Plate

    The “Wham Bam flex plate system” is by far the best upgrade I have done to a printer in a long time (almost as good as auto bed levelling). The Wham Bam system works well even up to 100C and is really durable. I previously use Build Tak and went through sheets really quickly. The Wham Bam system works great for ABS, PLA and PETG. I have used my sheet regularly for a few months now and it hasn’t shown any signs of wear or damage.

    Hotend Sock

    I added a hotend sock to my clone E3D hotend. I would recommend trying one. They are fairly cheap and keep hotend temperatures really stable, even with high fan speeds. Previously I had problems with the powerful part cooling fans cooling the hotend. The sock completely fixed that. The only small downside is that I did notice a slight increase in stringing.

    If you want a sock for a clone E3D you may struggle to find one that fits nicely. I made my own silicone sock to fit the hotend perfectly. I may post details in a following project. In the meantime, check out CNC Kitchen’s video on how to make your own hotend socks (https://www.youtube.com/watch?v=O5UiXky85hA).

    Extruder Motor Heatsink

    I found that my hotend was running quite hot. I adjusted the motor current to provide smooth and consistent extrusion at the lowest current possible. Despite this tuning, the motor was still getting hotter than I liked. I decided to add a heatsink to the motor. I don’t know if this is a good idea or if it even helps at all. All I did was use some thermal glue to stick 3 small heatsinks to the motor. It did significantly reduce the temperature of the motor. I have not had any problems with the motor since building the printer over 6 months ago.

    Smoke Alarm

    I am planning on adding a smoke alarm to the printer’s enclosure in the near future. It’s a small addition that can improve the safety of the printer. Mistakes happen, its good to be prepared.

    Fan Shroud Optimisation

    The fan shroud I designed for the part cooling fans could be improved. The airflow direction and restriction aren’t tuned as nicely as they could be. A bit of testing and iteration could greatly improve part cooling performance.

    Extruder Maintainability

    The extruder I designed for this printer is not the greatest. I dread the day I get a bad jam and must disassemble the whole extruder. Thankfully, I have not had any bad jams in the life of the printer. If you plan on making the printer, I would consider making the extruder easier to pull apart. I have included Fusion 360 and step files in the design files. 

  • Part and Design Choices: Electronics

    Luke Brandon08/15/2020 at 07:18 0 comments

    Electronics

    Strain Relief

    Strain relief is something to keep in mind when building/designing 3D printers. 3D printers are always moving, this can easily strain and break wires. My printer design has strain relief mounts designed into it. These points allow for cables to be zip tied to the moving carriages.

    A handy tip that I found (Maybe from Makers Muse on YouTube, cant remember exactly) is to use whipper snipper (brush cutters, weed whacker, grass trimmer, whatever you call them) wire in your wiring looms. The nylon wire is quite stiff and can be bundled together with your wires to give them support. The cord helps prevents wires from kinking and bending. It can easily be hidden inside the cable sheathing used around the wiring.

    Stepper Drivers

    I chose to go with silent stepper drivers. These are slightly more expensive than regular drivers, however, I prioritised the printers silence over its cost. The drivers I used were the TMC2130 drivers. These drivers have silent stepping with sensorless homing. Sensorless homing is nice as it eliminates end stops making the printer look cleaner (another design goal).

    I did use A4988 (regular) drivers on my extruder and Z axis motors. These axes move less often and produce less noise. This decision was made to save some money, TMC2130s could be used on all axes if preferred.

    Fans

    Noctua. If you want to get super silent fans, Noctua fans are the best. They aren’t cheap or good looking, but they are silent. Silence was a top priority for me so Noctua fans were used on the hotend and PSU.

    I bought a cheap 360 Watt PSU which had a loud fan and no thermostat. I could have added a thermostat to the PCB and the fan would likely remain off for almost all printing. I decided against this as I would rather stay away from mains wherever possible. I chose to replace the included fan with a Noctua fan. Unfortunately, the Noctua fan was thicker than the included fan and didn’t fit. I ended up just attaching it on the outside of the PSU. This wasn’t great but it did work, it also meant I didn’t waste an expensive fan. (INCLUDE PHOTOS OF FAN).

    In places where not as much cooling was needed (the electronics box) I used a cheap 12v fan. To silence it, I simply ran it at 5v. This was a cheap way to get silent cooling fans.  

    The part cooling fan used 2 50mm radial fans. These are loud fans, they sound like a jet engine, and are the loudest part of the printer. I tried using 2 fans at lower speed to reduce noise. This reduced the noise produced slightly. Truthfully, these two fans are still rather loud. I have a few ideas for an external ducted fan for a future upgrade.

    Hotend and Extruder

    I chose a E3D v6 clone for my hotend. The clone (also known as J-Head) works well for what I need. Despite using a clone, I would always recommend a genuine hotend if you can afford it. I wanted to save money so went with a clone. As mentioned previously, the hotend cooling fan was replaced with a 40mm Noctua fan.

    The extruder used is of my own design. It’s a simple, ungeared direct drive extruder. A drive gear and idler combination. I considered a Bondtech extruder and Bondtech clones, in the end I decided to design my own extruder. The clone Bondtech’s seemed to have a bad reputation and the genuine ones were pricey and hard to source. My extruder works well for PLA, ABS, and PETG.

    My previous printer used a Bowden extruder. After having used my new direct drive extruder I would never use a Bowden again. The print quality is far better when using the direct drive compared to the Bowden extruder. Direct drive extruders add weight to the moving carriage which is why they are sometimes avoided. For a moving bed design this weight saving isn’t so critical. The bed mass is already limiting your speed, so it doesn’t hurt too much having a little more mass on the extruder. (Actually, thinking about this further, I’m not sure if that last sentence is correct. More testing might be...

    Read more »

  • Part and Design Choices: Motion

    Luke Brandon08/15/2020 at 07:17 0 comments

    Motion

    Pulleys and Belts

    My previous printer didn’t have any way to tension the belts once they were installed. This was inconvenient and didn’t allow for easy maintenance. The new design includes screw tensioning on both the X and Y axes. The X axis includes a screw tensioner that pivots the motor to add tension to the GT2 belt. The Y axis relies on the idler pulley mounts to tension the belt. Before screwing the idler mount on fully the belt is tensioned as much as possible. The idler mount is then tightened down to tension the belt. Tight belts are critical for good print quality.

    Rails

    I decided to go with 10mm rails as they were a good quality/cost compromise. My previous printer used 12mm rails. 12mm rails are overkill, they don’t add any real print quality benefits to the printer. The increase in rail size and bearing size simply results in an unnecessarily expensive printer. 10mm rails don’t have any significant flex to them while still being affordable. If price is an issue, 8mm rails would suffice. The difference in quality would be minimal.

    Bearings

    Initially I wanted to buy IGUS bearings. I had hoped that they would produce less noise than steel bearings. I ended up buying some cheap IGUS bearings from eBay. This was a mistake, the bearings I received produced far too much friction to be usable. I don’t know if this is a problem with all IGUS bearings or just my cheap Chinese ones. I ended up switching to some steel bearings. The sound produced by the steel bearings is noticeable but not unbearable. The cost of the genuine IGUS bushings, and the difficulty of buying them in Australia, made steel ball bearings the best option.

    I would love to see some IGUS printers made. I would love even more to see some good IGUS, steel comparisons. That being said, do your own research, there are various advantages and disadvantages to both options.

    Check out this video by Thomas Sanladerer: (https://www.youtube.com/watchv=ZGBipbgwgME&list=LLMFYmOZqnvSH77--DmoYhCQ&index=1112)

    Couplers + Lead Screws

    When building my previous printer, I learnt my lesson about buying cheap couplers and lead screws. When choosing lead screws and couplers don’t be tempted to go to cheap. You want straight lead screws or else you get Z-Banding. Cheap Chinese lead screws aren’t always straight. It’s a major headache and isn’t worth a few dollars savings.

    Couplers can also cause problems. I found the “double locking” type to work well. These have a split in them which clamps to the shafts along with set screws. The “set screw only” types tend to be cheaper and nastier. I bought some that didn’t have centred holes. The locking type centre the shafts better and are generally made better.

    I have had bad experiences with cheap screws and couplers, learn from my mistakes. 

  • Part and Design Choices: Frame

    Luke Brandon07/30/2020 at 11:57 0 comments

    Part and Design Choices

    Frame

    Threaded Inserts

    Using threaded inserts was new to me. I was introduced to the idea in one of CNC Kitchen’s videos where he tested various styles of threaded inserts. Check out his video to learn how useful threaded inserts can be. https://youtu.be/G-UF4tv3Hvc.

    I had various ideas in mind as to how I could assemble the printer. Screws in inserts, screws in plastic, screws and nuts, and cable ties. My previous printer used cable ties quite extensively. Cable ties are alright but are not the strongest, neatest, or most maintainable. Screws in plastic are neat but aren’t very strong. They also tend to be easy to strip so maintenance on the printer is limited. Once you install and remove a screw once or twice it generally strips. Screws and nuts work well but nuts aren’t as convenient as inserts. Inserts are clean, convenient, strong and allow for multiple assemblies and disassemblies.

    Laser Cut Steel

    The main frame plates on the printer were made from 6mm steel plate. I chose laser cut steel because I hoped it would be strong, accurate, cheap and quiet.

    I want to be clear the strength of the frame is excessive. The steel frame has far more strength than a printer should ever need. The Prusa Mk3 printers use aluminium frames (I presume this may be to keep weight low for shipping?). Aluminium is great but doesn’t work for my design. I don’t have the skills or tools to weld aluminium and my design has a spot-welded frame.

    Laser cutting was used to ensure that the finished frame was square and accurate. I had all the sheet metal parts laser cut and etched. Small 3mm holes cannot be cut by a laser cutter. In these situations, centre marks were etched to ensure they were accurately positioned. I decided laser cutting was an affordable way to outsource accuracy. I could cut a frame myself however it was easier to use an already accurate machine to do all the precision work for me.

    I also hoped steel would make a quieter frame than my previous printers wooden frame. I thought that dense, small sections of frame may produce less noise than large wooden sheets. I have no real data or evidence to support this theory, it was merely based on personal observations and guesses. The finished printer was much quieter than my previous wooden design, whether this was due to the frame or not, I cannot really say.

    Price, steel seemed to be cheaper than aluminium. The pricing on the laser cutting seemed to suggest that the steel was going to be cheaper overall. The aluminium bed carriage cost around 40 - 50 dollars to cut one piece. The rest of the steel frame cost the remaining 20 dollars or so.

    Aluminium

    As previously mentioned, aluminium was used for the bed carriage. This was simply to reduce the mass of the moving bed carriage. Less mass on an axis is a good thing, it reduces ghosting, skipped steps, and allows for faster printing.

    The 3030 aluminium was chosen because it is common and cheap. In reality, I just used it because Prusa printers use it.

    Printed Components

    Printed parts were used as part of the frame. This was because 3D printed parts are easy, cheap and popular. Other printers use printed parts with great success. The printed parts don’t seem to be the limitation when it comes to 3D printing accuracy. ABS was used for all printed parts. This was to ensure that parts remained strong even when near the hotend or heated bed. All the plastics together used less than one kilogram of ABS, this fit with the goal of being affordable. 

  • Design Goals

    Luke Brandon07/27/2020 at 05:13 0 comments

    New Printer

    Design Goals

    Summary

    When designing my new 3D printer there were a few key goals I had in mind. Some of these goals were different to my last printer and some were just carried through from my last design. My new goals were to make the printer silent, good value and clean. Some goals that were inherited from the last design included high accuracy, reliability, and ease of use.

    I basically copied everything from the last printer that worked well and changed whatever did not.

    Silent

    Silence was the key goal for my new printer. My previous printer was about as loud as a 3D printer could be. The bearings rattled, steppers whined, and fans buzzed. This limited my effective printing time to hours where I was not going to be bothered by the noise. I could not print while studying or sleeping. The new design had to be quiet enough to study and sleep through. This would expand my printing production significantly.

    Accuracy

    Accuracy was another key requirement. The accuracy had to match that of a Prusa printer or similar production printer. My previous printer did not even produce prints that were square.  Large rectangular prints would come out looking more like a parallelogram. Since I offered 3D printing to people on Gumtree, I needed to be able to guarantee a degree of accuracy.

    Value for money

    My old printer was designed to be extremely strong and powerful. After having realised that this did not result in prints that were any better than other printers, I changed my mindset. This new printer was going to be more optimised. I would not pay for parts that would not improve print quality or meet design criteria.

    Reliable and Easy to Use

    My previous printer was easy to use and it worked nearly all the time. My new printer would inherit a lot of the same features. My goal was to minimise the amount of effort that needed to go into printing a part. This would make my small printing business more enjoyable.

    Clean

    My old printer was not the best-looking machine. Since I was making a new one, I decided I may as well make it look half decent. I wanted to machine to have a clean design, similar to a Prusa Mk3.

  • Background to the Project

    Luke Brandon07/25/2020 at 08:23 0 comments

    Background

    Why Build a 3D printer?

    I am a student

    Being an engineering student gives me a good excuse to waste months building stuff that I could easily buy online. I fully admit that buying a Prusa mk3 would have been a far better option than building a printer. This will not stop me from going on and justifying it anyway.

    As an engineering student, attempting personal projects is beneficial as I gain experience in the process. This means that I often attempt to build things rather than just buying them. Another advantage of being a student is the long holidays we get. I have the time to waste on designing and building a printer that is almost an exact copy of an existing printer.

    It was cheaper

    It was going to be fairly expensive to import a Prusa Mk3 into Australia. At the time of building it was going to cost around 1400AUD. The printer I built (minus enclosure) cost around 700AUD or there abouts.

    My previous design was getting old

    The previous printer I built and designed was getting old and ugly. It was time for an upgrade. In my spare time I offer a printing service on Gumtree. This old printer was starting to frustrate me and give me problems. This made it hard to continue my small business.

    Previous Printer

    It is clear from the list of pros and cons that my old printer was limited. The only reason I kept it for so long was that it did give pretty good results. It was a good first attempt a building a 3D printer. The lack of accuracy and loud operation killed it in the end. It was time for a new model.

    Pros

    • RGB (Can't argue with that)
    • It worked (Mostly)
    • Sturdy
    • First printer
    • Cheap

    Cons

    • Horribly loud (Have a listen below)
    • Wooden
    • Not even square
    • Old and ugly

View all 6 project logs

Enjoy this project?

Share

Discussions

Jan wrote 07/28/2020 at 09:05 point

Nice, thanks for your write-up (and the to-come articles!).
One thing which really amplifies noise is the coupling of the printer to the table. To be precise the table itself amplifies it significantly. CNC-Kitchen did a nice (actually two) video on it: https://www.youtube.com/watch?v=y08v6PY_7ak
But steppers and especially small fans do their best to kepp the noise level high, too :)

  Are you sure? yes | no

Luke Brandon wrote 07/28/2020 at 09:24 point

Yeah thats a really good point. I have actually seen those videos. My new printer has foam under each foot to minimise noise. It also uses silent steppers and noctua fans. Hopefully i will be able to post more information soon.

  Are you sure? yes | no

Dan Maloney wrote 07/27/2020 at 18:48 point

I really like the idea of a silent printer.

  Are you sure? yes | no

Luke Brandon wrote 07/28/2020 at 07:26 point

Yeah cool. I will hopefully get more information uploaded over the next little while

  Are you sure? yes | no

Alexiannamail wrote 07/27/2020 at 09:00 point

Very well and neat designed! 

Consider also upgrading the controller board/stepper dirvers for even more quiteness!

  Are you sure? yes | no

Luke Brandon wrote 07/28/2020 at 07:26 point

I have used tmc2130 drivers for the X and Y axes. More details to come as I post more.

  Are you sure? yes | no

Similar Projects

Does this project spark your interest?

Become a member to follow this project and never miss any updates