Close
0%
0%

Analog Speedometer Using Arduino and IR Sensor

The project describes an analog speedometer where we have used IR Sensor to calculate speed.

Similar projects worth following
In this project, we have described how we can easily calculate speed using an IR sensor.

About Project

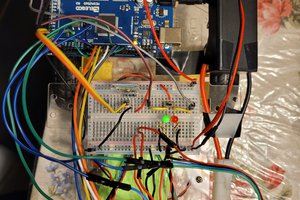
Here we have used IR Sensor which can recognize the presence of an object in front of it. We have also utilized two-blade rotors and put the IR sensor near it in a way that when the blades rotate every time the IR sensor recognizes it. We employ the support of timers and Interrupts in Arduino to estimate the time taken for one entire rotation of the motor. Here it is a two-blade rotor, which means the function will be ordered 4 times in one revolution.

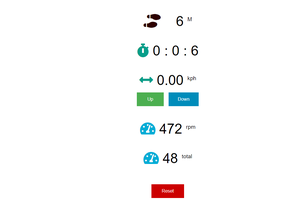
We can measure the RPM by utilizing the formulae, Where 1000/time taken will give us the RPS and multiplying it with 60 will give us the RPM.

rpm = (60/2)*(1000/(millis() - time))*REV/bladesInFan;

From this we get RPM then speed can be estimated by below formula:

Speed = rpm * (2 * Pi * radius) / 1000

Before putting the values, we need to convert radius from inches to meters

radius = ((radius * 2.54)/100.0) meters

Speed= rpm * 60.0 * (2.0 * 3.14 * radius)/ 1000.0) in kilometers per hour

Here we have worked with a 4 wire bipolar stepper motor for analog meter, which is having 200 steps per revolution.

Now we need to show 280 Kmh on the speedometer. For this stepper motor requires to move 280 degree

Here we have maxSpeed = 280 so the steps will be,

maxSteps = 280/1.8 = 155 steps

In the Arduino code, a map function is used to map speed into steps.

Steps = map(speed,0,maxSpeed,0,maxSteps);

After counting steps we can easily apply these steps in stepper motor function to drive a stepper motor.

  • 1 × Arduino Uno
  • 1 × Stepper Motor Bipolar
  • 1 × L298n Motor driver
  • 1 × IR Sensor Module
  • 1 × 16x2 LCD

View all 8 components

  • 1
    Run a Program

    #include
    LiquidCrystal lcd(A5,A4,A3,A2,A1,A0);
    #include
    const int stepsPerRevolution = 200; // change this to fit the number of steps per revolution
    Stepper myStepper(stepsPerRevolution, 8, 9, 10, 11);
    volatile byte REV;
    unsigned long int rpm,RPM;
    unsigned long st=0;
    unsigned long time;
    int ledPin = 13;
    int led = 0,RPMlen , prevRPM;
    int flag = 0;

    int flag1=1;
    #define bladesInFan 2
    float radius=4.7; // inch
    int preSteps=0;
    float stepAngle= 360.0/(float)stepsPerRevolution;
    float minSpeed=0;
    float maxSpeed=280.0;
    float minSteps=0;
    float maxSteps=maxSpeed/stepAngle;

    void setup()
    {
    myStepper.setSpeed(60);
    Serial.begin(9600);
    pinMode(ledPin, OUTPUT);
    lcd.begin(16,2);
    lcd.print("Speedometer");
    delay(2000);
    attachInterrupt(0, RPMCount, RISING);
    }

    void loop()
    {
    readRPM();
    radius=((radius * 2.54)/100.0); // convering in meter
    int Speed= ((float)RPM * 60.0 * (2.0 * 3.14 * radius)/1000.0);
    // RPM in 60 minute, diameter of tyre (2pi r) r is radius, 1000 to convert in km
    int Steps=map(Speed, minSpeed,maxSpeed,minSteps,maxSteps);

    if(flag1)
    {
    Serial.print(Speed);
    Serial.println("Kmh");
    lcd.setCursor(0,0);
    lcd.print("RPM: ");
    lcd.print(RPM);
    lcd.print(" ");
    lcd.setCursor(0,1);
    lcd.print("Speed: ");
    lcd.print(Speed);
    lcd.print(" Km/h ");
    flag1=0;
    }
    int currSteps=Steps;
    int steps= currSteps-preSteps;
    preSteps=currSteps;
    myStepper.step(steps);
    }

    int readRPM()
    {
    if(REV >= 10 or millis()>=st+1000) // IT WILL UPDATE AFETR EVERY 10 READINGS or 1 second in idle
    {
    if(flag==0)
    flag=1;
    rpm = (60/2)*(1000/(millis() - time))*REV/bladesInFan;
    time = millis();
    REV = 0;
    int x= rpm;
    while(x!=0)
    {
    x = x/10;
    RPMlen++;
    }
    Serial.println(rpm,DEC);
    RPM=rpm;
    delay(500);
    st=millis();
    flag1=1;
    }
    }

    void RPMCount()
    {
    REV++;
    if (led == LOW)
    {
    led = HIGH;
    }
    else
    {
    led = LOW;
    }
    digitalWrite(ledPin, led);
    }

View all instructions

Enjoy this project?

Share

Discussions

Similar Projects

Does this project spark your interest?

Become a member to follow this project and never miss any updates