| HARDWARE | |||
|---|---|---|---|
| 5 | JLCPCB | $ 2 | |
Have you ever thought about making Arduino boards out by simple components? Or have you ever thought about creating a customized development board for your needs?
This project will show you how to DIY an Arduino Board
Step 1: Design Schematics
There are many ways to make your own Arduino board, such as making PCB board for welding, using prototype universal board for welding, or inserting components directly into a breadboard.

List Materials;
1 voltage regulator; It is used to provide 5V power to Arduino to realize the function of the voltage stabilizing filter circuit.
2 16Mhz crystal oscillator;
3 22pF Capacitor;
4 an LED
Step 2: Upload the Boot Loader to the Blank ATmega Chip

This step loads the bootstrap for the Arduino for the blank ATmega chip.
There are already Arduino bootstrappers on the chip that can ignore this step. You can use an Arduino development board to boot the loader into a blank chip for the chip load loader, or you can use the AVR loader to load the loader. We will explain both approaches below.
Step 3: Use the AVR Loader to Load the Program
All you have to do is buy an AVR loader to upload the bootloader to any type of ATmega chip and plug the blank chip into the socket on your Arduino board.
As shown above, connect the loader to the Arduino. Find the installed Arduino folder "hardhardino-> arduino-> avr-> boards.txt". Then check the name of the chip in the document and the boot program (Duemilanove/Uno)(if you are using a blank ATmega328P chip, you can ignore this step).
Check the following parameter values on it: HFUSE, LFUSE, EFUSE. Now we will set the fuse bit for the blank chip, open the command prompt (Windows user) or the command line window (Linux user), and paste the following command:

Note: Specify values to high_fuses, low_fuses, extended_fuses. If the chip to be burned is not ATmega328 IC, please change "m328p" to the name of your chip in the command.
Next, upload the bootloader or hexadecimal file using the following command. Go to the program file or the path of the boot loader "/ hardware/Arduino/Avr bootloaders/at mega", from the command prompt or the command line "hex filename. Hex" replacement for your file.

The file will now be successfully uploaded to the ATmega chip
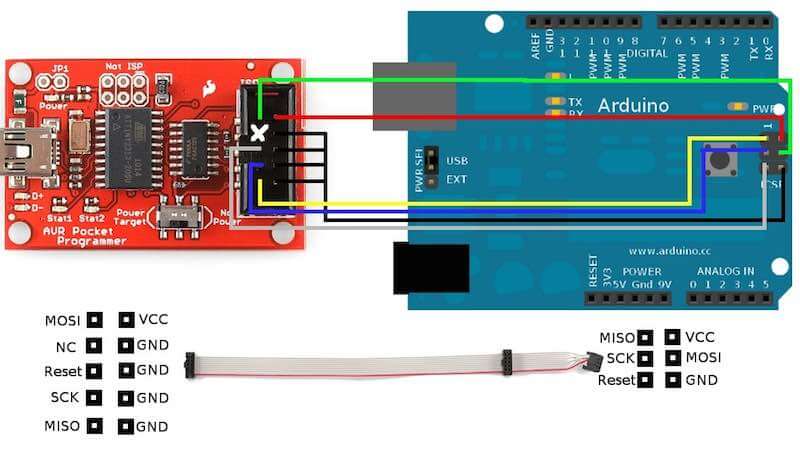
Step 4: Use Another Arduino As an ISP

If you plan to bootstrap the chip with another Arduino development board, follow the diagram above to connect.
Here you need two Arduino boards: one for the Arduino board as an ISP, and the other for inserting a blank ATmega chip. We used the ICSP(circuit Serial programmer) pin on the Arduino to burn the blank chip. After the connection is completed, connect the Arduino that serves as a burner to your PC. Next, open the Arduino IDE and enter the Tools menu. Select Burn Bootloader and click Arduino from its options as an ISP. Now, blank chips will burn. This method requires the correct configuration of the chip specified in boards. TXT to work.
Now we have a homemade Arduino board loaded with an Arduino bootstrap. Use the Rx, Tx and Gnd pins to connect to the USB-UART TTL converter and connect it to your PC for use.
 Daniel Frausto
 Simon
Simon