Close
0%
0%

Display Server

Reuse old computer monitors to display static documents or art.

Similar projects worth following
ACTIVE DEVELOPMENT - RELEASE IN A COUPLE OF WEEKS (this line will be removed)

Don't throw out old LCD monitors, repurpose them to display static documents such as datasheets, schematics, and cheat sheets. For example, you can use several old monitors to display documentation while building projects.

When static documents are not needed, the system can download and display art.

The problem with big screens and multiple screens is that they're hard to work with:

  • New windows pop up and grab the cursor away from what you're doing
  • New windows pop up in the wrong screen or inconvenient positions
  • It's easy to lose the mouse pointer (where is it?)
  • It's difficult for one computer to use more than two screens

This project uses a Raspberry Pi to display static documents on old monitors. Using this system, monitors placed anywhere can show documents as needed, sent from your main computer.

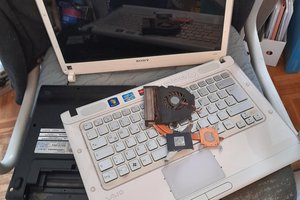
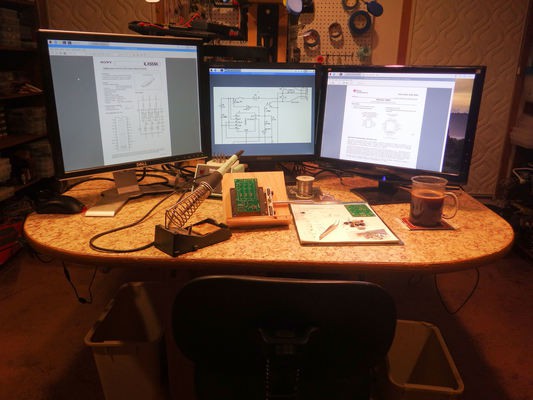
For example, three or four display servers on your workbench can display datasheets or schematics while you work.

The basic system consists of a Raspberry Pi (any version), a monitor, and the software from this project. Any file sent to the Display Server will be displayed, and this may be accomplished by:

  1. Remote copy (scp) of a file to the Display Server system
  2. Local copy of a file to a locally mounted remote directory (samba share)
  3. Transfer by html web page hosted on the Display Server
  4. Web socket interface

The project supplies utility commands which aid in the copy process: a program to take a screenshot and send it to the remote display, a program to watch a file and copy new contents when modified, and a program to "paste" a selected file from the clipboard.

When not in use as a document display, the system can be set to display art images from the internet.

Everything in the project is under the MIT license, which means that anyone can take and reuse anything in the project for any purpose - without attribution.

LICENSE.txt

The MIT license used throughout the project

plain - 1.58 kB - 08/31/2020 at 14:17

Download

  • 1 × Raspberry pi Any version of RasPi with wireless should work seamlessly. Versions without WiFi (Pi versions 1 and 2) will need to be configured without using the built-in configuration system.
  • 1 × Raspberry Pi power supply Different Pi models use different supplies - be sure to get the right kind for your system
  • 1 × Monitor Any DVI or HDMI monitor should work seamlessly.
  • 1 × 16GB memory card The base Raspbian GUI build is 7.4GB (!) and the DisplayServer installs a bunch of utilities on top of this, which pushes the total build over 8GB
  • 1 × Six inch HDMI video cable Velcro the RasPi to the back of the monitor and use a short cable for a packaged system.

View all 7 components

  • Making good web pages is hard!

    Peter Walsh10/19/2020 at 18:04 0 comments

    Project is procceding apace.

    I have software that runs on a RasPi, so that

    1. When the user presses a button the system switches to AP mode with an SSID of the name of the system.
    2. Connecting to this AP brings up a configuration web page
    3. Pressing buttons &c on the web page causes configuration changes on the RasPi
    4. I am complete rubbish at making web pages that look good!

    Anyone care to lend a hand formatting a web page?

  • Back on the wagon

    Peter Walsh10/16/2020 at 13:28 0 comments

    Back on the project after a brief hiatus (Mother Nature - she seduced me with her feminine wiles).

    I have a work process for developing RasPi utilities for my customers, and spent some time organizing and separating things into logical areas - each area is similarly constructed with a similar install procedure, which makes it easy for me.

    One area will be a separate GitHub project: "AppDaemon", which is a daemon that monitors other applications. This is for high reliability systems where the RasPi is not readily accessible such as a media server in the attic, or buried within a larger piece of equipment.

    The intent is that a user application might crash, hang, or otherwise go bad in ways that the programmer doesn't expect, but rebooting the RasPi will fix the problem. This was a particular problem with one customer using a cell modem on the RasPi - the cell connection could crash or hang for all sorts of reasons, and in ways that were not readily visible to the user application. An easy solution was to just have a separate process monitoring the process using the cell connection, and reboot if something went wrong.

    As a bonus the AppDaemon monitors a GPIO (button) input, and can put the RasPi in AP mode for system configuration. Setting up a computer for first time initialization is a problem for many customers - when the end-user purchases your product, how do they configure the system to connect to their local wifi? How do they name the system (if they have more than one) so they know which is which?

    Press the button and see an AP on your phone or other computer that you can connect to, and set the parameters of the system on first boot.

    Switching the RasPi into AP mode is tricky, so I figure this might be useful to other developers. Hence: separate GitHub project.

  • Oops - forgot to document the license

    Peter Walsh08/31/2020 at 14:00 0 comments

    Contest rules say to document any open source licenses - but how do we do this?

    All the software modules in the system (about 20 of them) have license text at the top, reproduced below. There's also a separate file LICENSE.txt in the project space (next to README.txt file and INSTALL.txt) with a separate copy.

    The MIT license I use is less restrictive than the CC licenses - you can take the project and use or modify any portion of it for any purpose without notice.

    For anyone at a company whose lawyers have any doubts, drop me a note and I'll E-mail back a specific waiver granting your company free and open access to the project.

    ########################################################################
    ##
    ## MIT LICENSE
    ##
    ## Permission is hereby granted, free of charge, to any person obtaining a copy of
    ## this software and associated documentation files (the "Software"), to deal in
    ## the Software without restriction, including without limitation the rights to
    ## use, copy, modify, merge, publish, distribute, sublicense, and/or sell copies
    ## of the Software, and to permit persons to whom the Software is furnished to do
    ## so, subject to the following conditions:
    ##
    ## The above copyright notice and this permission notice shall be included in
    ## all copies or substantial portions of the Software.
    ##
    ## THE SOFTWARE IS PROVIDED "AS IS", WITHOUT WARRANTY OF ANY KIND,
    ## EXPRESS OR IMPLIED, INCLUDING BUT NOT LIMITED TO THE WARRANTIES OF
    ## MERCHANTABILITY, FITNESS FOR A PARTICULAR PURPOSE AND NONINFRINGEMENT.
    ## IN NO EVENT SHALL THE AUTHORS OR COPYRIGHT HOLDERS BE LIABLE FOR ANY
    ## CLAIM, DAMAGES OR OTHER LIABILITY, WHETHER IN AN ACTION OF CONTRACT,
    ## TORT OR OTHERWISE, ARISING FROM, OUT OF OR IN CONNECTION WITH THE
    ## SOFTWARE OR THE USE OR OTHER DEALINGS IN THE SOFTWARE.
    ##
    ########################################################################

  • THinking through the project

    Peter Walsh08/31/2020 at 01:51 0 comments

    I didn't do any work on the project today (well... only a little) but went hiking instead. This gave me some time to think through some of the project issues.

    The goal isn't to make the project simple, it's to make it seamless. I want to have a project that's easy to install and easy to connect to. So for example, every time I add a samba share to any system I'm always fighting with the configuration for a couple of hours because it's completely opaque: something will be wrong and the only way to figure out what is to run the samba daemon in debug mode and sort through reams of log files.

    I realized today that I can make a separate user login that allows scp copies but doesn't allow ssh logins. This can exist as a separate user from pi, have no password, and also be the samba user with no password. If the user wants to do other stuff with his RasPi - such as an NAS or something - this will keep all the DisplayServer software out of the way.

    This might seem like a security risk, but the login cannot be logged into remotely - the only thing you can do is copy files to it (and also copy out), and the display server only allows a fifo of 10 files (configurable) in the directory anyway. I think I can set it up so that you can't locally log in to it on the RasPi system either, which means to do anything you have to a) have physical access, or b) log in to the RasPi using another login and su to that ID. Both cases will give you complete control of the system without the extra user ID, so it's not any more of a security issue than you started with. But it makes the scp and samba connections almost trivial.

    (Just checked online and samba without password is a thing, so it's not completely unreasonable.)

    Then the app server that monitors the GPIO and switches to AP mode for configuration should be a separate GitHub project. That might be something people want outside of the Display Server software, so making it a separate project will give them an opportunity to do that.

    (Both projects will be bundled up in one file for the .IO project here.)

    I'm already bundling the project up as installation scripts to make it easy for people.

    Ideally I would just host a configured disk image, but the current Raspbian is just shy of 8GB, and the added extra stuff (mostly apt-get installs that my system needs) pushes it over 8GB.

    Anyone know a place where I can host a 10GB file for free?

  • Marketing, shmarketing

    Peter Walsh08/29/2020 at 23:03 1 comment

    I spent the day running up three working Display servers for picture taking.

    Everything seems to be working, except for a lot of tiny details that need to be ironed out: the samba share doesn't have the right permissions, the target login user doesn't have access to the X-server display, the Pi 4 build doesn't work on a Pi 3 and vice versa (different wlan driver, I suspect, and a simple apt-get upgrade might fix this).

    I haven't run down any of the details because I wanted to get images for the project.

    Three days left, and I think what I'll do is finish most of the documentation and images, work the bugs out of the system up to the HAD prize deadline, then take a few days to decompress and clean up around the house.

    Here's the money shot for the Display servers.

  • Project coming along nicely

    Peter Walsh08/27/2020 at 23:14 0 comments

    I have a build that runs the display server, and when a button is pressed (GPIO12, configurable) the system switches to AP mode and any device that connects gets routed to a configuration page. That page doesn't yet have contents, but switching between the base server (for documants) and a config page seems to work OK.

    For reference: anyone who wants the ability to set the RasPi to AP mode showing a config page can use this project as a template.

    I have a singleton script that will configure the RasPi samba server based on the user's preferences (which the config web page will invoke when complete), and this seems to correctly configure the RasPi for remote directory mounting. Typing:

    ConfigureSamba --user=someone --password=some-pw --workgroup=some-group

    ConfigureSamba --user=someone --password=some-pw --workgroup=some-group

    will automatically set up this samba user, set the user's workgroup, *and* restart the samba demons.

    The display server is working, and will correctly display files in the directory on startup, and will notice and display subsequent files when delivered to the remotely mounted. Have to work out some details, such as maximizing the PDF reader once started.

    I have an application "Screenshot" which is available as part of the project (in the remote-mapped directory) which will take a local screenshot and automatically copy it to the Display server it came from, and this works.

    Minor bug: server doesn't recognize (and therefore doesn't display) image files, so displaying a screenshot doesn't work quite yet.

    All in all, the project is coming along quite nicely!

  • Switching to AP mode

    Peter Walsh08/26/2020 at 22:41 0 comments

    Work on the system is proceeding apace, I hope to get the project working in its initial form before the HAD prize cutoff in... let's see here... five days. EEK!

    This is really a Hail Mary for the Hackaday prize, but if it keeps a bunch of monitors out of landfills I'll consider that a win.

    I'm just now working up a RasPi configuration setup so that any user can install and configure the system without hassle. Here's how it'll work:

    Press a button, and the system will stop the display server and set up an access point. When the user connects to the AP, any web page access will show the local configuration page. This will have panels that allow the user to set the system name, samba user and password, wifi configuration, and so on.

    Rebooting, the system should have all the configuration settings the user needs to use the system.

    To summarize:

    1) Press a button on the RasPi

    2) The LED blinks, indicating that the system is in config mode.

    3) From another wifi-enabled device (phone, pad, laptop) the user will see a new AP with the same name as the RasPi system.

    4) The user connects to the AP

    5) Run any browser to see the configuration pages.

    6) Set whatever configuration the user needs, such as the user's wifi password

    7) Reboot the RasPi to go back to Display Server mode.

  • Getting started

    Peter Walsh08/25/2020 at 23:01 0 comments

    Whelp, the HAD prize is about saving the planet (or humanity) this year, and I just now decided to build a display server to make building my own projects easier, and the project would allow people to reuse/repurpose old LCD monitors, and LCD monitors form part of E-waste that we (as a species) need to do something about, so...

    I'm just getting started with the project, so nothing but a skeleton exists.

    I've already done much of the needed software for existing clients, so most of this should be just pulling together what I've already got.

    More to come later...

View all 8 project logs

  • 1
    Basic usage

    ACTIVE DEVELOPMENT - RELEASE IN A COUPLE OF WEEKS (this line will be removed)

    Basic usage

    The Display server is a Raspberry Pi system for document display. Documents sent to the Display system will be shown on the LCD screen.

    One easy way to send a document is by remote copy:

    scp NE555Timer.pdf Display@Display01:NE555Timer.pdf 

    Once copied, the file "NE555Timer.pdf" will pop up on the RasPi display as if opened by the user.
     

    Even easier usage

    We can reduce typing by using an alias:

    export D01IP="IP-address-of-display01"
    export D01PW="password-for-display01"
    alias d01="sshpass -p $D01PW scp $1 Display@$D01IP:$1"

    Now we can just type "D01 <some file>" and the file will magically appear on the remote display system:

    d01 NE555Timer.pdf

    Multiple Display servers can be used to display multiple documents. This can useful while assembling projects - you can display datasheets, schematics, cheat sheets, or anything useful as reference:

    d01 NE555Timer.pdf
    d03 Schematic.jpg
    d03 GPIOPinout.jpg

    For this, you will need to build and configure multiple display servers. For example, each display server will need your wifi ID ans password to be visible on your local network.

    Building and configuring a Display server are described in later sections.

  • 2
    Shared directories

    Shared Directories

    You can access the Display server by mounting it as a shared directory.

    How to do that is explained in another section. For now, let's assume that we have three display servers mounted as /mnt/Display01, /mnt/Display02, and /mnt/Display03.

    Looking at /mnt/Display01 we see the following:

    > ls /mnt/Display01
    bin  NE555Timer.pdf  NE592VideoAmp.pdf
    
    > ls /mnt/Display01/bin
    Paste Screenshot Watch
    
    >
    

    The remote directory contains two files previously copied, and a "bin" directory. In bin we see three commands: "Paste", "Screenshot", and "Watch".

    Screenshot will take a screenshot of your current window and send it to the display server as an image. When attached to a keyboard key it will allow you to display windows that aren't file documents.

    Suppose you attach the screenshot command to "Ctrl-Alt-Print Scrn" on your keyboard. Now when you're working on a Kicad schematic you can simply press Ctrl-Alt-Print Scrn and have that schematic appear on the Display server.

    Pretty neat, huh?

    Pasting files


    Another operation you can attach to a key is "Paste", which will paste the selected file to the Display server. This acts just like "pasting" a file in your file manager, except that the file goes to the Display server.

    Watching files

    You can also use the "Watch" command to monitor when a file changes. When the command detects that the monitored file has changed, it automatically copies the new file to the Display server.

    Suppose you "Watch" an .html file on the local system:

    > /mnt/Display01/bin/Watch    index.html  &
    Watching index.html for changes...
    
    >

    Now open the file in an editor, and every time the file is saved the changed output will be shown on the Display server.

    Also neat, right?

    Multiple Display Servers

    By default the commands will put files in the directory "one up" from where the executable is.

    If you copy the executables to a local directory that won't work so in that case you can use the "target-dir" option to explicitly set the destination.

    This example shows how to Screenshot to a specific DisplayServer, using a copy of the command on the local system:

    > ~/bin/Screenshot  --target=/mnt/Display02

View all instructions

Enjoy this project?

Share

Discussions

Similar Projects

Does this project spark your interest?

Become a member to follow this project and never miss any updates