 Oualid Burström
Project description
The initial goal of this project was to build a 4 DOF robotic arm by using standard parts from Amazon. The body of the robotic arm is mainly built by using aluminium profile.
The gripper is 3D printed.
The actuators are four Nema17 stepper motors.
The gripper is controlled by a servo motor.
Optionally the robotic arm can be controlled by using a Playstation 2 joystick. To prevent exceeding the limits micro switches are used.
The transmission is based on Aluminum timing pulley and timing belt.
The robotic arm is controlled by Arduino Mega.
The second part of the project was to implement object identification by using deep learning Tensorflow CNN.
A webcam sends images to Raspberry Pi 4 in real time and Tensorflow CNN identifies the object then a python script sends the information of which sequence will be executed to Arduino.
I will try to give as much information as possible, in this way other people can build a similar robotic arm and implement object identification.
The robotic arm
You can find a list of components that are needed to build the robotic arm in the file
Robotic arm components.pdf document.
Robotic arm assembly
By using Aluminium profile the building of the robotic arm becomes modular. This means that you can easily modify the positions of the parts easily. Please take a look at the different views of the assembly.
Link to tinkerCAD: https://www.tinkercad.com/things/3Wh4eA3mDdw
The gripper is 3D printed.
You can download the STL files on https://www.thingiverse.com/thing:2661755/files
The hardware
The hardware consists of one Arduino Mega for controlling the stepper motors and a Raspberry Pi 4 for running TensorFlow CNN for object identification.
Communication between Arduino and Pi is done via I2C.
We have fours stepper motors. They are used to move the base, shoulder, elbow and the wrist.
For homing the stepper motors there are eight micro switches, two for each stepper motor.
The homing is done every time the system is initialized.
For free running a PS2 controller is used and for preventing exceeding the limits the same micro switches used for homing are used.
Initially I used Easydriver to drive the stepper motors, then I changed to TB6600.
Please take a look at the schematics. I used Fritzing to draw it.
The software
Arduino code
I use the excellent library AccelStepper to control the stepper motors.
For PS2 controller I use PS2X_lib.
You can find the code on Github: https://github.com/ouaburst/4DOF-robotic-arm-arduino
AccelStepper: https://www.airspayce.com/mikem/arduino/AccelStepper/
PS2X_lib: https://github.com/simondlevy/PS2X_lib
Tensorflow CNN
To identify the objects I used TensorFlow CNN (Convolutional Neural Network) on Raspberry Pi.
(CNN) are the foundation of implementations of deep learning for computer vision, which include image classification. TensorFlow lets you build CNN architectures with tremendous flexibility, for tasks like image classification and object detection.
The steps I took to get it running are described on these pages:
Setup and run the environment on Windows10:
http://wiki.obkonsult.com/index.php/TensorFlow%27s_Object_Detection_API
Setup and run the environment on Raspberry Pi:
http://wiki.obkonsult.com/index.php/Install_Tensorflow_on_Raspberry_pi
Well, the task wasn’t obvious. You need to be careful when setting up the environments.
There are constantly new releases of TensorFlow and can cause compatibility issues with other packages.
To train the model you need an adequate GPU. In my computer I have a Nvidia GeForce GTX 1060 6GB. It took about eight hours to train the model.
If you have a weak GPU on your machine you can always use Google Colab.
It took time to find a model that was enough fast onRaspberry Pi.
Because of the limitation of Raspberry Pi it is important that the model is light.
In the end I found out that the model...
Read more »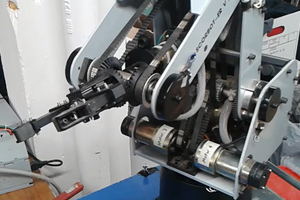
 John Duffy
 TinHead
 Larry W.