Close
0%
0%

IoT Digital Thermometer using LM35 and NodeMCU

Here we will make a web server to display the temperature using LM35 as a temperature sensor.

Similar projects worth following
We can use different methods to display the temperature using LM35 but here we will make the separate webserver to display the estimated temperature with the LM35 sensor.

About Project

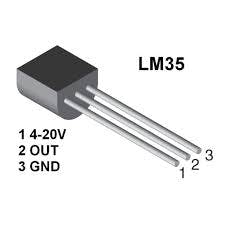
LM35 Temperature Sensor

LM35 sensor is an analog linear temperature sensor. Its output is equivalent to the temperature. LM35 is an analog sensor so we have to change this analog output to the digital output. For this here we use the ADC pin of NodeMCU which is described as A0. We will attach the output of LM35 to A0.

We have 3.3 V as output voltage on NodeMCU’s pins. So, we will utilize 3.3V as Vcc for LM35.

HTML Code to display Temperature on WebPage We are now going to display temperature on a separate webpage so that we can easily access from anywhere with the help of the internet

WiFiClient client = server.available();
client.println("HTTP/1.1 200 OK");
client.println("Content-Type: text/html");
client.println("Connection: close");  // the connection will be closed after completion of the response
client.println("Refresh: 10");  // update the page after 10 sec
client.println();
client.println("<!DOCTYPE HTML>");
client.println("<html>");
client.print("<p style='text-align: center;'><span style='font-size: x-large;'><strong>Digital Thermometer</strong></span></p>");
client.print("<p style='text-align: center;'><span style='color: #0000ff;'><strong style='font-size: large;'>Temperature (*C)= ");
client.println(temp_celsius);
client.print("<p style='text-align: center;'><span style='color: #0000ff;'><strong style='font-size: large;'>Temperature (F) = ");
client.println(temp_fahrenheit);
client.print("</p>");
client.println("</html>");
delay(5000);
}

After uploading the code, open the serial monitor and hold the Reset button on NodeMCU. Now the board is connected to the Wi-Fi network which you have specified in your code and also you got the IP.

Copy and paste this IP in any web browser. Make assure that your system on which you are running the web browser should be connected to the same network. Then the temperature will be restored automatically in a web browser after every 10 Sec.

  • 1 × NodeMCU - ESP12
  • 1 × LM 35 Temperature Sensor
  • 1 × Male Female Connectors
  • 1 × Breadboard Electronic Components / Misc. Electronic Components

  • 1
    Run a Program
    #include <ESP8266WiFi.h>
    const char* ssid     = "*********"; // Your ssid
    const char* password = "***********"; // Your Password
    float temp_celsius = 0;
    float temp_fahrenheit = 0;
    WiFiServer server(80);
    void setup() { Serial.begin(115200);  pinMode(A0, INPUT);   Serial.println();
    Serial.println();
    Serial.print("Connecting to ");
    Serial.println(ssid);
    WiFi.begin(ssid, password);
    while (WiFi.status() != WL_CONNECTED) {
    delay(500);
    Serial.print(".");
    }
    Serial.println("");
    Serial.println("WiFi is connected");
    server.begin();
    Serial.println("Server started");
    Serial.println(WiFi.localIP());
    }
    void loop() {
    temp_celsius = (analogRead(A0) * 330.0) / 1023.0;   // To convert analog values to Celsius We have 3.3 V on our board and we know that output voltage of LM35 varies by 10 mV to every degree Celsius rise/fall. So , (A0*3300/10)/1023 = celsius
    temp_fahrenheit = celsius * 1.8 + 32.0;
    Serial.print("  Temperature = ");
    Serial.print(temp_celsius);
    Serial.print(" Celsius, ");
    Serial.print(temp_fahrenheit);
    Serial.println(" Fahrenheit");
    
    WiFiClient client = server.available();
    client.println("HTTP/1.1 200 OK");
    client.println("Content-Type: text/html");
    client.println("Connection: close");  // the connection will be closed after completion of the response
    client.println("Refresh: 10");  // update the page after 10 sec
    client.println();
    client.println("<!DOCTYPE HTML>");
    client.println("<html>");
    client.print("<p style='text-align: center;'><span style='font-size: x-large;'><strong>Digital Thermometer</strong></span></p>");
    client.print("<p style='text-align: center;'><span style='color: #0000ff;'><strong style='font-size: large;'>Temperature (*C)= ");
    client.println(temp_celsius);
    client.print("<p style='text-align: center;'><span style='color: #0000ff;'><strong style='font-size: large;'>Temperature (F) = ");
    client.println(temp_fahrenheit);
    client.print("</p>");
    client.println("</html>");
    delay(5000);
    }

View all instructions

Enjoy this project?

Share

Discussions

Similar Projects

Does this project spark your interest?

Become a member to follow this project and never miss any updates