Where's all the information?
I haven't fully-populated this project page yet, but please see the github repo for more details:
https://github.com/gfoot/compvideo6502
There are also some videos on my YouTube channel that show this working, for example the one linked below at the end of this description.
And please do let me know if you're interested, as I can prioritize giving more information here and a deeper dive into how it all works!
What was V1?
In case you're curious, V1 was my first effort at video output, and it worked pretty well. It was built much like Ben Eater's scheme, but using 12-bit counters (4040BE) so I only needed two of them; then, as in Ben's video, logic gates to detect specific count values and do things like send sync pulses, start outputting a line of video, etc. It worked pretty well, but was inflexible - changing the timings required completely reworking all the logic gates, and that's what I sought to fix for this version, V2.
How is this V2 version different?
In this version, instead of having one central counter, each individual timed element has its own down-counter. Instead of using logic gates to determine the end of the count, we program the downcounters with specific values to count down from. Then when they hit zero, the event should happen; and they're all reset either at the start of a field, or the start of a line, or by some other downcounter, on a case-by-case basis.
The end result is that you can reconfigure the timings easily by moving certain links on the breadboard, connecting different pins high and low. It'd also be rather simple to connect up some 8-bit registers, e.g. 74HCT273s, and let the CPU itself define the timings dynamically. This is pretty close to how something like a 6845 CRTC used to work many years ago.
Future plans
I'm also considering a V3 with a planar memory architecture like old-school EGA, and hardware assists for writing to video memory, to take some load off the 6502 and allow it to work more effectively with higher colour depths and resolutions. Right now the 6502 itself is really the bottleneck, both in terms of address space for video memory, and the rate at which it can write to it.
Example video
Here's the video I mentioned above showing this video output circuit in action - towards the second half of this short video:

 Hayden Kroepfl
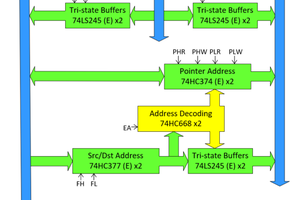
 Matt Stock
 Marcel van Kervinck
SD cards on a 6502 breadboard comp? Talk about technological cognitive dissonance!