A BIG BONUS OF NEXTPCB
The NEXTPCB want offer 10 units of this Arduino compatible PCB for your projects in your first order with the link: Earn my PCBs Arduino Compatible.

Below is the 3D View of the NEXTPCB Arduino compatible Printed Circuit Board.

Introduction
Introduction
Temperature is a physical quantity that measures the degree of agitation of the particles of a given physical body.
It is an important variable in the physical world that interferes in the most diverse processes such as data centers, chemical and pharmaceutical industries, etc.
That is why monitoring it is extremely important, either to display the values on a display or to issue alerts if the temperature exceeds a certain set point.
So in this article, we will learn how to develop a thermometer with an ATTiny 85, a temperature sensor LM35, and an OLED display.
We will use the ATTiny 85 microcontroller, as it is a low-cost microcontroller and as we will use few I / O pins, it meets our specifications.
Attiny 85 is an 8-bit microcontroller, it features several peripherals such as I2c, SPI, analog inputs, PWM outputs, it does not have native serial communication, but it is possible to emulate it by software.
It features 8 pins, so it is a great microcontroller for portable applications due to its low power consumption.

Therefore, through this article you will learn:
Carry out the assembly of the basic circuit for recording the ATTiny 85 microcontroller on the protoboard with the Lm 35 sensor and OLED display.
- Carry out the assembly of the basic circuit for recording the ATTiny 85 microcontroller on the protoboard with the Lm 35 sensor and OLED display.
Use of a new microcontroller different from the microcontrollers on the Arduino board.
- Use of a new microcontroller different from the microcontrollers on the Arduino board.
How to record ATTiny 85 with the Arduino IDE.
- How to record ATTiny 85 with the Arduino IDE.
Use of the Arduino Uno board as an ISP recorder to record the ATTiny 85;
- Use of the Arduino Uno board as an ISP recorder to record the ATTiny 85;
Earn your first NEXTPCB Arduino Compatible Board.
Now, we will start the complete presentation of the development of the Thermometer project with the ATTiny 85 and OLED display.
Developing the Thermometer Project with the ATTINY85 Microcontroller and OLED Display
Developing the Thermometer Project with the ATTINY85 Microcontroller and OLED Display
As previously mentioned, the project consists of creating a thermometer with the ATTiny 85 microcontroller, OLED display, and the LM 35 temperature sensor.
Before starting to assemble the ATTiny 85 circuit for recording on the protoboard, we will perform some procedures in the Arduino IDE to be able to record ATTiny 85 with the Arduino IDE.
Step 1: Copy the URL below:
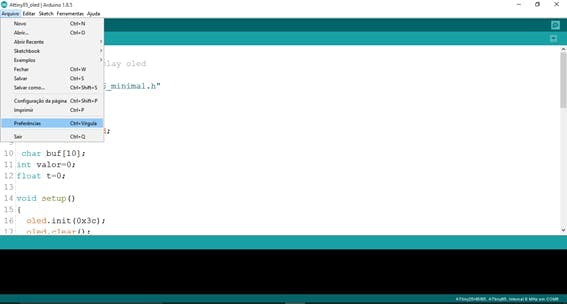
Step 2: Open the Arduino IDE click on Files -> Preferences as shown in figure 2
Step 3: After clicking on preferences it will open the screen of figure 3. In additional URLs, we paste the URL copied in step 1.

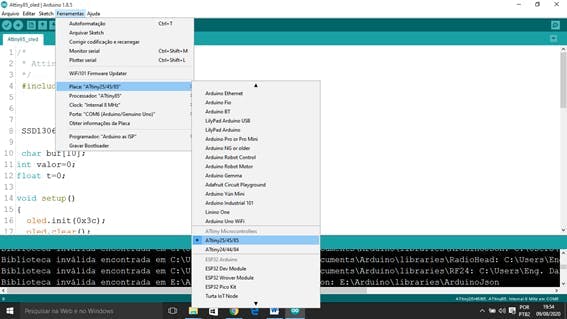
Step 4: Click ok and click Tools and boards and board manager as shown in figure 4.

Step 5: After clicking on board manager, the screen of figure 5 will open and we will type Attiny85.
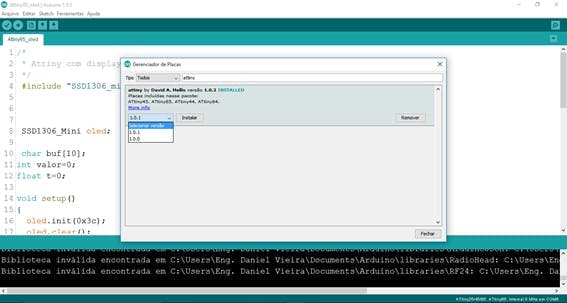
Step 6: Select version 1.0.1 and click on install, wait for the process to complete, and click on close.
Step 7: Close the Arduino IDE and open it again to check if ATTiny 85 was installed correctly.
The installation of Attiny on the Arduino IDE has been completed, now we are going to perform the assembly on a protoboard to perform the recording of a sketch...
Read more »
 Esmacat
 Majed Abouhatab, P.E.
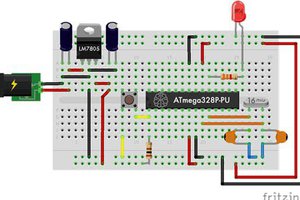
 Silícios Lab
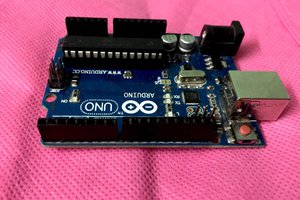
 ensafatef