Automatic lighting control is an automation system present in some industrial sectors, projects that need adequate monitoring, and even in homes, among others. An example is in the lighting poles present in some cities, which turn on automatically when in the late afternoon, the sensor no longer detects the presence of sunlight close to the sensor.
For many automation projects involving Arduino UNO, the Light Dependent Resistor is used, whose principle of operation is the variation of its resistance, as it is exposed to the lighting of an environment, that is, the resistance of the LDR is inversely proportional to the lighting.
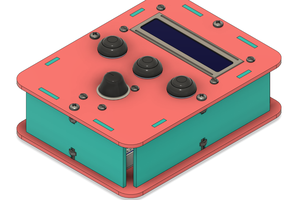
Thus, an application was developed in the case of the Didactic Robot Using the LDR Sensor, as shown in Figure 1.

Figure 1 - Case of the Didactic Robot Using the LDR Sensor.
With the development of this case of the Didactic Robot Using the LDR Sensor, you will learn both to assemble the basic circuit using the Arduino as in previous projects and to program it.
The Didactic Robot Using the implemented LDR Sensor has a simple structure, with the LDR sensor, 9 red Led's, 2 green Led's, 3 red Led's, 11 220Ω resistors, and one 10kΩ resistor.
The LDR sensor detects the presence of ambient light, and transmits the analog value through a voltage divider to the Arduino, which is responsible for processing the signal, and then activating the LEDs according to the variation of the light intensity. about the LDR.
In this article you will learn how to program the Arduino for this project and how to use the LDR sensor, this being an analog sensor with good accuracy.
Therefore, through this article you will learn:
- Know the structure of the Didactic Robot case using the LDR Sensor and the Analog LDR Sensor;
- Understand the operation of the Analog LDR Sensor well with the other devices in the case;
- Perform the Communication between the LDR Analog Sensor, the Led's, and the Arduino UNO;
- Couple the structure of the LDR Analog Sensor and other components to the didactic case developed.
- Earn 10 free NEXTPCB Arduino Compatible Boards.
Now, we will start the complete presentation of the development of the Didactic Robot Using the LDR Sensor.
Project Development Methodology
This project consists of presenting a didactic model of a robot using the LDR sensor with the UNO Arduino development board.
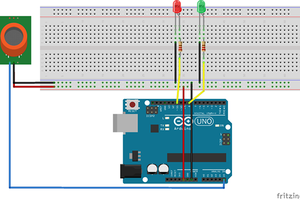
The project basically consists of the LDR sensor (which is a variable resistance device), responsible for detecting the presence of light in the environment, and through its housing, converting this light intensity into an analog signal, the Led's and the development board Arduino UNO, which will receive an analog signal sent by the sensor, supply the power so that the circuit can work and still process the received signals, as shown in Figure 2.

Figure 2 - Circuit proposed for the operation of the Didactic Robot Using the LDR Sensor.
The sensor detects the lighting in the environment through its housing and converts that luminous intensity into an analog voltage value, which is sent to the Arduino. Figure 3 illustrates the LDR schematic.

The LDR Sensor is basically constituted by a carcass of shape close to that of a cylinder trunk, however, flattened at two opposite ends, and two-three pins, responsible for the connection in the voltage and the 10kΩ resistor, being made at this point the divider of voltage responsible for the analog signal sent to the Arduino UNO.
According to its datasheet, the LDR has an inversely proportional relation to lighting, according to Figure 4.

Figure 4 - Resistance is a function of lighting.
Dessa maneira, é necessário captar o sinal analógico enviado por um dos pinos para o Arduino, para que possa ser convertido em um intervalo de 0 a 1023 (valor analógico).
Em seguida, é possível encontrar o valor de intensidade...
Read more »
 Andrew
 Silícios Lab