Do you know how to create the treasure hunt game? This game is very fun and I will teach you how to create this game with Arduino.
Are we going on a treasure hunt with the Arduino?
For this project, we will have a 64 position square map. This map will be represented by an 8x8 LED matrix. Through this map, the Arduino will choose a random position to hide the treasure.
In this project, you'll learn:
- How to configure and use the 8x8 LED Array with Arduino;
- How to use the randomSeed function with Arduino;
- How to scan the position in the 8x8 matrix with the Arduino;
- Produce, download, and earn your own NEXTPCB printed circuit boards with Arduino.
Now, we'll understand how to develop this game with Arduino.
How does this game work with Arduino?
This game can be played with one or several participants. Each participant has an attempt to find the position in which the treasure is hidden.
Initially, when turning on the system, the Arduino will randomly choose a position to hide the treasure. Then, each player must use the buttons shown in the Figure below.
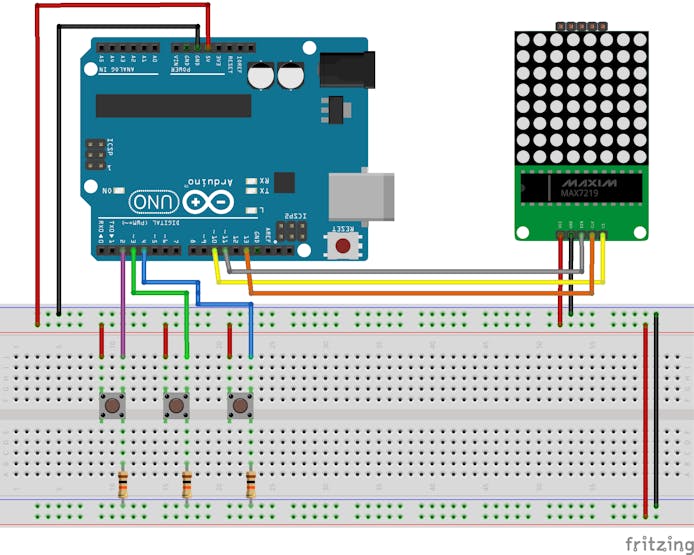
Figure 1 - Circuit of thetreasure hunt game with Arduino.
In this game, there are 3 buttons. One button will be used to scroll through the lines, the second will be used to scroll through the columns and the third will be used to select the position desired by the user.
After the user selects the position, the system will check if the chosen coordinate is the same as the coordinate where the treasure is hidden.
If it is wrong, the system will have a circle on the screen.
Otherwise, the system will display a circle to indicate that the user was correct.
The two videos above show how the hunt treasure game with the Arduino project works.
Now, we'll show how works the code and offer a printed circuit board for you to construct your own project, too.
Development of Project Programming Logic with Arduino
The code developed for this project is presented below.
#include <SPI.h>
#include <Adafruit_GFX.h>
#include <Max72xxPanel.h>

#define BOTAO_LINHA  2
#define BOTAO_COLUNA 3
#define BOTAO_SELECIONA 4

#define PINO_RANDOM A1

#define MAX7219_CS  10 // Attach CS to this pin, DIN to MOSI and CLK to SCK (cf http://arduino.cc/en/Reference/SPI )
#define QTD_MATRIZES_HORIZONTAIS 1
#define QTD_MATRIZES_VERTICAIS 1

Max72xxPanel matriz = Max72xxPanel(MAX7219_CS, QTD_MATRIZES_HORIZONTAIS, QTD_MATRIZES_VERTICAIS);

int linhaSorteada, colunaSorteada;

int linhaAtual, colunaAtual;

int linhaAnterior, colunaAnterior;

bool flagAcertou = false;

void setup() {
	matriz.setIntensity(4); // Set brightness between 0 and 15
	limparMatriz();

	pinMode(BOTAO_COLUNA, INPUT);
	pinMode(BOTAO_LINHA, INPUT);
	pinMode(BOTAO_SELECIONA, INPUT);

	randomSeed(analogRead(PINO_RANDOM)); // Initialize random generator

	Serial.begin(115200);
	Serial.println("Jogo_Matriz_8x8");

	inicializarJogo();

}

void loop() {
	while (digitalRead(BOTAO_SELECIONA) == LOW)
	{

		matriz.drawPixel(linhaAtual, colunaAtual, HIGH);
		matriz.write(); // Send bitmap to display

		if (digitalRead(BOTAO_LINHA) == HIGH)
		{
			linhaAtual++;

			if (linhaAtual > 7)
			{
				linhaAtual = 0;
			}

			delay(200);
		}

		if (digitalRead(BOTAO_COLUNA) == HIGH)
		{
			colunaAtual++;

			if (colunaAtual > 7)
			{
				colunaAtual = 0;
			}

			delay(200);
		}

		if ((linhaAtual != linhaAnterior) || (colunaAtual != colunaAnterior))
		{
			matriz.drawPixel(linhaAnterior, colunaAnterior, LOW); // Erase the old position of our dot

			linhaAnterior = linhaAtual;
			colunaAnterior = colunaAtual;
		}
	}

	limparMatriz();

	if ((linhaAtual == linhaSorteada) && (colunaAtual == colunaSorteada))
	{
		matriz.drawCircle(4, 4, 3, HIGH);

		flagAcertou = true;

		Serial.println("Acertou!");

	}
	else
	{
		matriz.drawLine(0, 0, 6, 6, HIGH);

		matriz.drawLine(6, 0, 0, 6, HIGH);

		Serial.println("Errou!");
	}

	matriz.write(); // Send bitmap to display

	delay(3000);

	limparMatriz();

	if (flagAcertou)
		inicializarJogo();
}

void inicializarJogo(void)
{
	flagAcertou = false;

	Serial.println("Sorteando...");

	linhaSorteada = random(8);
	colunaSorteada = random(8);

	Serial.print("Linha Sorteada: ");
	Serial.println(linhaSorteada);
	Serial.print("Coluna Sorteada: ");
	Serial.println(colunaSorteada);

	linhaAtual = 0;
	colunaAtual = 0;

	linhaAnterior = linhaAtual;
	colunaAnterior = colunaAtual;
}

void limparMatriz(void)
{
	for (int i = 0; i < 8; i++) //limpa a matriz
	{
		for (int j = 0; j < 8; j++)
		{
			matriz.drawPixel(i, j, LOW); // Erase the old position of our dot
		}
	}

	matriz.write(); // Send bitmap to display
}
Next, you will learn the logic of the developed logic step by step.
The first part of the code presents the inclusion of libraries, name definitions, and the declaration of all variables in your project. the code portion is shown below.
#include <SPI.h>
#include <Adafruit_GFX.h>
#include <Max72xxPanel.h>

#define BOTAO_LINHA  2
#define BOTAO_COLUNA 3
#define BOTAO_SELECIONA 4

#define PINO_RANDOM A1

#define MAX7219_CS  10 // Attach CS to this pin, DIN to MOSI and CLK to SCK (cf http://arduino.cc/en/Reference/SPI )
#define QTD_MATRIZES_HORIZONTAIS 1
#define QTD_MATRIZES_VERTICAIS 1

Max72xxPanel matriz = Max72xxPanel(MAX7219_CS, QTD_MATRIZES_HORIZONTAIS, QTD_MATRIZES_VERTICAIS);

int linhaSorteada, colunaSorteada;

int linhaAtual, colunaAtual;

int linhaAnterior, colunaAnterior;

bool flagAcertou = false;
Then, the code flow enters the void loop function. In it, we must make the following configurations, as shown below:
- Configure the luminous intensity of the 8x8 matrix LEDs and clean the matrix, so that the LEDs start off.
matriz.setIntensity(4); // Set brightness between 0 and 15
limparMatriz()
The code for the limpaMatriz function is shown in the following code block.
void limparMatriz(void)
{
	for (int i = 0; i < 8; i++) //limpa a matriz
	{
		for (int j = 0; j < 8; j++)
		{
			matriz.drawPixel(i, j, LOW); // Erase the old position of our dot
		}
	}

	matriz.write(); // Send bitmap to display
}
- Sets the Arduino digital pins and initializes the value generator based on a value read from the analog-to-digital converter.
pinMode(BOTAO_COLUNA, INPUT);
pinMode(BOTAO_LINHA, INPUT);
pinMode(BOTAO_SELECIONA, INPUT);

randomSeed(analogRead(PINO_RANDOM)); // Initialize random generator
Finally, execute the function inicializarJogo.
inicializarJogo();
The function is shown below.
void inicializarJogo(void)
{
	flagAcertou = false;

	Serial.println("Sorteando...");

	linhaSorteada = random(8);
	colunaSorteada = random(8);

	Serial.print("Linha Sorteada: ");
	Serial.println(linhaSorteada);
	Serial.print("Coluna Sorteada: ");
	Serial.println(colunaSorteada);

	linhaAtual = 0;
	colunaAtual = 0;

	linhaAnterior = linhaAtual;
	colunaAnterior = colunaAtual;
}

void limparMatriz(void)
{
	for (int i = 0; i < 8; i++) //limpa a matriz
	{
		for (int j = 0; j < 8; j++)
		{
			matriz.drawPixel(i, j, LOW); // Erase the old position of our dot
		}
	}

	matriz.write(); // Send bitmap to display
}
This function is responsible for starting the game and drawing the position in which the treasure will be hidden.
After that, we enter the void loop function.
At the beginning of the loop function, the user must choose a position where he imagines that the treasure is hidden. Then, you must press the select button.
Note that the system will be in a loop until the user selects the desired coordinate.
The portion of the code is presented below.
while (digitalRead(BOTAO_SELECIONA) == LOW)
	{

		matriz.drawPixel(linhaAtual, colunaAtual, HIGH);
		matriz.write(); // Send bitmap to display

		if (digitalRead(BOTAO_LINHA) == HIGH)
		{
			linhaAtual++;

			if (linhaAtual > 7)
			{
				linhaAtual = 0;
			}

			delay(200);
		}

		if (digitalRead(BOTAO_COLUNA) == HIGH)
		{
			colunaAtual++;

			if (colunaAtual > 7)
			{
				colunaAtual = 0;
			}

			delay(200);
		}

		if ((linhaAtual != linhaAnterior) || (colunaAtual != colunaAnterior))
		{
			matriz.drawPixel(linhaAnterior, colunaAnterior, LOW); // Erase the old position of our dot

			linhaAnterior = linhaAtual;
			colunaAnterior = colunaAtual;
		}
	}
After that, the system clears the matrix screen and checks whether the selected position is the same as the position where the treasure is hidden.
If true, the system will print a circle. If it is wrong, the letter X will appear in the LED Matrix.
while (digitalRead(BOTAO_SELECIONA) == LOW)
	{

		matriz.drawPixel(linhaAtual, colunaAtual, HIGH);
		matriz.write(); // Send bitmap to display

		if (digitalRead(BOTAO_LINHA) == HIGH)
		{
			linhaAtual++;

			if (linhaAtual > 7)
			{
				linhaAtual = 0;
			}

			delay(200);
		}

		if (digitalRead(BOTAO_COLUNA) == HIGH)
		{
			colunaAtual++;

			if (colunaAtual > 7)
			{
				colunaAtual = 0;
			}

			delay(200);
		}

		if ((linhaAtual != linhaAnterior) || (colunaAtual != colunaAnterior))
		{
			matriz.drawPixel(linhaAnterior, colunaAnterior, LOW); // Erase the old position of our dot

			linhaAnterior = linhaAtual;
			colunaAnterior = colunaAtual;
		}
	}
Next, we will present the printed circuit board structure for you to assemble and build your project.
Printed Circuit Board NEXTPCB for hunt treasure game with Arduino
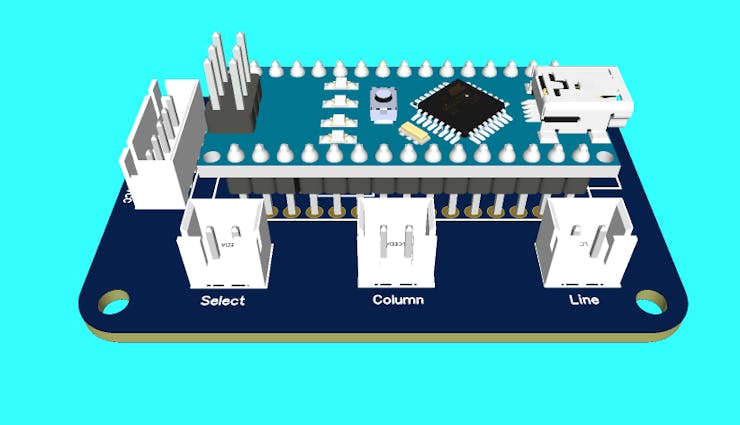
Was developed a Printed Circuit Board for this project. The figure below presented the 3D View of the PCB. You can download the files in this link.
This NEXTPCB Printed Circuit Board was developed through the following electronic schematic presented in the figure below.

From this schematic, you can create your project through the files presented above and obtain your 10 Free PCBs in NEXTPCB PCB Factory.
Acknowlegment
I thank the NEXTPCB Factory for the support and development of this project. In addition, I would like to thank the Robo Ludico School of Brazil.