 Lance
LanceIntroduction
If you have never upgraded firmware for a board before, this could be somewhat intimidating to some. Largely because if you do it wrong, you risk bricking the hardware. The manufacturer never intended the user to upgrade the firmware, so it isn't the simplest process. However, the process is very well documented so with a little preparation, anyone should be able to handle it.
There are various methods and tools to flash the firmware. I will list the ones I used and verified that work.
To start, be sure to read through the entire page for the firmware upgrade on the Unified Engineering page. Also watch Seon's video on the upgrade.
Firmware Github page:
https://github.com/UnifiedEngineering/T-962-improvements/wiki/Flashing-the-LPC21xx-controller
Seon's video:
https://youtu.be/pIGK9VNppWw?t=40
Notes on Required Resources
To do the upgrade you will need the binary firmware file (hex file), software to transfer the binary file from your computer (Flashmagic), and a USB to serial converter. Links to the hex file and Flashmagic software can be found on the firmware upgrade Github page.
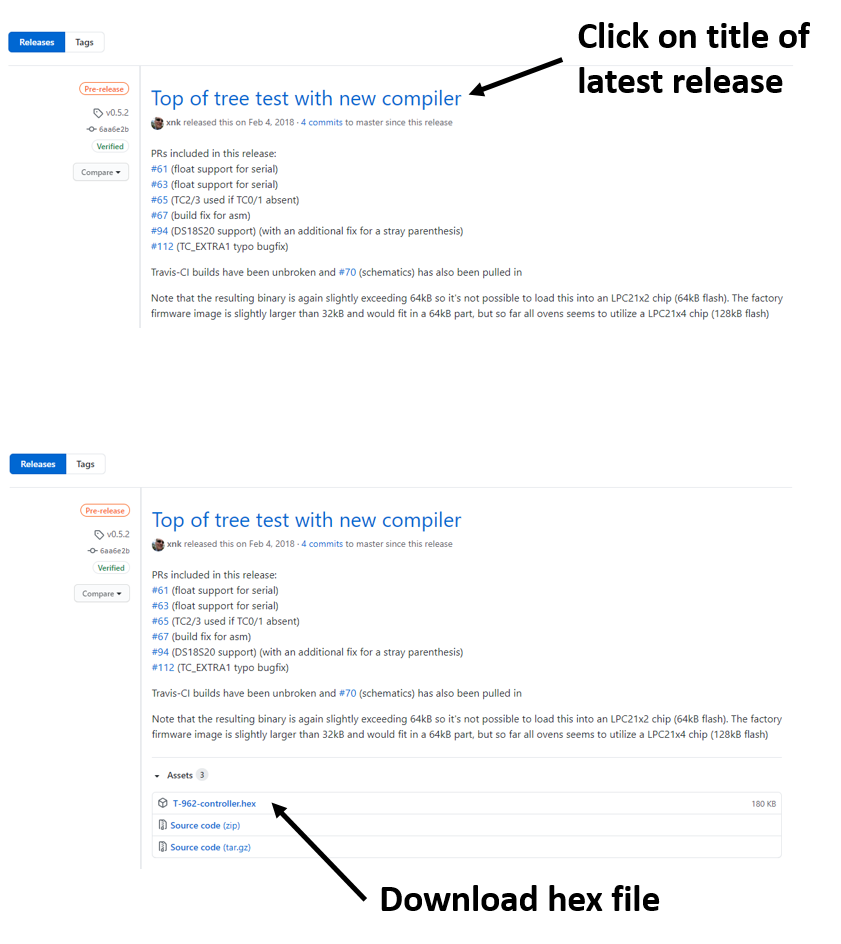
Getting the Hex File
To find the hex file, go to the firmware Github page. At the top of the page is a link for the latest releases. Once you click the link, it may not be obvious where to get the hex file. You need to click on the title for the latest release and that will take you to a page to download the file.
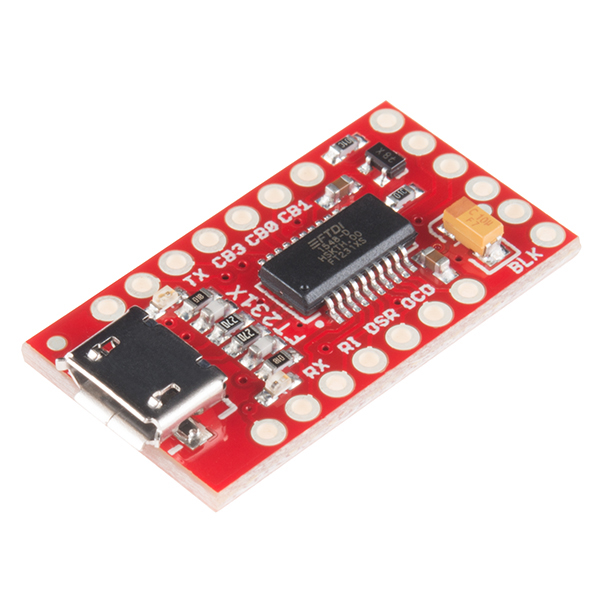
Hardware
You will need an USB to URT board. There are many options available. The one I used is linked below. Please note that this board ships as 5 volt and you need to change it to 3.3 volt to use it with the T-962(A) control board. Instructions for doing this are on the Sparkfun website.
https://www.sparkfun.com/products/13263
Notes on Upgrade
I won't go through the process step by step as the firmware page and Seon's video do a good job of that. I will note some differences in the way I did things as it may be useful.
Top Removal
When Seon worked on his oven he had to tip the oven on its side to allow the top to sit flat on the table. He had his top to the right of the oven. I put the top on the left side and it would reach without tipping the oven. I'm not sure if the side makes a difference or if the wires in my oven were longer.
Breakout Board to ISP Header Hook Up
I put my breakout board on a break board to prevent it from touching bare. I taped the breakout board down so it wouldn't slide off the bread board. The bread board was also used to ease the process of entering the firmware upgrade mode. I could use a row on the break board to temporarily ground the n_ISP and n_RESET pins. I have soldered a row of header pins on my USB to UART breakout board to make using it easier to use. That isn't required, you could use the header at the end of the board normally used to connect to your device.

Discussions
Become a Hackaday.io Member
Create an account to leave a comment. Already have an account? Log In.