 Lance
Lance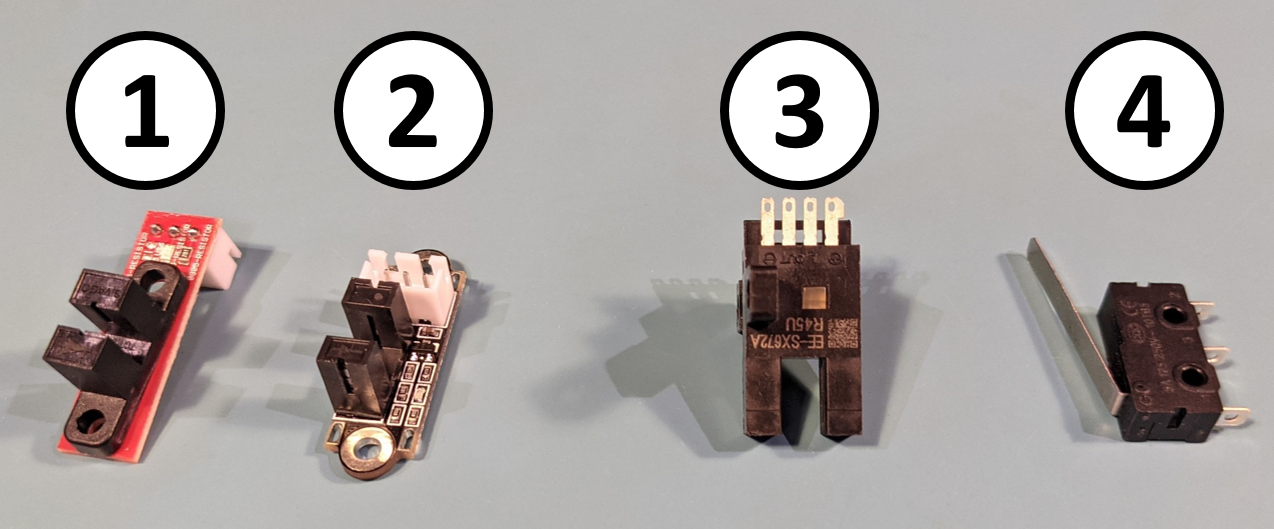
Sensors
I tested 4 different limit switches to see how they would perform with a Smoothieboard. The results varied.
1 – Red cheap optical sensor (less than $1)
2 – Black cheap optical sensor (less than $1)
3 – Omron EE-SX672A optical sensor (~30$)
4 – Mechanical switch (less than $0.50)
Smoothieboard Setup
Numbers 1, 2, and 3 read high when not activated and low when activated. Because of this, you need to use the “!” to invert the pin logic in the Smoothieboard configuration file. By default, Smoothieware expects low to be not activated and high to be activated.
For the mechanical sensor (4), it was connected between the signal pin and the ground pin. The normally closed terminal of the switch was used. That way when not activated, the pin was pulled low (as Smoothieware expects). When the switch is activated, the connection is open and the signal pin goes to high (as it is set to pull up).
Results
The optical sensors (1, 2, and 3) were first tested using a benchtop power supply and found they would work if set up correctly.
When using the Smoothieboard, number 1 worked, but just barely. It read about 1.2 volts when activated which was just below the threshold Smoothieboard needed to detect a low signal.
Number 2 did not work. It reads about 2 volts when activated and this was not low enough for the Smoothieboard to recognize it was activated.
Number 3 worked perfectly. This sensor came with the pre-assembled pickup head I bought. It is used as the Z-axis homing sensor.
In the configuration file, you can tell Smoothieboard to pull the sensing pin low, high, or leave it floating. Sensors 1 and 2 seem to want the pin floating. However, regardless if I set the pin to pull low, pull high, or float in the configuration file, the value at the pin was still high. (I’m not sure if this is a general Smoothieboard issue or an issue with my particular one.) This may be been the reason numbers 1 and 2 did not perform well. Sensor 3 wants the pin pulled high. This may be the reason it worked.
The mechanical switch, Number 4, worked perfectly. Because it was both cheap and reliable, this was the sensor I used for the end stops on the X and Y-axis.
Discussion
Mechanical Advantages
The mechanical switch had some additional advantages. The optical sensors require an additional component to act as a beam interrupter to trigger the sensor. These beam interrupters also require additional mounting hardware and they require three wires to connect instead of two. While these are minor things, fewer parts and wires are always preferred.
Accuracy of Mechanical versus Optical
The Smoothieboard page advises the use of mechanical sensors because they are more accurate in terms of repeatability. There are those who disagree. For pick-and-place machines, this is an academic discussion and isn't practically relevant.
For the X and Y-axis, OpenPnP uses the limits switches to home to a known position on the machine and then uses the more accurate optical homing. Thus, close is good enough for the limit switches.
For the Z-axis, both Juki and Samsung type nozzles have built-in travel which allows for small amounts of forgiveness to positioning errors.
Conclusions
In terms of accuracy, I think your time is far better spent worrying about other sources. Good optical sensors or even some low-cost ones should work. Mechanical switches are tried and true and perform well. In the end, you have to select what works for you.
For me, the simplicity and reliability of the mechanical switches led me to select them for my X and Y-axis limit switches. I purchased a pre-assembled head that had a functioning optical switch already attached (switch 3). I used that as my Z-axis sensor.
Discussions
Become a Hackaday.io Member
Create an account to leave a comment. Already have an account? Log In.