Step 1: No Installations No Downloads! - Open a Browser
Open any browser. Currently, all the browsers support the Arduino simulation code execution.
In this tutorial, I will use either firefox or Avast secure browser. I have not seen any significant differences in the performance of the Arduino simulator.
Before we start,
- The Arduino code running online or on a simulator may not guarantee the same performance of behaviour when it comes to real hardware
- The real hardware poses you more challenges (open connections, short connections, missing connections, pullups, noise, floating pins, dry solder, poor solder, incompatible voltage, insufficient setup and hold times, ringing etc.
- Software simulations are just the steps to learn but it is not the final destination
A request:
Please comment and like this project, if you find this helpful. Also, feel free to ask questions or suggest any new topics. I will be glad to reply and improve 😀
Let us begin :)

Step 2: How to Test the Arduino LED Blink Code Online?
LED blink code is the basic example which most of us would have run when exploring hardware circuitry involving an MCU. This is definitely equivalent to the "Hello World" program in computer languages 😀. In this step, we will see how we can test our basic LED blinking code for Arduino
To verify the LED code online, please visit
https://wokwi.com/playground/blink
The view is something like the image shown (might be slightly outdated) 😅
the Right pane is where we will put the code :)
Let us try a few LED blink examples:
Code 1 below:
/*  Blink   Turns on an LED for one second, then off for half a second, repeatedly.     This example code is in the public domain.  */   // Pin 13 has an LED connected on most Arduino boards. // give it a name:
int led = 13;
// the setup routine runs once when you press reset:

void setup() {                   // initialize the digital pin as an output.   pinMode(led, OUTPUT);      }
// the loop routine runs over and over again forever:
void loop()
{   digitalWrite(led, HIGH);   // turn the LED on (HIGH is the voltage level)   delay(500);               // wait for a second   digitalWrite(led, LOW);    // turn the LED off by making the voltage LOW   delay(500);               // wait for a second }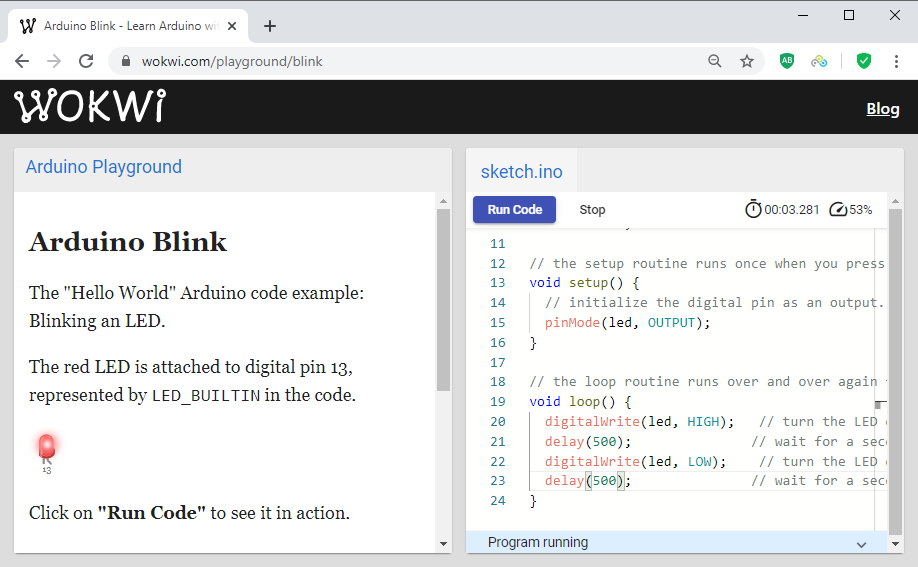
once I copy the code and paste it in the link above, I could run and test my Arduino code online 😀
Please let me know if you have any trouble in running the LED code in the Link above. Next, we will see the servo motor code!!!
Step 3: How to Test Your Arduino Servo Motor Code Online?
Servo Motors are intelligent motors which can understand the angle of rotation based on the PWM width we drive with. They have built-in comparators which compared the width of the PWM and then act accordingly. They are used in robotics, pick and place and many such examples. These are definitely of interest to hobbyists. In this step, we can see how one can play with Arduino Servo motor simulations as well as test their own code online for free 😃
- Go to
https://wokwi.com/playground/servo
- Copy the servo motor code you want to test. Let me also take a random code from the internet
This is the code from
Here is the code from Arduino Stackexchange- just random:
#include Servo myservo; // create servo object to control a servo // a maximum of eight servo objects can be created
int pos = 0; // variable to store the servo position
void setup() { myservo.attach(9); // attaches the servo on pin 9 to the servo object }
void loop() { for(pos = 0; pos < 90; pos += 1) // goes from 0 degrees to 180 degrees { // in steps of 1 degree myservo.write(pos); // tell servo to go to position in variable 'pos' delay(15); // waits 15ms for the servo to reach the position } for(pos = 90; pos>=1; pos-=1) // goes from 180 degrees to 0 degrees { myservo.write(pos); // tell servo to go to position in variable 'pos' delay(15); // waits 15ms for the servo to reach the position } }
- The copied code is pasted into the editor field of the shared link
- The...
 R0b0bcb
 Joshua Snyder