Close
0%
0%

Dockerize All the Things

hard drive crash! recover, revive, and re-engineer server using docker contained services this time.

Similar projects worth following
I re-engineer my home server using containerized services. For some, I use existing, curated images. For others, I have to build them myself. Maybe someone else will find this story useful.

My home server crashed for the umpteenth time, so I am going to try to make good from bad by using this as an opportunity to re-engineer the server using the modern container approach and a Raspberry Pi 3 as the host platform.

'Containers' are a thing somewhere between a chroot jail, and a fully virtualized system.  There's more isolation than a chroot jail (e.g. networking), and they're lighter in resources than a full VM (e.g. the OS and simulating a standalone processor).  This allows you to package an application and it's dependencies as a modular unit, decoupled from others.

Aside from the management benefit, containerization is a key dependency for modern clustering techniques (though in this project I will not be exploring clustering -- just the containerization).

This has taken me some time to do, so I thought it might be of use to others in similar circumstances as a leg-up.

docker-compose@.service

my systemd meta-service definition for services defined in a docker-compose yaml. The gist is to put the docker-compose.yml in a named directory under /etc/docker/compose (named after the name of the service), and then you can systemd-it-up as 'docker-compose@name' (where 'name' is the name of the services and of the directory).

service - 720.00 bytes - 11/15/2020 at 18:39

Download

  • 1 × Raspberry PI 3 ye olde SBC
  • 1 × tenacity hang in there, baby!

  • Dockerizing the FTP Daemon

    ziggurat2911/20/2020 at 16:27 2 comments

    Summary

    I add another dockerized service to the collection -- this one based on pure-ftpd.

    Deets

    Usually I prefer SCP to old-school FTP, but I still find FTP handy for sharing things in a pinch with others without having to create a real system account or walk folks through installing additional software.

    FTP is an archaic and quirky protocol.  Hey, it's ancient -- from *1980* https://tools.ietf.org/html/rfc765.  Here, I'm going to support PASV, virtual users, and then also TLS for kicks as well.

    The ftp daemon I am using here is 'pure-ftpd', which has been around for a while and is respected.  There does not seem to be a curated docker image for this, so as with fossil SCM, I will be cooking up a Dockerfile for it.  Unlike fossil, this will be an independent service running via systemd.

    Most of the work in this exercise is understanding pure-ftpd, and it took me about 3+ days of work to get to this point.  What follows is the distillation of that, so I will cut to the chase and just explain some of the rationale rather than walking through the learning experience here.

    First, I make a Dockerfile.  This will be a multistage build.

    Dockerfile:

    ########################
    #build stage for creating pure-ftpd installation
    FROM alpine:latest AS buildstage
    
    #this was the latest at the time of authorship
    ARG PUREFTPD_VERSION="1.0.49"
    
    WORKDIR /build
    
    RUN set -x && \
    #get needed dependencies
        apk add --update alpine-sdk build-base libsodium-dev mariadb-connector-c-dev openldap-dev postgresql-dev openssl-dev && \
    #fetch the code and extract it
        wget https://download.pureftpd.org/pub/pure-ftpd/releases/pure-ftpd-${PUREFTPD_VERSION}.tar.gz && \
        tar xzf pure-ftpd-${PUREFTPD_VERSION}.tar.gz && \
        cd pure-ftpd-${PUREFTPD_VERSION} && \
        ./configure \
    #we deploy into /pure-ftpd to make it easier to pluck out the needed stuff
            --prefix=/pure-ftpd \
    #humour is a deeply embedded joke no-one would see anyway, and boring makes the server look more ordinary
            --without-humor \
            --with-boring \
    #we will never be running from a superserver
            --without-inetd \
            --without-pam \
            --with-altlog \
            --with-cookie \
            --with-ftpwho \
    #we put in support for various authenticator options (except pam; we have no plugins anyway)
            --with-ldap \
            --with-mysql \
            --with-pgsql \
            --with-puredb \
            --with-extauth \
    #various ftp features
            --with-quotas \
            --with-ratios \
            --with-throttling \
            --with-tls \
            --with-uploadscript \
            --with-brokenrealpath \
    #we will have separate cert and key file (default is combined); certbot emits separate ones
            --with-certfile=/etc/ssl/certs/fullchain.pem \
            --with-keyfile=/etc/ssl/private/privkey.pem && \
        make && \
        make install-strip
    
    #now the entire built installation and support files will be in /pure-ftpd
    
    ########################
    #production stage just has the built pure-ftpd things
    FROM alpine:latest AS production
    
    COPY --from=buildstage /pure-ftpd /pure-ftpd
    
    RUN apk --update --no-cache add \
        bind-tools \
        libldap \
        libpq \
        libsodium \
        mariadb-connector-c \
        mysql-client \
        openldap-clients \
        openssl \
        postgresql-client \
        tzdata \
        zlib \
        && rm -f /etc/socklog.rules/* \
        && rm...
    Read more »

  • Making a Docker Image from Scratch for Fossil-SCM

    ziggurat2911/18/2020 at 17:59 0 comments

    Summary

    My next stop in this Odyssey involves getting a little more hands-on with Docker.  Here, I create a bespoke image for an application, and integrate that into my suite of services.  We explore 'multi-stage builds'.

    Deets

    Another of my services to be restored is my source code management (SCM) system.  Indeed, it is due to data failures in the SCC that first alerted me to the fact that my server was failing.  It's a separate topic as to how I did data recovery for that, but the short story is that it was a distributed version control system (DVCS), so I was able to recover by digging up some clones on some of my other build systems.

    The SCM I am presently using for most of my personal projects is Fossil.  I'm not trying to proselytize that system here, but I should mention some of it's salient features to give some context on what is going to be involved in getting that service back up and running.

    Fossil is a DVCS, in the vein of Git and Mercurial, and for the most part the workflow is similar.  The features I like about Fossil is that it also includes a wiki, bug tracking/ticketing system, technical notes, a forum (this is new to me), in addition to the source code control.  All of this is provided in a single binary file, and a project repository is similarly self-contained in a single file.  The gory details of the file format are publicly documented.  It was created by the SQLite folks, who use it for SQLite source, and also now SQLite's public forum is hosted from it as well.  It's kind of cool!  If you choose to check it out, know also that it can bi-directionally synchronize with git.  (I have done this but I'm not going to discuss that here.)

    DVCS was an important thing for the Linux kernel development, but pretty much everything else I have seen doesn't really leverage the 'distributed' part of it.  DVCS systems are still mostly used in a master/slave kind of arrangement.  What seems to me to be the reason they took off so strongly was that they have really, really, good diff and merge capabilities relative to prior systems.  Not because prior systems couldn't, but rather they didn't need to as badly, and DVCS just wouldn't be viable at all if they didn't have really good branch-and-merge capabilities.  So I think it's the improvement in branch-and-merge that led to their widespread adoption more than the 'distributed' part of it. (Which when you think about it, is kind of a hassle:  I've got to commit AND push? lol.)

    Anyway, Fossil is less commonly used, so you usually build it from source.  No biggie -- it's really easy to build, and it's just a single binary file you put somewhere in your path, and you're done.

    Providing a server for it means starting the program with some command-line switches.  In the past, I set up an xinetd to spawn one on-demand.  Now, I'll just run it in a docker container in the more pedestrian command-line mode.

    The protocol Fossil uses is http-based.  This means that I can use nginx to proxy it.  Historically, I opened a separate port (I arbitrarily chose 8086), but I now can use a sub-domain, e.g. fossil.example.com, and have nginx proxy that over the the fossil server, and avoid opening another port.

    Alas, not so fast for me.  I am using a dynamic DNS service, which doesn't support subdomains on the free account, so I'll still have to open that port, alas.  I do have a couple 'spare' domains on GoDaddy, so I can test out the proxy configuration, anyway, though.

    The other benefit of proxying through nginx (when you can), is that you can do it over TLS.  Fossil's built-in web server doesn't do TLS at this time -- you have to reverse proxy for that.

    OK!  Time to build!

    Building Fossil

    I did first build on the host system because I find the fossil exe handy for inspecting the repositories in an ad-hoc manner, and also by using the test-integrity...

    Read more »

  • Let's Do Encrypt; And Why Not?

    ziggurat2911/16/2020 at 19:19 0 comments

    Summary

    Here I modify the nginx configuration to also support TLS, and redirect unencrypted requests to our encrypted version.  I also modify the base nginx image to include the Let's Encrypt certbot tool to keep the certificates renewed automatically.

    Deets

    In this modern world, who does plaintext HTTP anymore except in special circumstances?  Also, since I can now get free certificates from Let's Encrypt, why would I not want to upgrade to TLS?

    Let's Encrypt

    Let's Encrypt is a non-profit set up to encourage the use of encryption on the Internet by providing free TLS certificates.  It uses an automated issuance process, and so has some limitations (you can't get OV or EV certs), but it is useful for the vast majority of use cases.

    The automated issuance is done with a tool called 'certbot'.  It is a python application that handles generating of keys, supplying a 'challenge' to prove domain ownership, generating certificate signing requests, and retrieval of issued certificates.  It also can handle renewal, since the Let's Encrypt certificates are valid for 90 days only.

    There are several modes of proving domain ownership, and the two most common are 'HTTP' and 'DNS'.  In the HTTP challenge (elsewhere called 'webroot') proof of ownership of the domain is established by the presence of well-known resources on a server than can be accessed via the DNS name being challenged.  In the DNS challenge, some special TXT records are used to prove domain ownership.

    The DNS challenge gives more options, because that is the only way that you can get a 'wildcard' certificate issued -- they won't issue such when using the webroot challenge.  However, the challenge with that challenge is that the certbot needs to understand how to manipulate the DNS records.  It does this via 'plugins' that you can install that understand various APIs, however the DNS providers I have (GoDaddy, Google Domains, no-ip.com) do not have such APIs, and hence I will have to use the 'webroot' mechanism.  This isn't too bad, because even though I can't get a wildcard certificate, I can get a certificate with multiple server names, such as 'example.com', 'www.example.com', 'ftp.example.com', etc.

    Nginx

    Setting up TLS on nginx is not particularly difficult; you specify another 'server' block, listen on 443 with the TLS protocol, and specify various TLS options.  There is one gotcha though:  it wants the certificates to exist upon startup.  And I haven't gotten any yet!  So, chickens and eggs.  As such, I'm going to have to get the certbot working first to 'prime the pump', and then reconfigure nginx for HTTPS afterwards.

    Certbot

    My original thought was to get certbot running in yet another containers.  I still think this is a plausible idea, but there were two things that nagged me:

    1. when renewing the certificate, the nginx needs to be told to 'reload' so that it will pick up the new cert.  It is not currently clear to me how to do that easily container-to-container (I have no doubt there are some clever ways, and maybe even orthodox ones, but I don't know of them yet.)
    2. it vexes me to have a container running just to support a cron job that runs once a day.  Maybe I'm being miserly with system resources, but it seems a waste, and this Pi3 just has 1 GB ram.

    So, I decided to not run certbot in a separate container, but rather derive a new image from the curated 'nginx' that also includes certbot inside it, and has a cron job to test for renewal each day, and cause nginx to reload if needed.  If nothing else, it's practice building a derivative docker image.  The first time I'll build one of our own!

    Dockerfile

    Creating new docker images involves specifying what's going to be inside and what code to run when it starts up.  As mentioned before, things are usually run as conventional processes rather than daemons in the docker scenario, because the daemonic...

    Read more »

  • Using docker-compose and systemd

    ziggurat2911/15/2020 at 18:37 0 comments

    Summary

    Here, I define a group of related services (in this case, nginx and php-fpm) using the 'docker-compose' tool.  This allows us to start (and restart) collections of related containers at once.  I also define a systemd 'unit' that will start services defined by docker-compose definitions.

    Deets

    First, a brief excursion:  my data drive is getting a little messy now with docker build configurations, container configuration files, and then the legacy data.  So I made some directories:

    • /mnt/datadrive/srv/config
    • /mnt/datadrive/srv/data

    I moved my legacy data directories (formerly directly under 'srv') into 'data', and the existing container configuration file stuff under 'config'.  OK, back to the story.

    I got the two containerized services working together, but I started those things up manually, and had to create some other resources (i.e. the network) beforehand as well.  There is a tool for automating this called 'docker-compose'.  Try 'which docker-compose' to see if you already have it, and if not get it installed on the host:

    # Install required packages
    sudo apt update
    sudo apt install -y python3-pip libffi-dev
    sudo apt install -y libssl-dev libxml2-dev libxslt1-dev libjpeg8-dev zlib1g-dev
    
    # Install Docker Compose from pip (using Python3)
    # This might take a while
    sudo pip3 install docker-compose

    So, docker-compose uses YAML to define the collection of stuff.  The containers to run are called 'services', and the body defines the various parameters that would passed on the docker command line as I have been doing up to this point.  But it's formatted in YAML!  So get used to it.

    Authoring the Compose File

    Now I'm going to get a little ahead of myself and tell you that the end goal is to have this docker-compose definition be hooked up as a systemd service, and so I am going to put the file in the place that makes sense for that from the start.  But don't think these files have to be in this location; you could have them in your home directory while you develop them, and maybe this is easier.  You could move them into final position later.

    You can find deets on the tool at the normative location https://docs.docker.com/compose/gettingstarted/ ; I am only going to discuss the parts that are meaningful in this project.

    First, create the definition in the right place:

    sudo mkdir -p /etc/docker/compose/myservices

    Ultimately, I am going to create a 'generic' systemd unit definition that will work with any docker-compose yaml, not just the one I am creating here.  If I wind up making more compose scripts for other logical service groups, then I would create a new directory under /etc/docker/compose with a separate name, and store its docker-compose.yml in that separate directory.  So, basically, the directory names under /etc/docker/compose will become part of the systemd service name.

    But again I'm getting ahead of myself (sorry).  Onward...

    Create the docker-compose definition:

    /etc/docker/compose/myservices/docker-compose.yml

    version: '3'
    services:
    
      #PHP-FPM service (must be FPM for nginx)
      php:
        image: php:fpm-alpine
        container_name: php
        restart: unless-stopped
        tty: true
        #don't need to specify ports here, because nginx will access from services-network
        #ports:
        #  - "9000:9000"
        volumes:
          - /mnt/datadrive/srv/config/php/www.conf:/usr/local/etc/php-fpm.d/www.conf
          - /mnt/datadrive/srv/data/www:/srv/www
        networks:
          - services-network
    
      #nginx
      www:
        depends_on:
          - php
        image: nginx-certbot
        container_name: www
        restart: unless-stopped
        tty: true
        ports:
          - "80:80"
        volumes:
          - /mnt/datadrive/srv/config/nginx/...
    Read more »

  • Adding a Dockerized Service Dependency: PHP-FPM

    ziggurat2911/13/2020 at 18:06 0 comments

    Summary

    Here we get a little bit more fancy by adding another microservice to the group:  this one for handling PHP processing.  We explore some things about networking in docker.

    Deets

    I have at least one PHP application on my personal web site, so I need PHP processing capability.  In the prior days of Apache2, that involved installing and configuring mod_php, but I am using nginx now, and apparently the way that is done is with PHP-FPM.  FPM (FastCGI Process Manager) is an alternative PHP FastCGI implementation.

    One option is to derive a new docker image from the existing nginx one, and install PHP-FPM in it, alongside nginx.  However in this case I am going to use a curated PHP-FPM image from Dockerhub, and let the two containers cooperate.  This saves me the trouble of building/installing the PHP -- I should just have to configure it.  There is an 'official' image maintained by the PHP people that is for this machine architecture ('ARM64') and for Alpine Linux:  'php:fpm-alpine'

    But first, a little bit about networking in Docker.

    A Little Bit About Networking in Docker

    Docker creates a virtual network for the various containers it runs.  There is a default one named 'default', however there is a quirk with it on Linux.  The machines (containers) on it do not have names, so it is a hassle to refer to other services.  If, however, you create a named network, then magically those machines (containers), will have DNS names, and they happen to be the name of the container.

    There are several networking technologies you can use in Docker -- this is provided by what Docker calls a 'driver' -- and the most common technology for stuff like we are doing is to use a network bridge.  You may need to ensure you have bridge-utils installed first:

    sudo apt install bridge-utils

    Then we can create a named network that we will have Docker place its containers on:

    docker network create -d bridge localnet

    This network definition is persistent, so you can destroy it later when you're done with it:

    docker network rm localnet

    OK!  Now our containers will be able to communicate using hostnames.

    PHP, Der' It Is!

    The PHP-FPM has its own set of configuration files.  The curated Docker image 'php:fpm-alpine' has sane defaults for our need, but there is some sand in that Vaseline:  filesystem permissions on mounted directories/files.  These docker containers are running their own Linux installation, and so user ids and group ids are completely separate from those on the host filesystem.  For example, all my 'datadrive' files are usually owned by me, with UID:GID of 1001:1001.  However, this user does not exist in the PHP container.  The process there is running as 'www-data:www-data' (I don't know the numbers).  

    There's several ways of dealing with this, but I chose to simply alter the config file that specifies the uid:gid to be 1001:1001.  The relevant file is located at '/usr/local/etc/php-fpm.d/www.conf', so I need to alter that.  Much like with nginx, I create a directory on datadrive that will hold my configuration overrides for the PHP stuff, and then mount that file into the container (thereby overriding what's already there).  First, I make my directory for that:

    mkdir -p /mnt/datadrive/srv/php

    OK, and here's a little trick:  if you mount a file or directory that does not exist on the host, then the first time you start the container, docker will copy the file/directory back onto the host.  This only happens if it's not there already.  It's really a bit lazy, but interesting to know.  Other mechanisms are good old fashioned cat, copy-paste, and there are also docker commands to explicitly extract files from images.  So, for the hacky way:

    docker run --rm -it \
      --mount 'type=bind,src=/mnt/datadrive/srv/php/www.conf,dst=/usr/local/etc/php-fpm.d/www.conf' \
    ...
    Read more »

  • Using An Existing Image (nginx)

    ziggurat2911/11/2020 at 17:59 2 comments

    Summary

    We do something a little more interesting by using a curated image with a useful application running inside.  In this case, we run nginx as our web server.

    Deets

    The Dockerhub is a great place to look for images that have already been created for common things.  In this episode I will use an existing docker image for nginx to host a website.  This will consist of setting up configuration, mounting volumes, publishing ports, and setting up systemctld to run the image on startup.

    Getting the Image and Getting Ready

    The image we will use is an nginx deployed on Alpine.

    docker image pull nginx:alpine

    Docker has the sense to figure out CPU architecture, but not all docker images out there have been built for all architectures, so do take note of that when shopping at Dockerhub.  This will be running on a Raspberry Pi 3, so it needs to be ARM64.

    Docker creates private networks that the various containers run on.  Typically these are bridges, so you poossibly need to install the bridge-utils package on the host so that docker can manage them:

    sudo apt install bridge-utils

    Getting Busy

    We can do a quick test:

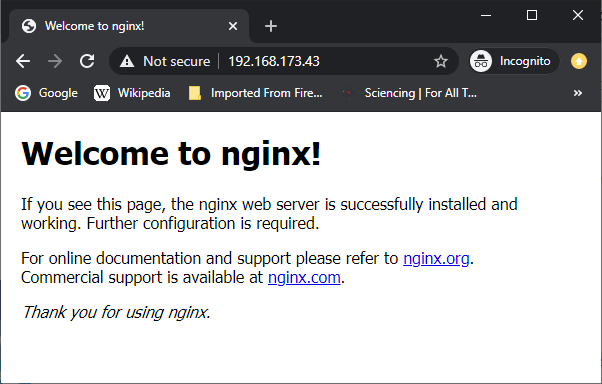
    docker run -it --rm -d -p 80:80 --name devweb nginx:alpine

    The new things here are '-d', which is shorthand for '--detach', which lets the container run in the background, and '-p', which is shorthand for '--publish', which makes the ports in the container be exposed on the host system.  You can translate the port numbers, hence the '80:80' nomenclature -- the first number is the host's port and the second is the container's.  Here they are the same.  Also, we explicitly named the container 'devweb' just because.

    You can drive a web browser to the host system and see the default site:

    OK, that's a start, but we need to serve our own web pages.  Let's move on...

    docker stop devweb

    As mentioned before, my server has a 'datadrive' (which used to be a physical drive, but now is just a partition), and that drive contains all the data files for the various services.  In this case, the web stuff is in /mnt/datadrive/srv/www.  Subdirectories of that are for the various virtual servers.  That was how I set it up way back when for an Apache2 system, but this go-round we are going to do it with Nginx.  Cuz 2020.

    Docker has a facility for projecting host filesystem objects into containers.  This can be specific files, or directory trees.  We will use this to project the tree of virtual hosts into the container, and then also to project the nginx config file into the container as well.  So, the config file and web content reside on the host as per usual, and then the stock nginx container from Dockerhub can be used without modification.

    There are two ways of projecting the host filesystem objects into the container.  One is by using a docker 'volume', which is a virtual filesystem object like the docker image itself, or a 'bind', which is like a symbolic link to things in the host filesystem.  Both methods facilitate persistence across multiple runnings of the image, and they have their relative merits.  Since I have this legacy data mass and I'm less interested right now in shuffling it around, I am currently using the 'bind' method.  What I have added is some service-specific directories on the 'datadrive' (e.g. 'nginx') that contain config files for that service, which I will mount into the container filesystem and thereby override what is there in the stock container.  In the case of nginx, I replace the 'default.conf' with one of my concoction on the host system.  I should point out that the more sophisticated way of configuring nginx is with 'sites-available' and symlinks in 'sites-enabled', but for this simple case I'm not going to do all that.  I will just override the default config with my own config.

    default.conf:

    server {
        listen       80;
        listen  [::]:80;
        server_name example.com...
    Read more »

  • Dicker with Docker

    ziggurat2911/10/2020 at 17:11 0 comments

    Summary

    Just exploring some Docker basics, with a bent towards Raspberry Pi when relevant.

    Deets

    The path to here is long and tortuous.  Multics. Unix. VAX. 386. V86 mode. chroot. Solaris Zones. cgroups. LXC. and now, Docker.

    The concept is similar to a chroot jail, which partitions off part of the filesystem namespace, except that much more is also partitioned out.  Thinks like PIDs, network sockets, etc.  The low-level technology being used on Linux is 'cgroups'.  Windows also now has a containerization capability that is based on completely different technology.

    'Docker' is a product built upon the low-level containerization technology that simplifies the use thereof.  (lol, 'simplifies'. It's still a bit complex.)  When you use the technology, you are creating a logical view of a system installation that has one purpose -- e.g. web server.  This logical view of the system is packaged in an 'image' that represents the filesystem, and then is reconstituted into a 'container' that represents the running instance.  The Docker program also helps with creating logical networks on which these containers are connected, and logical volumes that represent the persistent storage.  The result is similar to a virtual machine, but it's different in that the contained applications are still running natively on the host machine.  As such, those applications need to be built for the same CPU architecture and operating system -- well, mostly.  It needs to be for the same class of operating system -- Windows apps in Windows containers running on a Windows host, and Linux on Linux.  But with Linux you can run a different distribution in the container than that of the host.

    Containers are much more resource friendly than full virtualization, and part of keeping that advantage is selecting a small-sized distribution for the container's OS image.  Alpine Linux is very popular as a base for containerized applications, and results in about a 5 MB image to start with.

    For my host OS, I chose Ubuntu server (18.02).  To wit, Docker requires a 64-bit host system, so that is the build I installed.  Initial system update:

    sudo apt update -y && sudo apt-get update -y && sudo apt-get upgrade -y && \
    sudo apt dist-upgrade -y && sudo apt-get autoremove -y && \
    sudo apt-get clean -y && sudo apt-get autoclean -y

    For historic reasons, I created a separate partition called 'datadrive' and set it up to mount via fstab.  This is an artifact from migrating the system over the years -- originally it was a separate, large, drive.  It contains application data files, such as databases, www, ftp, source control, etc.  This is not a required setup, and I don't know that I even recommend it.

    sudo bash -c 'echo "LABEL=datadrive  /mnt/datadrive  ext4  noatime,nodiratime,errors=remount-ro  0  1" >> /etc/fstab'

    Then I make a swap partition:

    sudo fallocate -l 2G /var/swapfile
    sudo chmod 600 /var/swapfile
    sudo mkswap /var/swapfile
    sudo swapon /var/swapfile
    sudo bash -c 'echo "/var/swapfile swap swap defaults 0 0" >> /etc/fstab'

    It's useful to note that swapfile has compatibility issues with Kubernetes (aka 'k8s'), so if you eventually want to do that then you'll probably wind up turning that back off.  But I'm not planning on doing k8s on this machine, so I turn it on for now.

    Then it's time to do some installing:

    # Install some required packages first
    sudo apt update
    sudo apt install -y \
         apt-transport-https \
         ca-certificates \
         curl \
         gnupg2 \
         software-properties-common
    
    # Get the Docker signing key for packages
    curl -fsSL https://download.docker.com/linux/$(. /etc/os-release; echo "$ID")/gpg | sudo apt-key add -
    
    # Add the Docker official repos
    echo "deb [arch=$(dpkg --print-architecture)] https://download.docker.com/linux/$(. /etc/os-release; echo "$ID") \
         $(lsb_release -cs) stable" | \
        sudo tee /etc/apt/sources.list.d/docker.list
    
    # Install Docker
    sudo apt update
    ...
    Read more »

  • Dockerize All the Things!

    ziggurat2911/09/2020 at 18:31 0 comments

    Summary

    I had a 'hard drive' (really, SD card) crash, and now I am in data recovery mode.  I will have to rebuild the server.  I will lick my wounds in the modern, containerized, way.

    Deets

    Youth

    I have run a home server for decades -- I assume most have at this point.  Back in the day it was a relegated desktop system (a 66 MHz Pentium with the floating point bug, lol) but progressively it migrated to embedded devices like a WRT54GL, an NSLU2, a SheevaPlug, and finally to a RaspberryPi.  The server provided WWW, FTP, SSH, SMB, MySQL, SCM, and later VPN.  It primarily served media for the home, and a gateway into the home from outside.  Over the years, some of that responsibility was delegated to other things (such as a dedicated NAS for storage), and I use client-server database less now (preferring embedded application-specific databases using sqlite).  But it is still handy to have a server for the other things, either for legacy support or most critically for VPN.

    The latest stage of that evolution led to using a Raspberry Pi 3, and a 32 GB SD card for the filesystem.  Both of those things are wonderfully cheap and compact and silent and low power, but they are neither server-grade components.  Hardware failures are more frequent with these consumer products.  I lost my SheevaPlug after many years of service (the device had a well-known design defect in the power supply).  Although it was a bit of a hassle to migrate to the Raspberry Pi replacement, it was surmountable -- just yet another lost weekend to home IT work.

    Sorrow

    My latest system failure was more catastrophic.  As best as I can tell, I think the Raspberry Pi is OK, but rather the SD card is intrinsically defective.  And I did not have recent backups, so I was faced with data loss and re-deploying software and configuration.  Shame on me, of course, but there I was nonetheless, and that was the task before me.

    I did at length (I think!) manage to recover the data -- that's the most critical thing -- but it took several IT weekends.  My bulk storage was not on the server, and the web stuff and ancient database stuff hadn't been modified in many years, so I was able to recover that from old backups.  The source code control was my big fright (indeed, that's how I found out about the fault -- I couldn't check in code), however one of the great things about modern distributed SCM is that the clones can be used to reconstitute the one you consider as the 'master'.

    Resurrection

    The obvious path is to just, yet again, install all the software, and configure it appropriately, and refer to the existing bulk data.  Had I chosen that path, I would not be writing this log.  That path would take a while to do, however I have decided to make my life harder and instead re-design the server's configuration.  There is a more modern technology called 'containerization' that is increasingly becoming popular for deploying services, so why not use this opportunity to explore that?

    'Containers' are somewhere in between a chroot jail and a virtual machine.  There are several alternative technologies involved, but the most prominent one at present is 'docker'.

    So I am setting out to reconstitute my server, but as much as possible containerize my former services using docker containers.  What does this mean specifically?  Well, I'm going to find out!

    Next

    Dicker with Docker

View all 8 project logs

Enjoy this project?

Share

Discussions

Kyle Brinkerhoff wrote 11/13/2020 at 00:10 point

bruh. unraid.

  Are you sure? yes | no

ziggurat29 wrote 11/13/2020 at 01:39 point

Thanks! Will have to investigate that.

  Are you sure? yes | no

Similar Projects

Does this project spark your interest?

Become a member to follow this project and never miss any updates