 Jithin Sanal
Hey guys, welcome back to another project from RootSaid. In this post, I’m gonna show you how I made this cool DIY Rocket Launcher using Arduino. Using this you can control the direction as well as launch the rocket one by one using your mobile phone. Without further ado let’s get started.
The first thing you need is to select an arduino board. For this project, I’ll be using this Arduino Nano 33 IoT. This enables us to control the launcher using your mobile phone.
- Arduino Nano 33 IOT
- SSRs
- Rockets
- Matchsticks
- Blade
- Insulation Tape
- PC
- Rocket Mount
Rocket Launcher Video Tutorial
Guys if you like this video and want to see more videos like this, make sure you check out Arduino Robotics Tutorial Videos. Hit the like button and subscribe to our channel by clicking the subscribe button here. Share your thoughts in the comment box and guys see you in the next video.
New to Robotics?
We have beginners guide on Getting Started with Robotics which will give you a kick start in this field. Check out our free video tutorial below for a brief introduction.
Steps to Make a DIY Rocket Launcher
Step 1 – DIY Rocket Launcher Circuit
Drawing Schematics and PCB Design
So I used Altium Designer to draw the circuit and design the PCB. It is a powerful tool that can be used to design and create your own PCBs for your project as well as complex and multiplayer PCBs for industrial use. Here is the link to the Altium trial version. So make sure you check it out.
Schematics
This circuit is designed to work with Arduino Nano and yes it will work with all Arduino Nano. Here, if you take a closer look you will see two power sources, Vin and 12 volts. Vin is connected to a 7805 voltage regulator. This voltage regulator converts Vin into a steady 5 volt regulated power supply.
Get Arduino Rocket Launcher complete tutorial here.
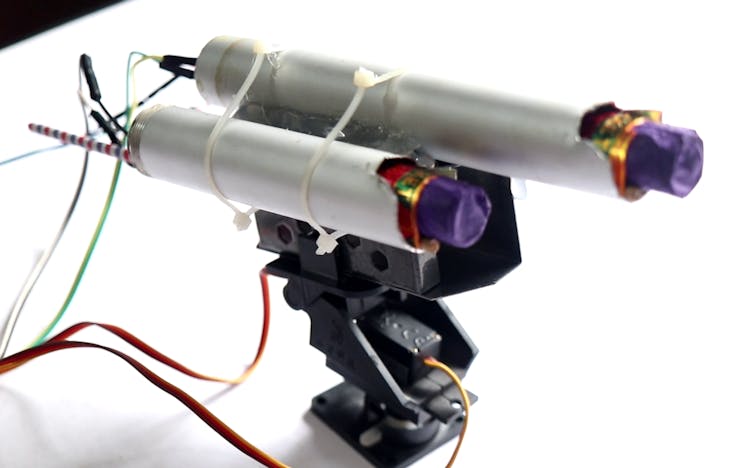
Making the Rocket Mount
Now we need something like a stand that can be rotated to control the direction and to place the rocket. For that, I’ll be using this tiny camera mount. The good thing is it already has two servo motors in it.

I placed a metal piece on top of this mount, on top of which I’ll be mounting the rocket holders.

So let’s glue the rocket holders. Rocket holders are nothing but aluminum pipes. Since we have 4 relays in our circuit we can launch a maximum of 4 rockets at a time. I’ll be going with 3 rockets. So we need 3 rocket holders.

Our rocket mount is now ready.
How to make a DIY Rocket Ignitor?
Now we will make the Rocket Igniter. To make an igniter, all we need is a matchstick, a blade, a wire, and a cello tape. To make an igniter, take a long wire and cut it into two. Now remove the insulation from one end. Take a matchstick and draw a thin line on the head of the matchstick with a blade.

Now take one of the wires and carefully separate a single strand of wire and place it over the line. Now place the other half of the wire on the other side of the matchstick and connect the single strand to that piece of wire.
Now to test it, all I had to do was connect the terminals of the wires to a battery. I needed three more igniters.
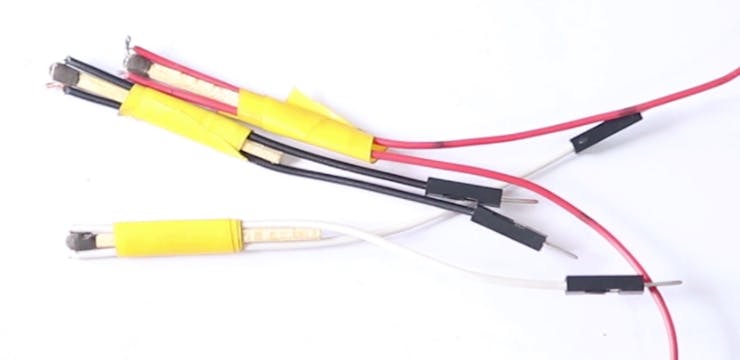
Once I made all the igniters, I carefully attached these fuses to the rocket.
Coding your DIY Rocket Launcher Arduino
Now, we will start coding. Like I mentioned earlier, I am using Arduino Nano 33 IoT for this project, and for that reason, I decided to go with Arduino IoT Cloud for coding. A few weeks back we published a video on our youtube channel explaining how you can code an Arduino online using Arduino IoT Cloud. If you haven’t seen that yet, check out the below video.
Project Properties
This is our thing or our project. I just named it a Remote Device. Now let’s open this thing and here you will see five properties created by me for this project.
- Horizontal
- Vertical
- Rocket 1
- Rocket 2
- Rocket 3
Properties are like variables. Here you will see two variables – horizontal and vertical. These two are of integer type that will vary from 0 to 180 degree. These two variables are for controlling the servo motors.
Then we have rocket 1, rocket 2 and rocket 3. These all are boolean variables that are 0 or 1.

Here there are 2 sliders and 3 buttons. Sliders are linked to horizontal and vertical properties and the buttons are linked to the boolean properties. We can control the value of the properties using these widgets.
Get Complete Codes and Instructions for Arduino Rocket Launcher
Controlling Rocket Launcher from Mobile
Download and install the Arduino IoT Cloud application in your mobile phone.
Now open the application and sign with your account. There you should see the dashboard you created earlier. Once I did that, I was able to control the rocket launcher from my Mobile Phone.

3, 2, 1 … LIFT OFF !!
Now all I had to do was, fix the rocket launcher somewhere outside. I had to make sure it won’t fall off during the launch. Looks good right? Then I fixed the PCB a little bit far from this rocket launcher. That’s because I had to make sure that the flame from the rocket would not burn the PCB.
Everything is all set guys. We just have to power on the circuit and let’s see what happens. Once it’s all powered up, I tried controlling the rocket launcher from our mobile phone, which I did.
Now I aim the rocket somewhere safe and we will launch our first rocket. Okay, this looks fine and three, two, one and GO!!

We have beginners guide on Getting Started with Robotics which will give you a kick start in this field. Check out our free video tutorial below for a brief introduction.