 doctek
The stm32duino project supports a large number of ST microprocessors and boards. One of the processors it supports is the STM32L071! So the first step in developing software for the tArmDuino is to add these files to Arduino. I followed the Getting Started section at the stm32duino github page. After following the directions, I restarted Arduino, and verified that I now had a heading in the Tools/Board menu that said "STM32 Boards (selected from sub-menu)" with a number of selections below it. I don't really use any of this, but the libraries that accompany the package are just what I need.
There is no entry in the STM32 Boards menu that is specific to the STM32L071, so I had to create a board definition and add it to Arduino. While there is a lot of documentation available, most of it seems to be for the commercial developer and contains way more information than the individual needs to just add a single board. At the same time, key details seem to be glossed over. So some detective work and a lot of experimentation was necessary to add the tArmDuino! These references were particularly helpful: Arduino documentation, Stm32duino documentation, Rick Kimball's excellent example.
Mining these resources, I discovered three key details. First, I needed a board.txt file which defines the features of my board, and a platform.txt file which would define my progamming method. Mostly, this means definitions that will be pulled into the recipes for compiling, linking, and uploading the code for the board. Modifications started by copying the boards.txt and platform.txt from the stm32duino download. (These were in ~/.arduino/packages/STM32/hardware/stm32/1.9.0 on my system). Making an educated guess, I modified the boards.txt file to only include the Nucleo_L031 board and changed the occurrences of "31" to "71". Another change was to put the definition "[name].core=STM32:arduino" in which caused Arduino to use the tools in the STM32 Boards area that I previously installed. Finally, I caused a menu to appear in the Arduino Tools drop-down so that the memory size could be specified. Another menu allows choosing the upload method, although the only choice is to use SWD. There were already menus for optimization, C runtime library, and U(S)ART selection (not implemented yet). The platform.txt file was edited to only include the SWD upload method. Have a look at the versions I provide in the tDuino.zip archive.
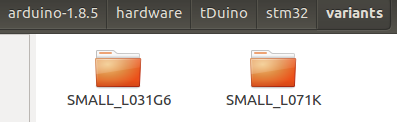
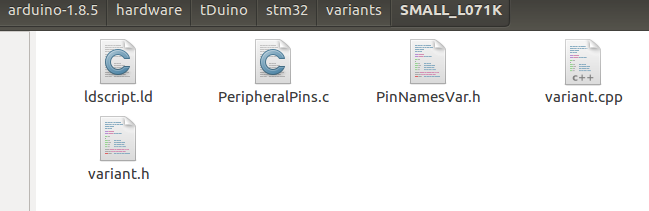
The second detail is to provide a variant directory with the same name as is in the boards.txt file. In this case, that is SMALL_L071K (name is arbitrary). Inside that directory, the files PeripheralPins.c, variant.h and variant.cpp define the pins on my board, the functions they support, and the mapping to Arduino digital and analog pin numbers (like D0 or A5). I started by copying from the Nucleo_L031 board and carefully modified the files for the tArmDuino. While I'm still experimenting in this area, it all seems to work!
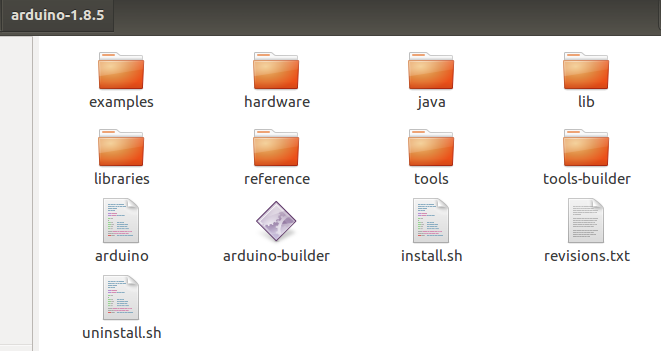
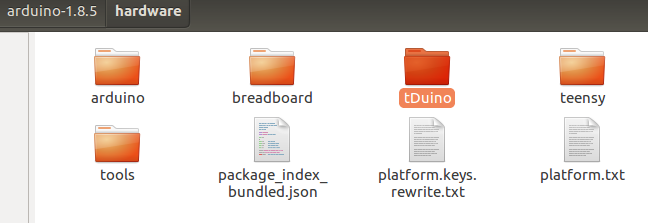
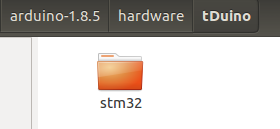
The third and final detail is exactly where to put the files so that my boards will show up in the Arduino Tools/Board menu and my code will be compiled properly for them. I'll skip the details of the many experiments I tried before I figured this out. The trick is to build a suitable directory structure and put that in the correct location. Cut to the chase: Build the structure shown and put it in the Arduino home directory in the hardware folder. The following pictures show how it fits together.

For anyone wanting to duplicate this, download the tDuino.zip file and unzip it into the Arduino hardware folder. Restart Arduino and you will find entries for "tArmDuinoL031" amd "tArmDuinoL071" under the title "tArmDuino Boards", right after the many entries defined for official Arduino boards. The L031 version only works with the 28 pin first version. I include it as a useful example and because I still use it sometimes. This method of adding a new board to the Arduino environment is not the official one! But the official one involves distributing from a web site and other overhead that an individual (at least this individual) may not be inclined to do. The method I describe works and gives the desired result. The downside is that this will need to be repeated whenever a new Arduino version is loaded.
Two minor notes if you try to duplicate my work: 1) Be sure you install the stm32duino files first! 2) The debug version and the tArmDuino version of the STM32L071 are identical from the software side. One entry covers them both.
Discussions
Become a Hackaday.io Member
Create an account to leave a comment. Already have an account? Log In.