puneet1984
Charge Controller Specs
Max Solar Panel - 36V
Max current - 5A (15A with heatsink)
Battery Over voltage protection - YES
Battery Over Discharge protection - NO
Charging Over current protection - internal mosfet controlled ( mosfet temp controlled)
Requires a reverse polarity protection diode on the solar panel connections (most solar panel include it -prebuilt)
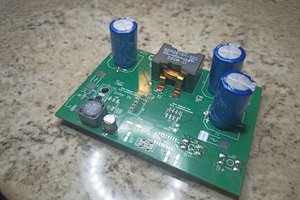
Schematic
The schematic is drawn using easyeda software. Its easy and has most of the components with their footprint.
With easyeda it's also extremely easy to export the gerber files and assembly files to jlcpcb for fabrication as easyeda and jlcpcb are very nicely integrated together.
The schematic comprises of 3 parts
- Attiny85 + its power supply (3.3v)
- Charge Pump
- Mosfet Driving circuit
Ordering PCBs
Now we have got the PCB design and it’s time to order the PCB’s. For that, you just have to go to JLCPCB.com , and click on “QUOTE NOW” button. JLCPCB are also sponsor of this project. JLCPCB (Shenzhen JLC Electronics Co., Ltd.), is the largest PCB prototype enterprise in China and a high-tech manufacturer specializing in quick PCB prototype and small-batch PCB production. You can order a minimum of 5 PCBs for just $2. To get the PCB manufactured, upload the gerber file you downloaded in the last step. Upload the .zip file or you can also drag and drop the gerber files. After uploading the zip file, you’ll see a success message at the bottom if the file is successfully uploaded. You can review the PCB in the Gerber viewer to make sure everything is good. You can view both top and bottom of the PCB. After making sure the PCB looks good, you can now place the order at a reasonable price. You can order 5 PCBs for just $2 plus shipping. To place the order, click on “SAVE TO CART” button. My PCBs took 5 days to get manufactured and arrived within 20 days using standard registered post delivery option. There are fast delivery options also available. PCBs were well packed and the quality was really good. JLCPCB is now offering SMT assembly service that too at a very reasonable price and after trying it I must say that they are doing excellent work and their craftsmanship is comparable to any other commercial PCB manufacturing and assembly service all over the world. Their backend team is so efficient and through that they will check each and every design and component placement and will inform the customer about required changes in design or about wrong placement and polarity of the components and correct the minor issues at their end itself.
Working
This is a PWM (pulse width modulation) based charge controller.
PWM based charge controllers are very efficient when solar panel are of 20V open voltage and battery max voltage is 13-14 volts.
PWM means that the microcontroller changes the off-on time (duty cycle) on the mosfet to attain the set voltage on the battery/analog input pin. It is a method to obtain a lower voltage output without a substantial power loss.
When the battery is almost discharged the mosfet is fully open and it's like a direct connection between the solar panel and the battery.
When the battery is fully charged the mosfet is fully closed and there is no current flowing from the panel to battery.
When the battery is partially charged or on the verge of being fully charged or when a electrical load is put on the battery, the microcontroller adjusts the off-on time of the mosfet to make sure that the battery does not overcharge or the battery voltage does not cross the set threshold while charging and works as a top up charge.
For more details on the PWM please visit WikiPedia
Arduino Code
download code from here - thanks to adam welch for coding and making it bugs-free
https://github.com/AdamWelchUK/PWM85
Pre requisites
- ATTINY board manager installed - download board files from here
https://github.com/SpenceKonde/ATTinyCore
- ISP programmer - you can use arduino as ISP or a USBASP device...
 Adam Lučanský
 Jasper Sikken