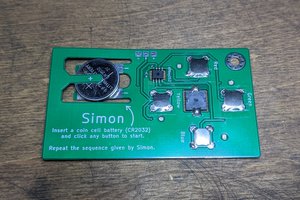
 Ryan Chan
The display is made up of 18 LEDs organized into 9 segments where there is a blue and red LED in each segment. There is a single button that the player uses to control where they will place their mark. There is also a micro-USB port that is used to power the card.
An ATmega328P-AU in a TQFP package is used as the brains to control everything. It is bootloaded with the Arduino Uno bootloader since I found that to be the most convenient and low-cost way to program it (although there are other ways to do it).
Here is a video of the card. Currently, one segment doesn't work in the video because I accidentally connected 2 pins to input only pins. However, I will make a follow-up part 2 video with the fixed design. The schematic and code on this project page do have the fixes in case you'd like to make your own.
 Eric Ljungquist
 MatYay
 mircemk
 mulcmu
Nice Post. Motivation is the driving force behind our actions, fueling our aspirations and perseverance See https://sumitmotivation.com/2023/12/12/motive-login/. It's the inner spark that propels us towards our goals, pushing us through challenges and setbacks. Whether sparked by ambition, passion, or necessity, motivation empowers us to conquer obstacles and pursue our dreams with unwavering determination.