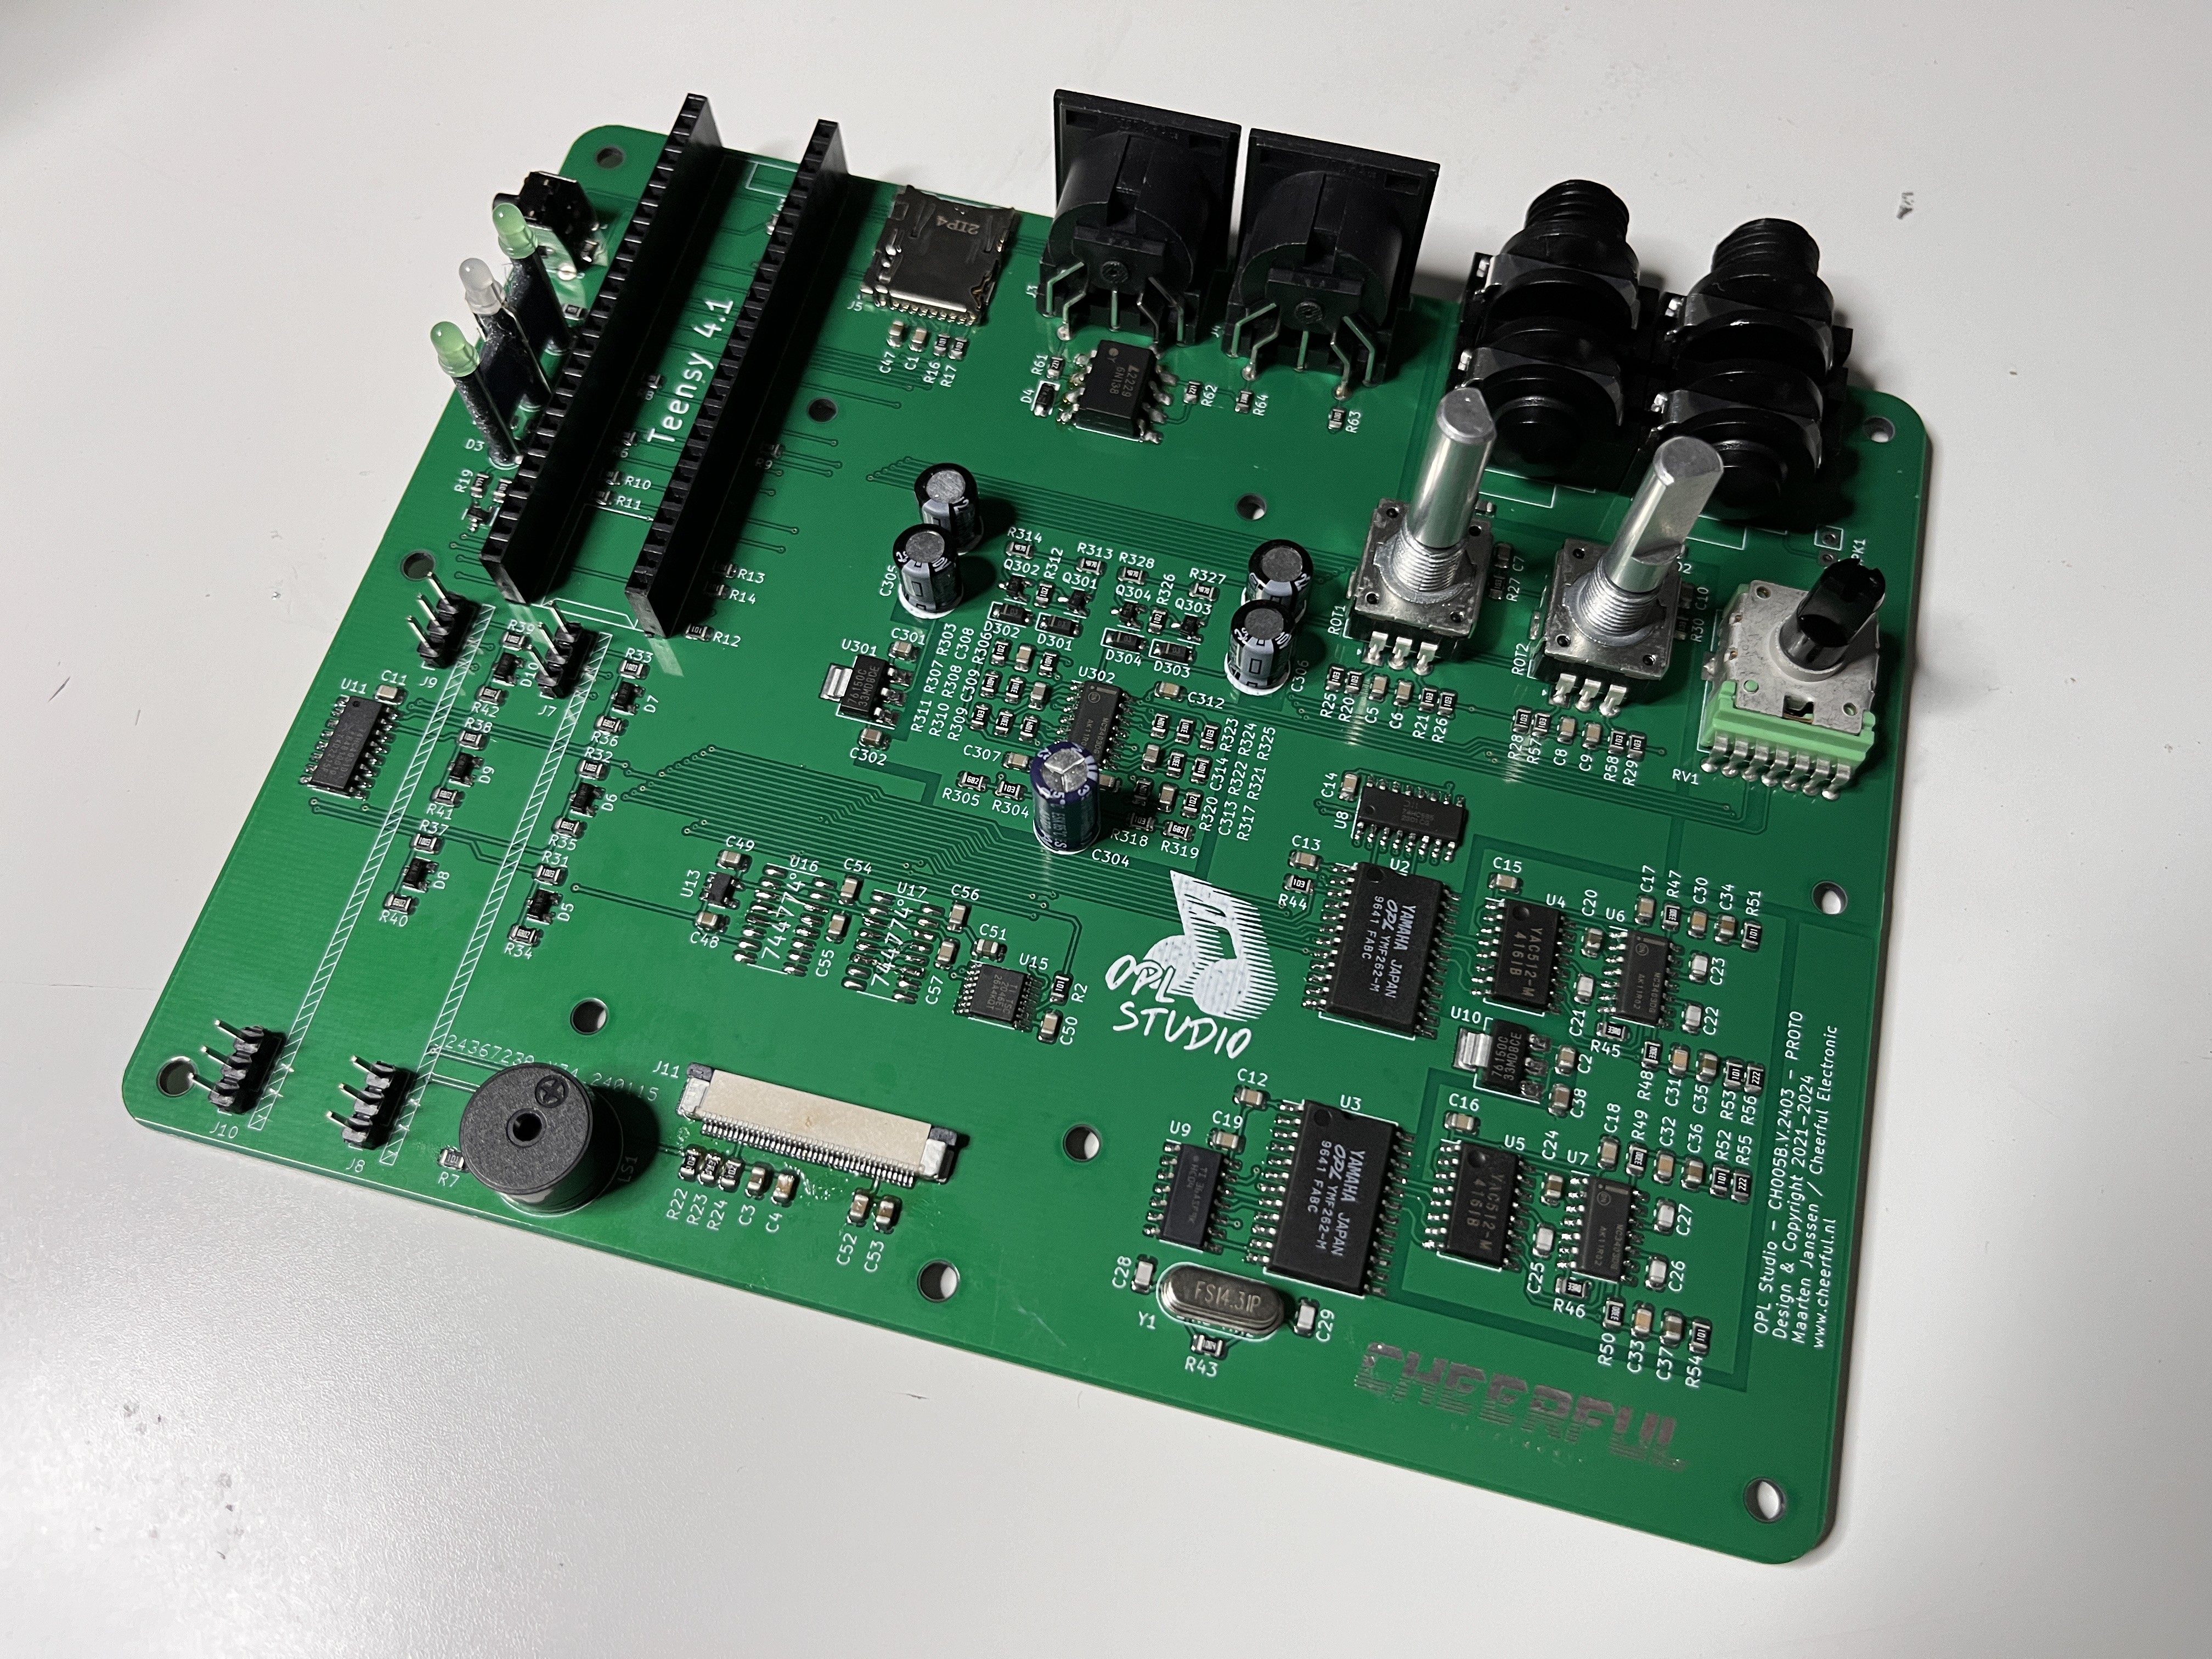
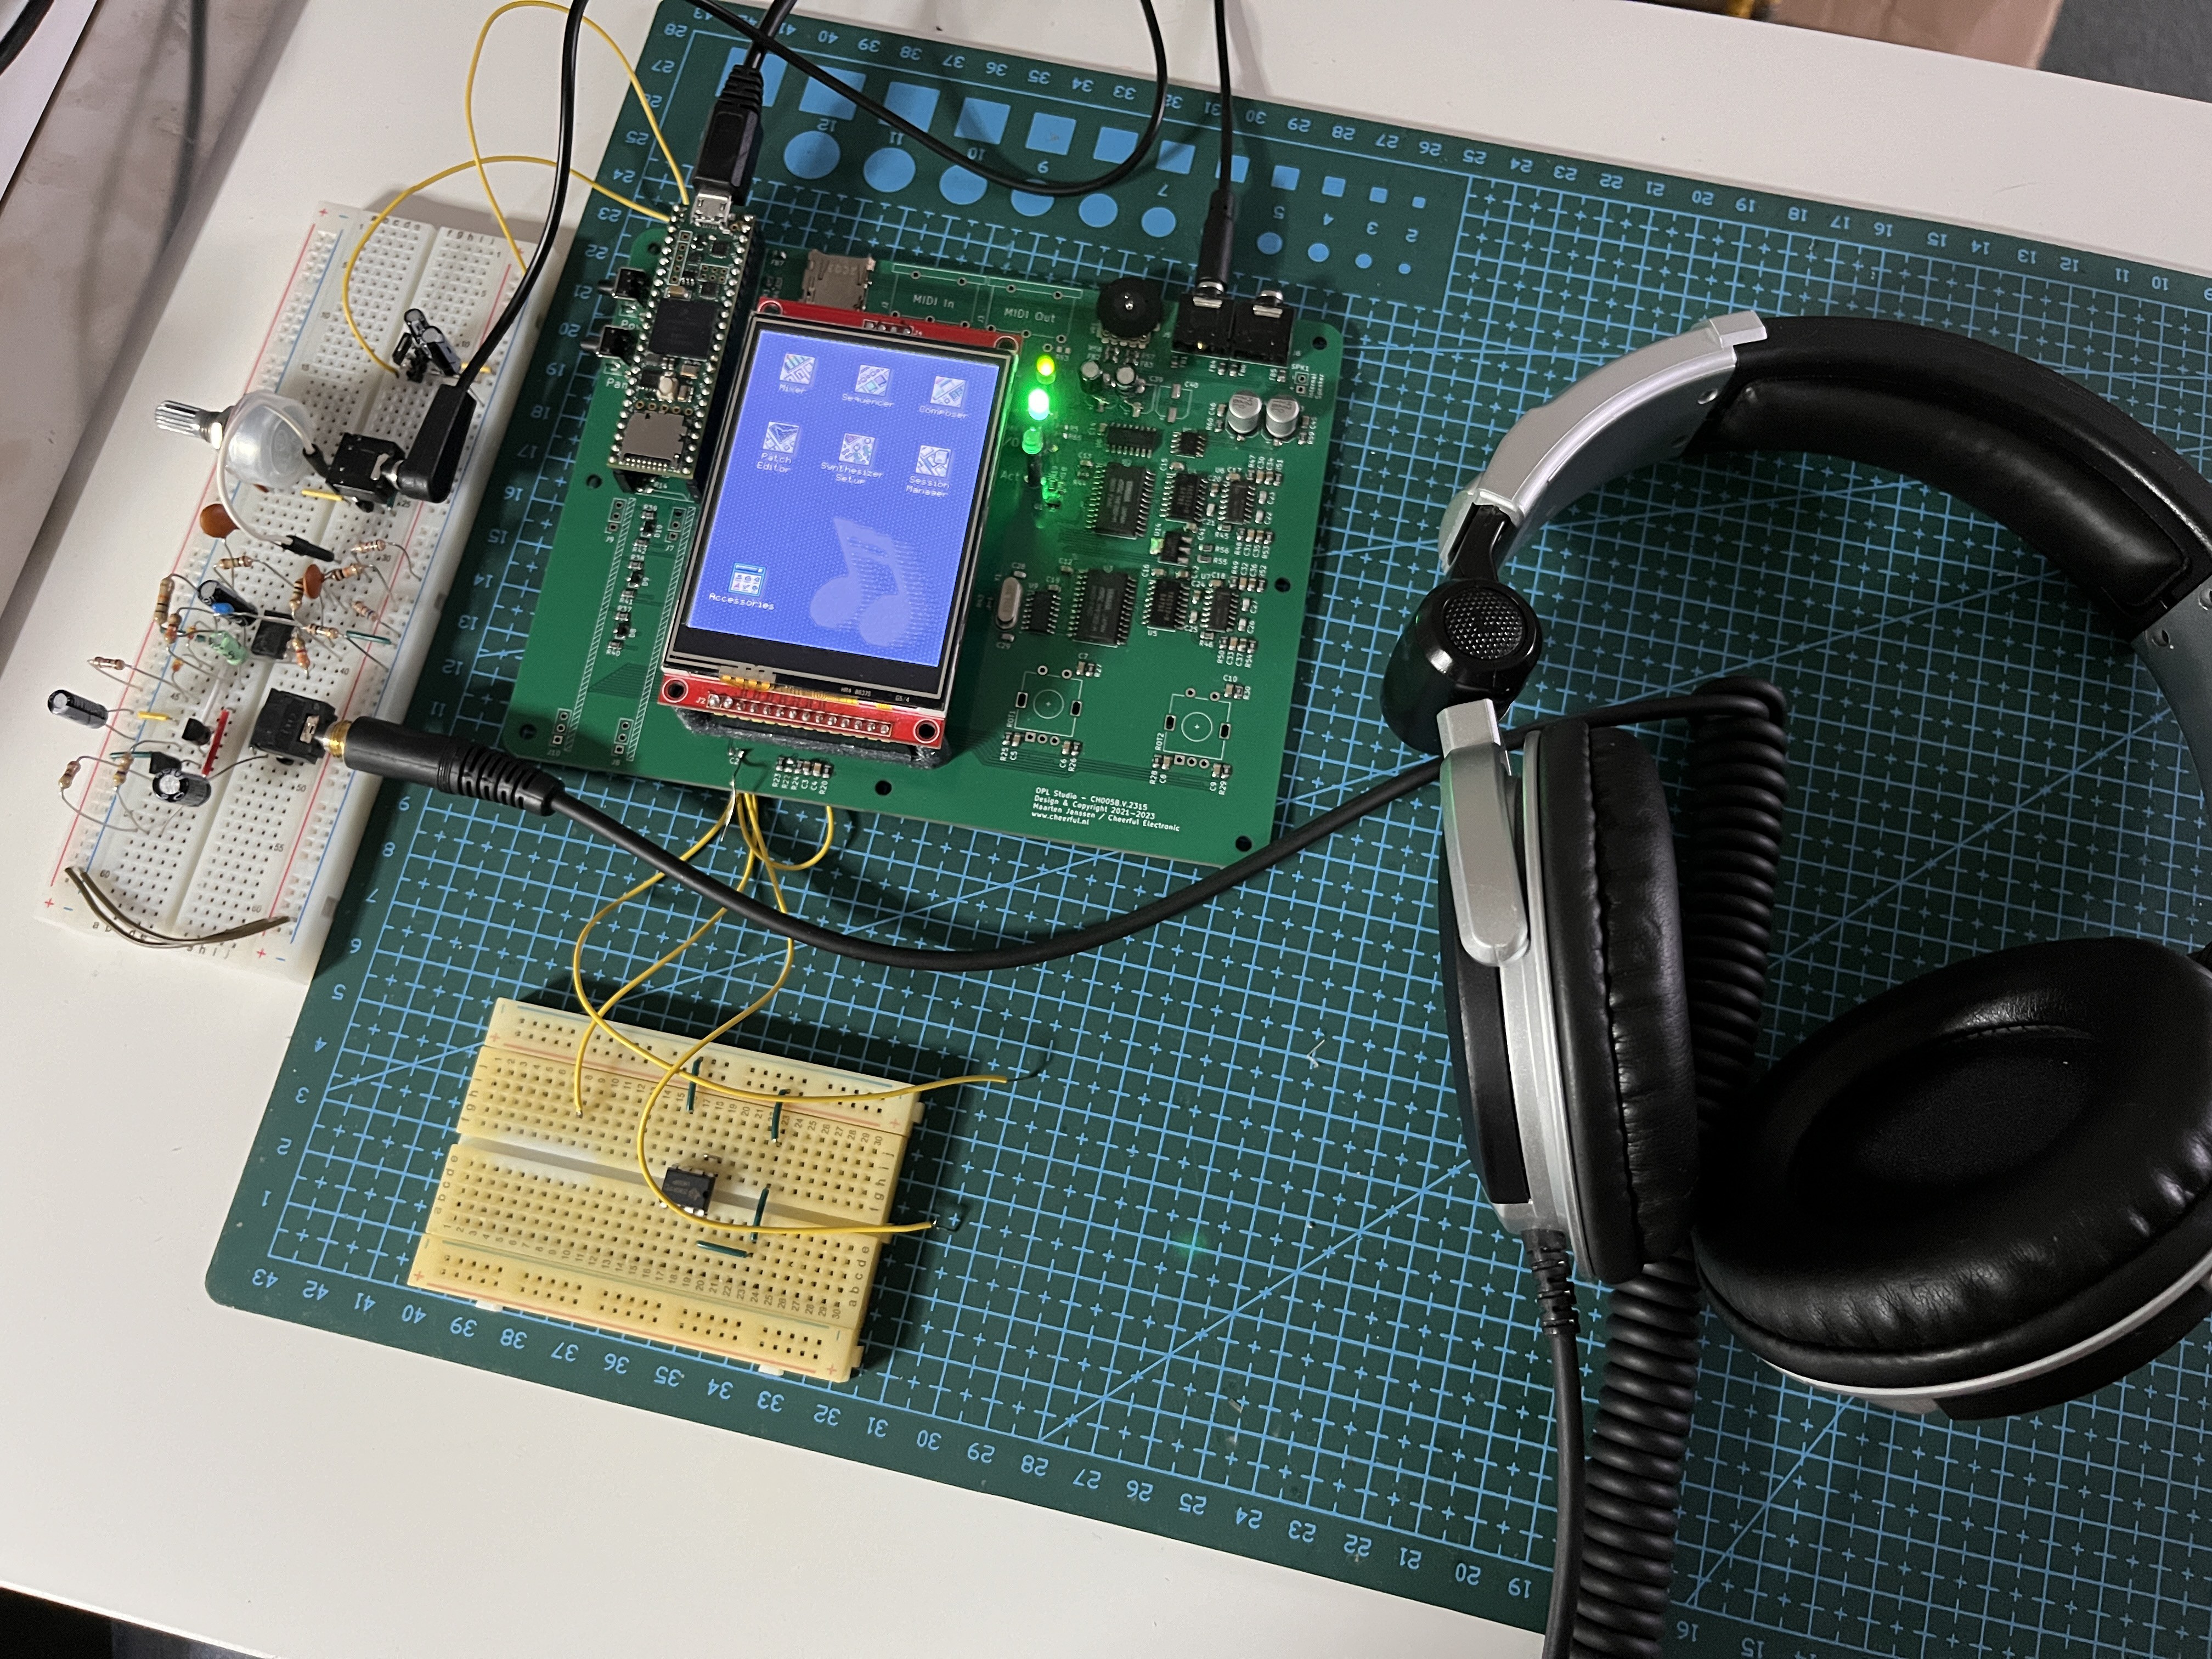
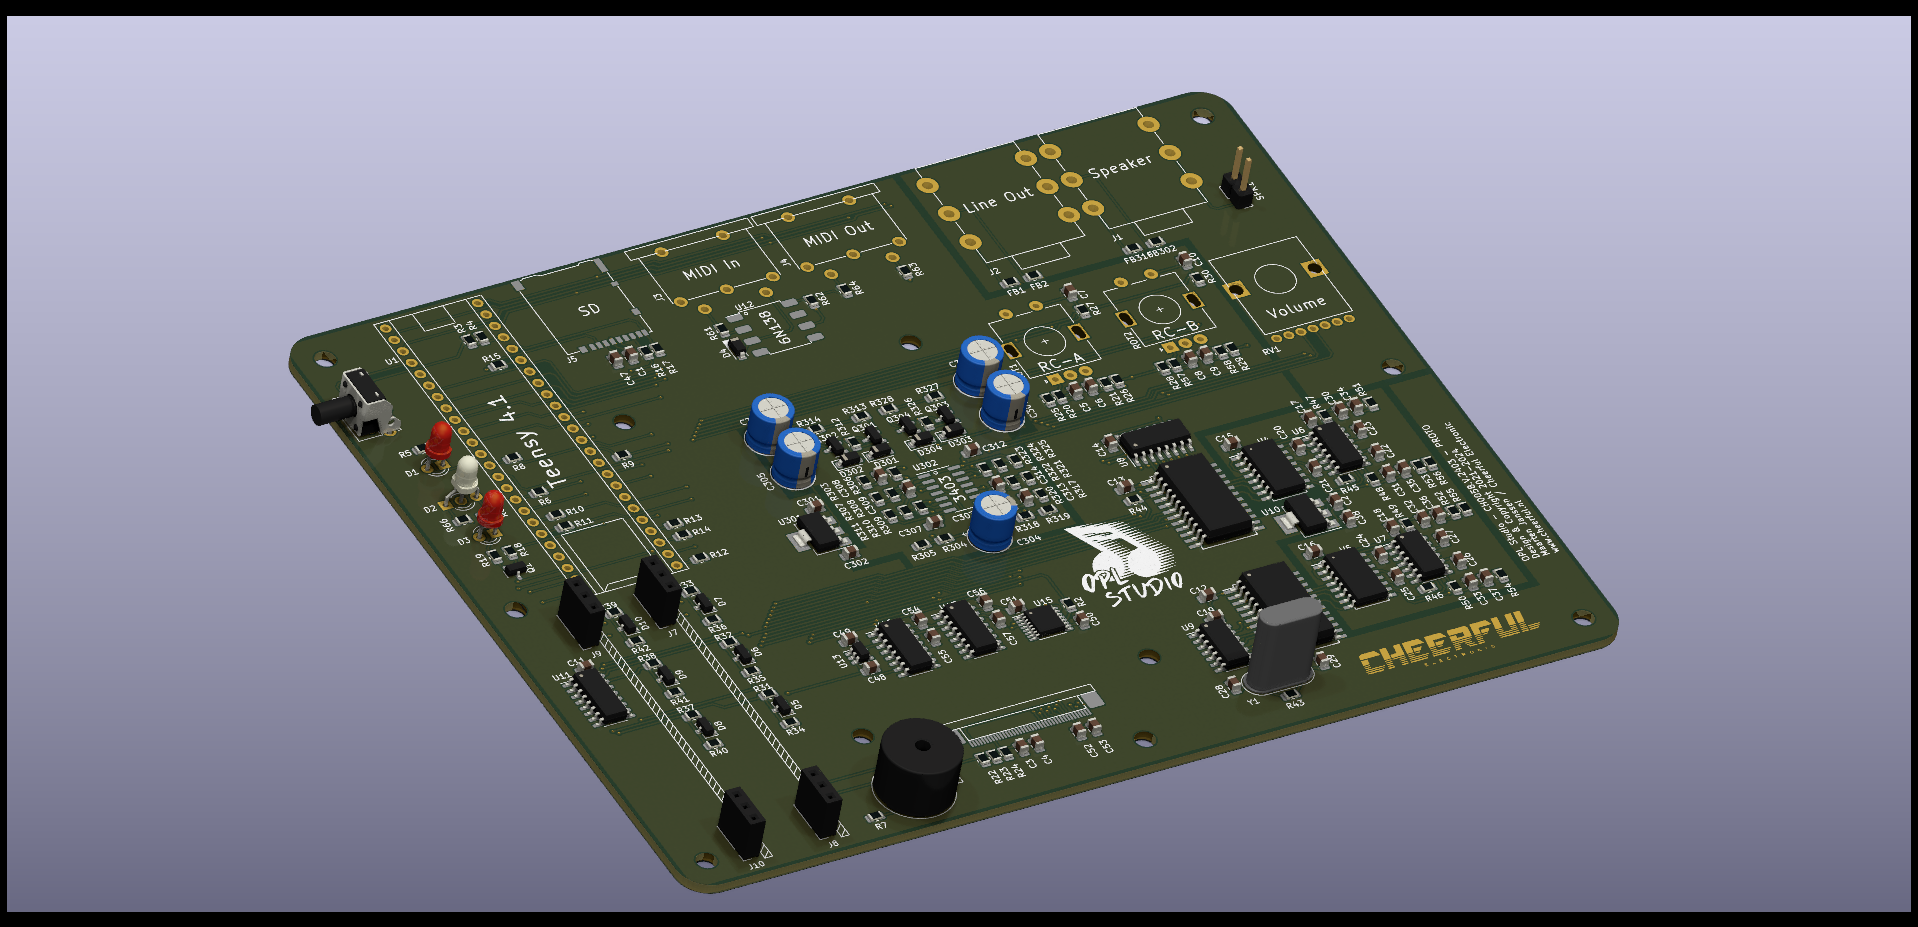
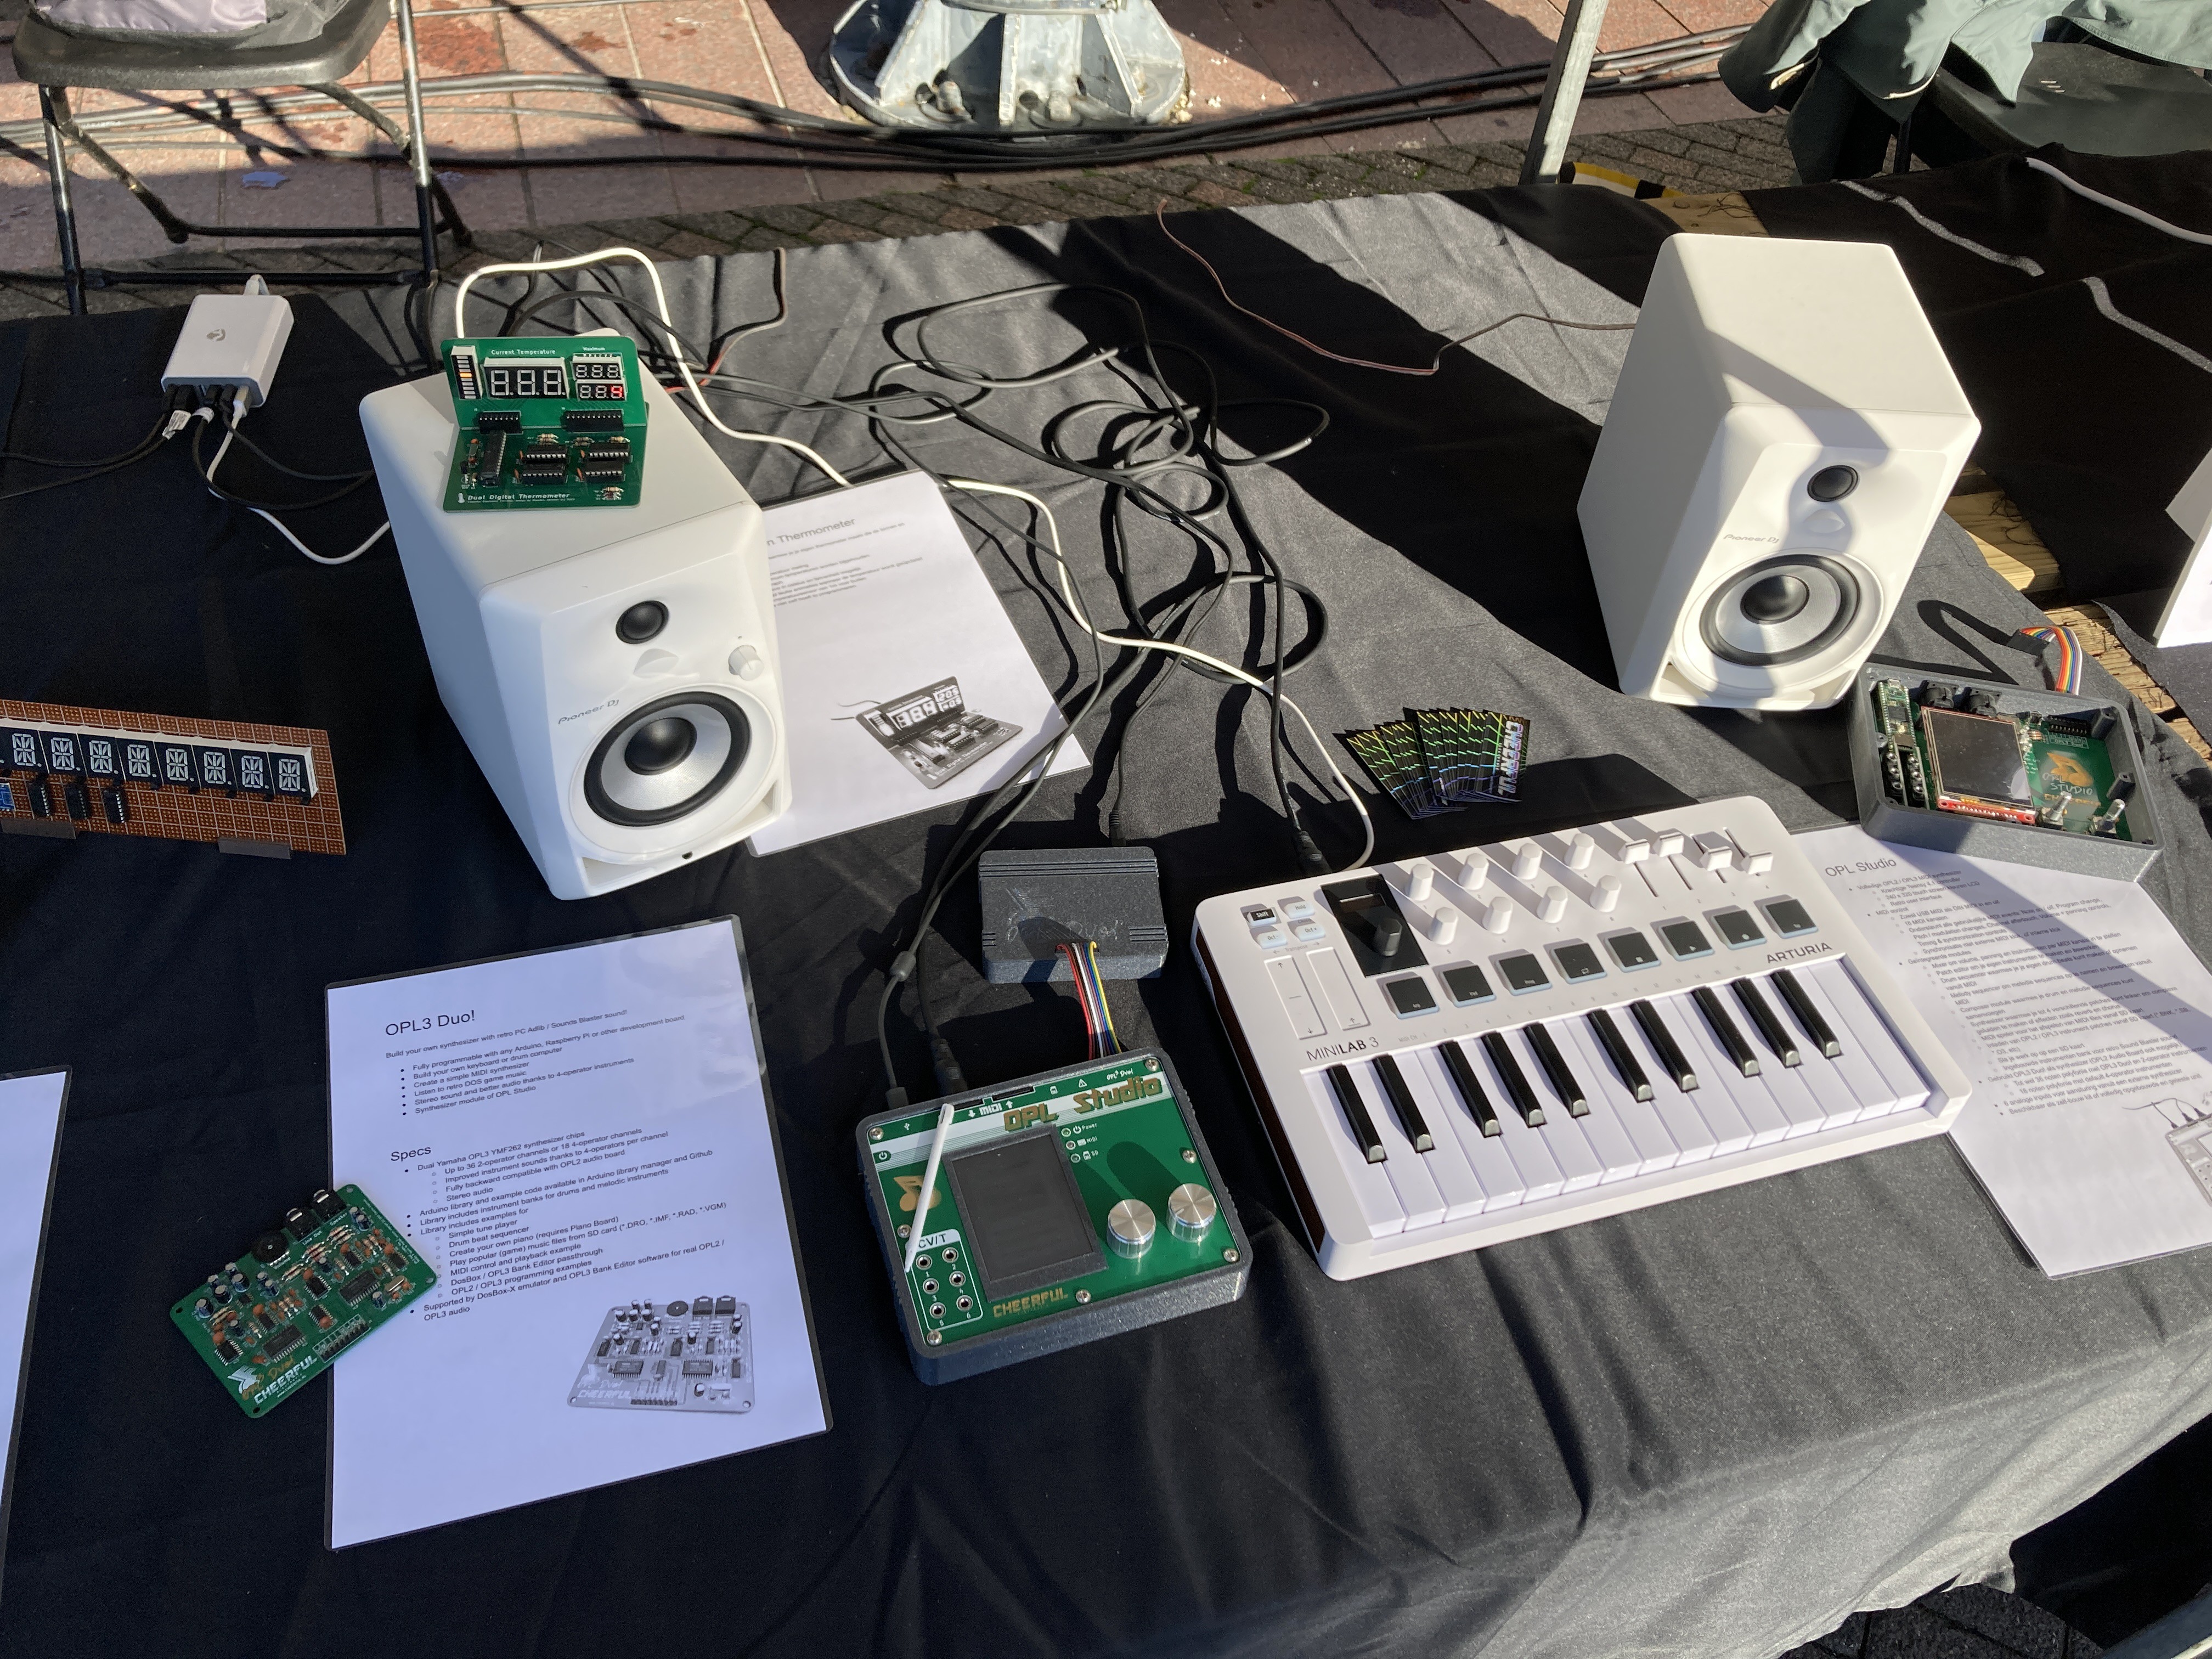
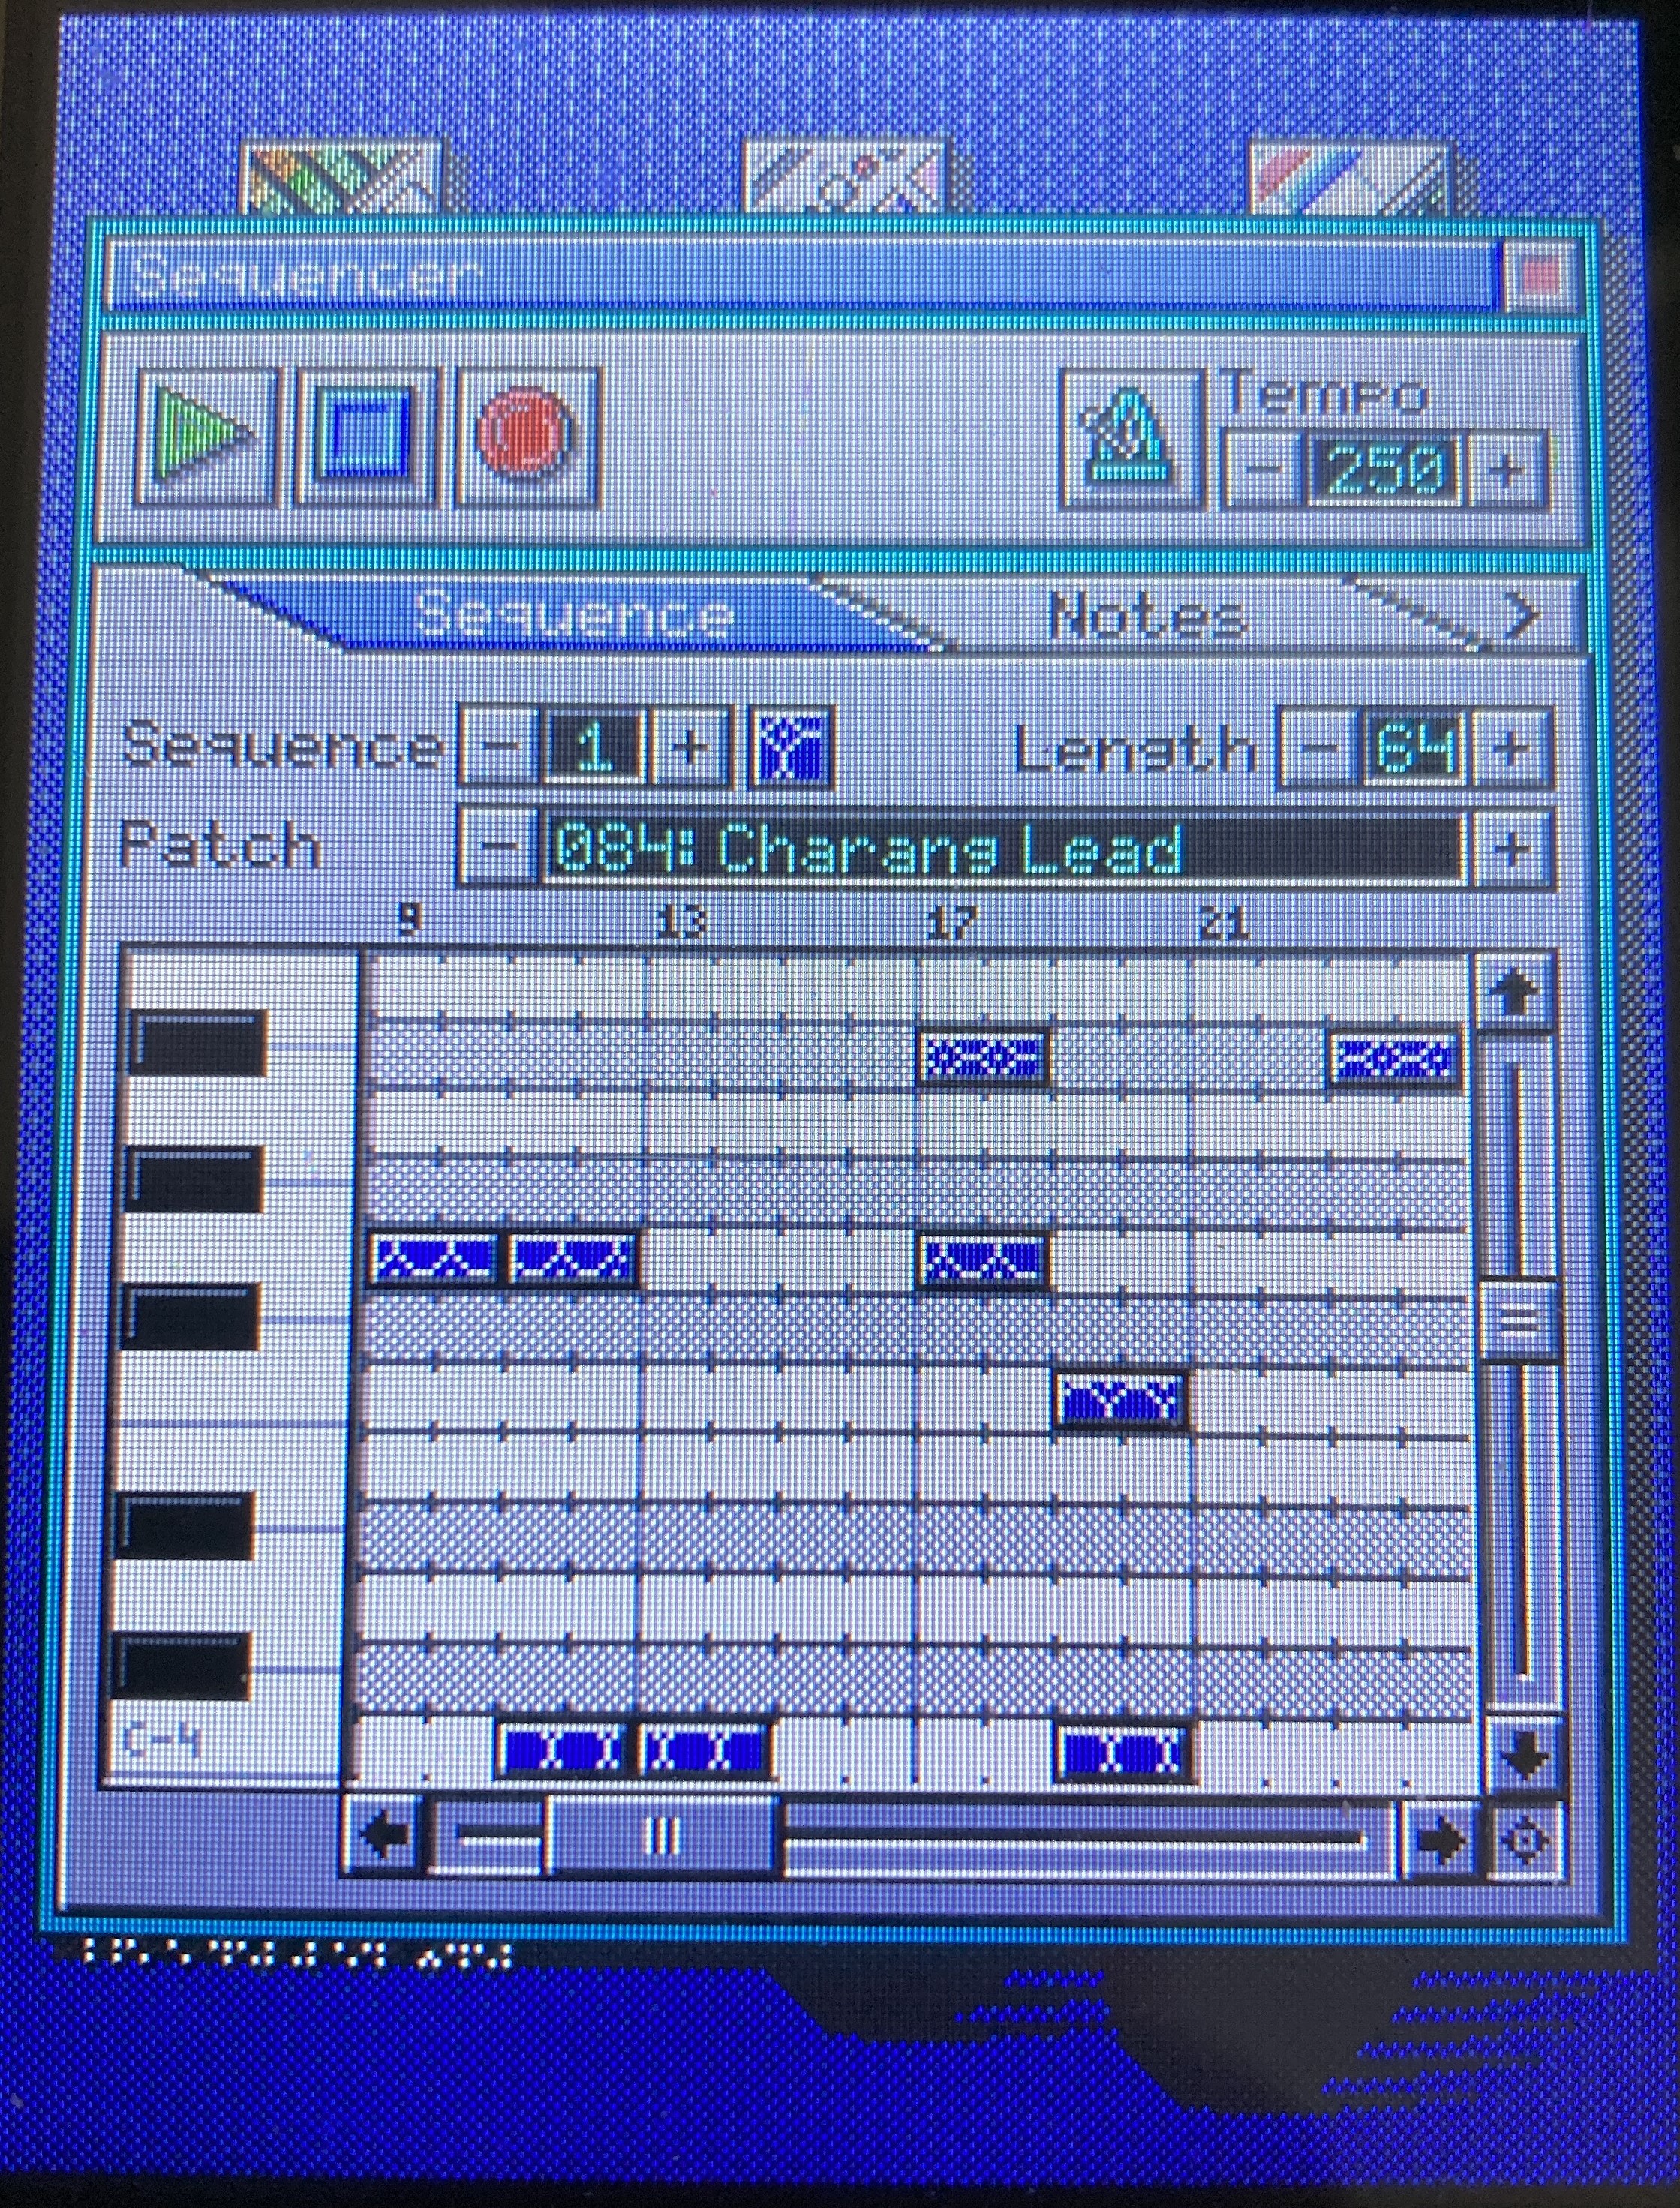
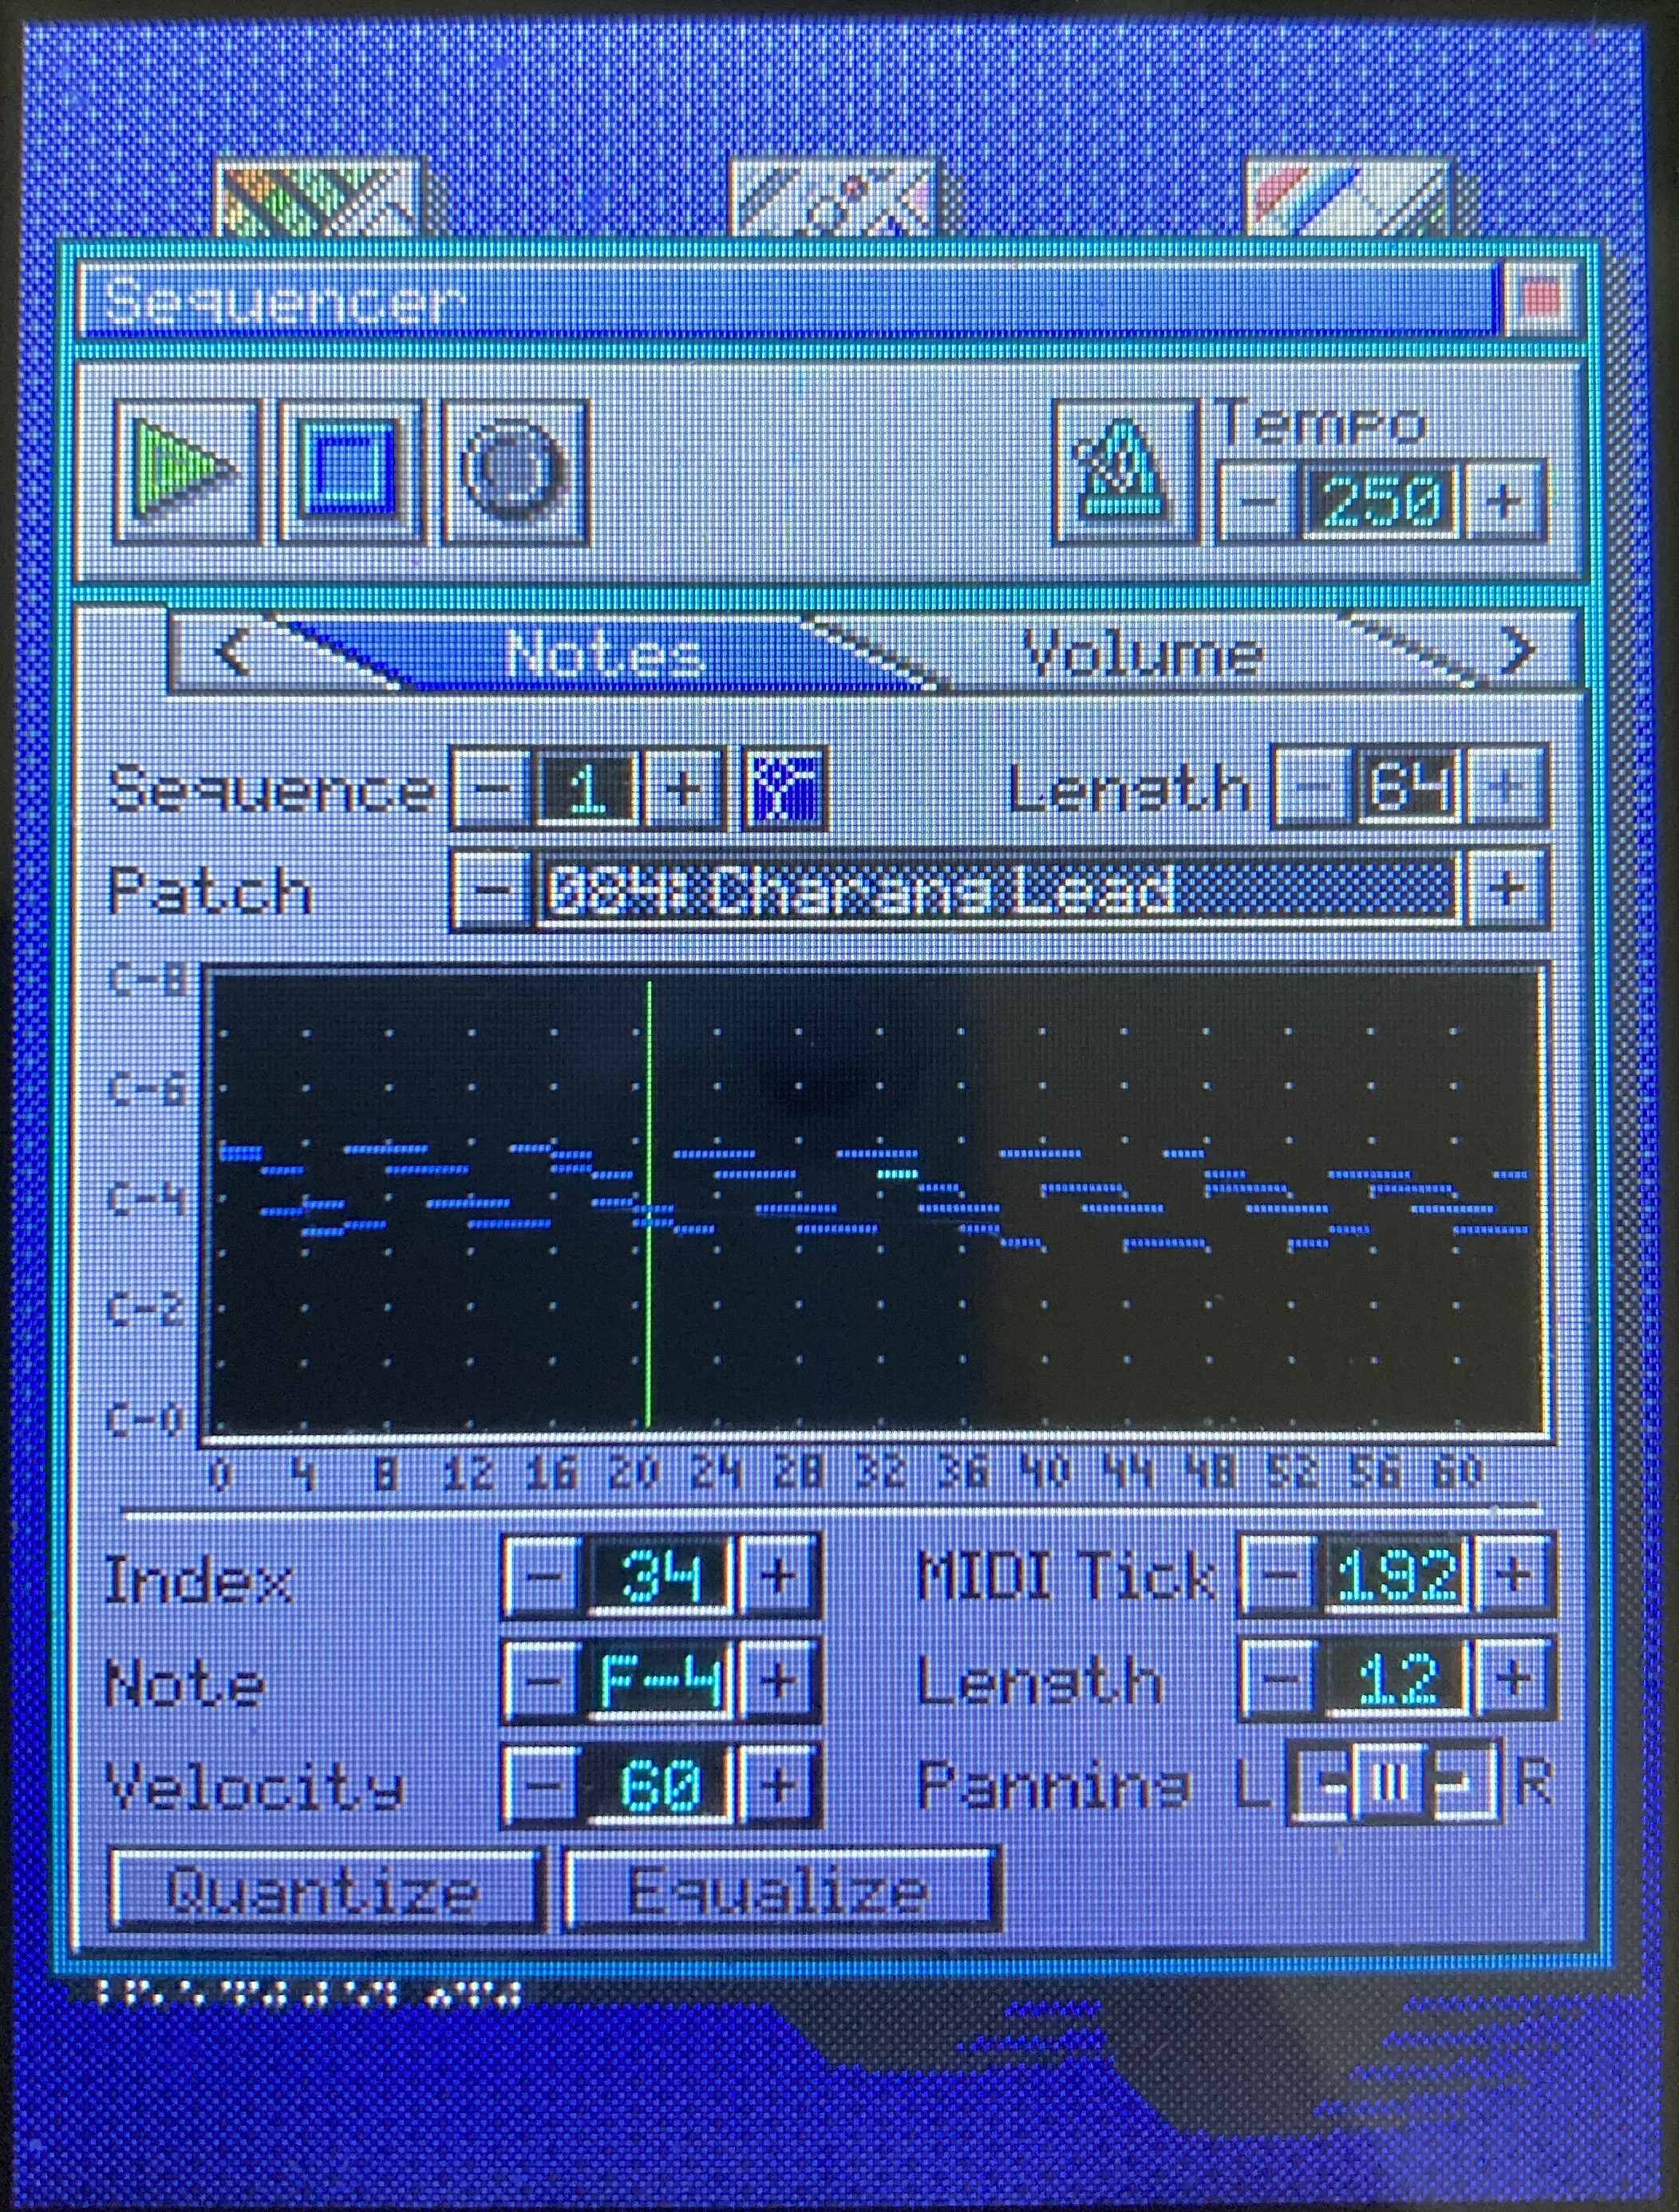
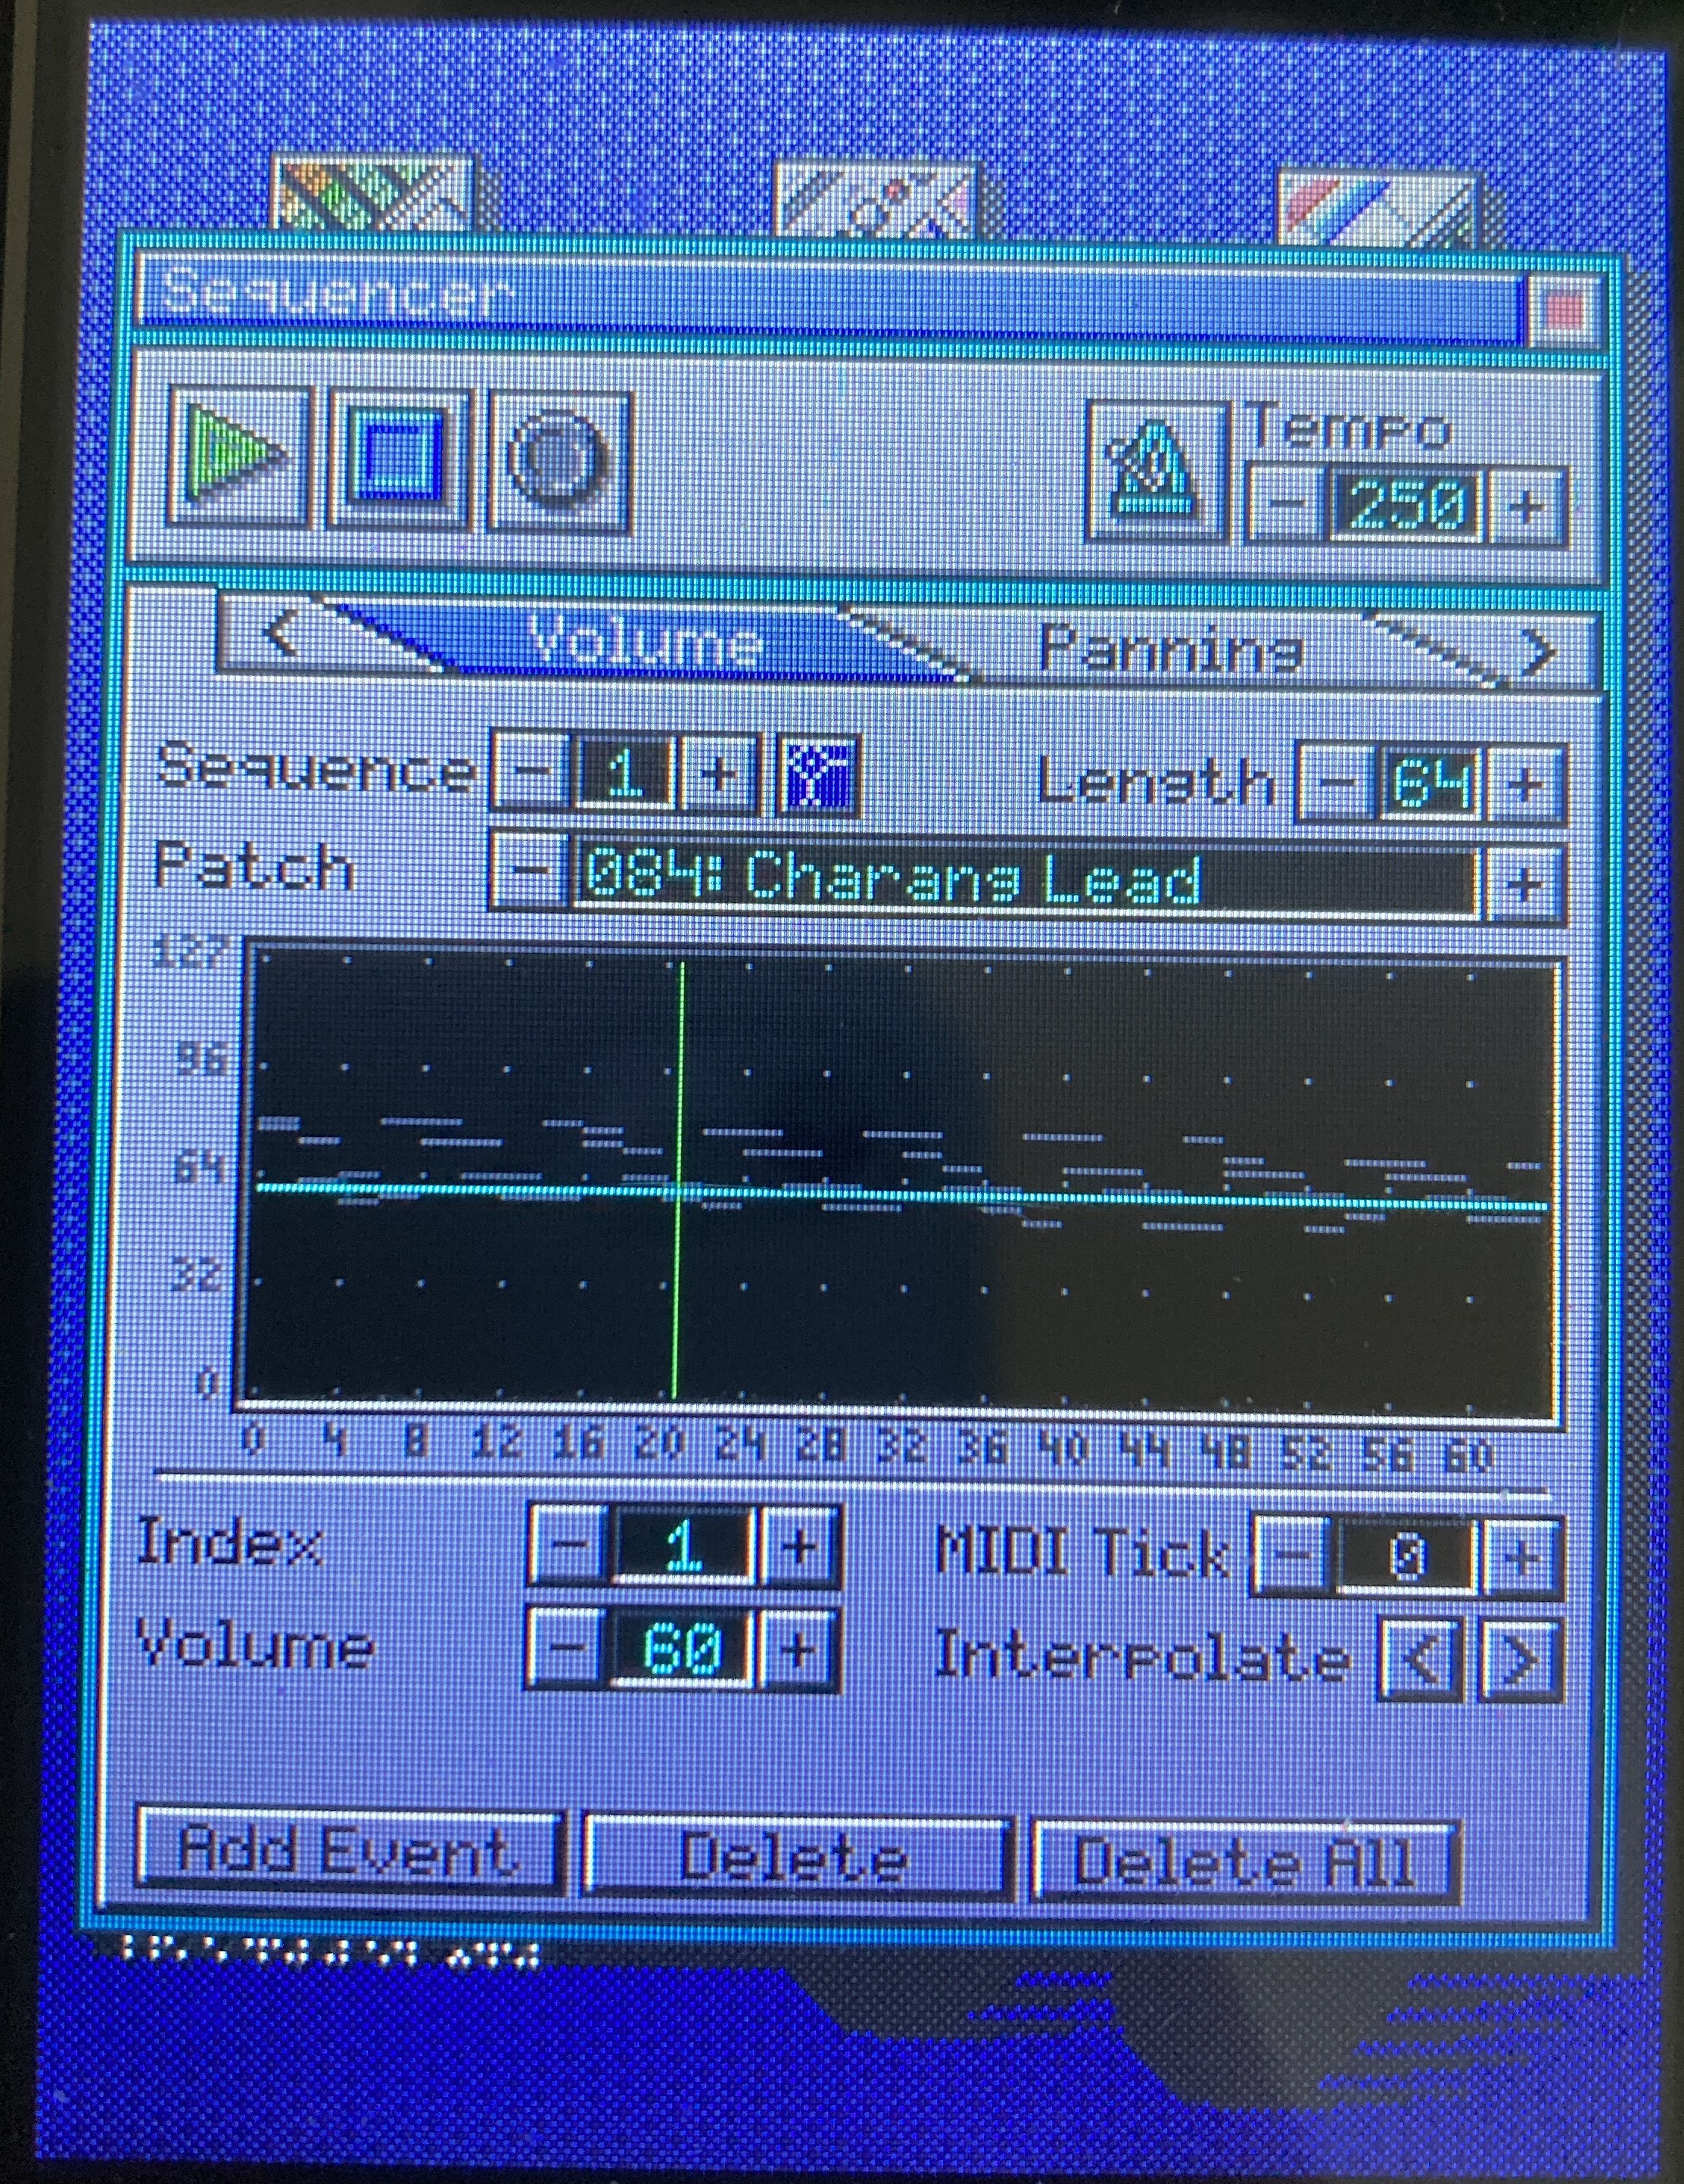
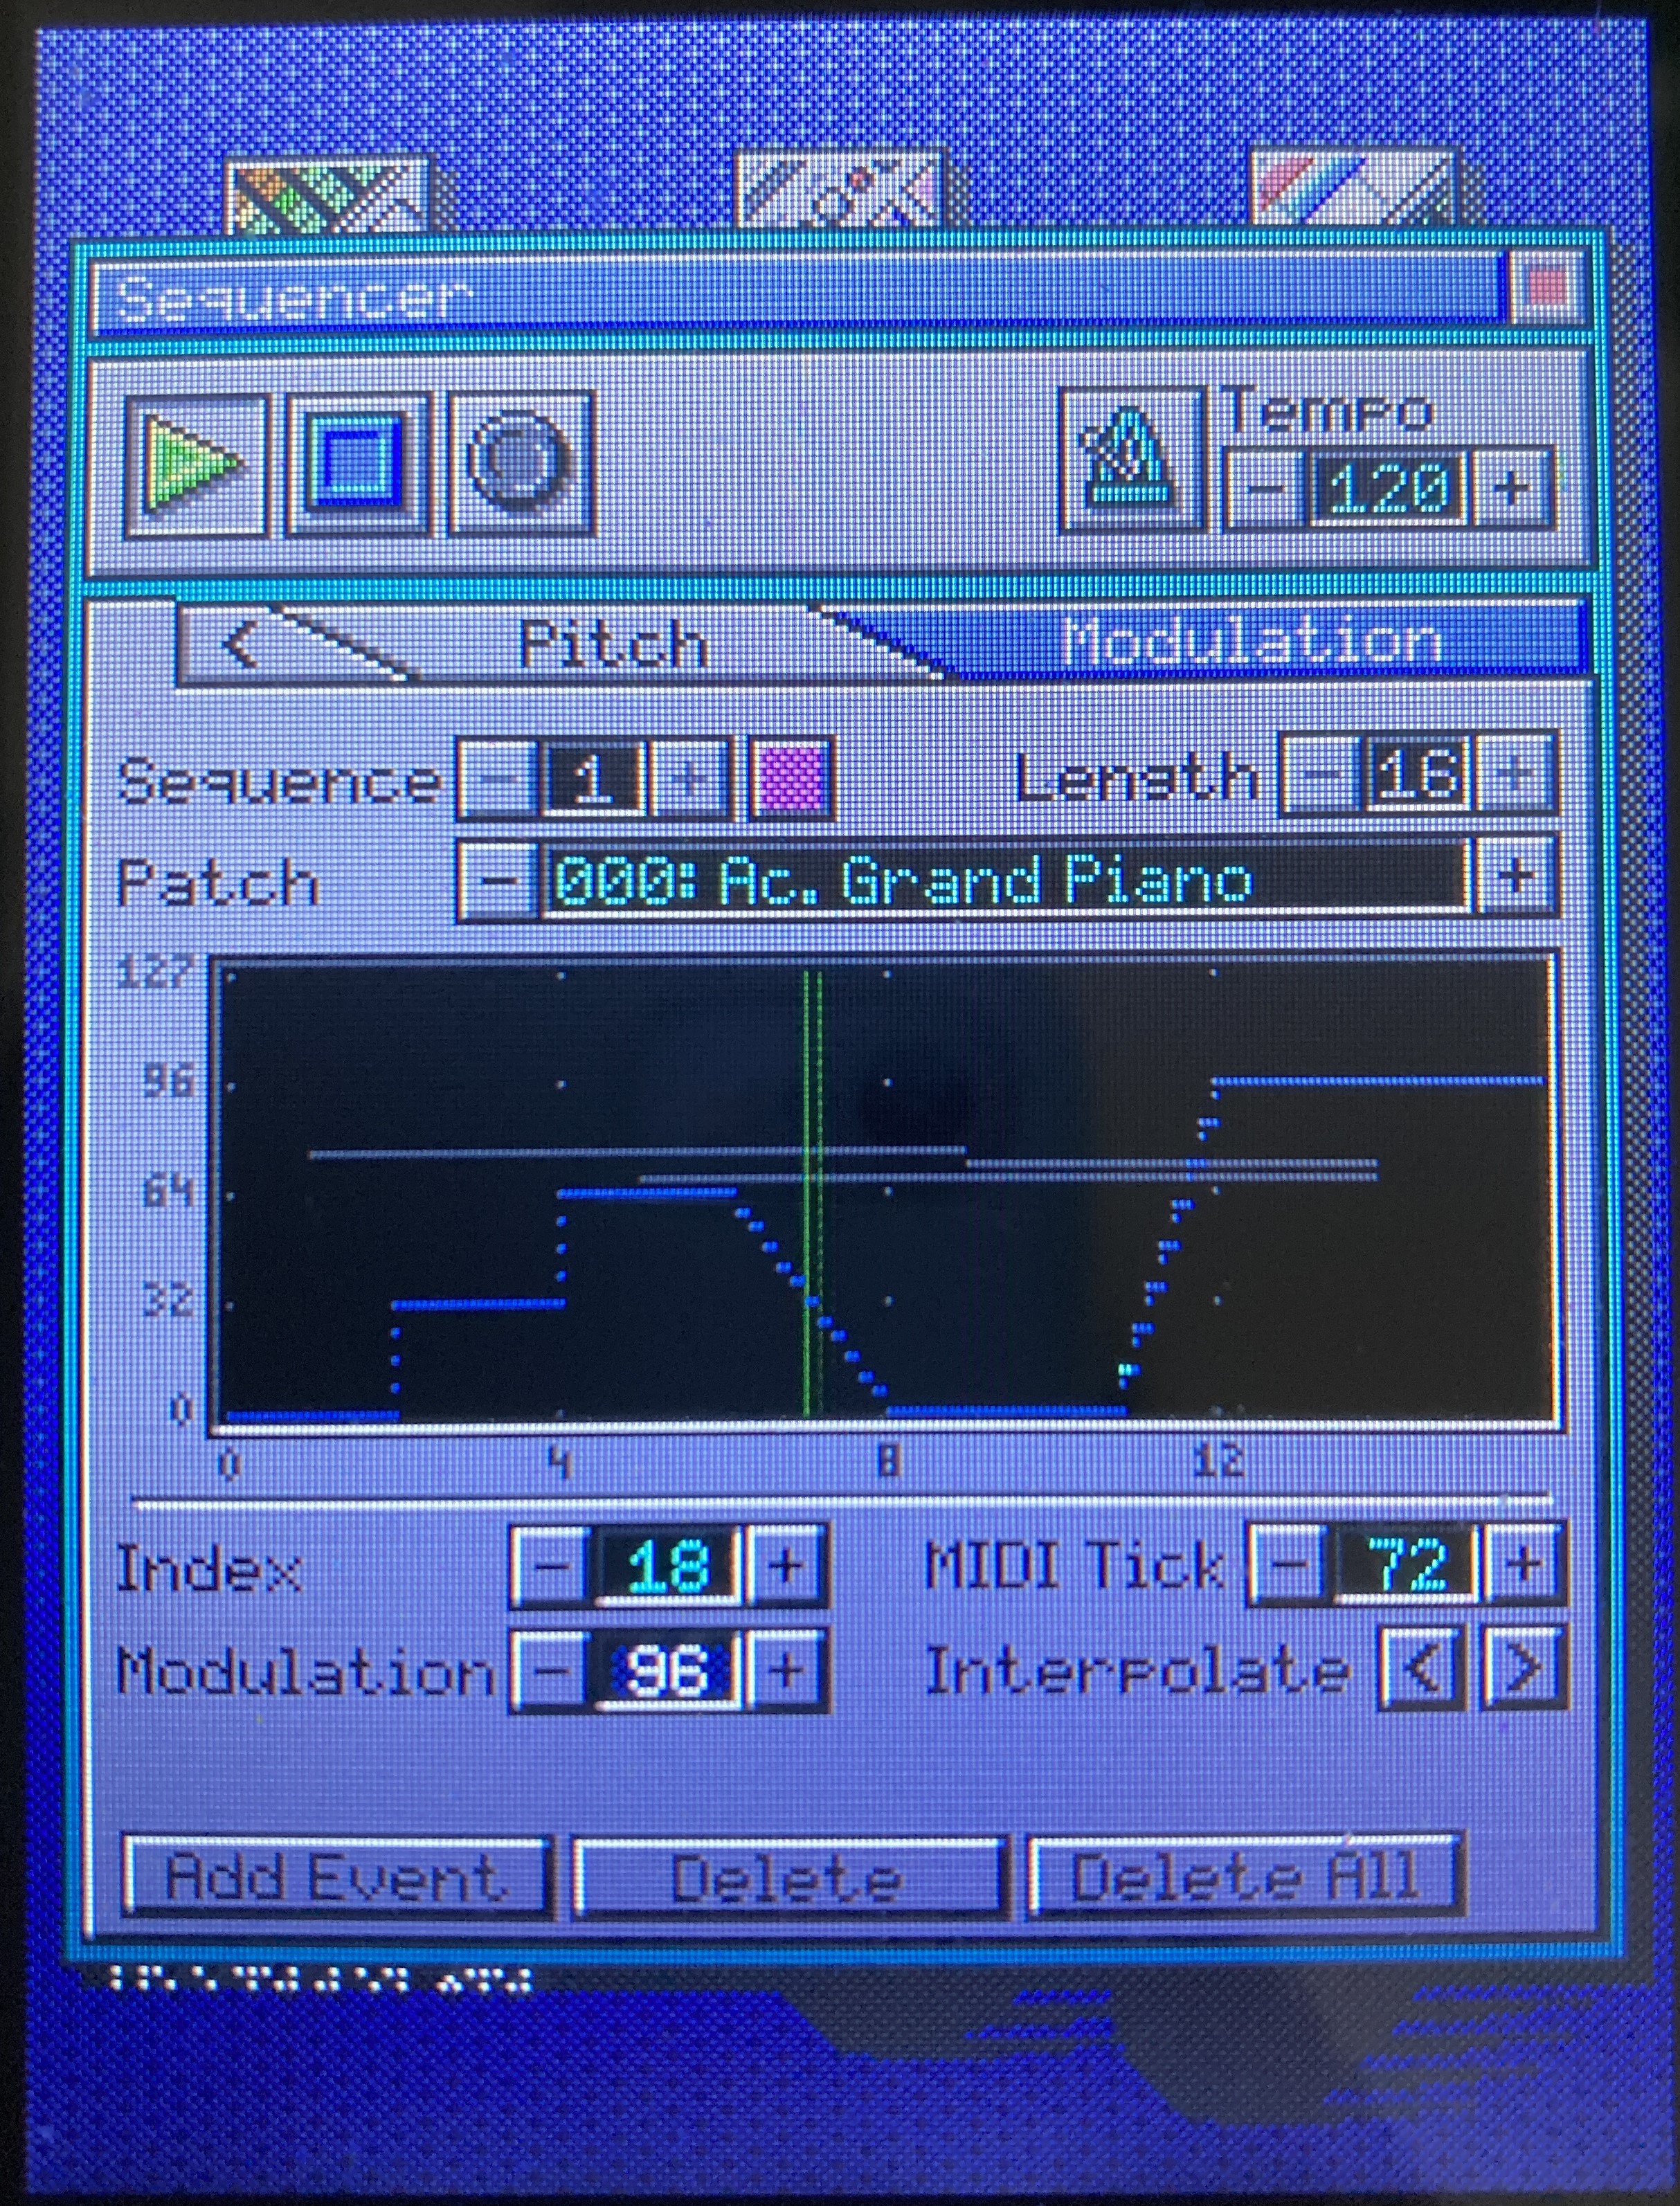
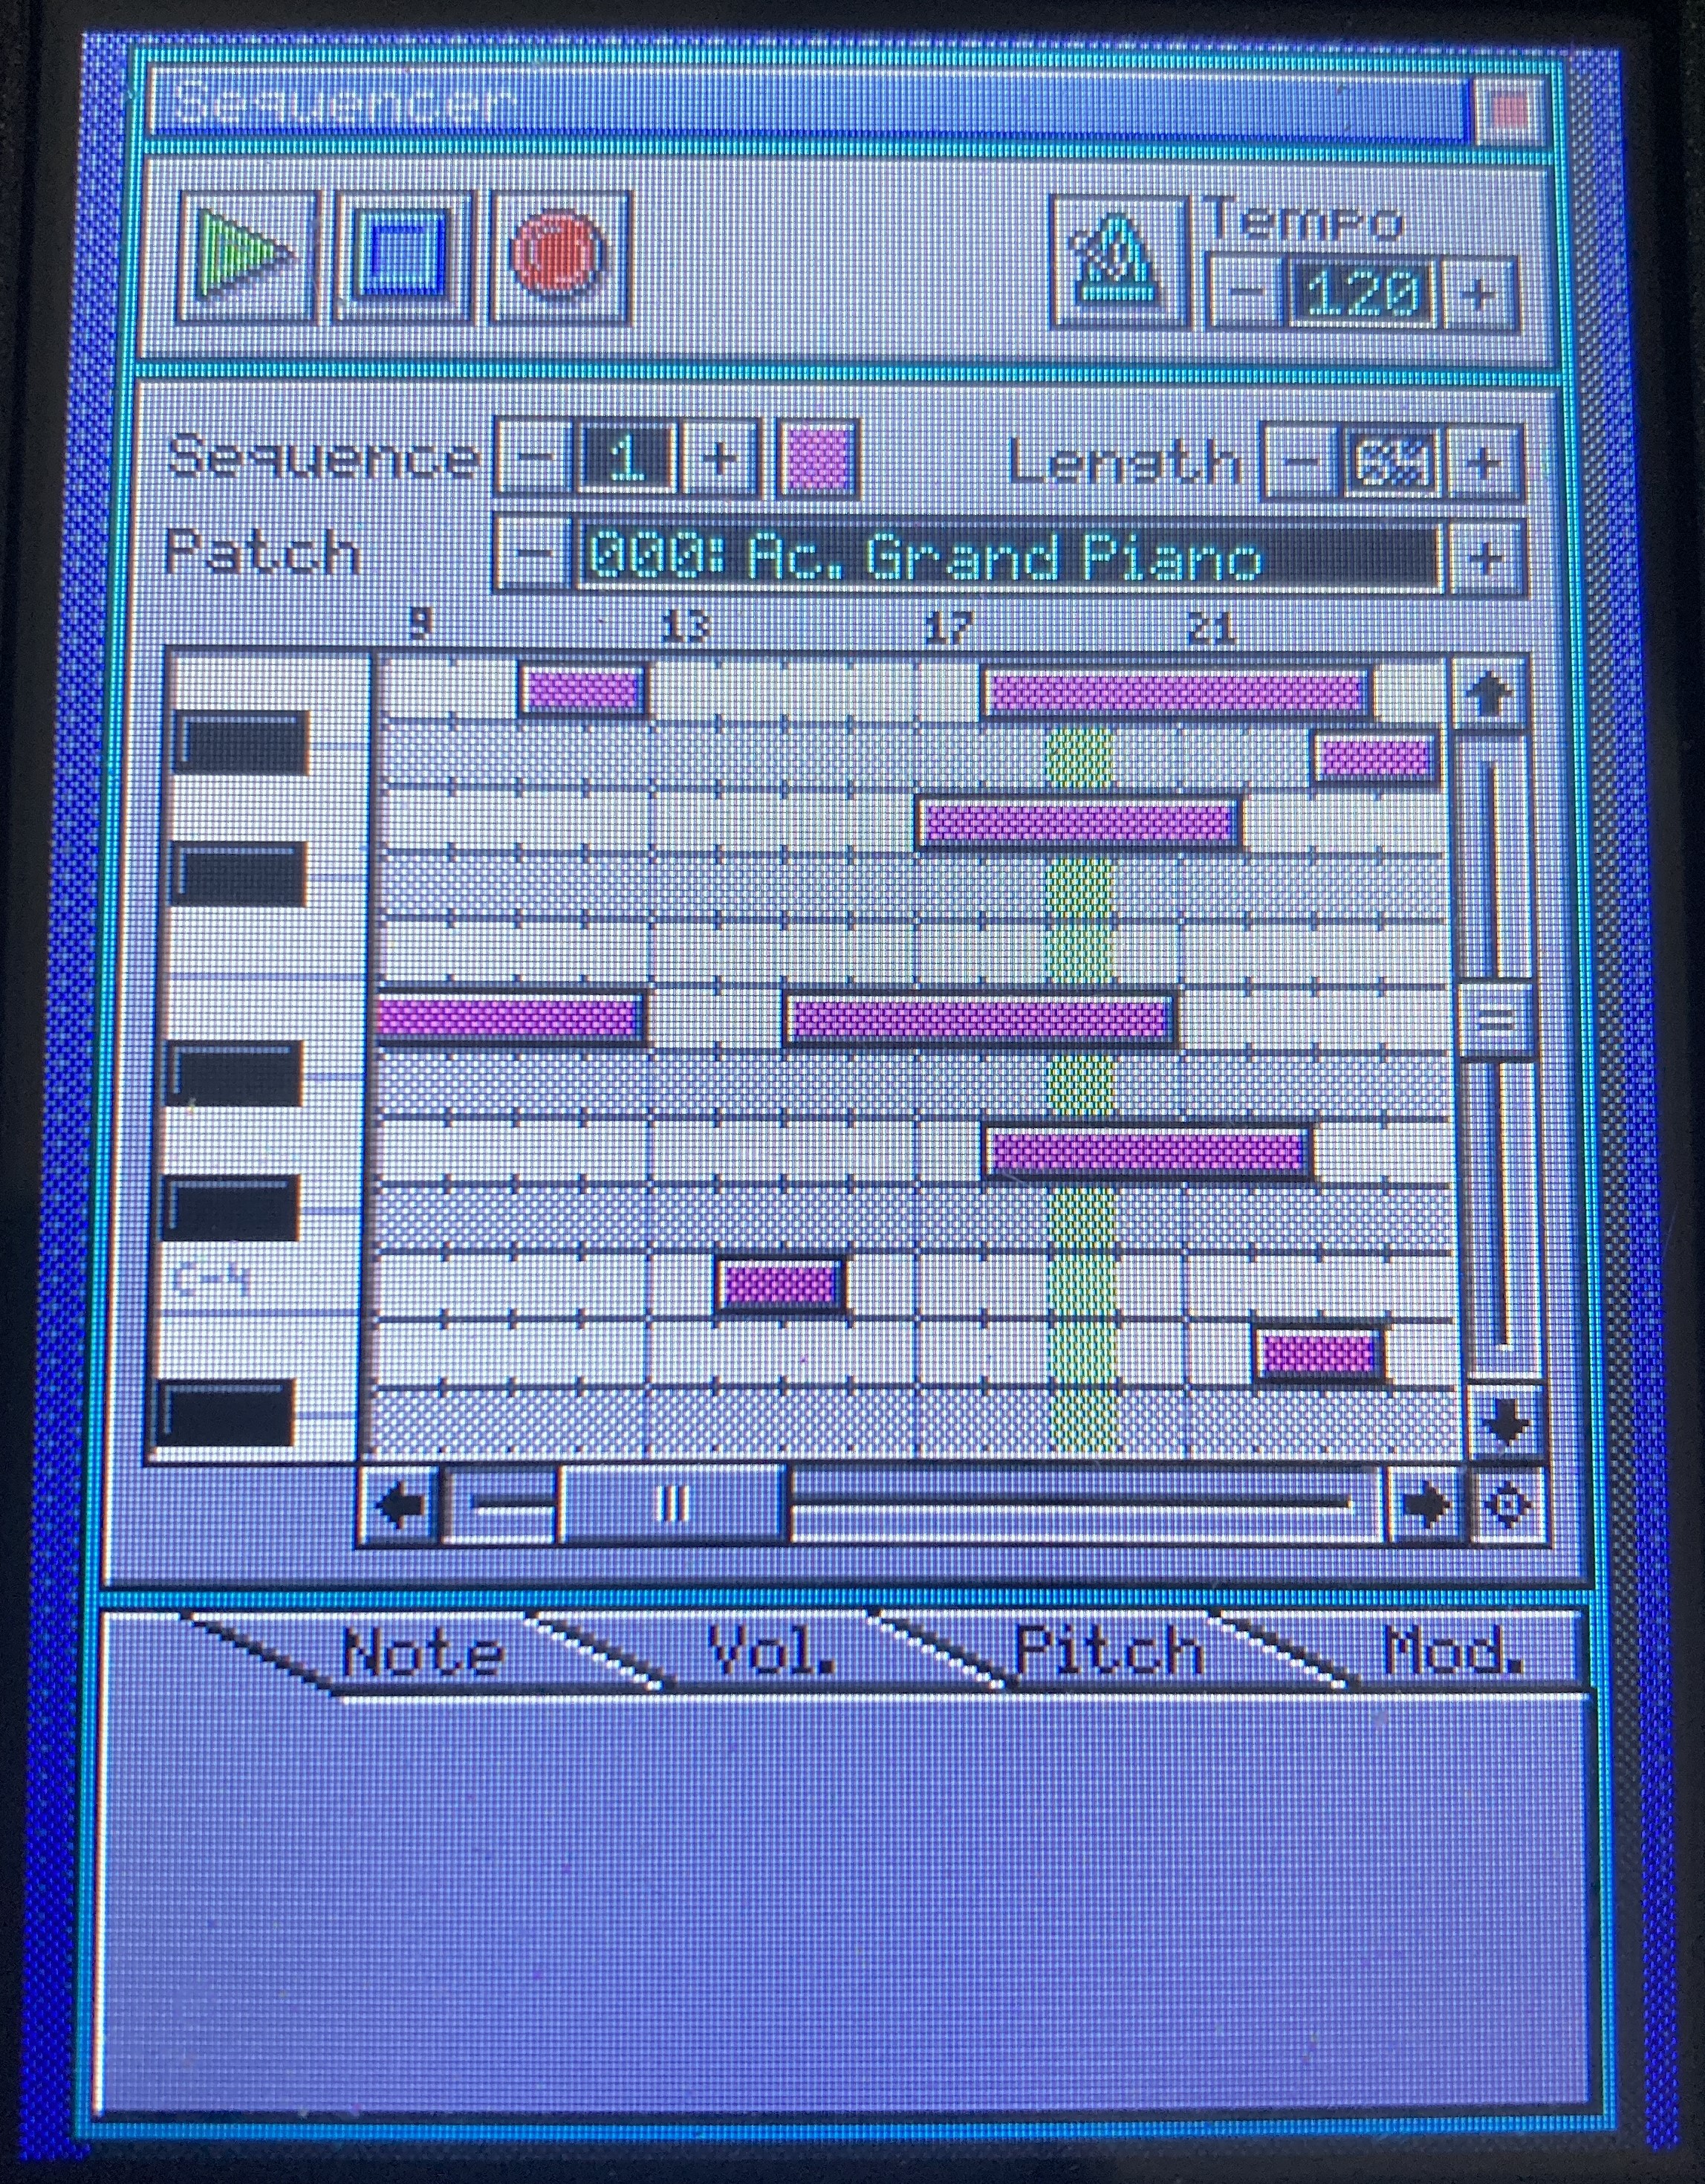
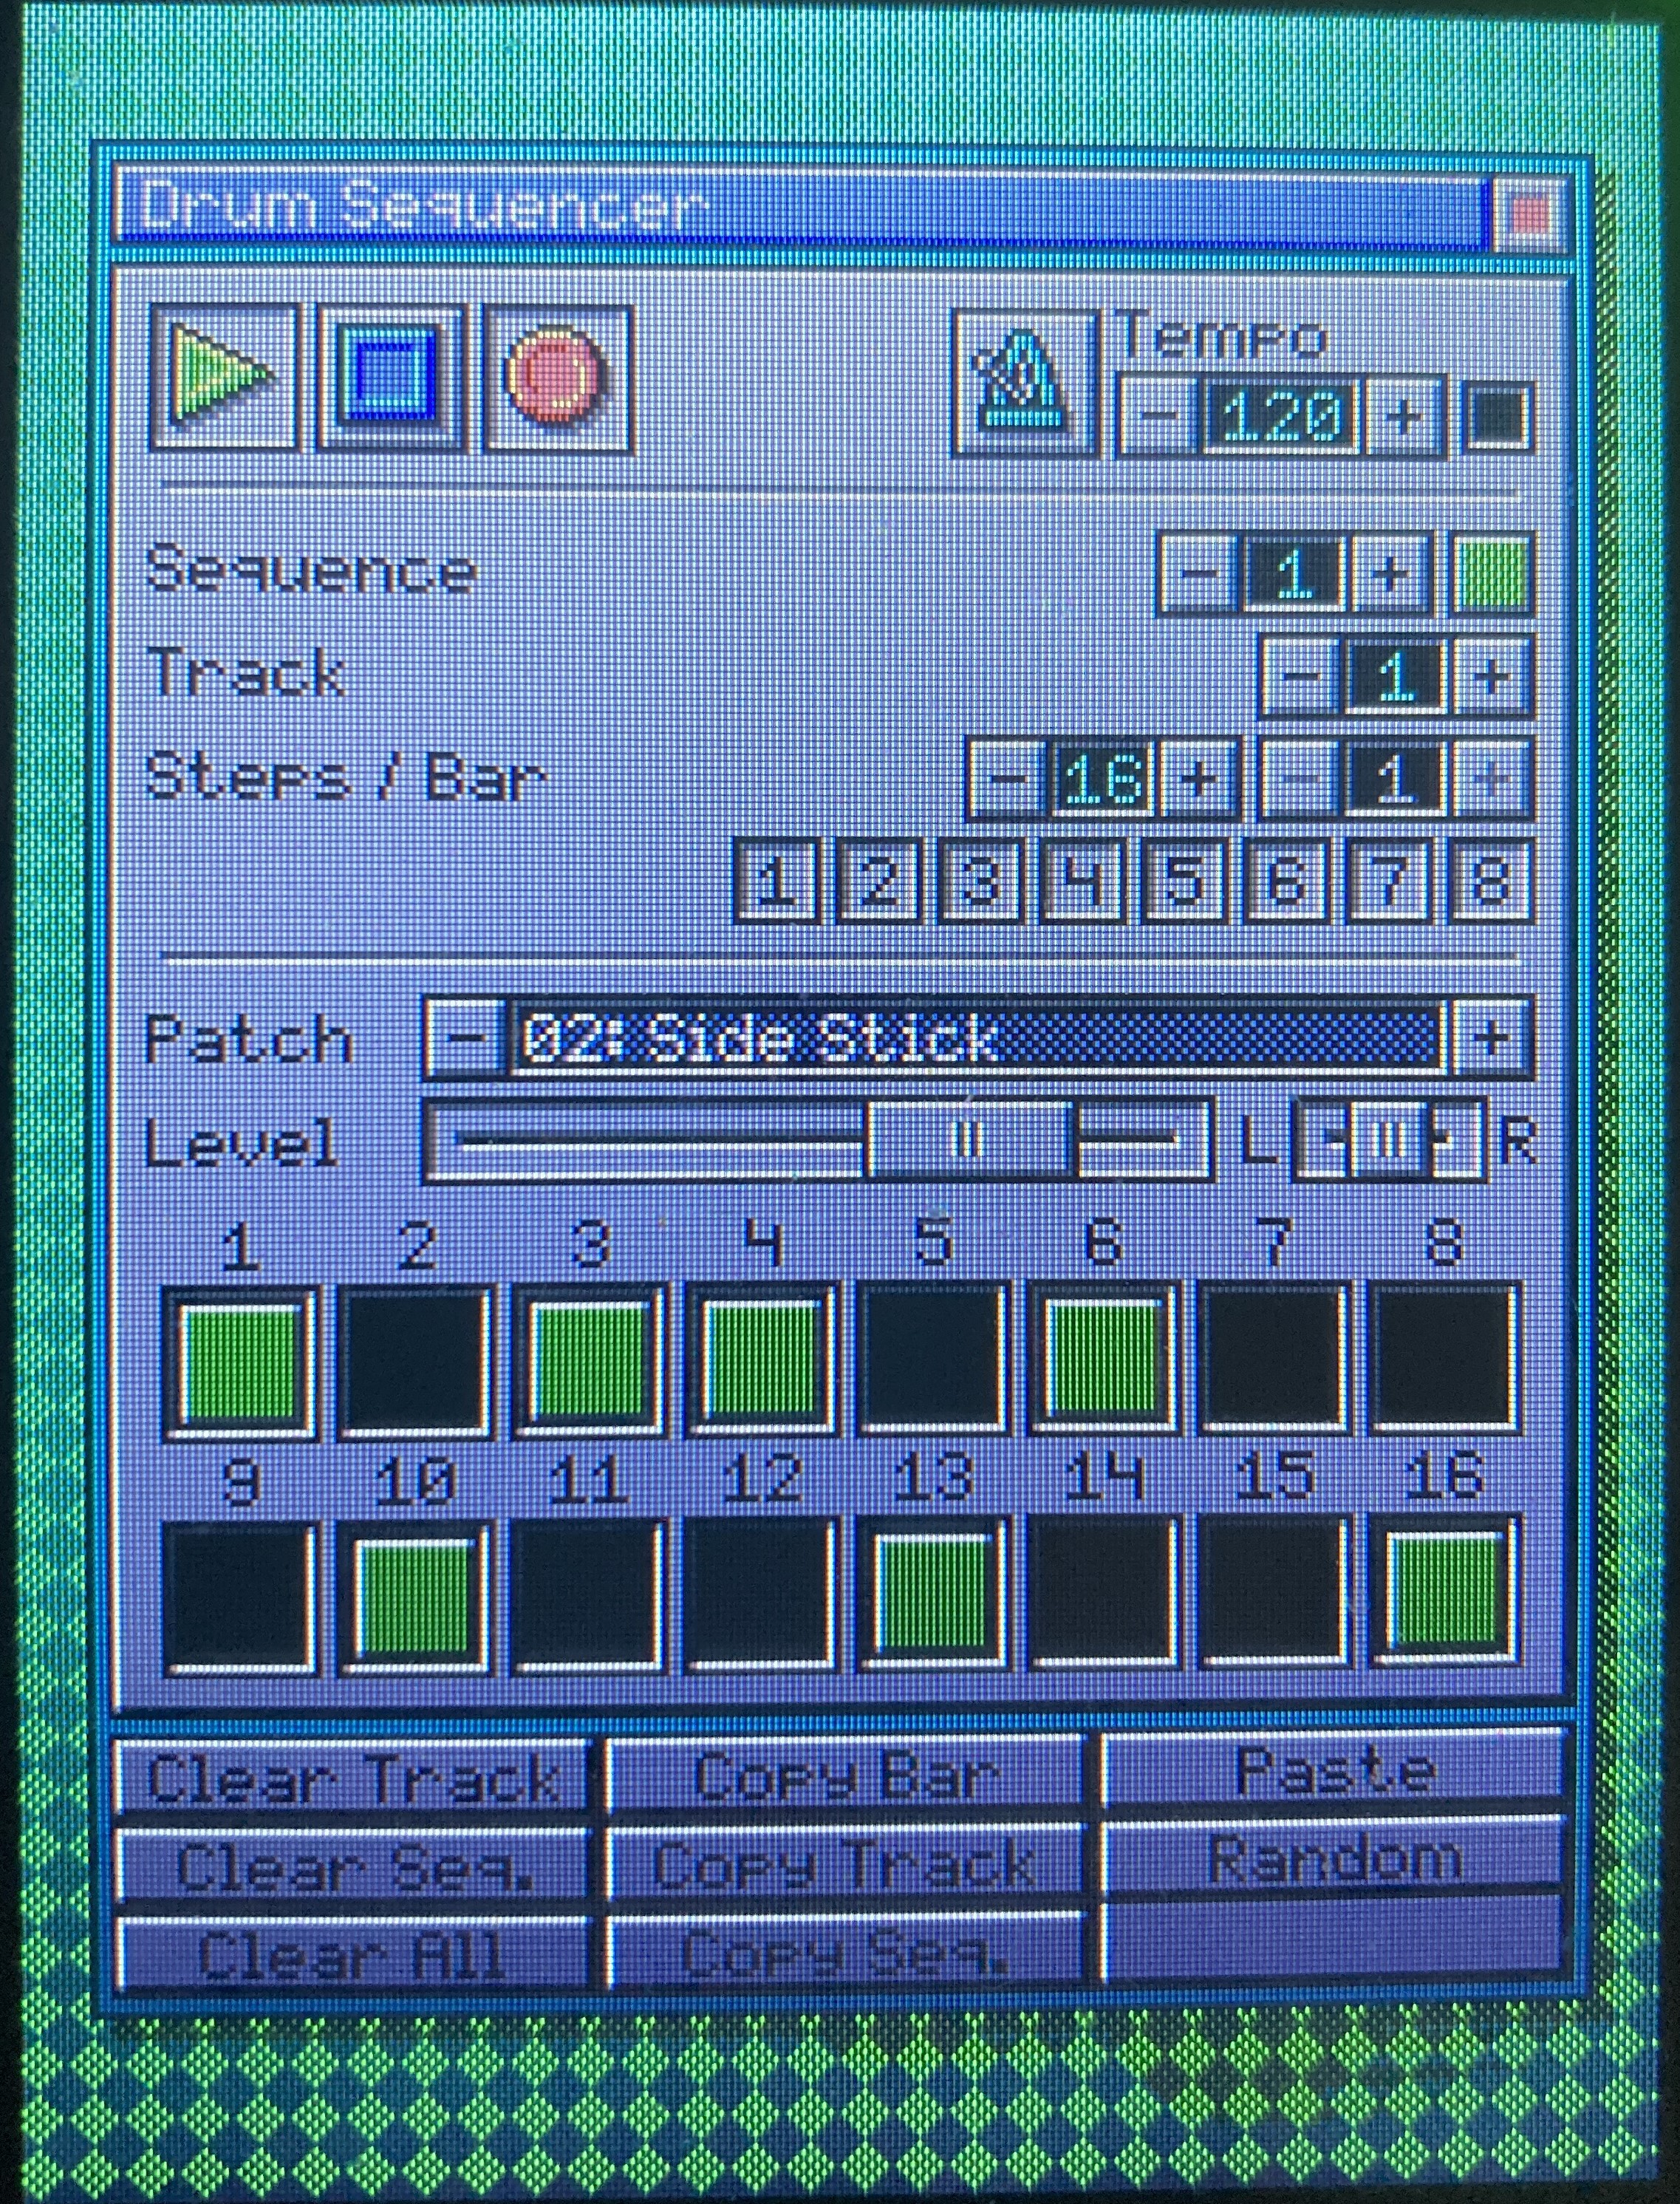
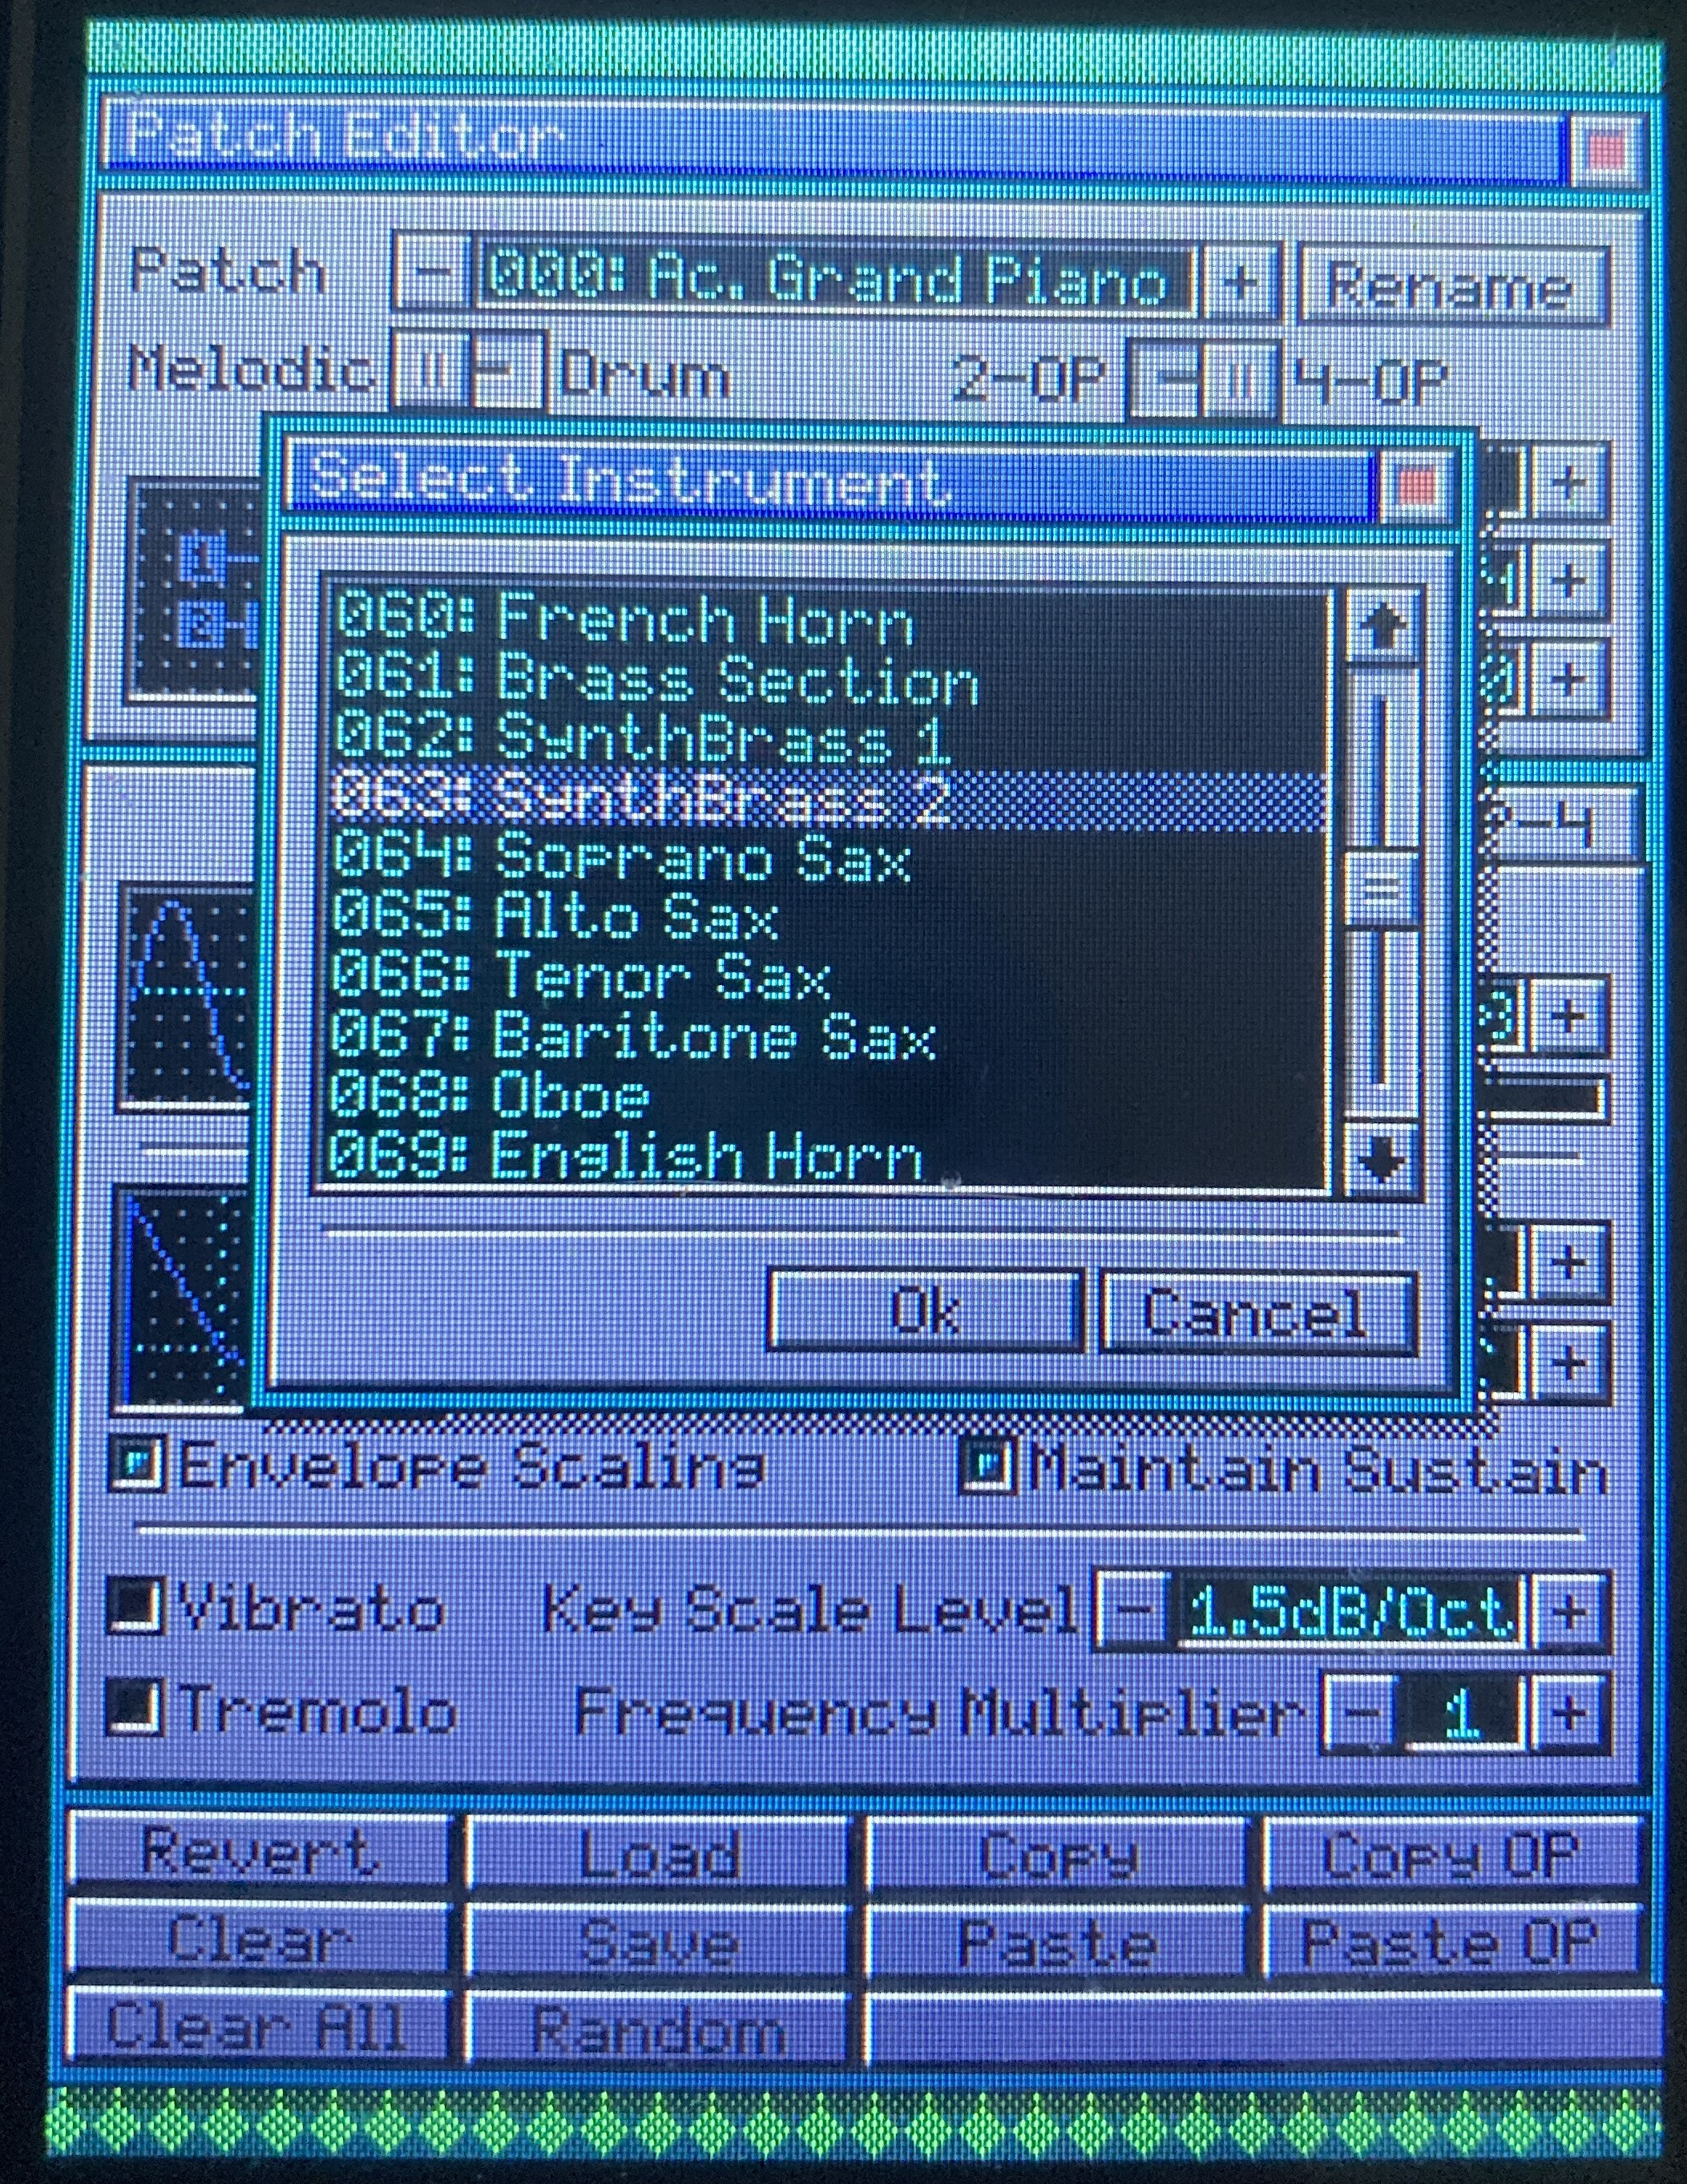
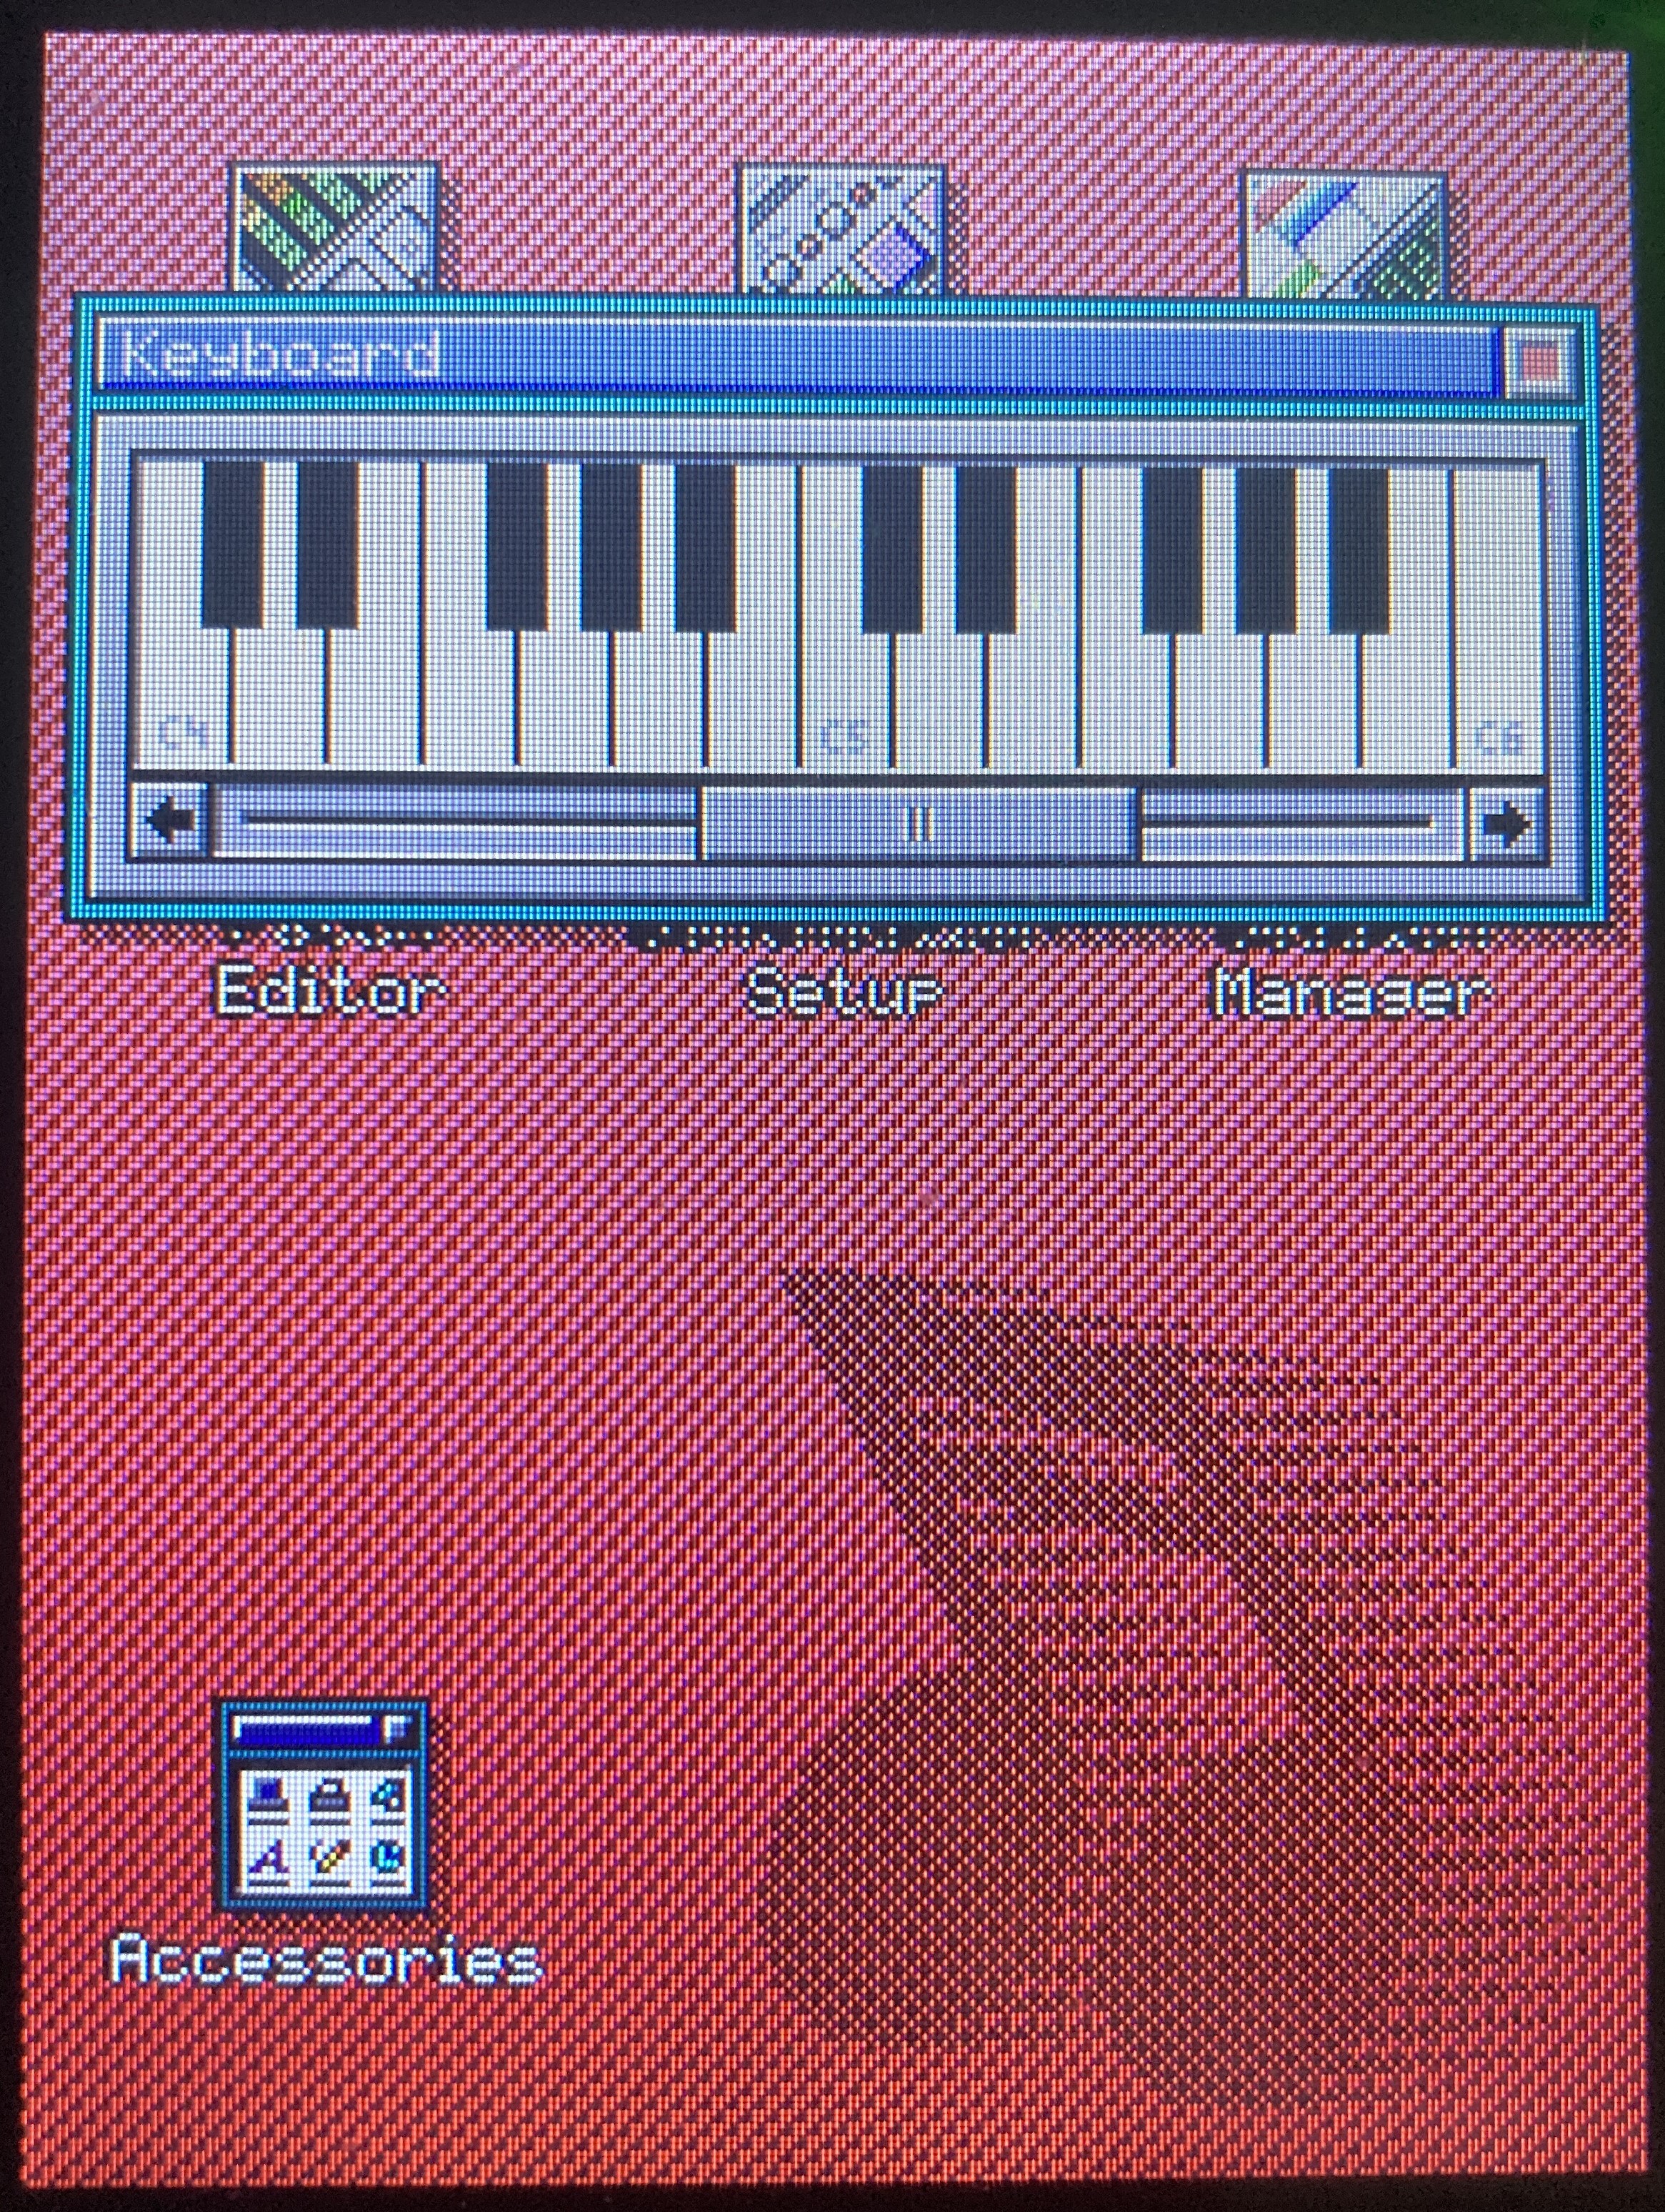
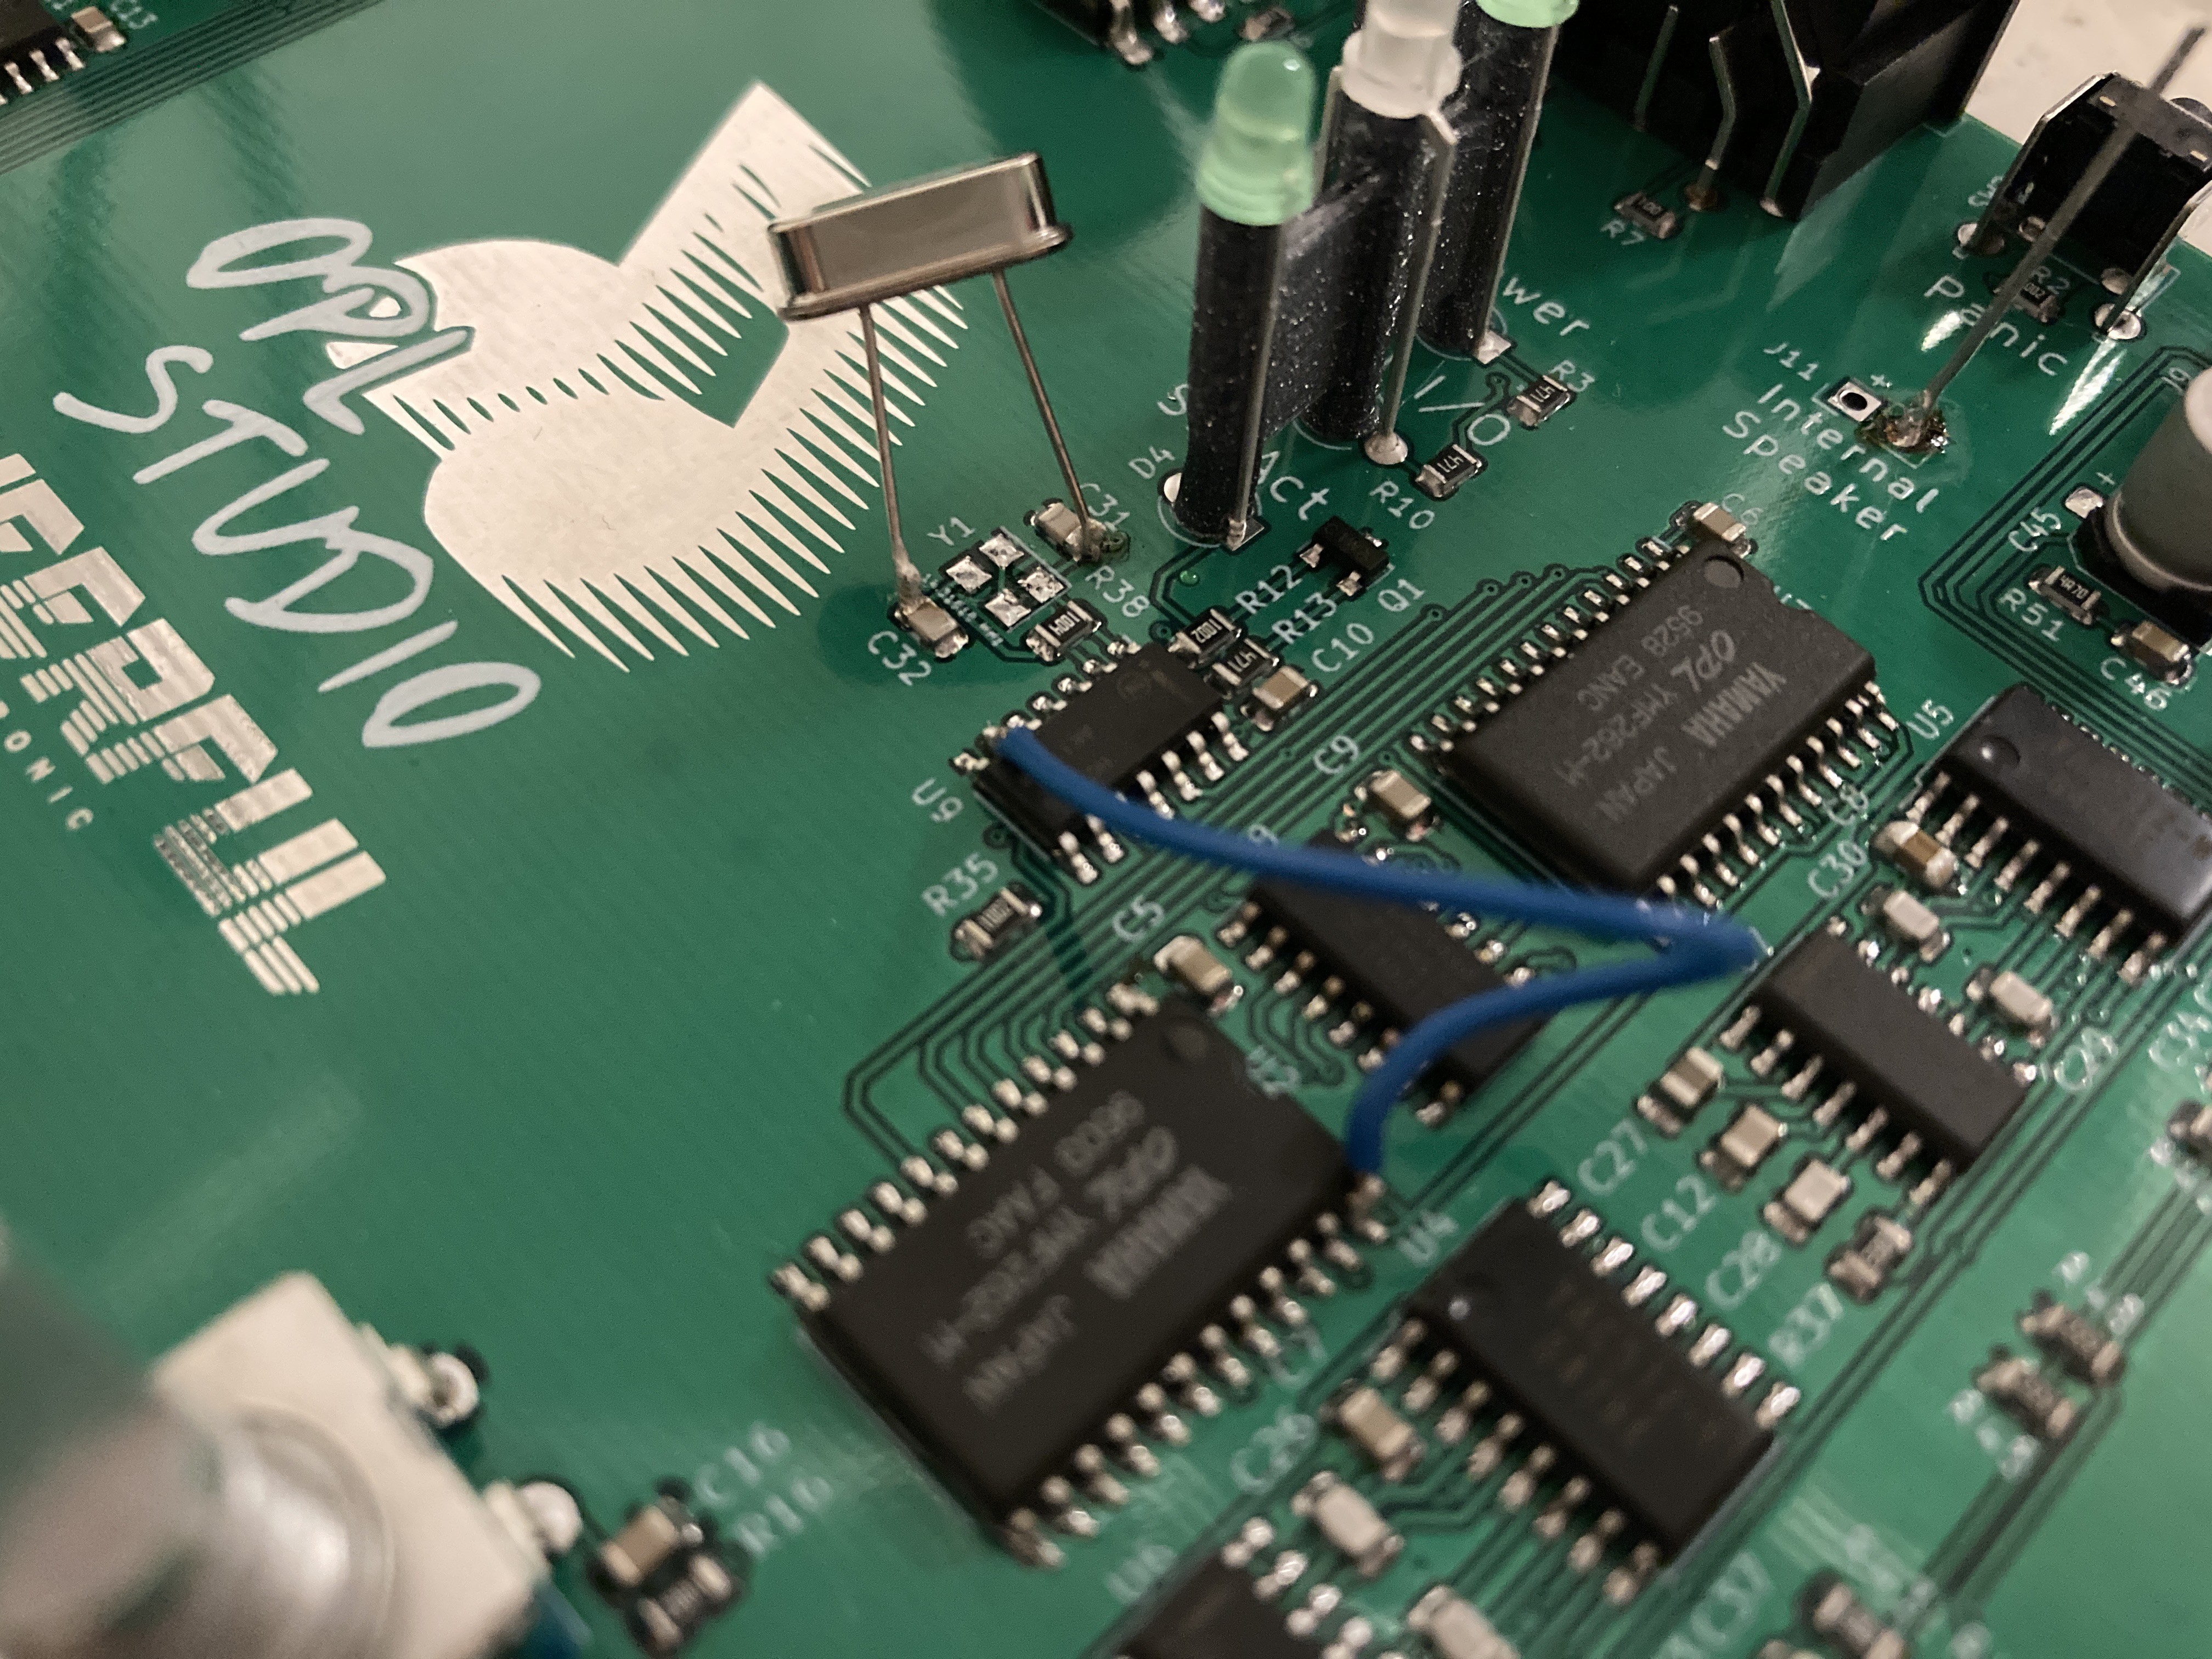
• The All In One hardware

    Maarten Janssen03/23/2024 at 14:43 0 comments

    The hardware for OPL Studio with integrated OPL3 Duo! is ready!!! It has taken many months with lots of frustrations and times where I just wanted to give up, but now it's finally here :)

    I've put together a quick video to show the first images of the all in one OPL Studio in action. It's playing a simple MIDI tune running an inbetween version of the old and upcoming re-write of the synthesizer code. The audio is a direct capture from the line out. You can hear some exagerated vibratos that I had hardcoded while experimenting with the new synth code, it does sound nice on this tune I think.

    The enclosure is also almost ready, so in a couple of weeks the new OPL Studio will be finally available from my Tindie shop!

  • The Good News Project Log

    Maarten Janssen02/14/2024 at 19:12 0 comments

    Finally I have good news to report on the all-in-one OPL Studio! 

    This design is like a night and day difference compared to previous prototypes. The audio is clear, the line out has a higher output level and the speaker out has a much, much lower noise floor. There is no more noise on the line out and on the speaker out there is only very slight noise from the LCD if you're listening through headphones and the OPLs are silent.

    There is light at the end of this very long tunnel now!

    Mistakes With The LCD

    Is it all good? No! Of course I did find more mistakes. The biggest one being the LCD connector. At one point during the design I had rotated the footprint, but I fell into 'a trap for young players' and I forgot to also reverse the order of the pins! So the LCD was dead. After realizing this I was a bit hesitant about fixing it, because it was tricky enough to solder the connector the first time and desoldering it and soldering it back after rotating was a good challenge! Also because there was no room. I had to solder the connector back at an angle and let it rest on some resistors and capacitors. To my surprise I managed to do it! 

    The LCD showed some signs of life, but still no clear image. It only showed a garbled mess of gray pixels. So I was sure that I messed up when soldering the connector. But to my surprise, when I added a connector for one of the old LCD modules, it was showing the same mess of pixels. This confused me and took me a while to figure out. It turned out to be the reset signal. On the kit design I had not used it, but for the all-in-ones I intended to use it. Turns out that I had not given the LCD controller enough time to properly reset. Problem solved after a simple software fix. Even the touch screen worked on the first try.

    The brightness is still a bit of an issue, because it doesn't work as it did on the old design. The screen is very dim, so that's still something I need to fix.

    Other Small and Easy Fixes

    There are other small things that need fixing. Transistor footprints that are not quite right, the MIDI status LED being too bright, the 3D printed LCD mount that needs some tweaking.

    All small thing that I will be working on in the next two weeks and get another few PCB prototypes made to check what should be the production version of OPL Studio. 

  • All-In-One Prototype Assembly

    Maarten Janssen02/06/2024 at 17:09 0 comments

    All-In-One Prototype

    All the parts to assemble the fist new All-In-One prototype have arrived and I have now put together the first board!

    The LCD connector was especially difficult and exciting cause of the teeny tiny pins and I wanted to be careful not to melt the plastic while soldering the part with hot air. There were a few bridges that I managed to fix with the soldering iron, some flux and carefully dabbing the excess solder with some desoldering braid. I'm happy with the result and it seems that at least there are no shorts.

    Of course I did make some mistakes when I ordered the components... :)

    • I ordered mono jack sockets instead of stereo ones
    • My BoM had the same Mouser part # for 10nF caps as I had for the 2200pF caps. Oops! I must've copy pasted the parts without updating the reference, so for now 0.1uF will have to do instead of 10nF
    • The shaft of the volume pot is too short, though I think this one is on Mouser for getting me the wrong part since I did order one with a 20mm shaft, but no worries for the prototype I'll just 3D print an extension for the shaft
    • My biggest mistake is with the two level shifters that I intended to use with the LCD. I must've forgotten to check the footprints, cause these parts aren't available as SOIC-16, what I used on the PCB. I ordered TSSOP-16s without checking and that will not fit! So for now I omitted the level shifters. They are probably not really needed since the breakout boards I was using before also don't have them. I used some tiny single strands of copper wire that I cut from a stripped wire to connect the data lines

    I haven't yet tested the board. I need to make some software changes to accomodate the different pinouts on this board. This is what I'll do during the course of this week and hopefully the prototype works as expected!

    MIDI Controller Update

    While I was waiting for the new PCBs and components I continued working on the MIDI and OPL controllers in the software. The audio part has been completely reworked to allow for exciting new features such as pseudo 4-OP instrument patches, patch effects and MIDI control mapping. 

    Right now the MIDI control mapping is finished, except for the UI. You can now map any incoming MIDI CC to a synthesizer control. For example map MIDI CC 54 to a software vibrato, software tremolo or patch parameter such as operator output level.

    Next up will be to implement support for pseudo 4-OP patches...

  • A New All-In-One Prototype

    Maarten Janssen01/14/2024 at 11:27 0 comments

    Now the sequencer has been updated and after a few day where I added additiona file support to the media player it's time to get back to the hardware of OPL Studio!

    The media player now supports DOSBox raw OPL (*.DRO), id Music Files (*.IMF) and Video Game Music (*.VGM)

    Another All-In-One Prototype

    Before my christmas holiday I spend a lot of time breadboarding parts of a new all-in-one design and experimenting with a previous prototype that has now become a Frankenstein setup with many loose wires, replaced components and failed experiments. The goal was to fix the issues that existed with the previous prototypes. Whether this is now the case I'll not comment about. I have been disappointed a few times before after getting excited about new PCBs.

    So another round of prototypes is now going to get manufactured where I made some drastic changes that I left out of previous prototypes:

    • The LCD screen is no longer a breakout module, but now attaches directly to the mainboard using a ribbon cable. All circuitry to drive the LCD is now also on the mainboard. This is scaring me the most since I couldn't breadboard this part
    • The little TDA2822 amplifier is also gone. Now there is an amplifier build out of discrete components
    • The status LEDs hadve moved left of the screen
    • The power button doubles as panic button
    • The line and speaker jacks are now 6.3mm jacks
    • There is a real volume knob now and the A and B rotary controls have moved for better looks and operation

    In The Mean Time: Software Refactoring

    While I wait for the new PCBs I will continue working on the next major update of the software. The code that handles MIDI and controls the OPL3 chips will be refactored to allow for some cool new tricks:

    • Pairing two 2-OP channels to make a pseudo 4-OP channel and support for OPL patch files duch as *.DMX that allow this
    • MIDI control mapping so you can map any MIDI control to an OPL Studio control. For example to have the volume slider control the output level of an OPL channel, to name something stupid
    • More advanced instrument patch effects like those used by various trackers to create more convincing drum sounds or to emulate the sound of the Loudness OPL2 music from games such as Fuzzy's World of Golf

  • New Sequencer Nearing Completion & All In One Update

    Maarten Janssen11/14/2023 at 13:57 0 comments

    The new sequencer is nearing completion. All functionality has been implemented and many bugs have already been fixed. The newest additions since the last log are:

    • A revert function that works as a rudimentary undo for any changes made to the sequence since it was opened.
    • The option to copy and paste sequences.
    • There is a transpose function to change the pitch of all notes or to shift all notes left or right in time.
    • The piano roll editor now has the controls to set the velocity and panning of new notes that are added by hand.
    • You can now also drag and drop events in the details panels. For example you can long press the volume graph to add a new volume event and you can drag it to change its position and value.
    • Many, many tweaks and bug fixes

    Drum sequences are still not using the new sequencer and I will definitely leave that until after the new software update. I now just want to release this thing after a few more days of testing to capture as many bugs as I can.

    Next to the sequencer update there will be a fun little secret hidden in the new software ;)

    Update On The All In One Units

    I have some good news on the all in one units this time. When using the line out the audio is now fine. No more excessive noise from the different components. The amplifier to the speaker out is still a problem, but I think I also have that mostly covered now. I've been working on a different amplifier design using a different chip that as far as I've been able to test sounds promising. I have a little test amplifier breakout board on the way to test my new design before I integrate it into the main PCB.

    For the LCD module I also have some new plans. So far I've been using complete modules for the LCD and touch panel that also include an SD card socket. The problem I'm having with these modules is that too often they are of questionable quality where some have brightness issues, some of them have misaligned touch screen panels, others have issues with adhesion of the different layers of the LCD and so on. This means that for every OPL Studio I've been shipping so far I've been hand picking the LCD modules to make sure they function correctly. This also means that I've been rejecting far too many modules (around 25%) and then I'm not even counting all modules that arrive broken due to aweful packaging done by vendors. Anyway, to get a better grip on LCD quality I will change to building the modules myself or rather I will use the loose LCD + touch panels that connect to the main PCB using a ribbon cable and I will build the interface myself. I have a few panels on the way to test this out.

    Finally the enclosure will also get an update, though it will keep the same dimensions and overall look as the current units.

  • Detailed Editing Panels In The New Sequencer Module

    Maarten Janssen10/08/2023 at 14:55 0 comments

    Time for another sequencer update! 

    I had a little break in between to attend the 2023 Eindhoven Maker Fair with the OPL Studio and some other projects of mine. It was a lot of fun to see and talk to everyone there and have lots of people and especially kids play around with all the synths I brought! Lots of good energy to continue work, so there has been a lot of progress over the last couple of weeks. 

    The sequencer is now at a point where it's fully functional and includes all the panels that allow you to edit all sequence details.

    In the previous log I wasn't sure yet how I could facifitate editing sequence details such as note properties, volume, modulation, etc. I was thinking to add a little panel with tabs below the piano roll, but since most of the screen was already taken this would be way too small. Still sticking with the tabs seemed like the only viable option, although still the screen is too small since I need 6 tabs and this wouldn't leave any room to show any labels on the tabs. This meant that it was time to expand the UI with a new component: a tabs ribbon! The ribbon now allows me to scroll through a list of tabs if there are too many to fit on screen.

    The 'Sequence' tab is the main tab of the sequencer where you create your sequences by recording MIDI or using the drag and drop piano roll and where you do all your basic editing. The other tabs go into more details of the sequence and allow you to tweak all the tiny details. Something the old sequencer really was lacking!

    The first tab shows the note details. It shows a graph of the full sequence and all of the notes. Using the spinners and rotary controls you can now navigate through the sequence note by note and change parameters such as note velocity, panning and start and duration up to MIDI tick level. Quantization is also done in this tab, plus there is a handy feature to equalize the velocity and / or panning of all sequence notes. By clicking the equalize button a dialog will open that allows you to set a default velocity and panning. Handy if your fingers don't always hit the keys with the right pressure.

    The next tabs allow you to change volume level, panning, pitch and modulation. They all function in a similar way. Again the sequence graph is there to show you the parameter values over time, with the notes of the sequence in the background (in dark grey). In these panels you can tweak existing events that you may have recorded from MIDI, you can add new events and of course delete them. A handy reature is to interpolate between the values of two events when you're adding them manually. 

    For now the sequencer has all the basic functions that I want it to have. Some things that are still missing are more controls to add, delete, copy and paste notes, to transpose the sequence and to configure the MIDI channel. This will be added in the coming weeks as well as more improvements and streamlining of the code while I work and play around with the sequencer. Whether or not I'll also replace the current drum sequencer with this new one in the same release is something I'm not yet sure of. Eventually I will, but it depends a bit on how much memory I will have left on the Teensy and on how much effort it takes to finalize the sequencer.

  • A New Sequencer

    Maarten Janssen08/20/2023 at 16:18 0 comments

    It's been quiet here for a while regarding updates, but I think that today I have a nice one. 

    Ever since I had the melody sequencer in OPL Studio I never really liked it. It's ok for just the basic stuff, but it's a pain to really get serious about editing your sequences, because it only shows you if one or more notes are active on a step. You can't easilly change existing notes, let alone change any other properties such as modulation, panning, etc after recording.

    This is now going to change. I've had the idea to implement a piano roll style editor for a long time and finally now is the time to show the progress I'm making with it.

    The new sequencer is a more conventional piano roll style editor that you may be familiar with from other MIDI editing software. You can add notes to a sequence by simply drawing them onto the piano roll. This is also a welcome improvement for when you don't have a MIDI device to record from, but still want to play with the sequencer. You can drag new notes up and down to set their pitch and left and right to change their length. As you drag the notes around they will play.

    Existing notes can be dragged across the piano roll to change pitch and location. You can grab the end point of notes to change the start and end points. Or long press to delete individual notes from your sequence. While dragging the notes around, the piano roll will automatically scroll.

    The little piano on the left hand side of the view shows you the range of the musical scale where you're editing and you can press the keys to get a note preview.

    The piano roll has a green playhead to indicate the current playback position. As you play the sequence the piano roll will start to scroll to show you the notes that are being played. Scrolling can be disabled by disabling the scroll lock on the bottom right of the view.

    When you are in recording mode the playhead will turn red and show you where the next note will be recorded in the sequence. All existing recording functionality still exists in the new sequencer: direct MIDI recording, step recording and the ability to set up a trigger to start recording as soon as a note on event occurs.

    It took quite a lot of code to get this all working, but it was well worth it I think! The piano roll makes the sequencer much more user friendly and powerful. But, we're not done yet... Moving notes around is just one thing, but as the tabs at the bottom of the screen may be giving away already, there will also be options for more detailed editing. Changing note velocities, volume, panning, pitch, modulation etc. 

    The detailed editing is something I haven't fully figured out yet how to make it work in the UI on this tiny screen. It also leaves no room for the 'menu' buttons that I have on some of the other app modules to, for instance, copy & paste. I'm sure I'll figure it out as I go...

    Below you can see a demo of the sequencer in action.

  • Some Cool Software Improvements

    Maarten Janssen05/24/2023 at 19:03 0 comments

    Despite all the hardware troubles with the all in one boards I'm not forgetting about the software with some nice updates coming up!

    Drum Sequence Recording + MIDI Input

    The drum sequencer has always been kind of left out when it comes to recording and MIDI functionality. You could create a drum sequence by tapping on the sequence buttons in the app, but not record from the MIDI inputs.

    This will finally change! The drum sequencer will now listen to MIDI channel 10 for drum notes to play. You can also record a drum sequence from MIDI, where the sequencer will assign the various drum sounds to one of 8 tracks depending on what drum sound is played and which tracks are available. You make a recording by clicking the record button to go into recording mode and clicking play. While working on this feature I found that the way in which a triggered recording is started (recording starts when the first MIDI note is received) was a bit counter intuitive. You would click the record button to enable a recording and then long press the play button to go into trigger mode... That will now be changed to doing a long press on the record button to go into triggered recording mode for both the melody and the drum sequencers. Of course our friend the metronome will also make an appearance in the drum sequencer. 

    Something that I didn't mention yet is that the drum sequencer also received a randomizer function some time ago. When you click the Random button the current track of your sequence will get a random pattern. Great for experimenting!

    Better Patch Selection

    A second improvement that is coming up is about how you can select instrument patches. Throughout the UI there are these spinners where you need to step through your patches one by one to select the one you want. Not very user friendly! To improve this there will be an instrument selection window that shows you a list of all available patches (melodic or drum) that you can scroll through to look up and select the patch you want. When you select a patch from the list it will go into preview mode, so you can immediatley hear a different instrument playing and you can select another one right away if you don't like the one you selected. You open the instrument selection by double clicking on the instrument name in the spinner. Of course the old way of stepping through the instrument one by one will also still work.

    From the mixer you can now also change the instrument patch of each channel (except for channel 10) by clicking on the instrument name.

    Mini Keyboard

    Lastly, I've started to work on an on-screen keyboard that will help you in one of the sequencers or the patch editor when you don't have a MIDI input connected. The little keyboard can play individual notes by tapping the keys on screen, but it can also do pitch sides by dragging the stylus left or right and modulation by dragging up and down when a note is playing.
    The keyboard can be opened on its own as well from the accessories panel. In that case you will get some additional controls to select an instrument patch, adjust volume and panning and maybe some more.

    And The All In One Boards??

    For the all in one boards I've now narrowed the problem down to the amplifier. The line out with some additional caps sounds crystal clear! The speaker out however is still unusable. I'm thinking it's the ground plane or the lack of a good ground plane... I need to make a video of it and reach out to see if there are some audio gurus who can help.

  • I'm throwing in the towel

    Maarten Janssen04/01/2023 at 12:52 4 comments

    Sadly this will be the end for OPL Studio unless some sort of miracle happens. As much as I love my project and all the things that it can do I'm starting to loose my sanity over all the issues with the TDA2822 amplifier and all the noise it's picking up from the screen. I simply can't make this thing work... 

    • Add resistors to the signal lines. Done, it didn't help much
    • Add more capacitance to filter the supply. Done, it didn't help. Are two beefy 4700 uF caps good enough?
    • Add a separate regulator for the analog part of the circuit. Done, it didn't help
    • Add ferrite beads to filter the power lines. Done, it didn't help
    • Add another regulator for the LCD screen. Done, it didn't help
    • Don't power the thing from your laptop! Done, even on a powerbank the noise remains the same

    Whatever I do the amplifier keeps picking up noise from the screen. This is way above my level of knowledge to fix. So after a month or two of going insane over this problem I've had enough. I'm calling it quits!

  • One Broken Crystal Later...

    Maarten Janssen03/01/2023 at 19:56 0 comments

    I found the problem regarding the signal noise!

    The issue seems to have been caused by a broken clock crystal. After assembling the board I had already noticed that the clock for the OPL3 chips was not right. It measured 33 MHz instead of the 14.3 MHz that is required and the OPL3s would only produce hissing noises. For the time being I had written it off as a small problem for later, after I had fixed the horrible signal noise.

    Though after two evenings of getting nowhere I decided to maybe tackle a more simple issue first, so I desoldered the little crystal and I replaced it with a through hole 14.3 MHz crystal that I also use tor the OPL3 Duo boards. I soldered it to the little pads on the board and powered it up again. At this point I though I had now broken the board with all my bodges, because my headphones were dead silent. No noises when the OPL Studio was booting, nothing when it was accessing the SD card, nothing when I was touching the screen. Obviously I started looking for what wire I had disconnected without noticing it. Everything was still connected. I went into the drum sequencer to create a little drum beat and lo and behold! There was crystal clear sound coming from the line out!

    I can't quite explain what had gone wrong with the crystal that would cause all this noise, but what I'm thinking is that during soldering I put too much heat through the crystal with my hot air gun. This probably damaged the crystal causing its frequency to change to 33 MHz. Maybe signal noise was picked up by the crystal's GND causing some frequency modulation in the broken crystal that got picked up by the OPL3s and amplified. I don't know, I don't have a better explanation for what happened.

    Long story short, the major noise issue has been fixed! There are some smaller problems that I want to address with the boards, such as the location of the power button so the board fits better in the enclosure. Also I'm not 100% happy yet with the amplifier, which will take some more tweaking.

    I would've never thought that a broken crystal could cause this kind of problem and I'm happy to have caught it early on, in a small batch of prototype boards. It's a small setback toward the all in one OPL Studio!