This little display module is very common and being sold everywhere. Thousands of Arduino projects are possibly using these too.
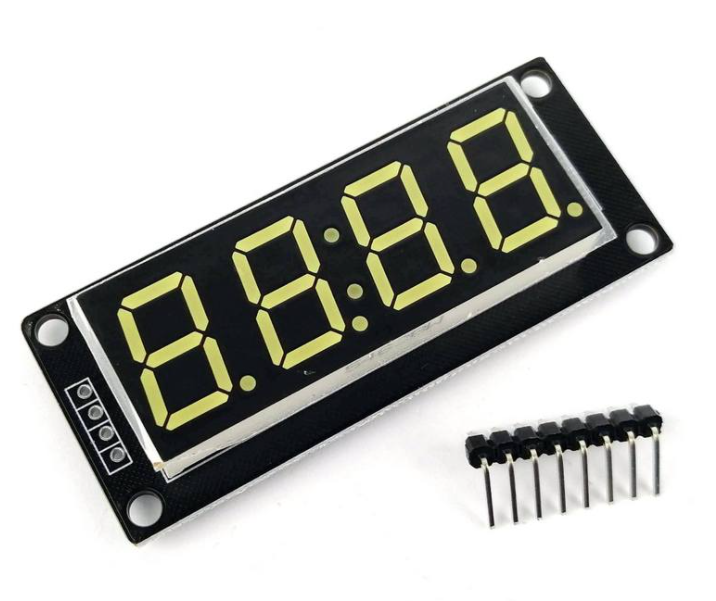
The very strange part is, despite this is using the 2-wire interface, it isn't any I2C! Connecting this and expecting it to work like I2C will not get you anywhere!
Why? It's simple - this thing is a modified I2C interface. Its I2C address isn't there:
Obviously, we got to bit-bang it. That's the first thing to do.
But since the RP2040 has a PIO module, why not we spare ourselves from doing the casual bit-bang?
With that PIO, we try to imitate the behaviour of how it sends the stuff bit by bit (no pun intended!).
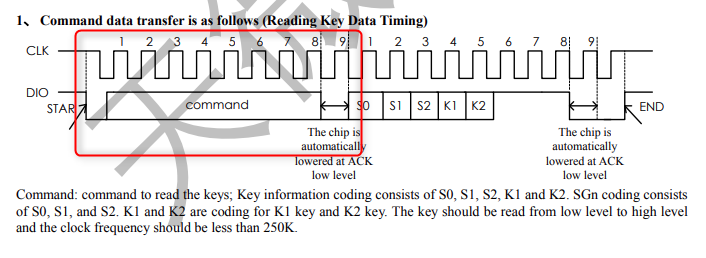
Start Condition:
_startCond:
   set x, 7               ; (4)
   set pins, 1 side 1 [7] ; (1)
   set pins, 0            ; (2)
   set pins, 0 side 0     ; (3)
In this code the "pins" is set to be referring to the "DIO", while the "side" is referring to the "CLK".
These PIO instructions are known to work in parallel manner, where you can change a pin state and another at the same time too. If you look at (1), this loosely translates to: "set the DIO 1 and at the same time set the CLK 1 and delay for 8 PIO cycles".
At (4) this "set x,7" just means set the x register to 7. This will be used in the following operation.
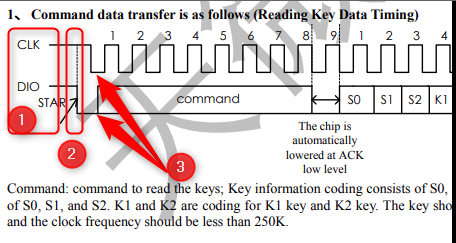
Shift the Bits:
_bitShiftLoop:
   out pins, 1 side 0            ; (1)
   nop side 1                    ; (2)
   jmp x-- _bitShiftLoop side 0  ; (3)
That "out" instruction just means shift out a bit. Here, at (1) it translates to "shift out 1 bit from the DIO, at the same time 0 on the CLK line". Then on (2), just "nop and 1 on the CLK line".
About that x register earlier? Since shifting is being done for 8 times, so the "jmp x-- _bitShiftLoop side 0" just means to "jump to _bitShiftLoop, if x is not yet zero, else decrement, and finally at the same time pull down the CLK pin to 0".
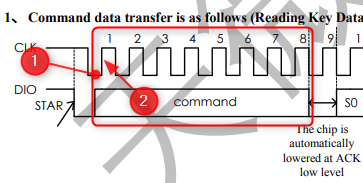
Acknowledge bit:
_ackCond:
   set pins, 0 side 0  ; (1)
   nop side 1          ; (2)
   nop side 0 [1]      ; (3)

Again, this PIO code mimics how to perform that ACK bit.
Stop bit:
_stopCond:
   set pins, 0 side 1
   set pins, 1 side 1
To end the transmission successfully.
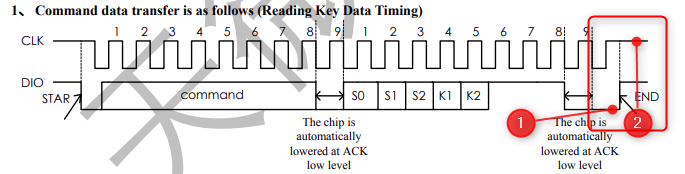
This is how the PIO will mimic the TM1637 protocol. Note that we are sending the command only, not its data. We need to start, send the command, then the data, and then end. However, this 9 instructions in PIO doesn't help at to "recycle" some parts of the code (due to the lack of "call" operation) , or to further distinguish if it is a data or a command that have to be sent.
Discussions
Become a Hackaday.io Member
Create an account to leave a comment. Already have an account? Log In.