Close
0%
0%

68k-MBC: a 3 ICs 68008 homebrew computer

An easy to build homebrew SBC with a 68008 CPU. Two HW options: Lite and Full. Lite allows to build a 3 ICs 68008 system running CP/M-68K.

Similar projects worth following
The 68k-MBC is an easy to build 68008 CPU SBC (Single Board Computer), using only easy to find TH parts.

It follows the same "concept" of the previous Z80-MBC2 (https://hackaday.io/project/159973) and V20-MBC (https://hackaday.io/project/170924) boards, using a PIC18F47Q10 MCU as EEPROM and "universal" I/O emulator (so a "legacy" EPROM programmer is not needed).

You can choose between two main HW configuration options: Lite or Full. Lite HW configuration option allows to build a 3 ICs 68008 system running CP/M-68K.

It has an optional on board 16x GPIO expander, and uses common cheap add-on modules for the SD (HD emulation) and the RTC options.

Having two onboard RS232 serial ports, it allows to connect RS232 terminals like uTerm-S (https://hackaday.io/project/176716).

It is compatible with the uTerm (https://hackaday.io/project/165325) and uCom (https://hackaday.io/project/165709) add-on boards.

* NOTE TO THE READER *: Due to a text size limitation of the Hackaday. io site a few chapters have been moved to "Log files". In this case you have just to click on the link of the chapter's title to open a new tab and read it.


* * PROJECT STATUS (18/04/2023) * *

HW:

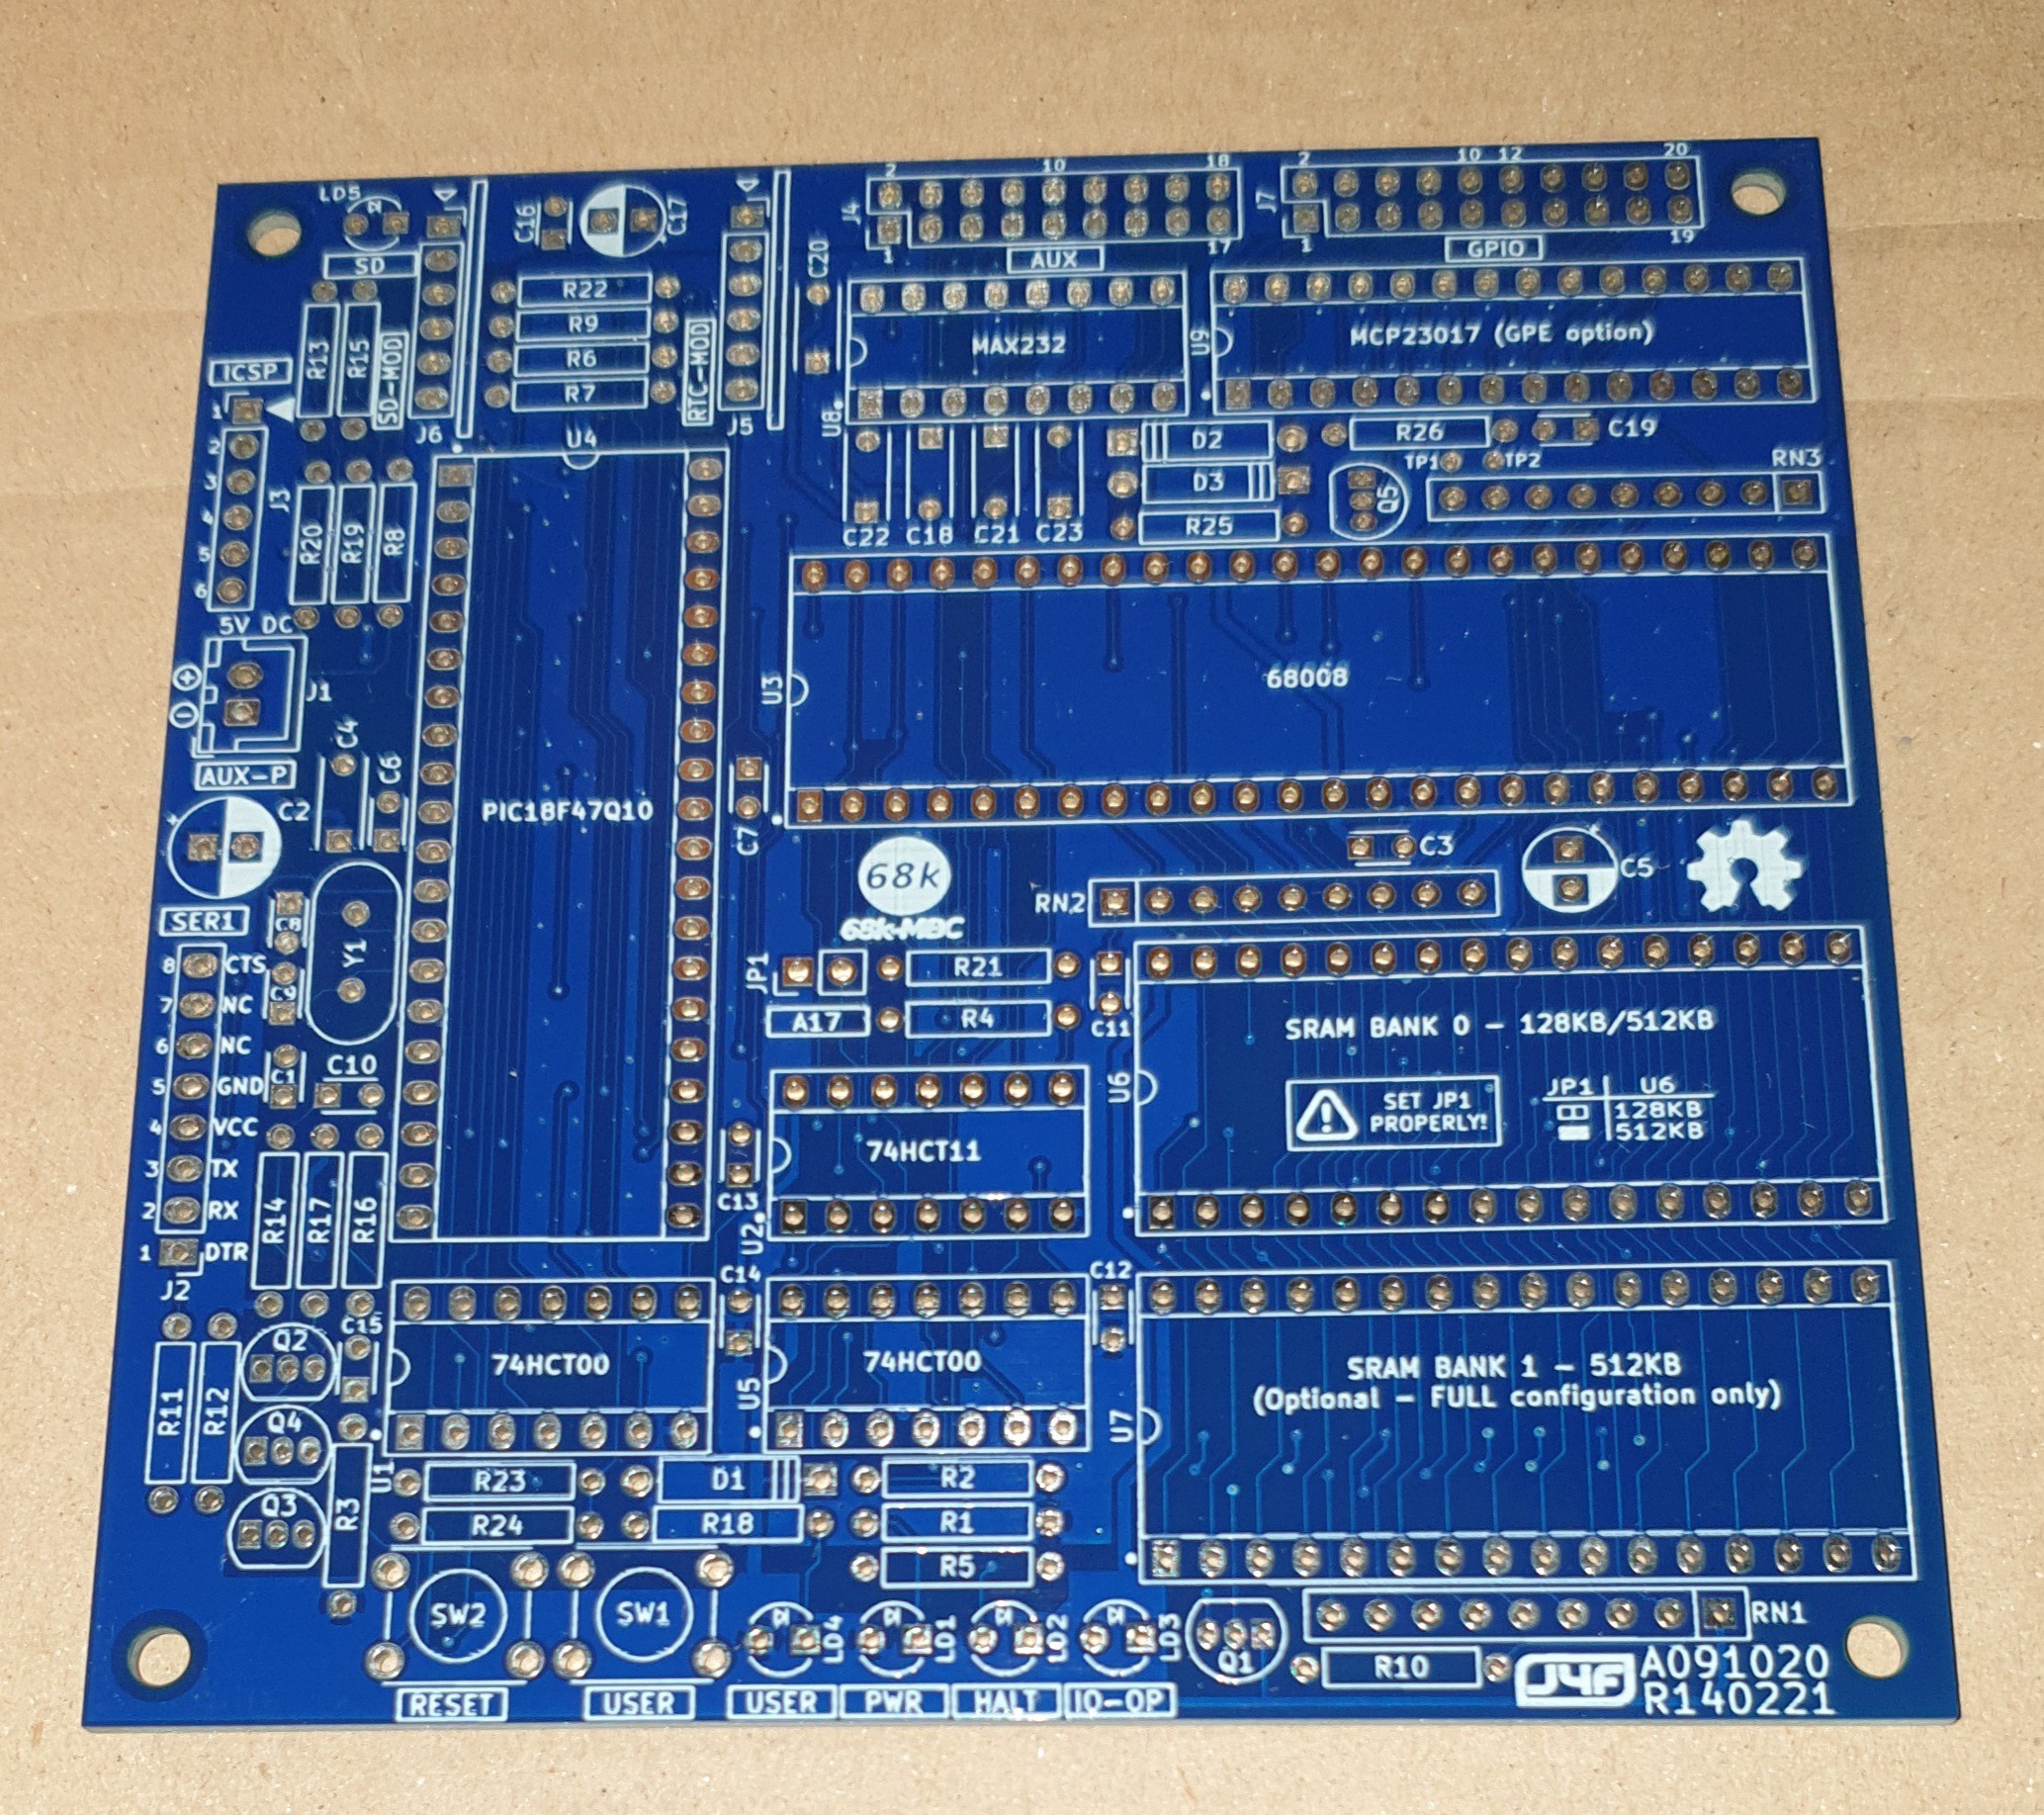
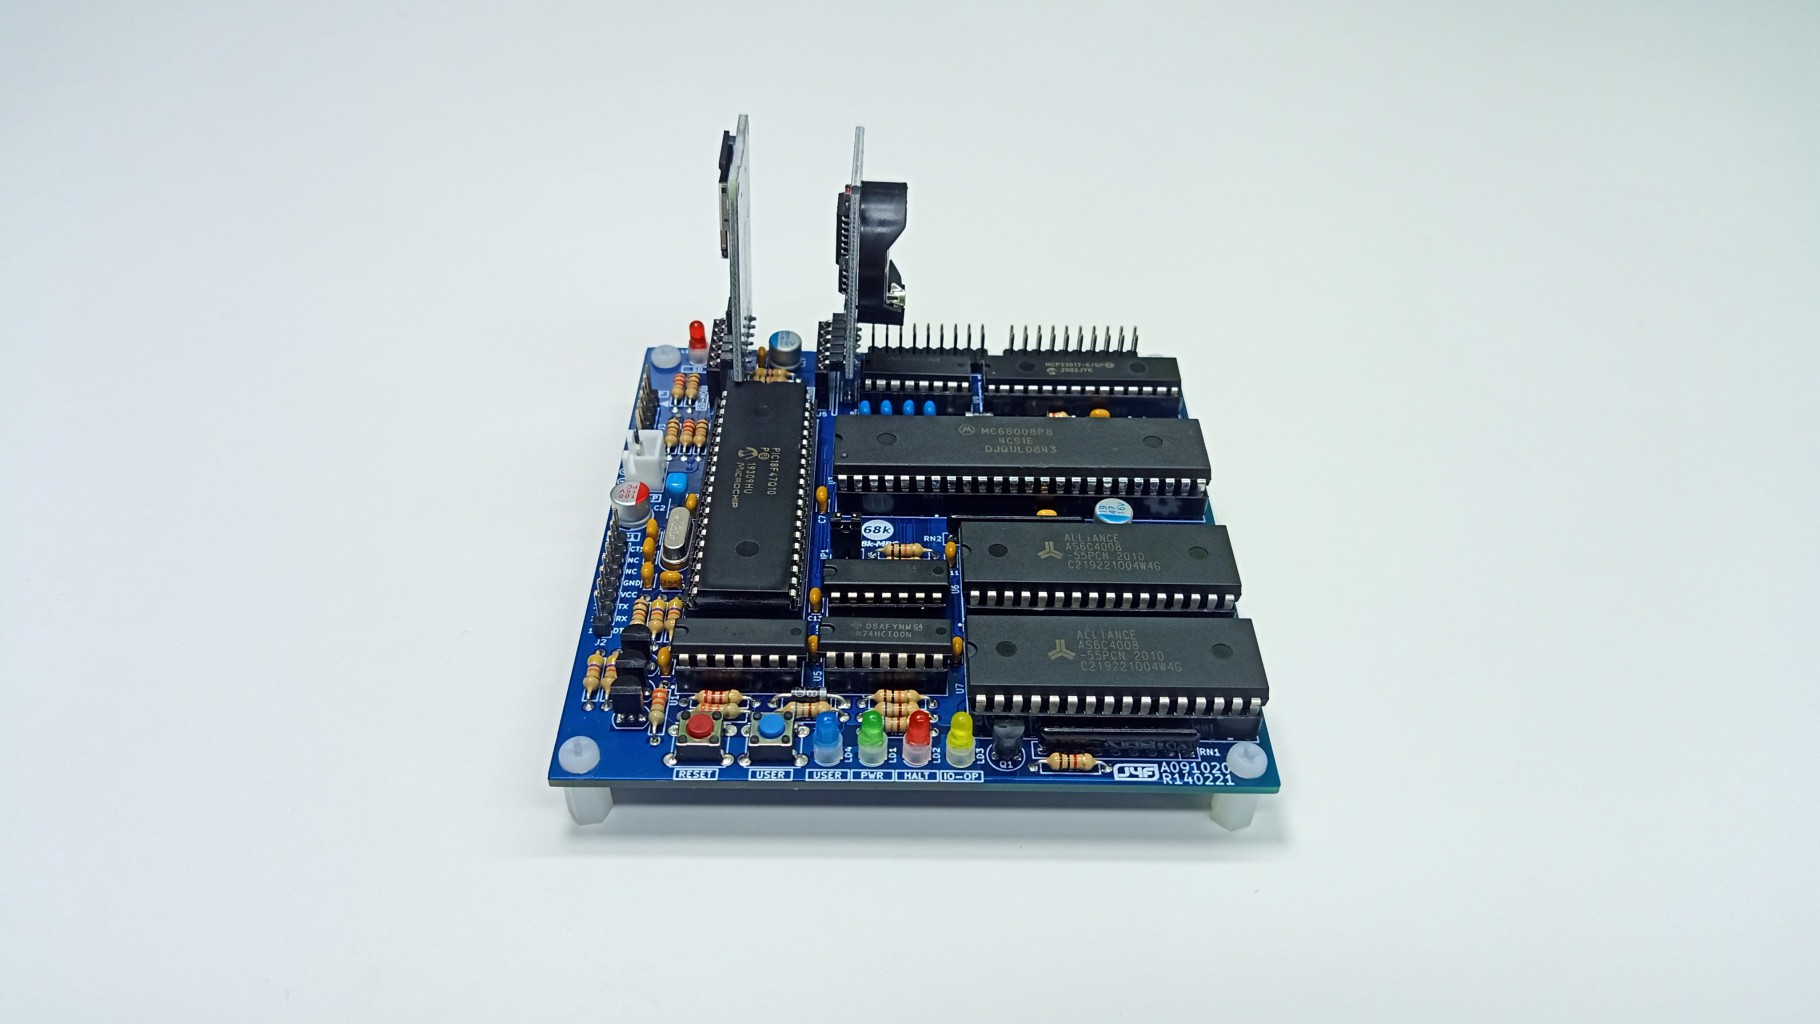
  • Released all the HW related files (see the FILES section);
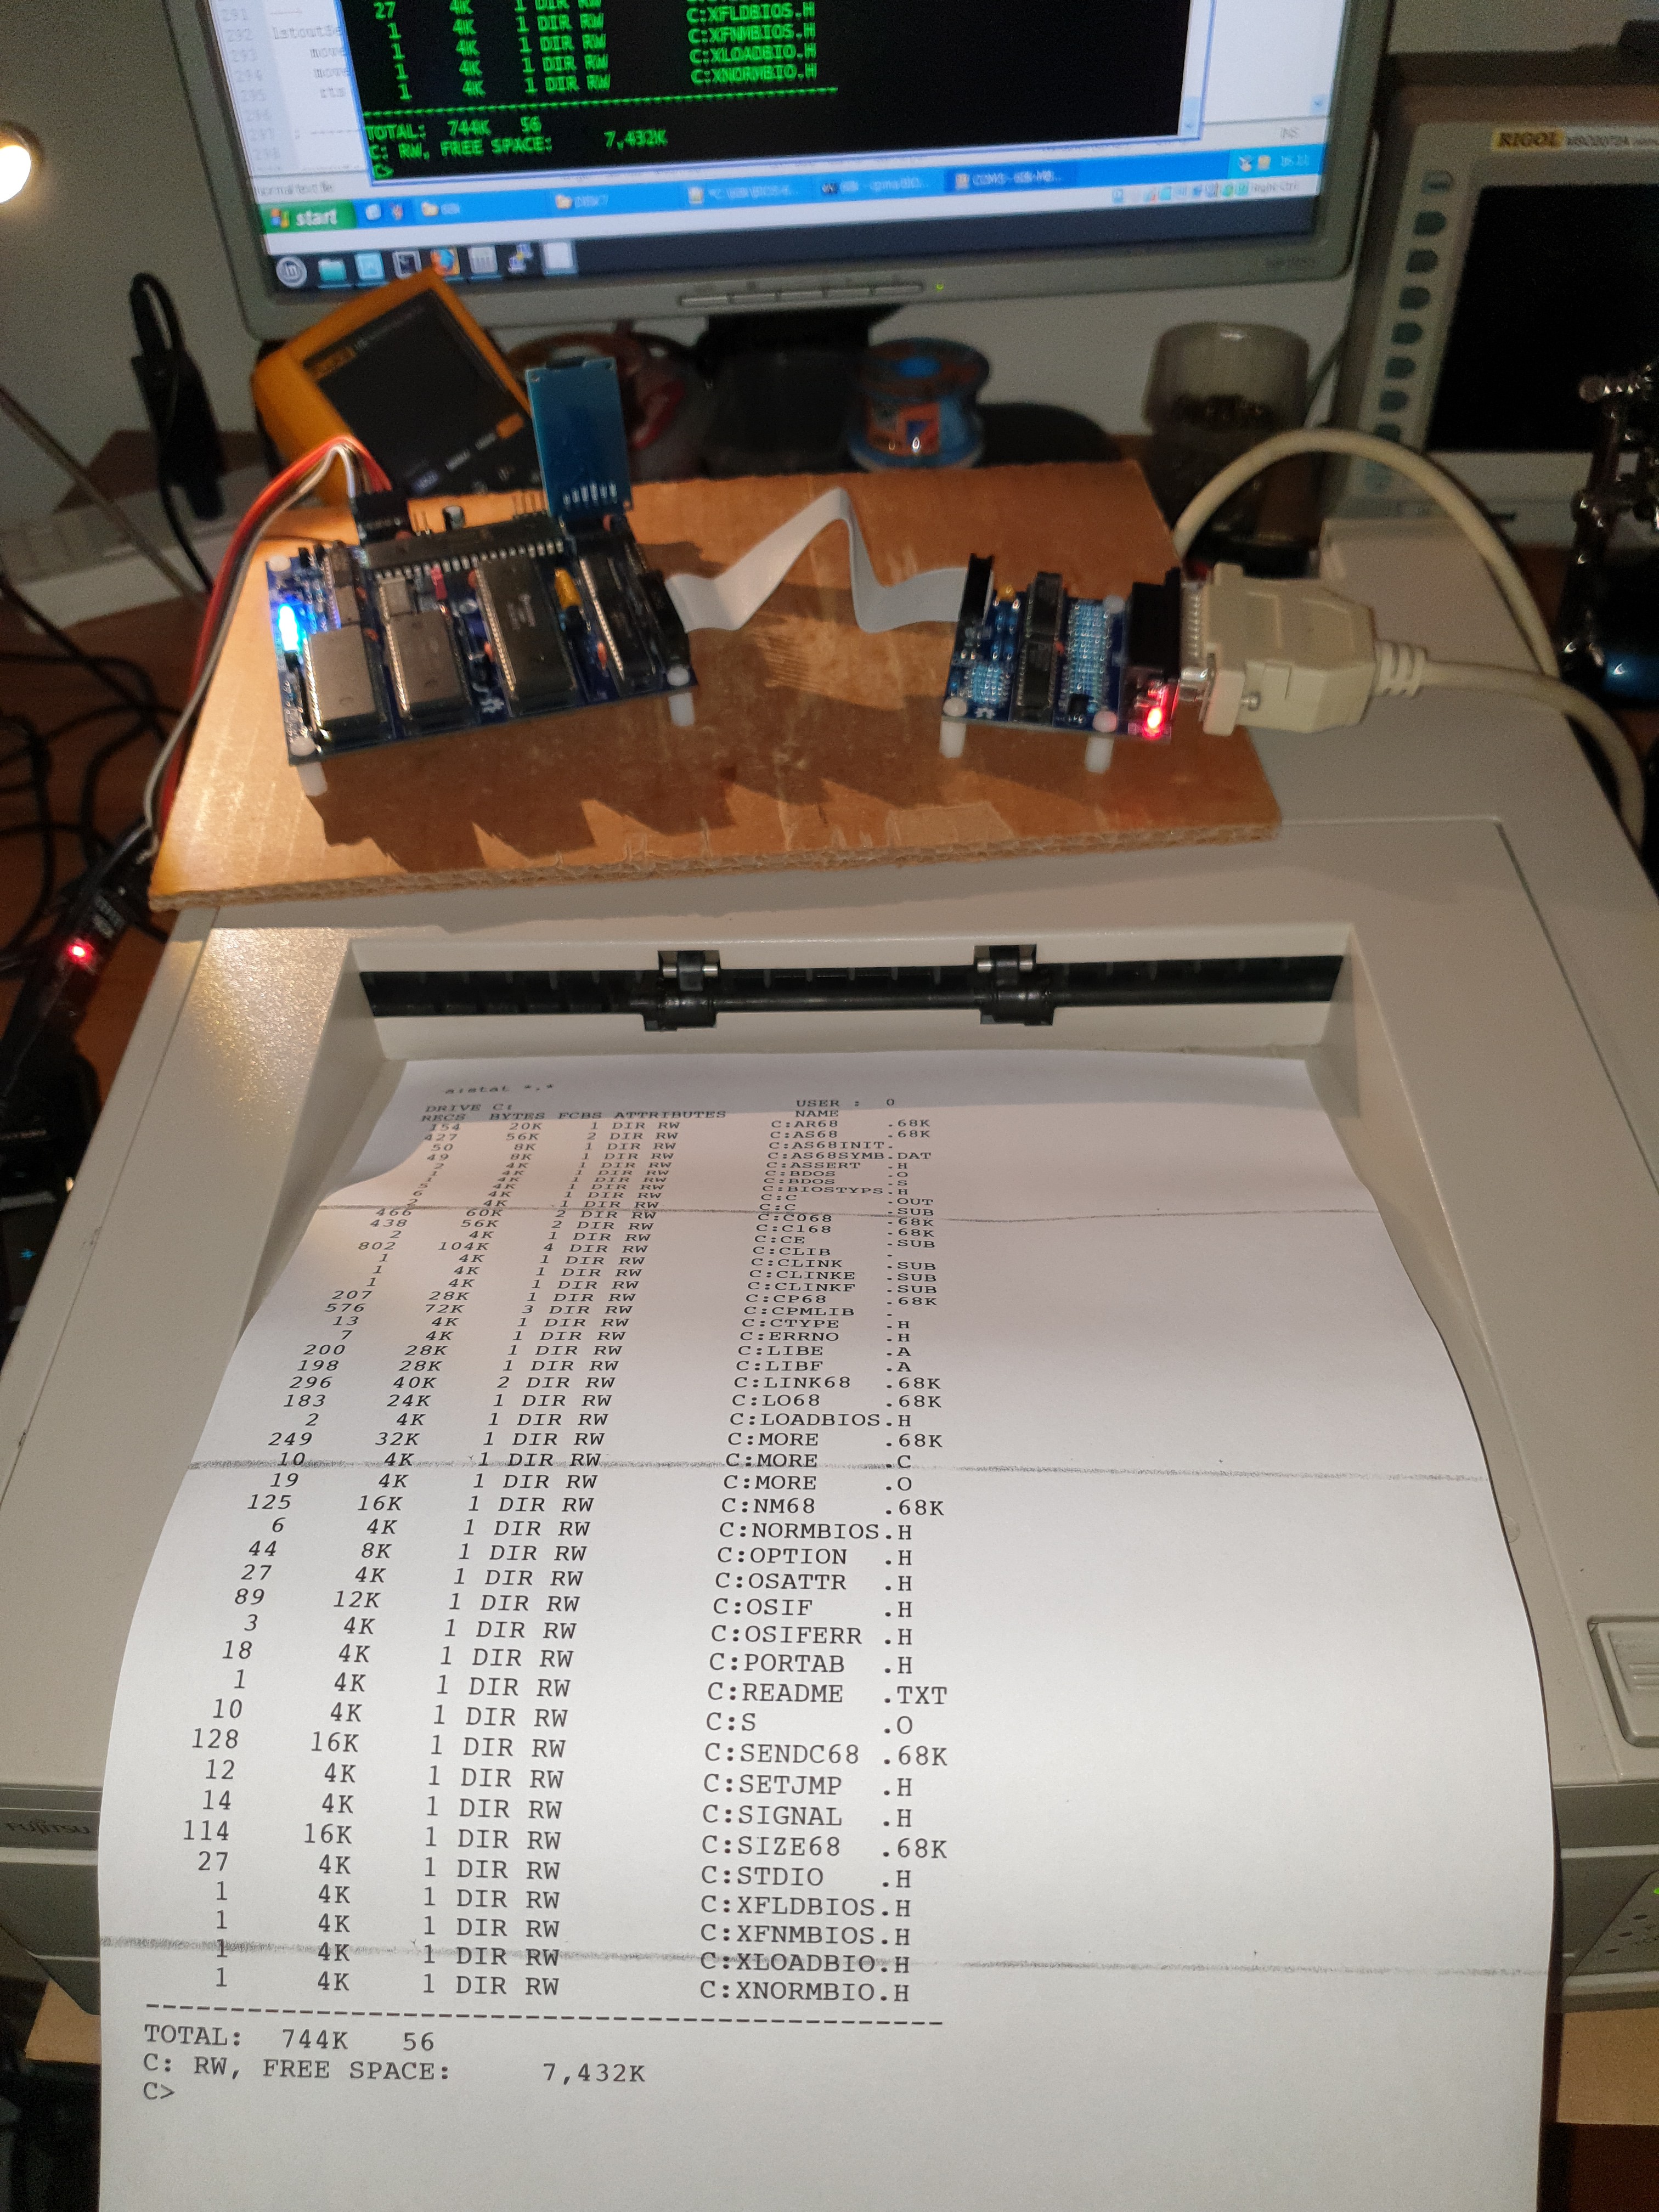
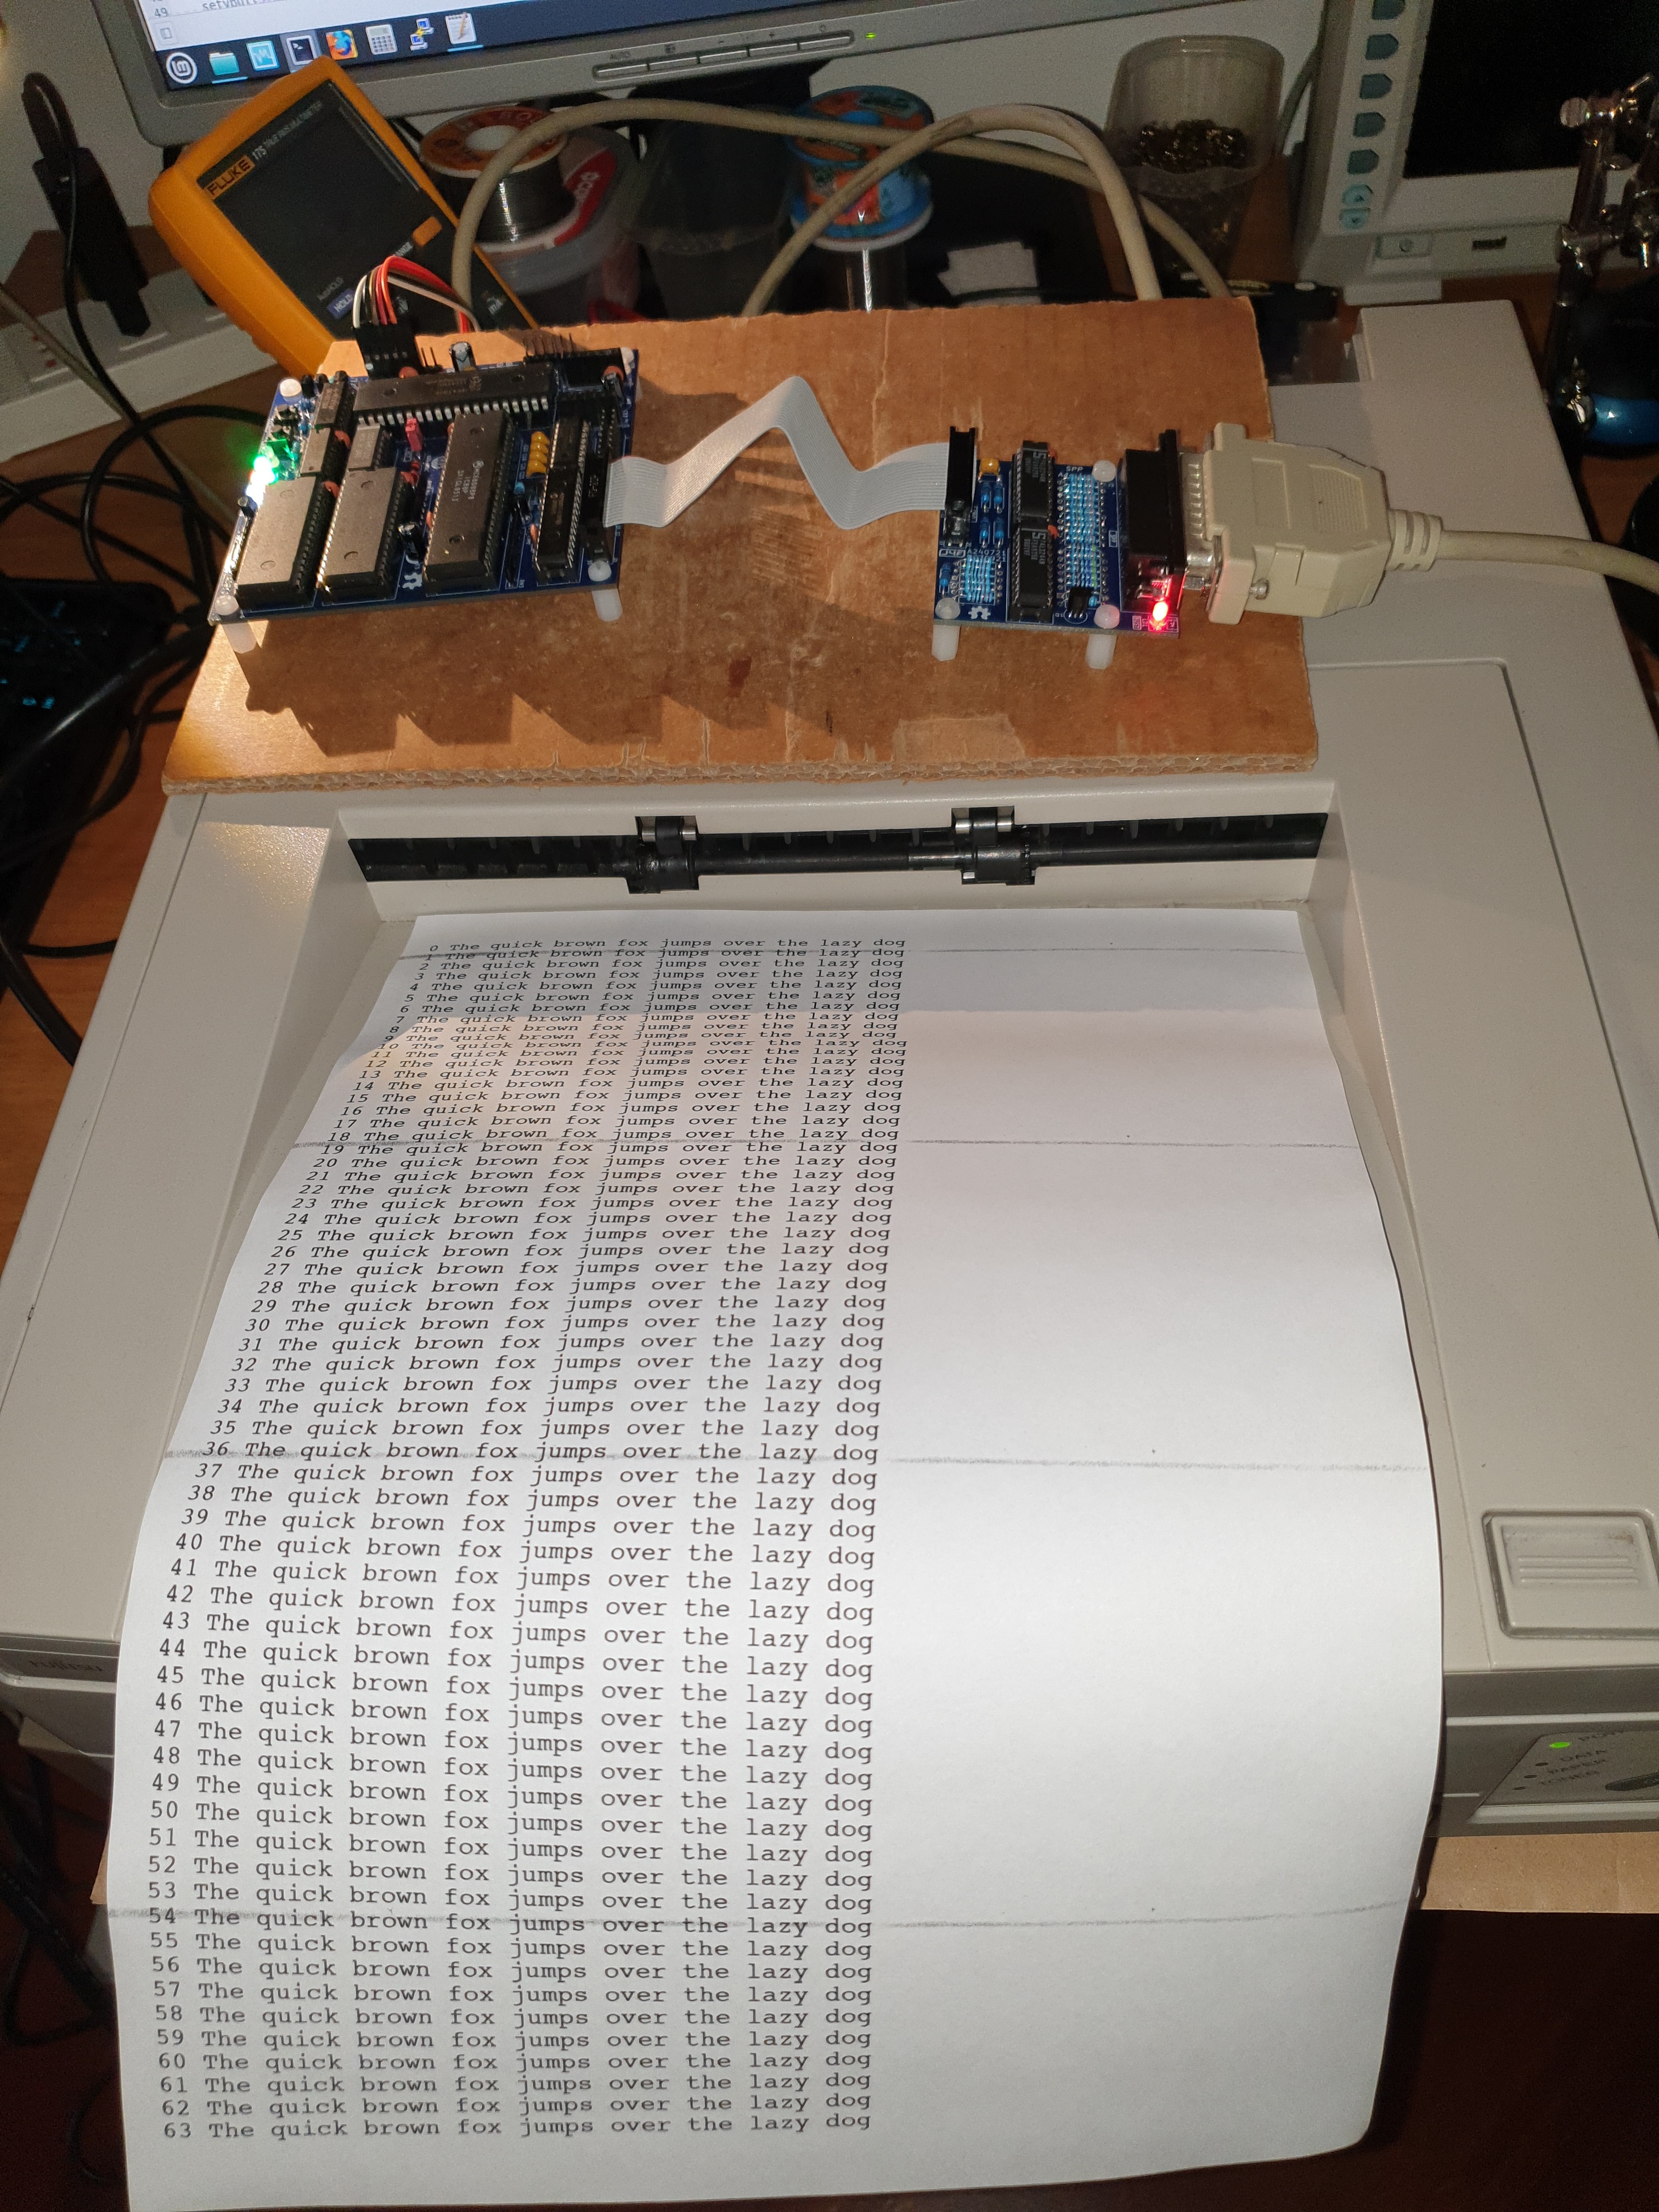
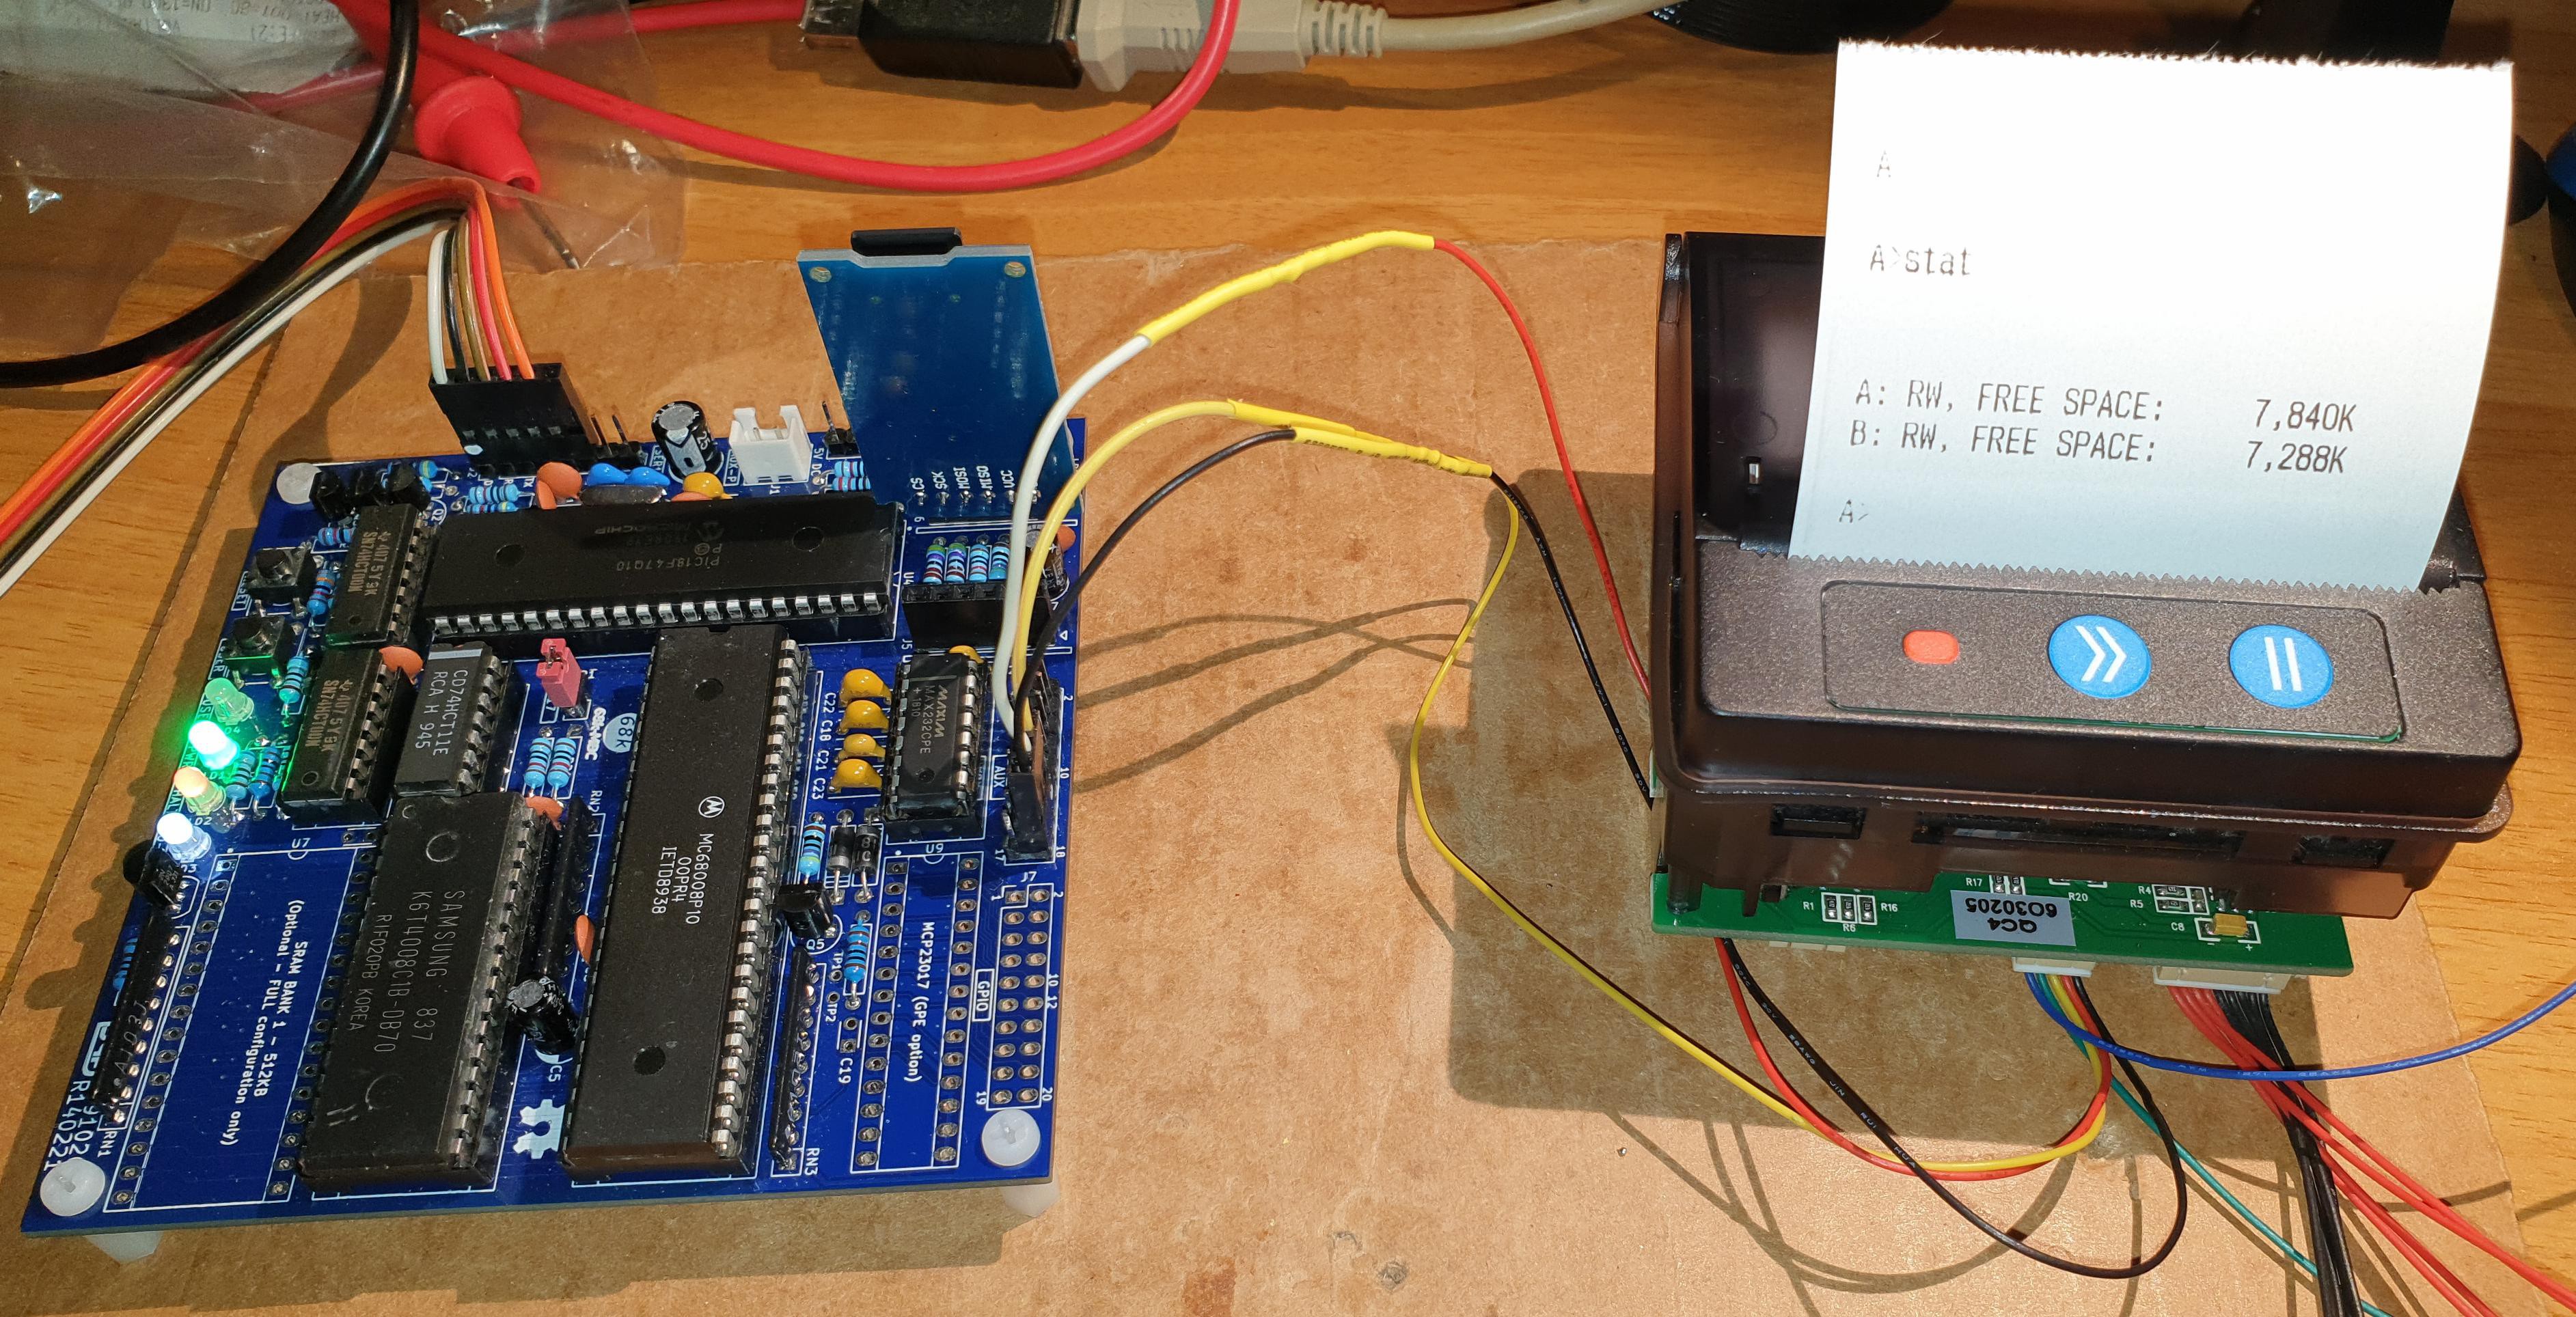
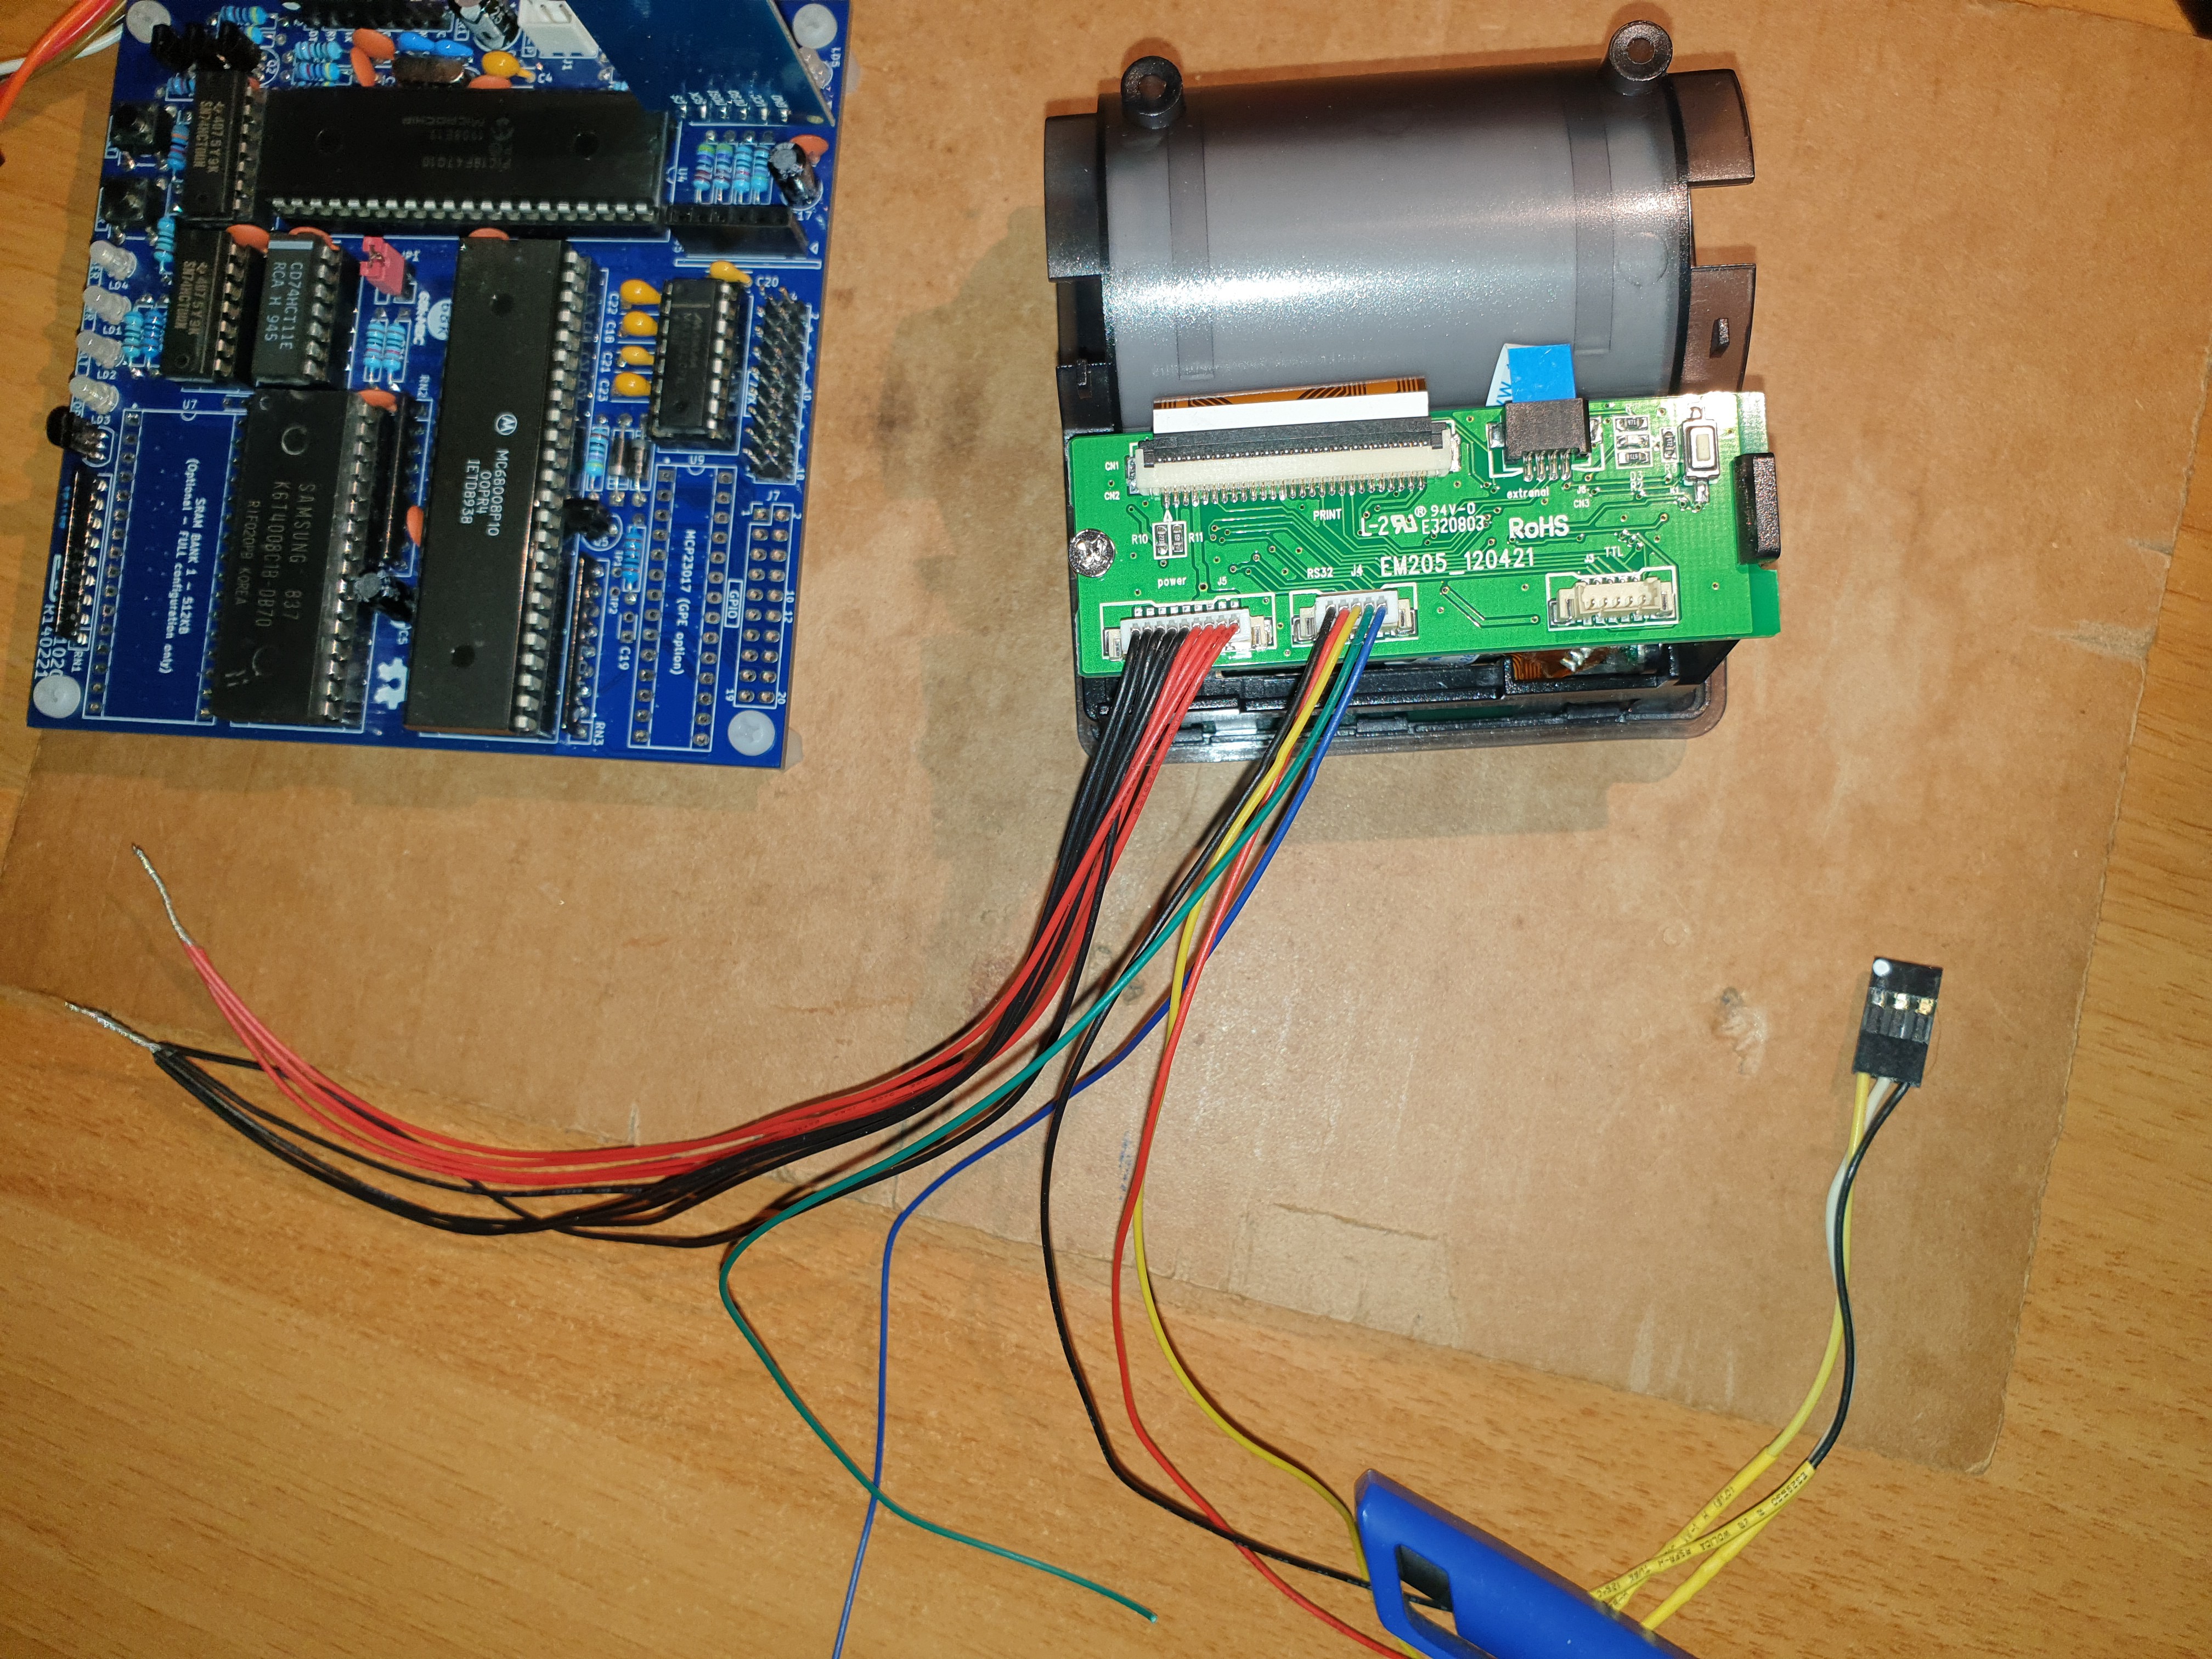
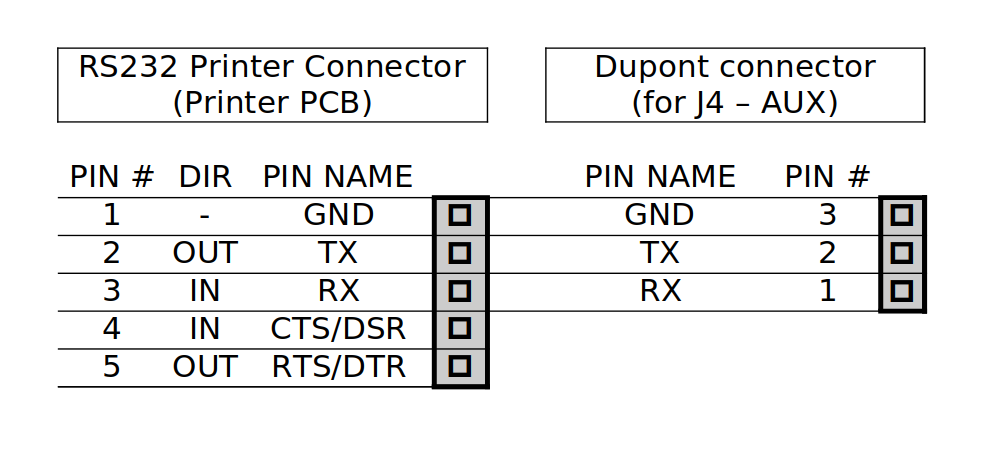
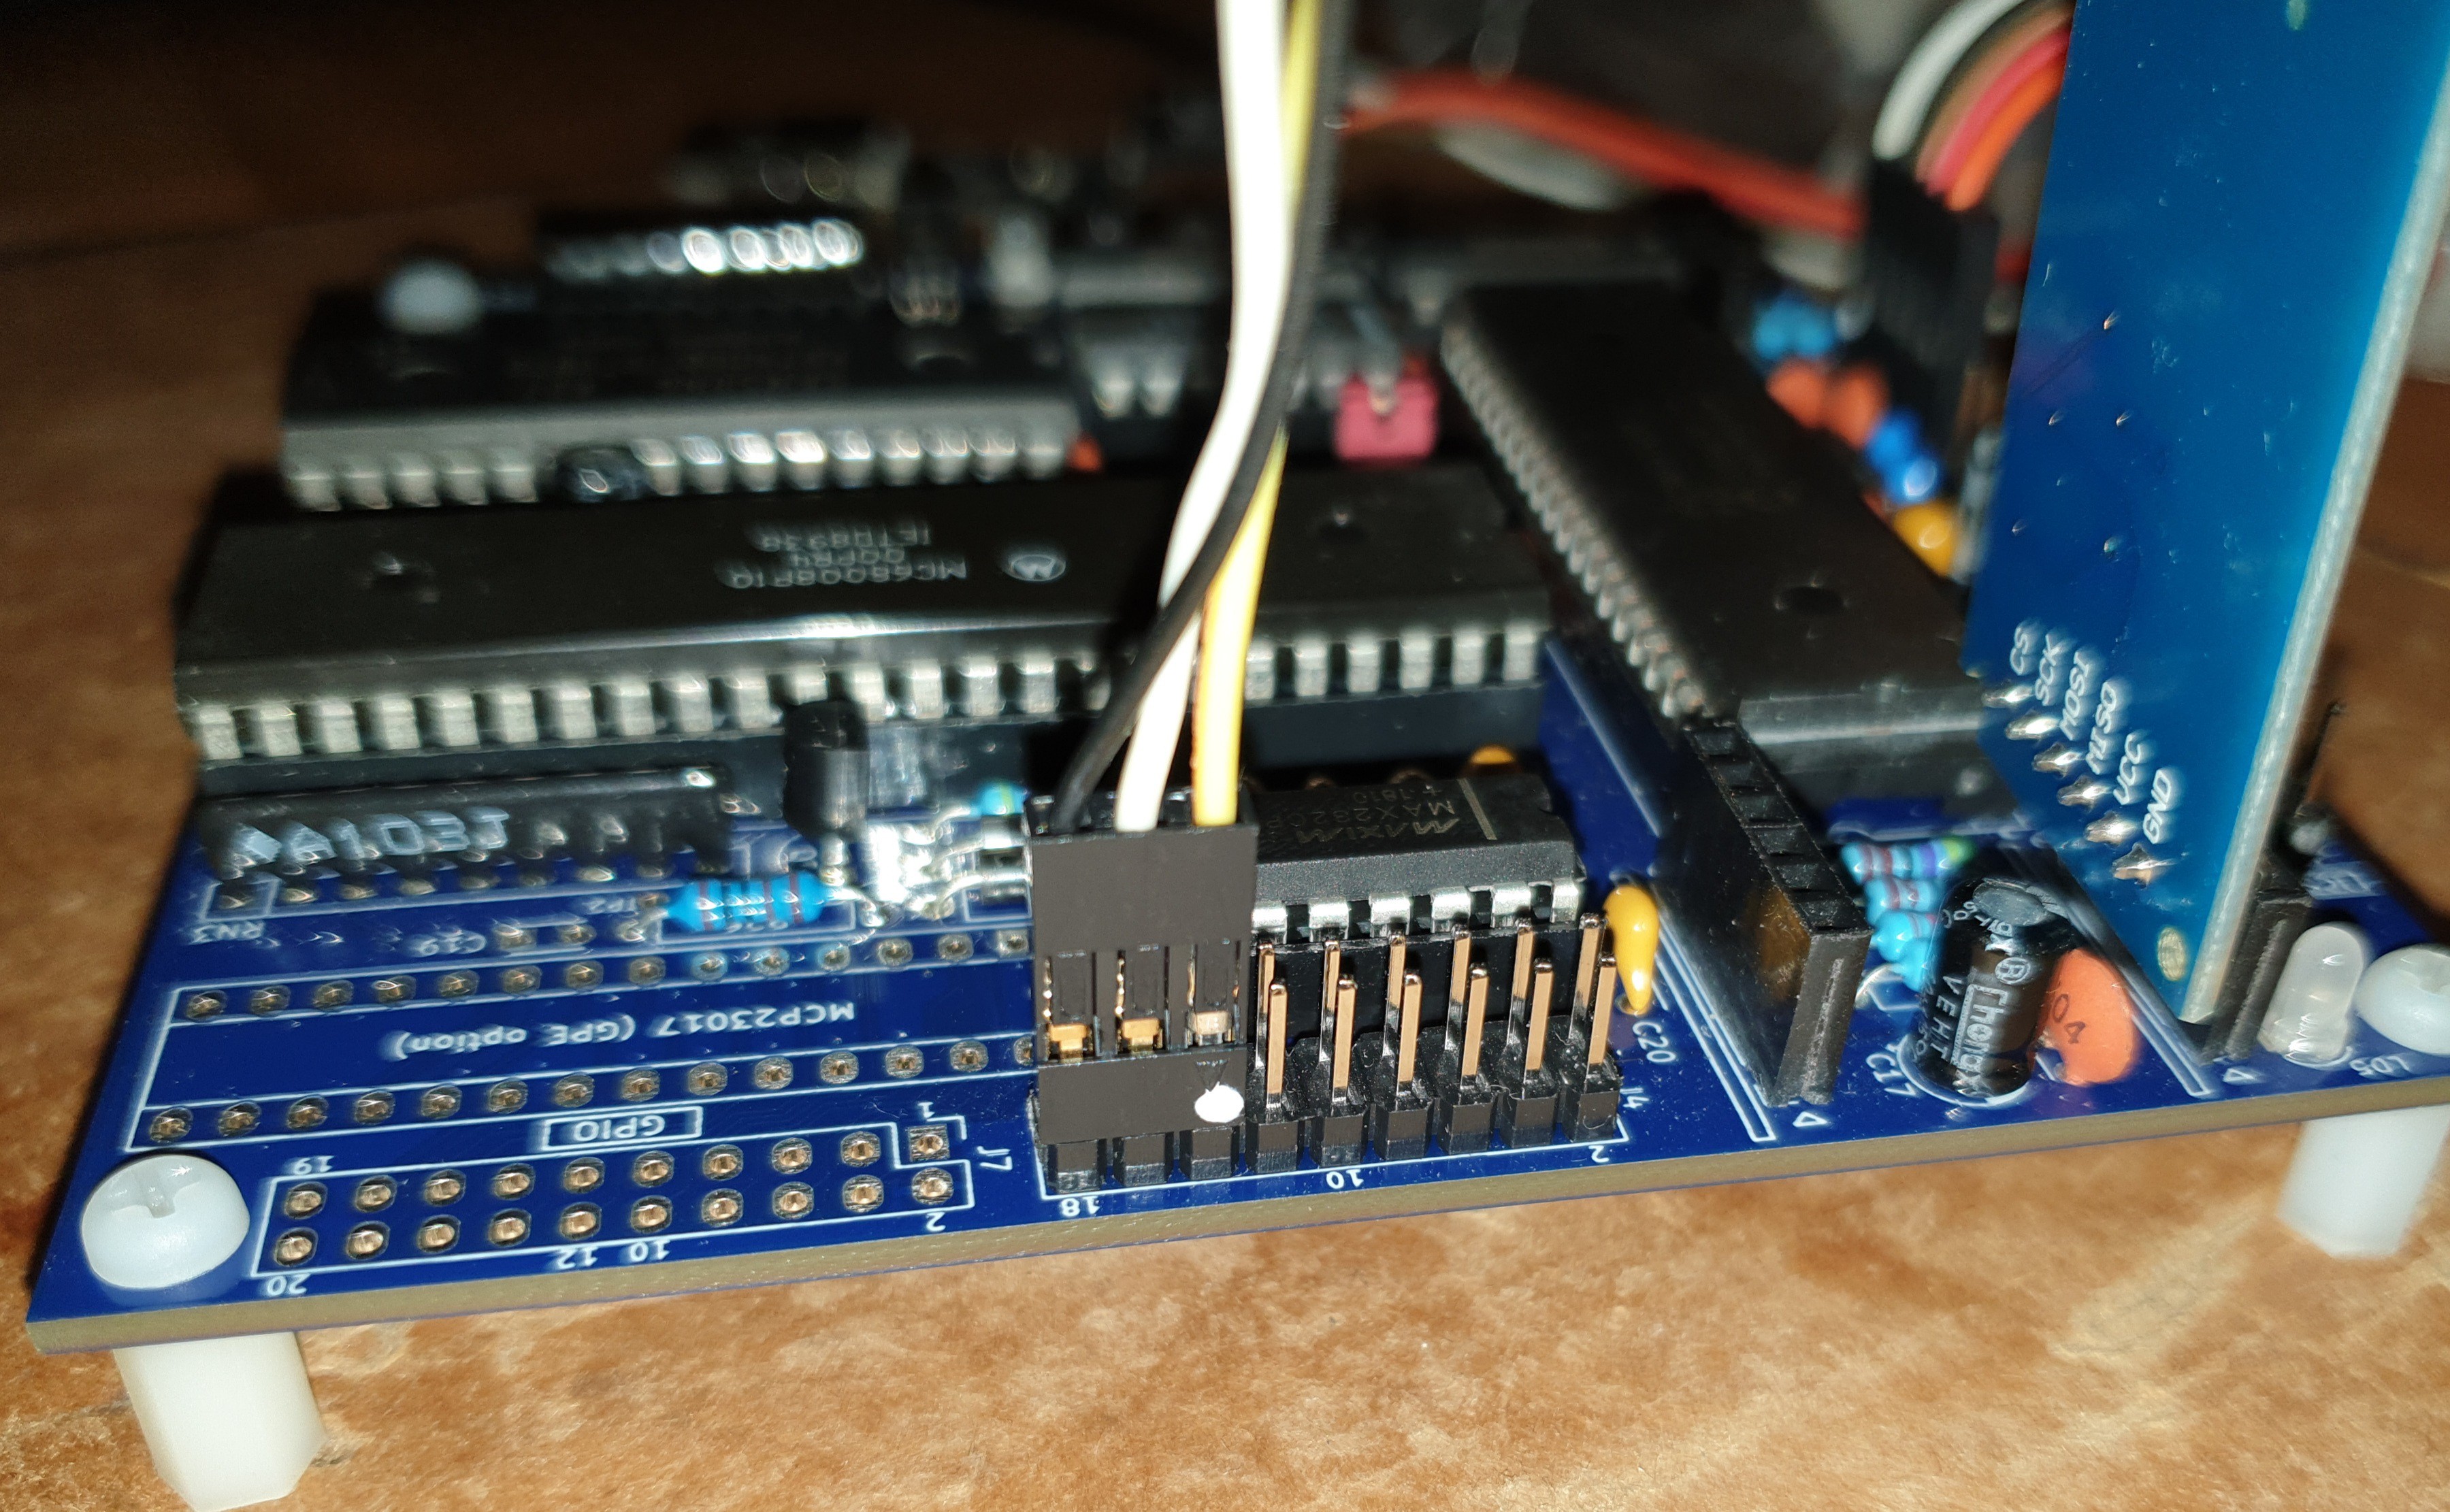
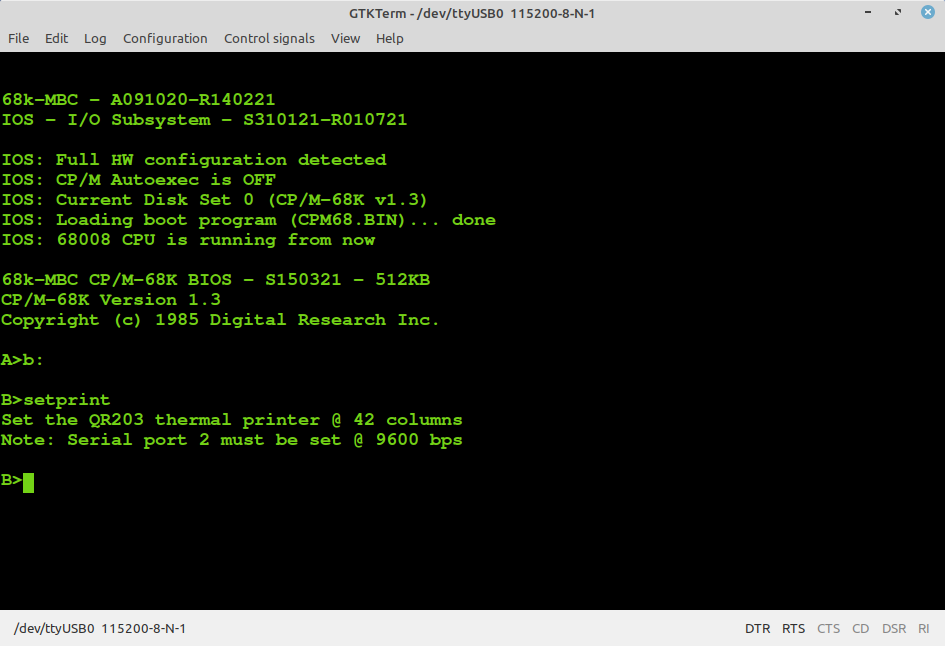
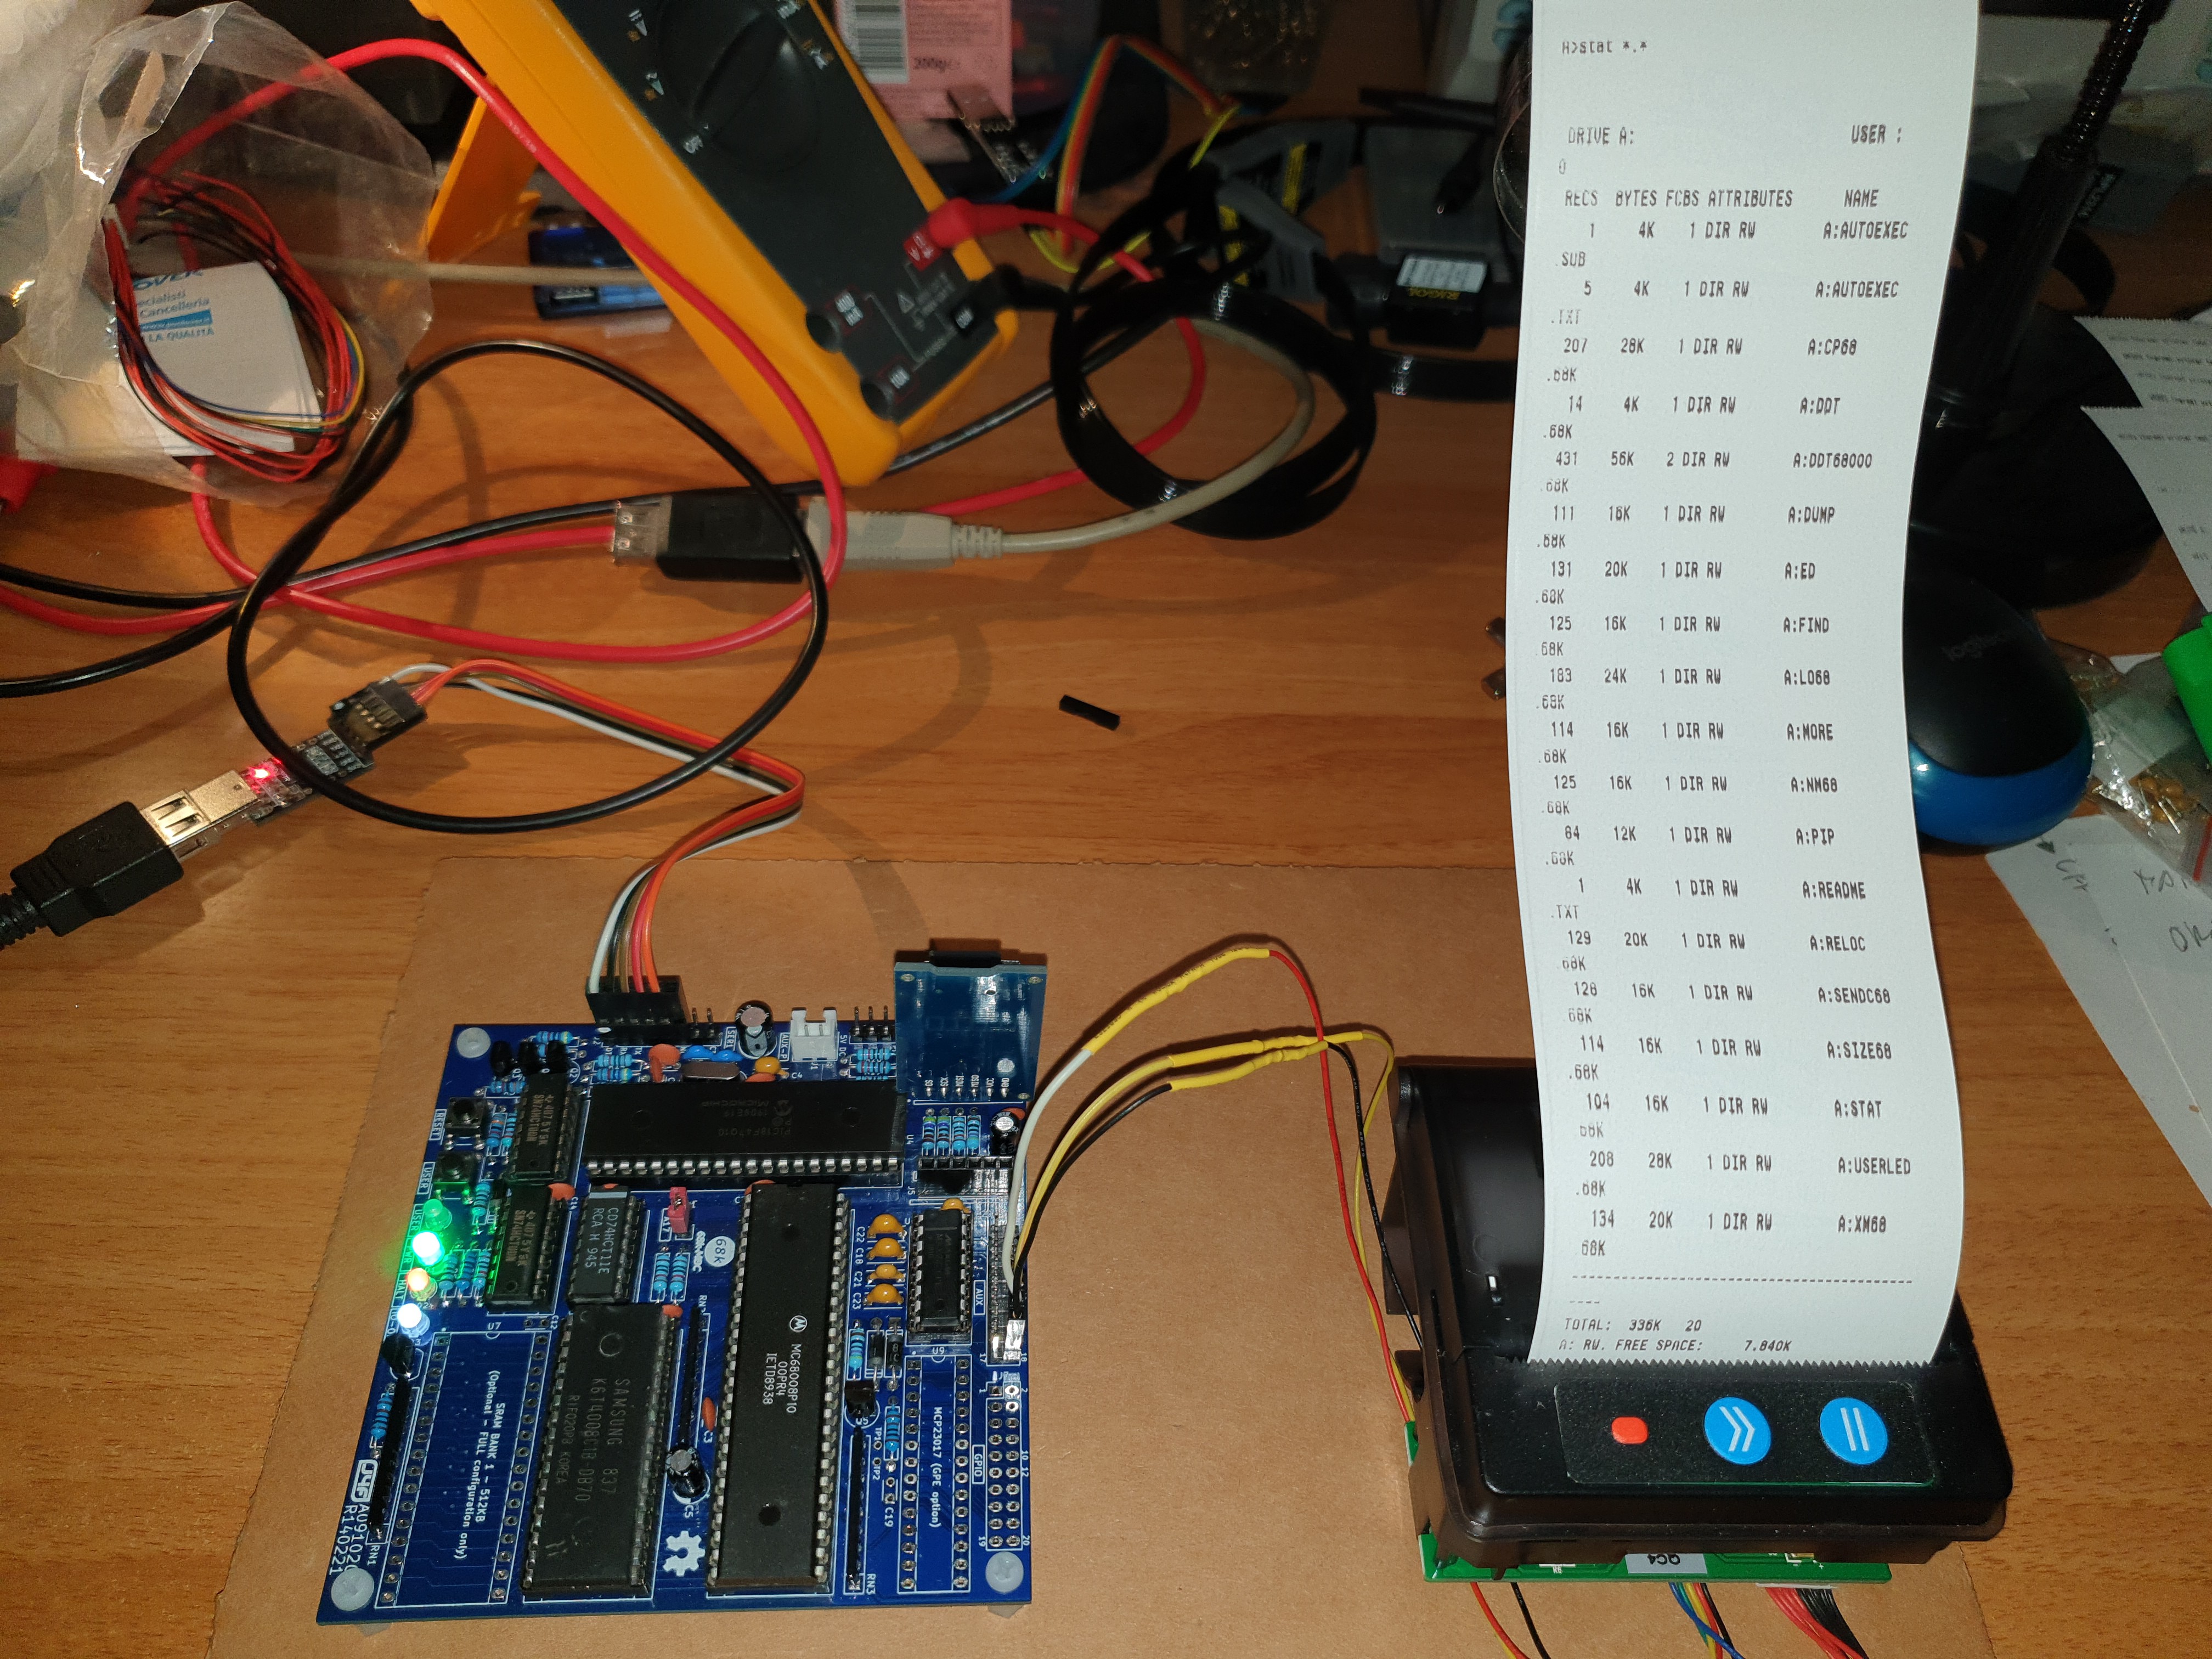
  • Added the USING A SMALL THERMAL PRINTER chapter;
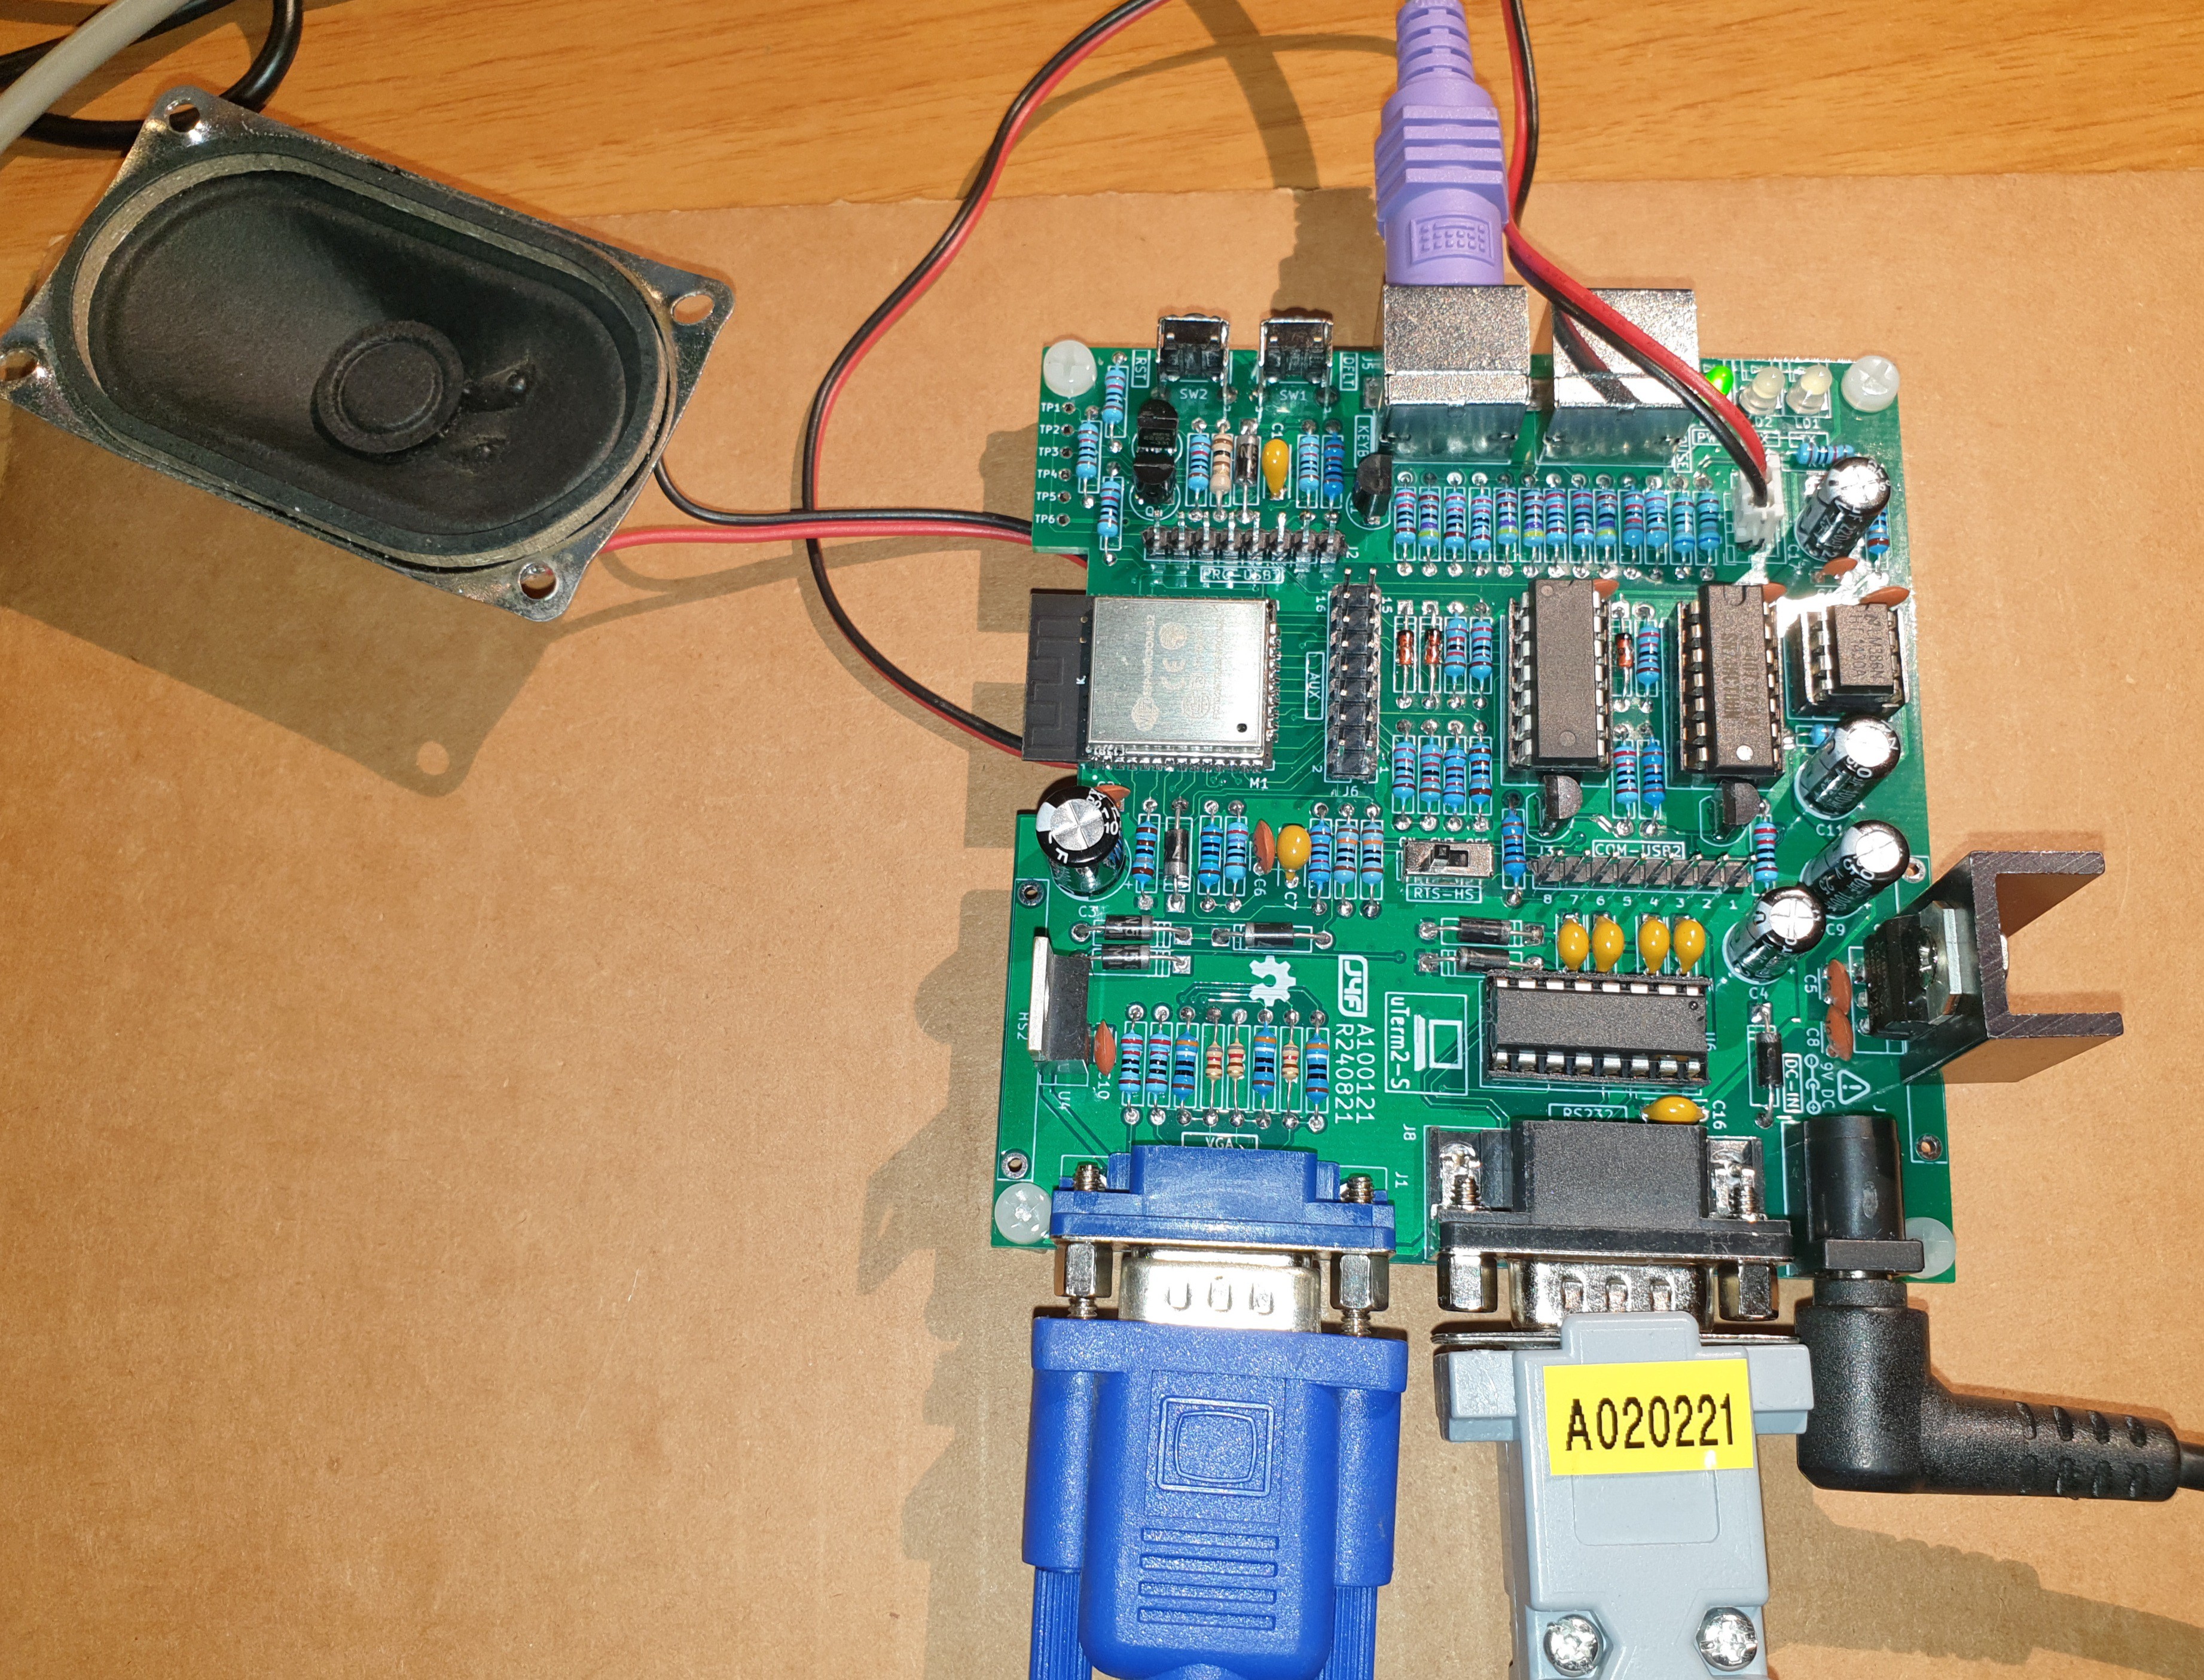
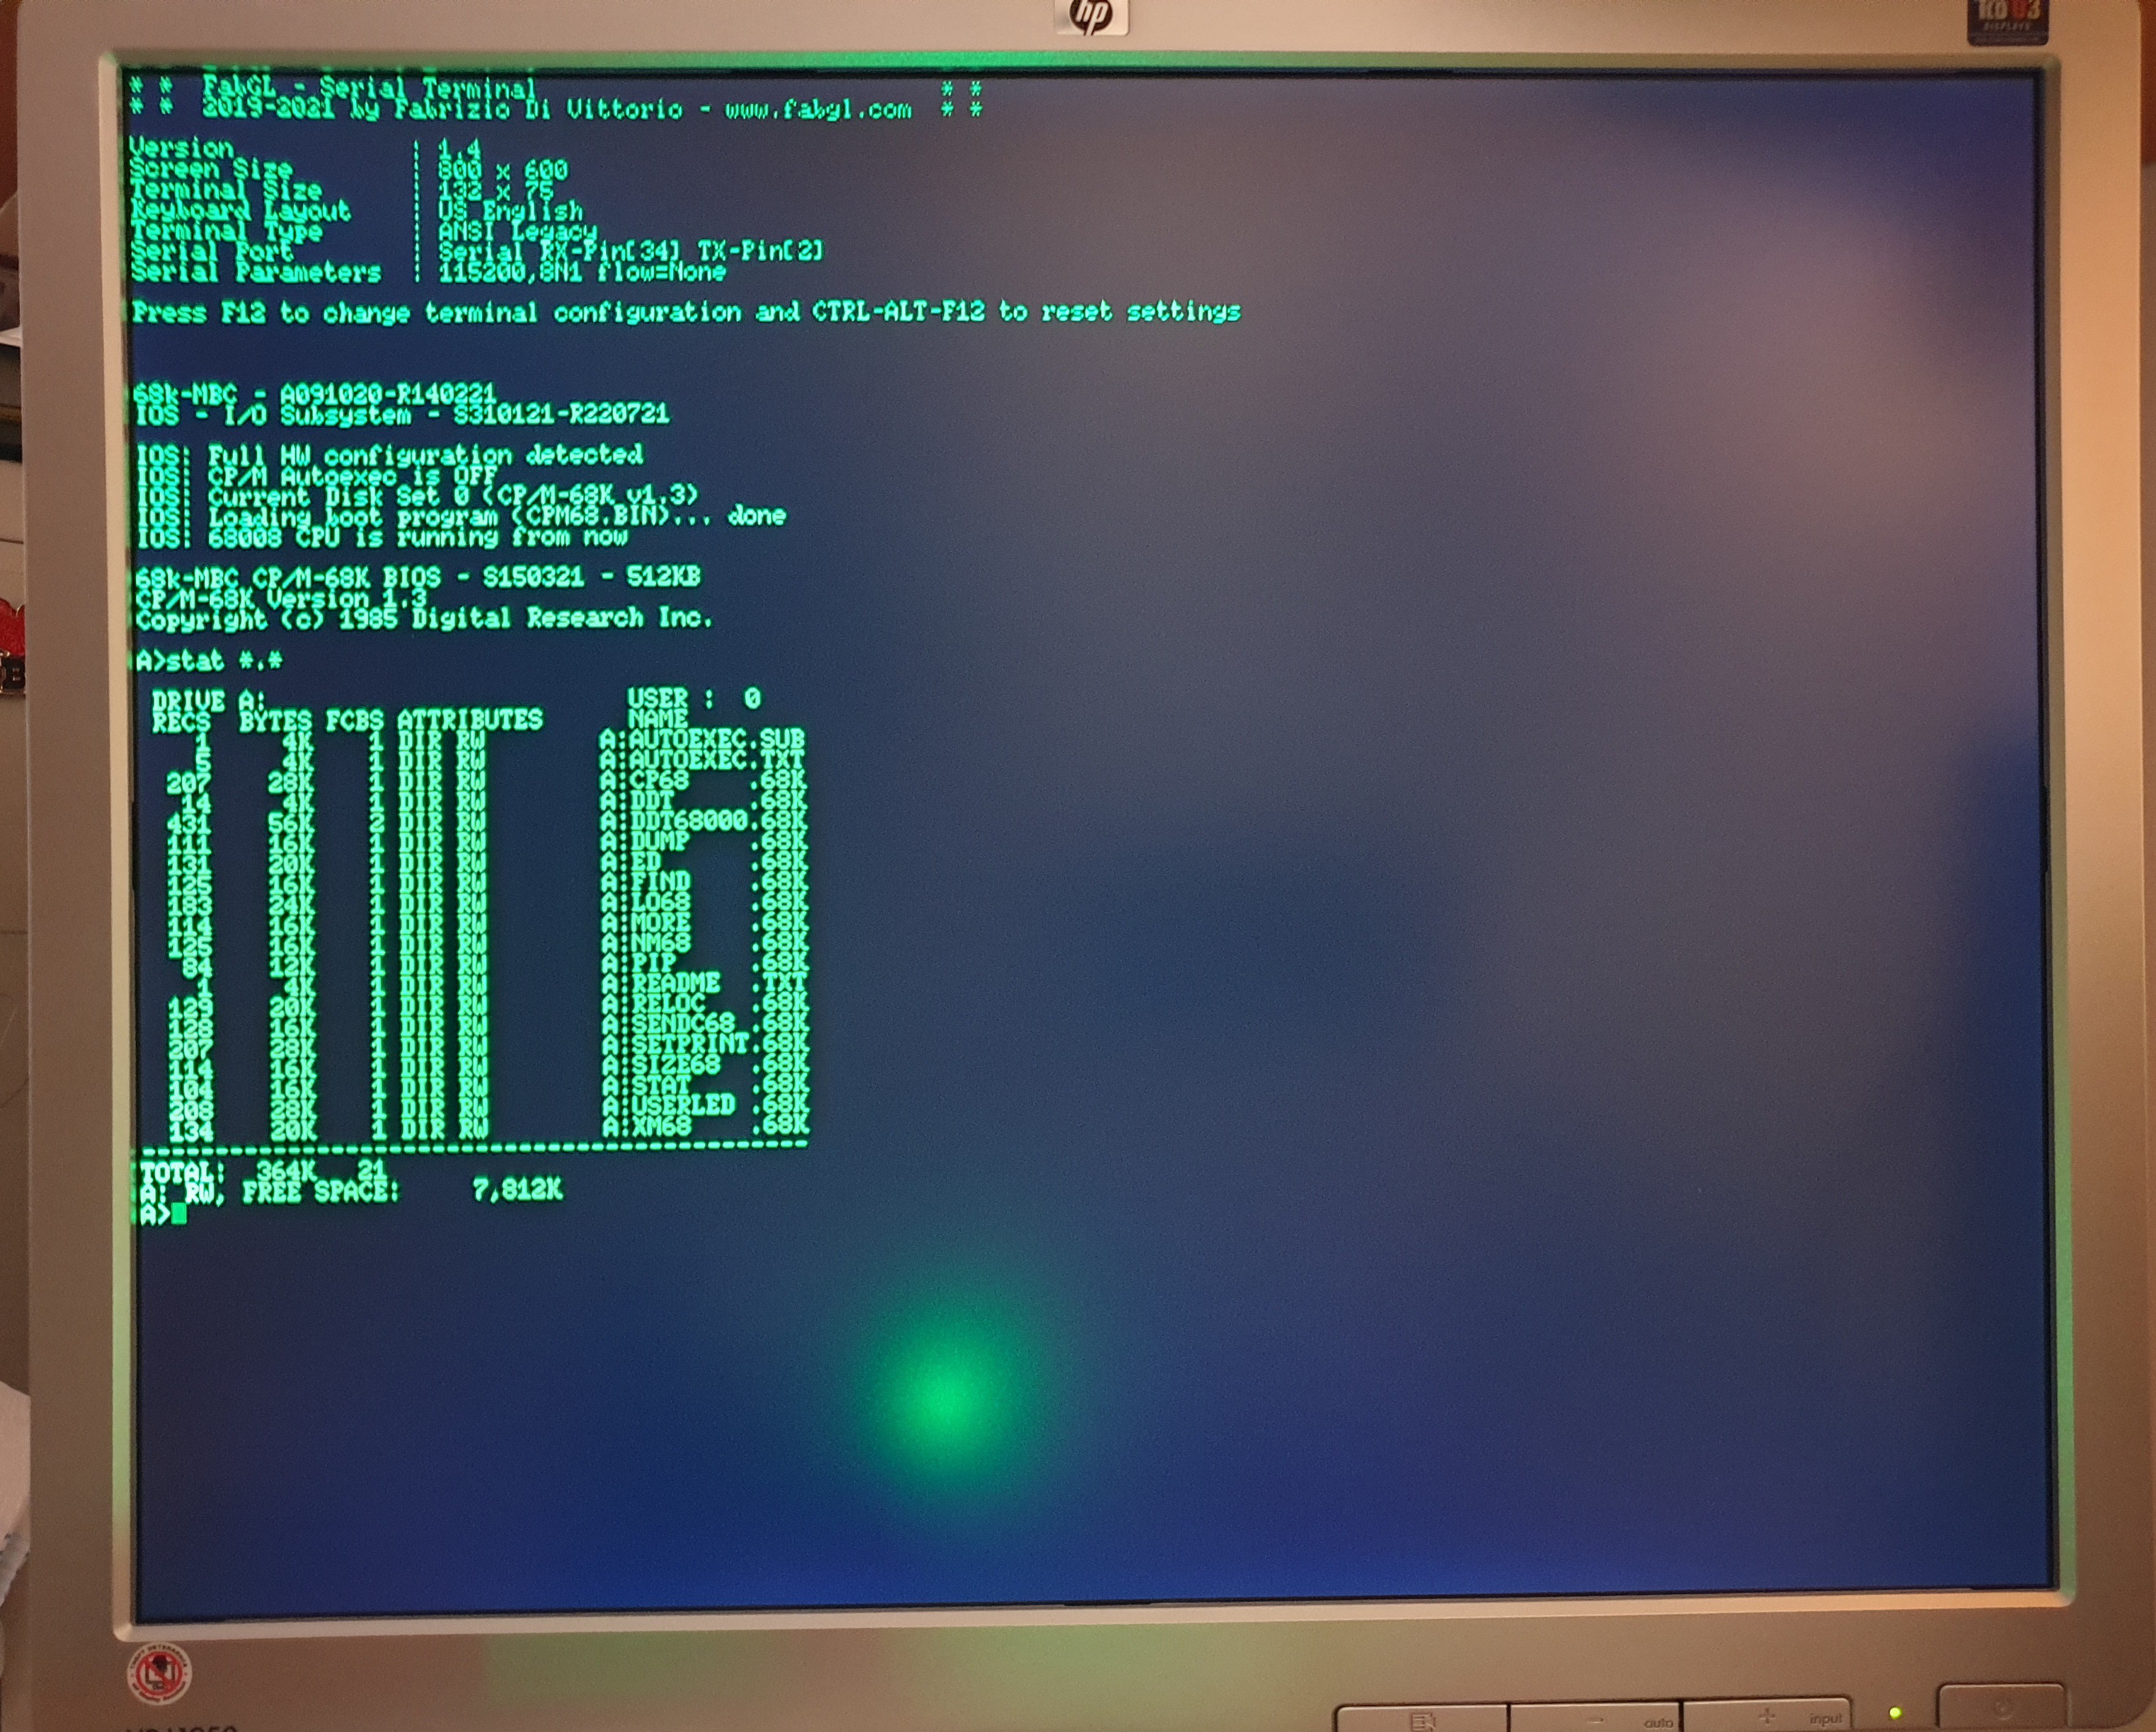
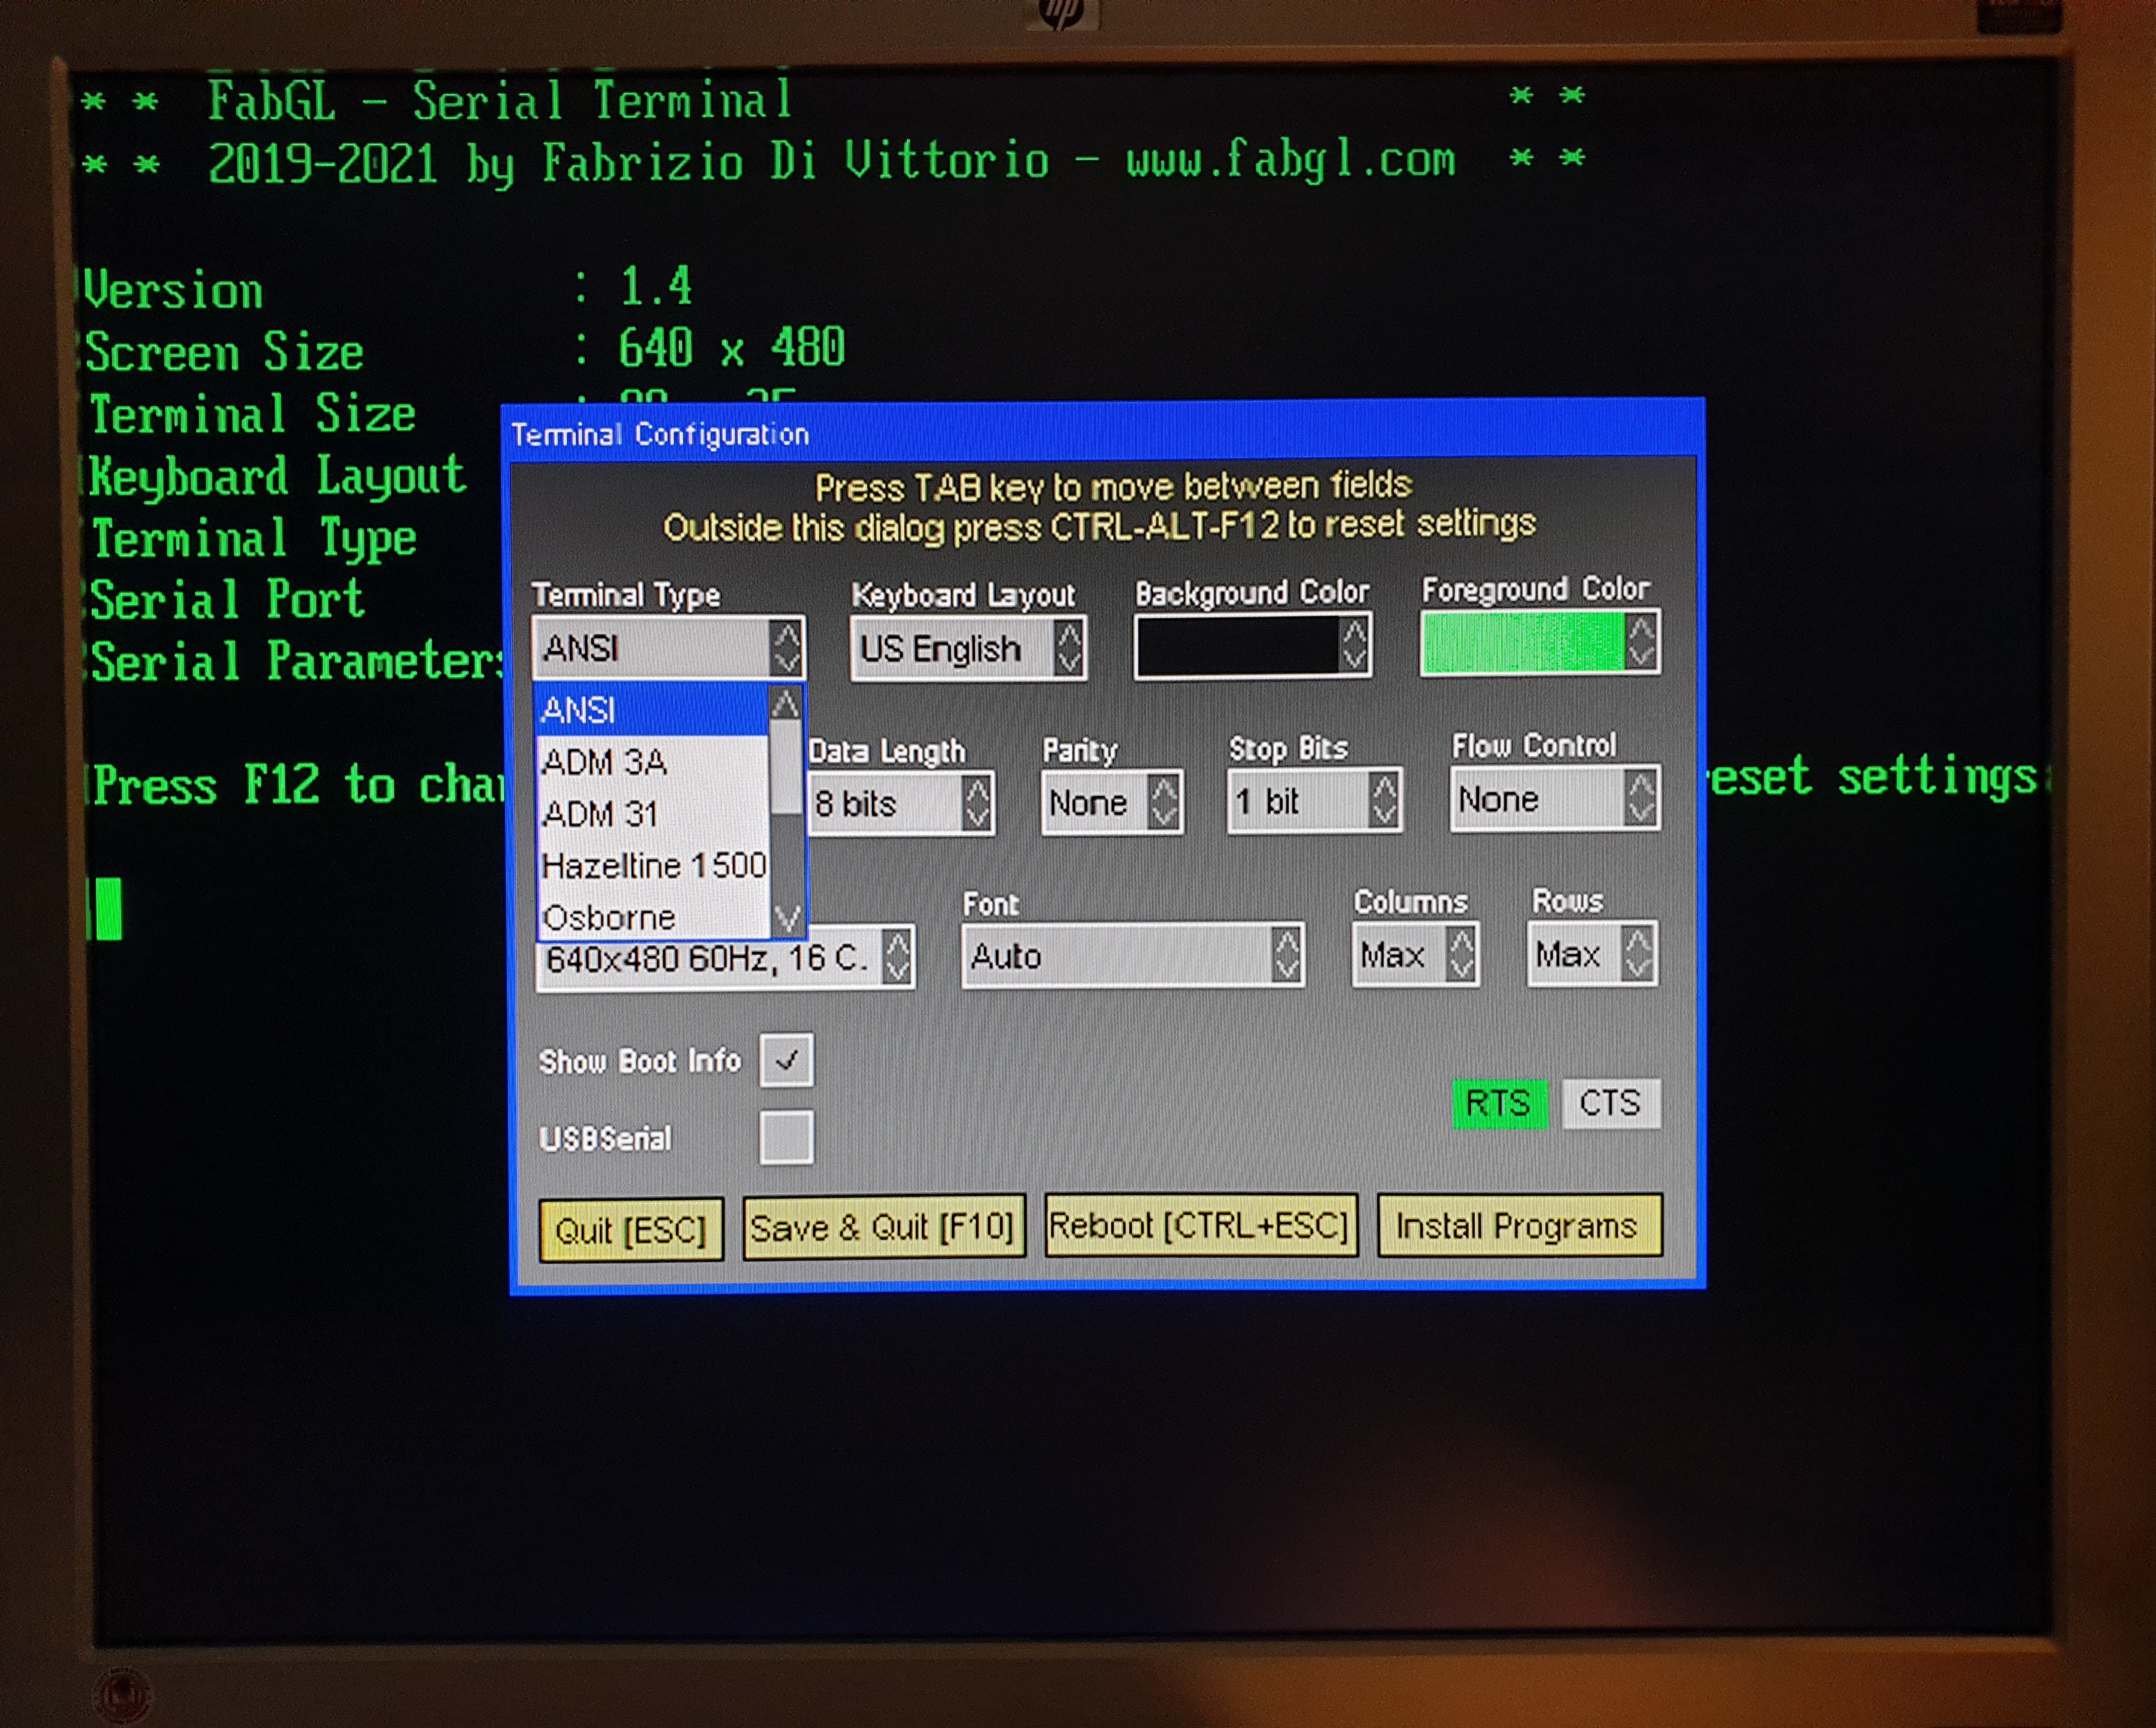
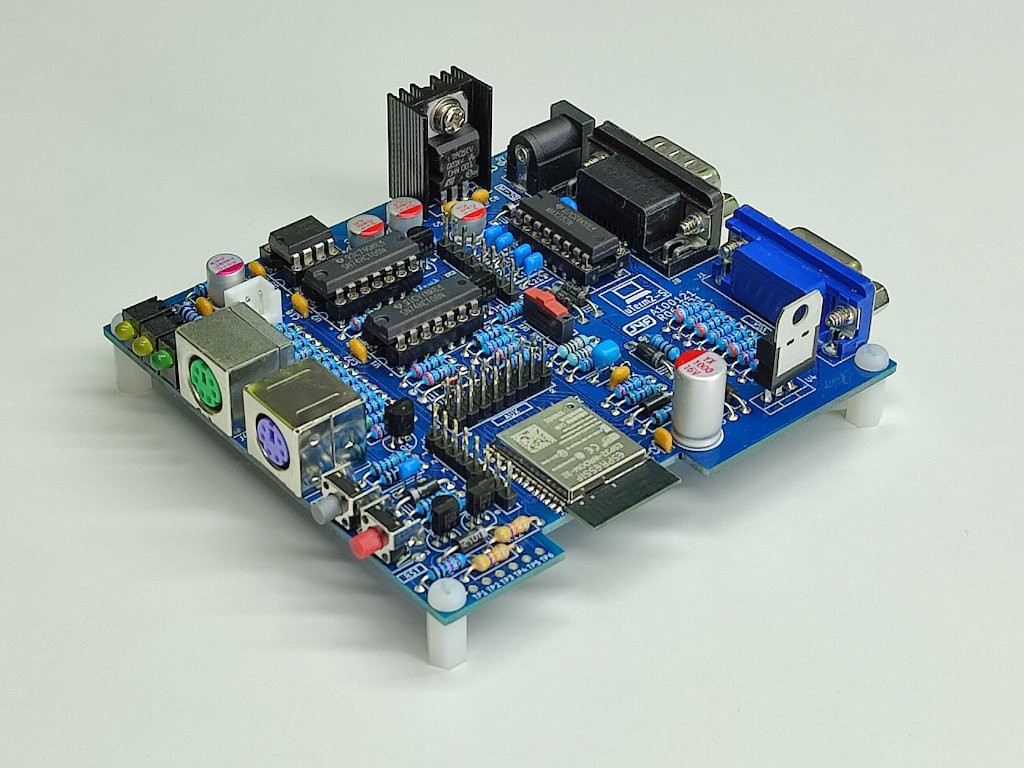
  • Added the USING A uTERM2-S RS232 TERMINAL chapter;
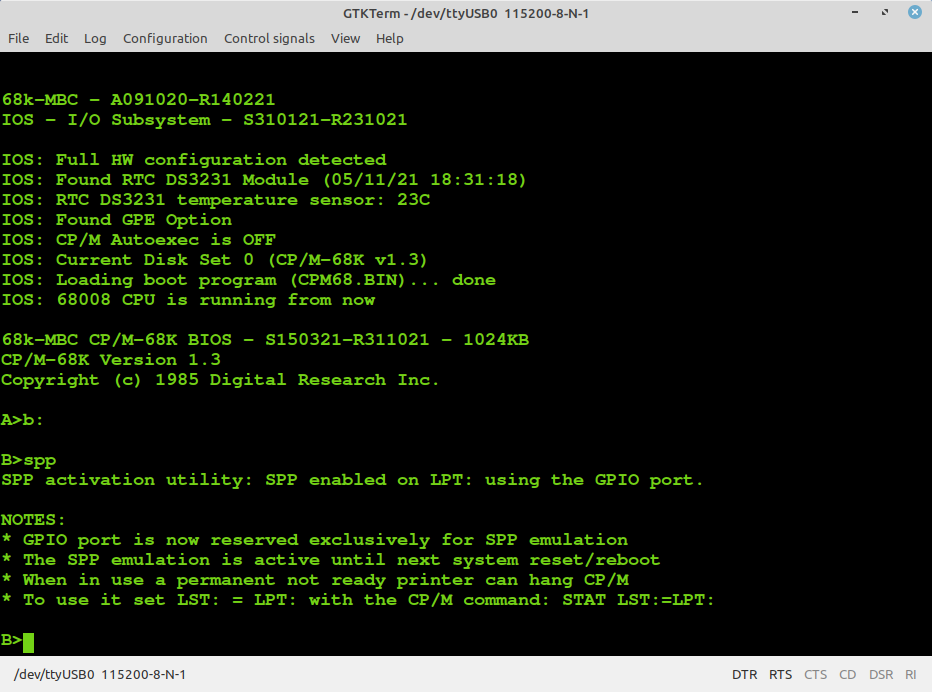
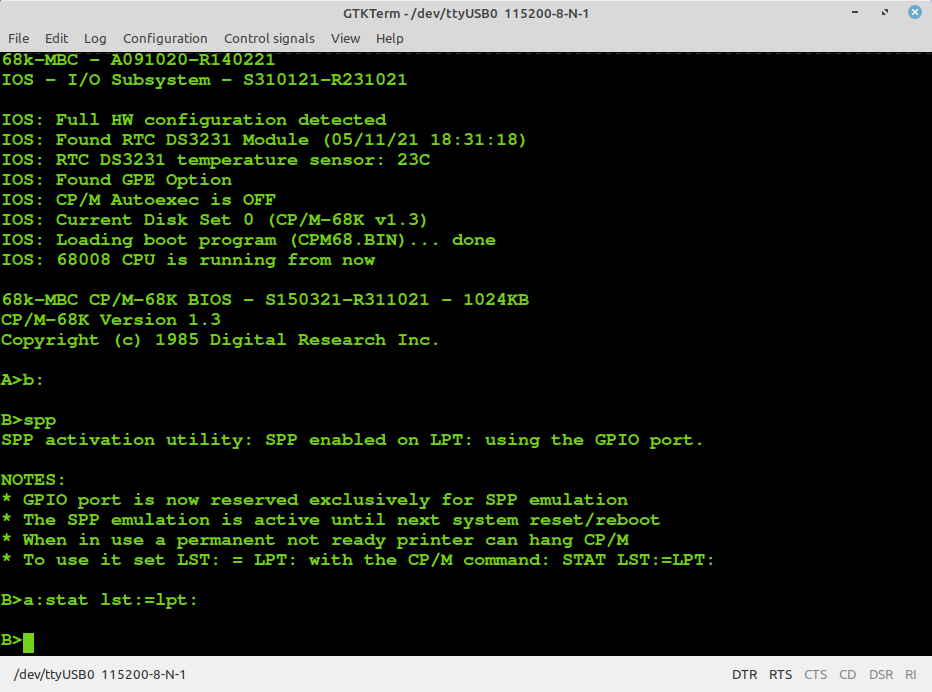
  • Added the SPP (STANDARD PARALLEL PORT) ADAPTER BOARD chapter;
  • Added documentation to build the SPP Adapter board (A240721-R270921). See the FILES section.

SW:

  • Released all the SW related files (see the FILES section);
  • Updated IOS S310121-R130421 and SD-S310121-R130421-v1.zip (see the FILES section);
  • Added the complete collection of the 4 Manuals of CP/M-68K (see the FILES section);
  • Updated IOS S310121-R150421 and SD-S310121-R150421-v1.zip (see the FILES section);
  • Added the SW/FW for the Arduino Uno PIC programmer, including the "ICSP Shield" board (see the paragraph: FLASHING THE FIRMWARE WITH AN ARDUINO UNO AS PROGRAMMER);
  • Updated SD-S310121-R150421-v2.zip (see the FILES section);
  • Released a working experimental doker image for a gcc cross-compiler toolchain (See the paragraph: SLOAD: HOW SETUP A "DOCKERIZED" GCC + NEWLIB CROSS-COMPILING AUTOMATED TOOLCHAIN (LINUX));
  • Updated IOS S310121-R250521 and SD-S310121-R250521-v1.zip (see the FILES section);
  • Added the 68000 IDE installation files and the custom cstart.asm file for the 68k-MBC (128/512/1024KB versions. See the FILES section);
  • Updated SD-S310121-R250521-v2.zip (see the FILES section);
  • Updated IOS S310121-R010721 and SD-S310121-R010721-v1.zip (see the FILES section);
  • Updated IOS S310121-R220721 and SD-S310121-R220721-v1.zip (see the FILES section);
  • Updated IOS S310121-R231021 and SD-S310121-R231021-v1.zip (see the FILES section);
  • Updated SD-S310121-R231021-v2.zip (see the FILES section);
  • Updated SD-S310121-R231021-v3.zip (see the FILES section).
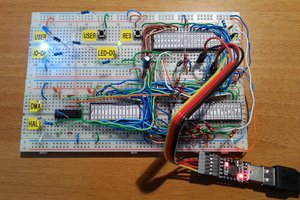


* * THE PROTOTYPE * *

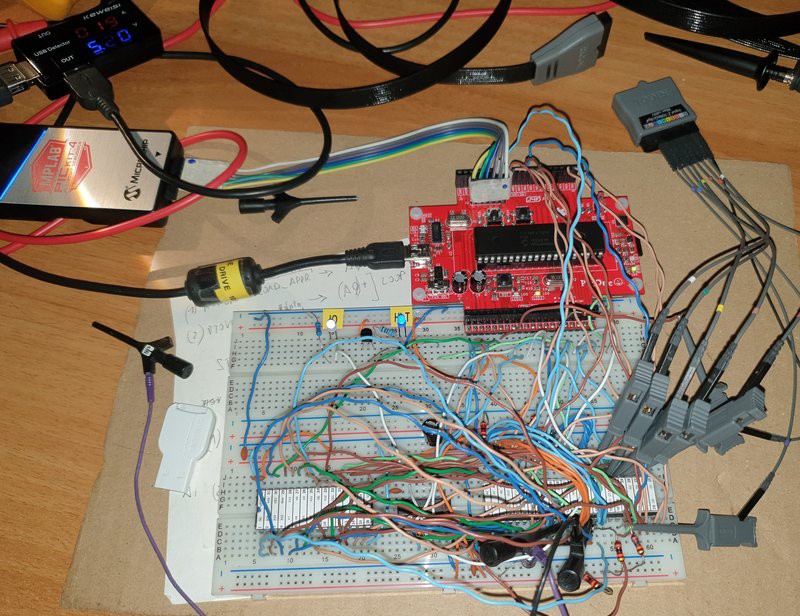
In the first phase of the design I've used a prototype on a breadboard to check the basic "concepts".

I've used as "companion" MCU a PIC18F47Q10 on a custom board (PicOne) I previously made and that it is directly pluggable on breadboards, and with onboard microSD card and USB-serial adapter.:

To make the firmware for the PIC18F47Q10 I've used MPLAB X IDE with the MCC plugin.

Here a short video with an automated assembler toolchain using Easy68K as assembler and sLoad, a custom SW utility to load from the serial port and execute a Motorola S-record formatted executable:


To allow a real automated toolchain an auto-reset circuit on the breadboard takes the DTR signal from the serial-USB adapter and uses it to reset the MCU (like in the Arduino Uno board), so it is possible reset the breadboard from a batch file running in the PC using a macro of Tera Term.


* * WHY A PIC? * *

Those have followed the previous Z80-MBC2 and V20-MBC boards will note that I haven’t used here an Atmega MCU. Using an Atmega MCU allows to use the friendly Arduino IDE and many ways to flash the MCU, so this is an enabling factor.

Unfortunately Atmega MCU GPIO ports are not TTL compatible, and this limitation was solved in the previous boards using a CMOS CPU that under given conditions can accomplish the digital levels of the Atmega MCU.

But here the 68008 CPU isn’t available in CMOS technology at all, so an Atmega MCU cannot be used.

So I’ve done some searches to find an alternative MCU having three main constraints: must have TTL compatible GPIOs (I mean strictly "guaranteed" TTL compatible), must be a TH part and cheap too.

The only part I’ve found was a PIC18F47Q10 MCU, and I must say that it accomplish the previous constrains very well. More, it is a modern MCU with lot of interesting features and more flash and RAM memory than the previous Atmega32 MCU.

Of course nothing comes free, and the choice of a PIC18F47Q10 brings some complexities. The first is the need...

Read more »

SPP Adapter board - A240721-R270921.zip

All the documentation needed to build the SSP (Standard Parallel Port) Adapter board (A240721-R270921) including schematic, PCB assembling guide, Gerber files for PCB production. PCB is 55mm x 60mm 2-layers.

x-zip-compressed - 747.10 kB - 11/06/2021 at 10:10

Download

S310121-R231021_68k-MBC_IOS.X.production.hex

The IOS in executable format (.HEX). This executable file is intended for the use with MPLAB IPE (or any other equivalent SW) to program the PIC MCU directly.

x-hex - 87.37 kB - 11/05/2021 at 18:29

Download

S310121-R231021_68k-MBC_IOS.X.zip

The sources for the IOS (with the needed libraries). Unzip into a folder and open with MPLAB X IDE (I've used version v5.45). IOS must be uploaded into the PIC18F47Q10 flash. See the CHANGELOG section on main.c source for more info on changes.

Zip Archive - 2.01 MB - 11/05/2021 at 18:30

Download

SD-S310121-R231021-v3.zip

The content of the microSD for IOS S310121-R231021. See the CHANGELOG.TXT file inside the SD root for more info on changes.

Zip Archive - 2.34 MB - 04/18/2023 at 17:22

Download

EF06120-A2-user manual.pdf

QR203 printer commands (it is referred to another model but the commands seem to be the same of this one).

Adobe Portable Document Format - 424.74 kB - 07/23/2021 at 17:57

Preview
Download

View all 13 files

  • * * SPP (STANDARD PARALLEL PORT) ADAPTER BOARD * *

    Just4Fun10/10/2021 at 09:03 2 comments

    * * SPP (STANDARD PARALLEL PORT) ADAPTER BOARD *  *

    The Standard Parallel Port (SPP) Adapter board allows to use the GPIO port of the 68k-MBC as a standard printer parallel port.

    In this way you can use a legacy parallel (Centronics) printer.

    To connect the SPP Adapter board to the GPIO connector of the 68k-MBC board you need a 10cm long 20 wires flat cable terminated with an IDC connector at both sides (pay attention to connect the cable in the right way on both sides, so the pin 1 on the 68k-MBC GPIO connector corresponds to the pin 1 on the SPP Adapter board GPIO connector).

    Please note that you have to power off the 68k-MBC board before connecting or disconnecting the SPP Adapter board to it.


    NOTE:
    before using the SPP Adapter board (A240721-R270921) you have to update both the IOS firmware and the SD image to the latest available version (see the FILES section).

    In the following image the SPP Adapter board with the flat cable (connected to the GPIO connector of the 68k-MBC) and with the printer cable:

    The cable to use for the printer is the common parallel printer cable, with a DB-25 connector at one side and a Centronics connector at the other:


    HOW TO BUILD IT

    In the FILES section you can find a zip file with all the documentation needed to build the SPP Adapter board, including the Gerber files for the PCB production.


    HOW TO USE IT: THE SPP CP/M-68K UTILITY

    To enable the SPP Adapter board under CP/M-68K I've added on the drive B: the custom utility SPP.68K (and the source SPP.BAS).

    You have to execute the SPP utility to enable the SPP Adapter board and "link" to it the LPT: CP/M device inside CP/M-68K. After the execution of the SPP utility the GPIO port will be linked and reserved (the "normal" GPIO opcodes/functions inside IOS will be disabled) to the SPP parallel port emulation until a system reset or reboot:

    After the execution of the SPP utility you need to link the LST: logical device to the LPT: device with the CP/M command STAT LST:=LPT:


    At this point you have a working printer parallel port on LST:, so if you give the Ctrl-P command all the console output will be echoed to the printer:


    NOTE:
    The SPP utility will output an error message if the GPE (GPIO Expansion) option is not installed.


    HOW TO USE IT: GCC EXAMPLES

    I've added a couple of source examples in the SD image (/gcc-68k/workdir directory) to show how to use the SPP Adapter with the gcc cross compiler.

    The two source examples are getStatusSPP.c and writeTestSPP.c, and they are the ones I used for the first test of the SSP Adapter board:


    WHERE TO GET A PCB

    I've prepared an "easy" link to get a small lot (5 pcs minimum) of PCB of the SPP Adapter. The link is this one.


    HOW TO GET A KIT OR AN ASSEMBLED UNIT

    If you are looking for a kit with all the needed parts or an assembled unit ready to use now there is a professional seller that can sell both and ship worldwide.

    The link to the seller is this one.

  • * * USING A uTERM2-S TERMINAL * *

    Just4Fun09/10/2021 at 15:30 0 comments

    * * USING A uTERM2-S TERMINAL *  *

    I've just relesed the uTerm2-S, a new multi-emulation color RS232 terminal for the 68k-MBC (but not only...). It is based on a ESP32 cheap module and is designed to use the FabGL library.

    More info on the uTerm2-S can be found here.

    The following image shows the uTerm2-S (previous PCB revision) connected to a 68k-MBC using the custom RS232 cable (A020221) previously described:

    Here I've set the screen of the uTerm2-S to 132 columns x 75 rows to have a large display area:

    In the following images a 68k-MBC powered with a uCom add-on board and connected to a uTerm2-S terminal (here the terminal was set to 128 columns x 40 rows):

  • * * USING A SMALL THERMAL PRINTER * *

    Just4Fun07/20/2021 at 17:25 0 comments

    * * USING A SMALL THERMAL PRINTER * *

    It is possible to find "around" cheap little thermal printers like those used to make receipts. The model name of the one I've used here should be QR203.

    These printers typically have an RS232 serial interface, so you can connect it to the 68k-MBC  thru the second RS232 port and use it as a little system printer (i.e. activating the "hard copy" with the CP/M command Ctrl-P):

    These printers are normally sold with two cables, one for the power and one for the data (RS232 or TTL). I suggest to cut both cables in the middle so you'll get two pieces (with one side already connectorized on the printer side) for each type.

    To connect the printer to the RS232 port 2 (J4/AUX) of the 68k-MBC you have to make a custom cable using an half data cable connected to a 3 pin Dupont connector as in the following photo (I've just soldered three wires with one side already connectorized with a Dupont terminal, then isolated with a heat-shrink tube):

    Here the table with the connections between the RS232 connector on the PCB printer side (5 pin) and the Dupont 3 pin connector (for J4/AUX):

    Only GND and RX are really needed, anyway I've connected also TX.

    The pin 1 of the Dupont connector (RX) is the one marked with a white dot on the photo.

    The pin 1 of the 5 pin RS232 connector on the printer PCB side is the one on the left (black wire) on the previous photo.

    This way it is ready to be connected to the RSR232 port 2 pins of J4/AUX as the RS232 custom cable (A020221):

    To power the printer I suggest to use a 9V 3A power supply adding a silicon diode (at least 3A rated) in series to protect against polarity inversions and to lower a little the voltage (9V is the maximum voltage for this printer).

    Remember to set the speed of the serial port 2 at 9600 bps, as this one is the standard operating speed for this model.

    I've done a little utility (SETPRINT.68K) to set the printer to 42 columns using a smaller font and to set bold characters for a better readability (it is in the drive B: together with the source SETPRINT.BAS for the CB68 Basic compiler):

    In the Files section I've uploaded a manual with all the commands for this printer (it is referred to another model, but the commands seem to be the same of this one).

View all 3 project logs

Enjoy this project?

Share

Discussions

sierra29 wrote 01/21/2024 at 16:01 point

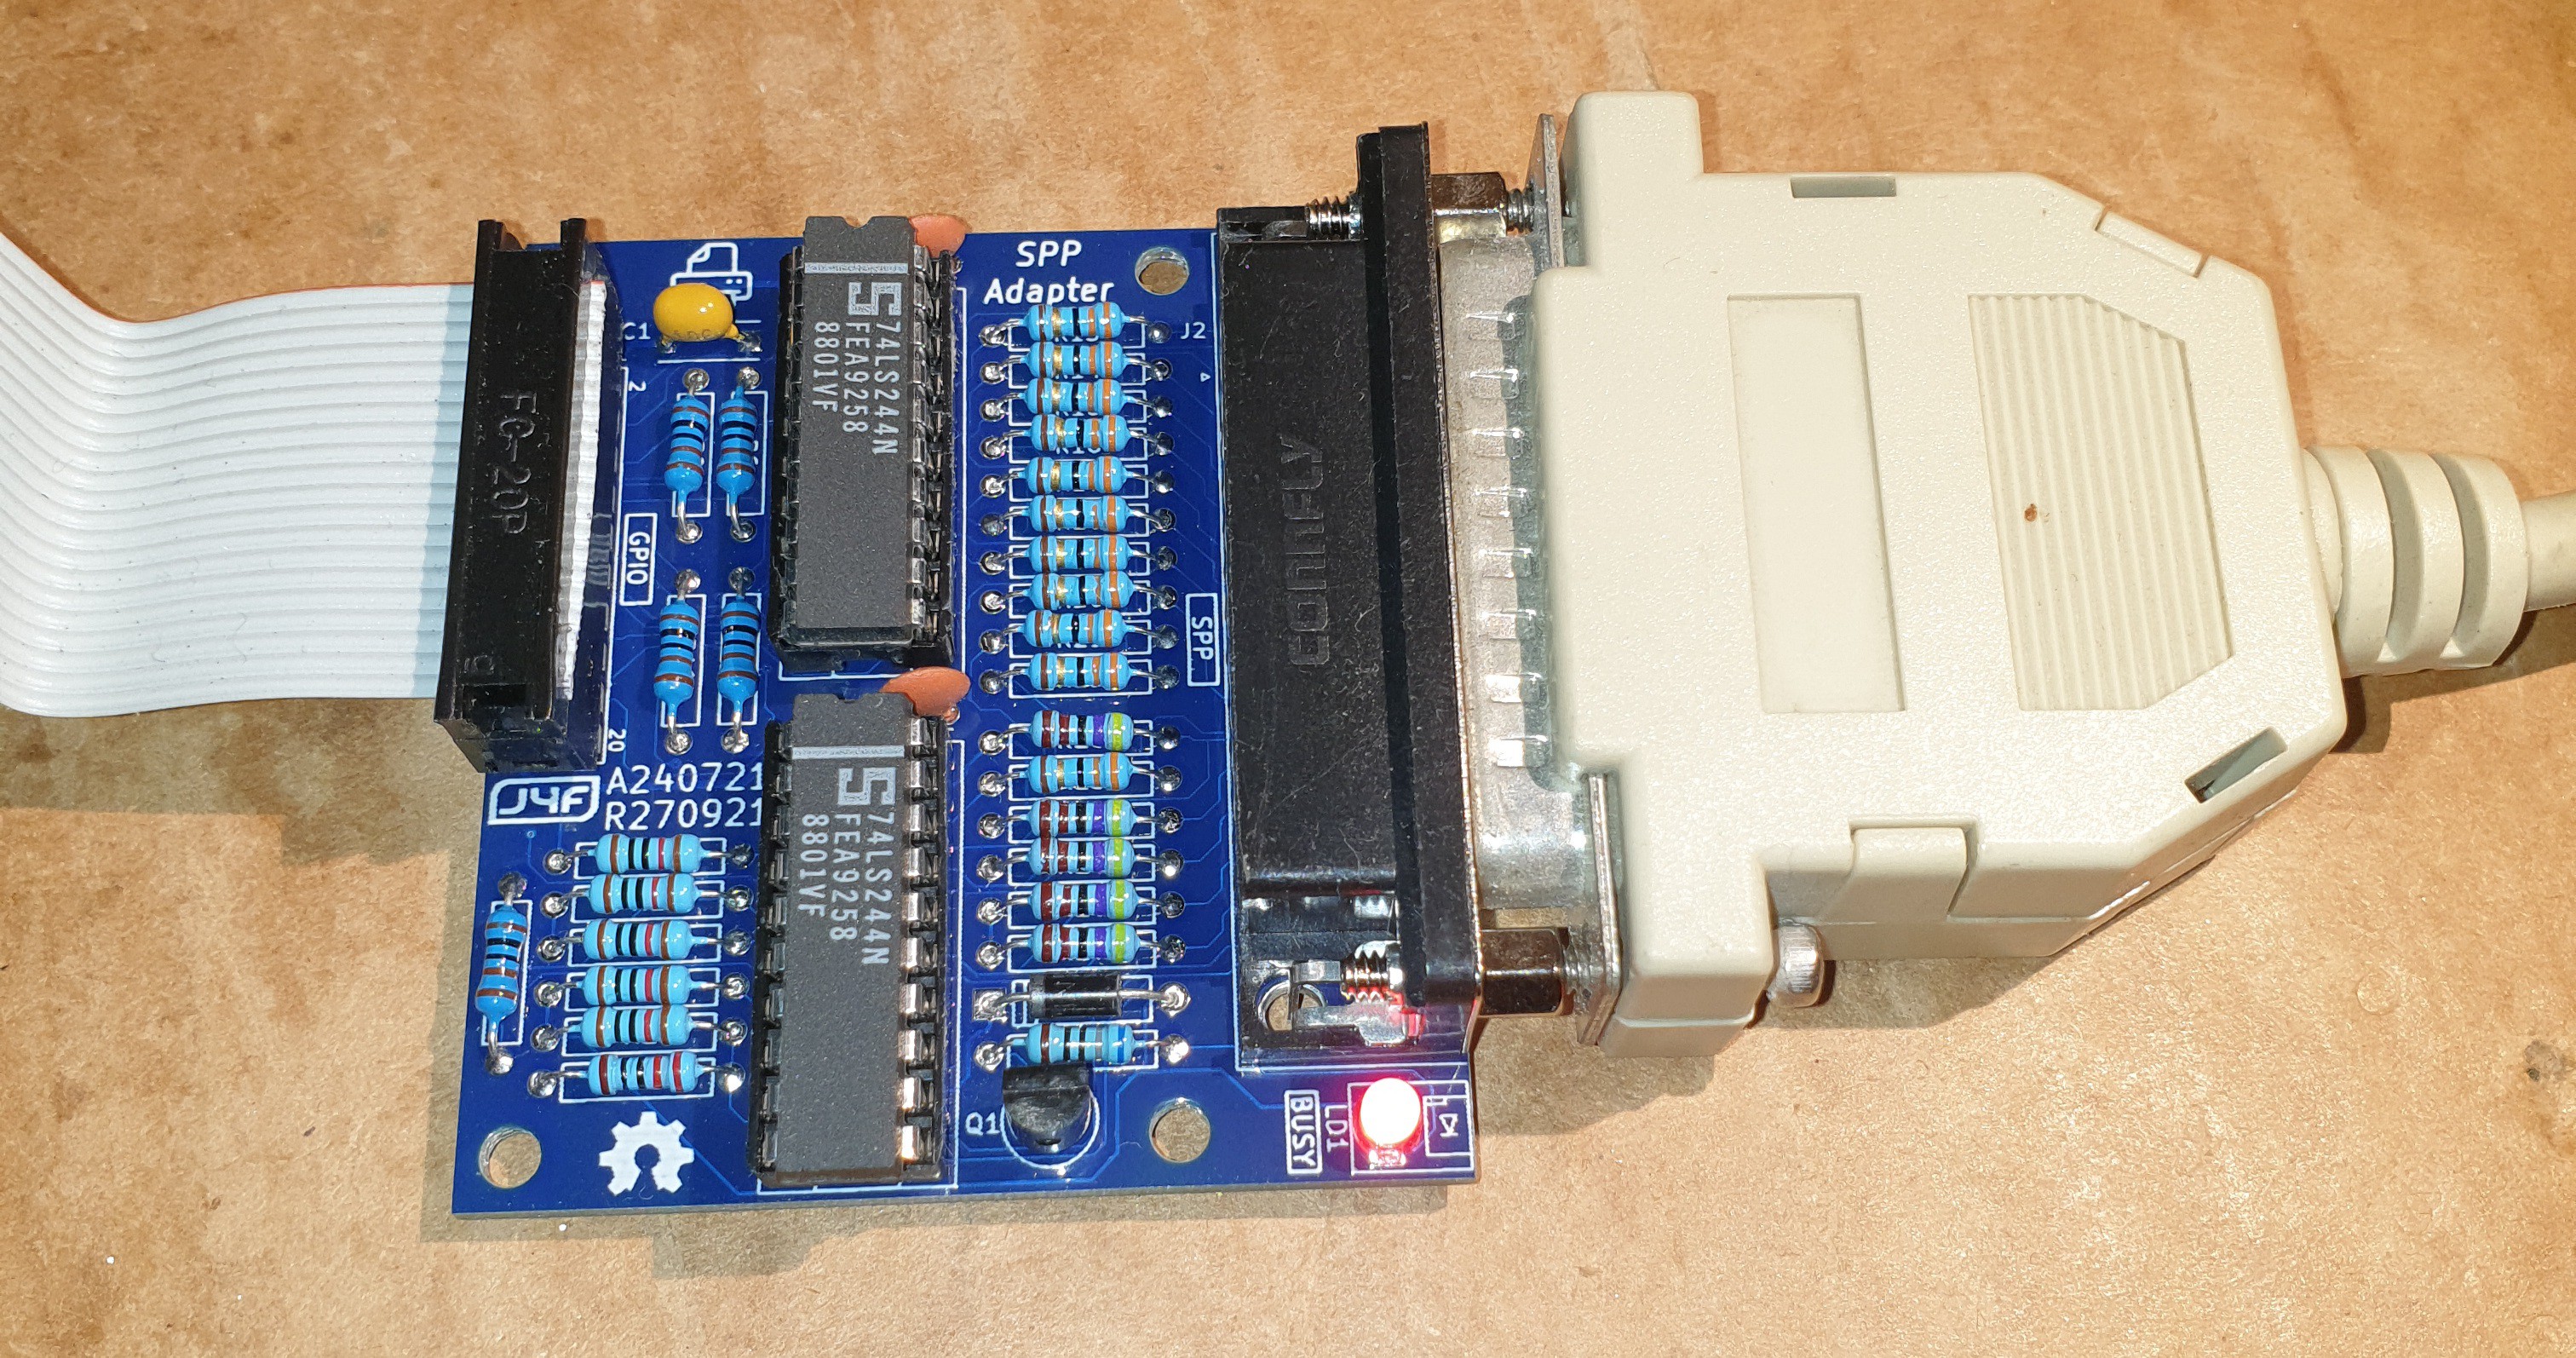
Perhaps my explanation was not clear, I have the docker toolchain with gcc gunning and working. But I see not how to create .68k application with that toolchain. In Autoboot it works, but I have no idea to make a CP/M application which is able to return to the OS - that´s ist. Has someone a tip for me how to do that?

  Are you sure? yes | no

sierra29 wrote 01/19/2024 at 01:54 point

Hi, has anyone out there set up a cross compiler (c or c++) for windows or linux? I`d like to port a wysiwyg editor for the system because the ED is horrible. 

  Are you sure? yes | no

jrw1975 wrote 06/19/2023 at 23:06 point

No comments since 2021, hope this page is still monitored. 
I built the lite version, and it works well.  I'm trying to configure an OLED display.

.96" I2C with SSD1306 chip.   Modified main.c to check to address (x3C).

I cannot get anything to display.  Set bits correctly, I think.  Is the virtual command structure causing this ?


Thanks for any guidance.

  Are you sure? yes | no

Thomas Tahsin-Bey wrote 05/21/2023 at 10:26 point

Hi,

the blink-demo in the "asm_demo"-directory seems to require a newer version (r091121) of the ios than provided in the files section (r231021).

Any updates available on the ios that you can share?

Thank you for this awesome project!

  Are you sure? yes | no

Just4Fun wrote 05/21/2023 at 17:28 point

Hi, I've to admit that at first I thought it was a typo on the source... but after a while I remembered I did a "special version" (IOS S310121-R091121_DEVEL4) to run an experimental EmuTOS porting made by Vincent Rivière (you can read the thread on the Z80-MBC2 FB group searching for "Emutos"). That example refers to that IOS version. You can find the IOS source and the compiled .hex binary here (and the change-log too):

https://github.com/SuperFabius/IOS-S310121-R091121-DEVEL

BTW: probably I inserted that asm example in the "normal" SD image by mistake, as it was intended to test the added IRQ capabilities for EmuTOS support...

  Are you sure? yes | no

c.legal wrote 02/26/2023 at 20:20 point

Hello, is there a schematic of the maon board ?

Thank's

  Are you sure? yes | no

Mike wrote 11/18/2022 at 21:12 point

Has anyone built the CP/M 68K BIOS from source? I'm not sure the supplied source files include the changes required by the board?

  Are you sure? yes | no

Phil wrote 11/16/2022 at 13:55 point

For the parallel port adapter, could somebody please explain the in-line resistors? There's 33R on the SPP side and 1k on the SBC side. What is the the purpose of these resistors and why is it different for the SBC vs the SPP? I'm a newbie and trying to learn/understand. Thanks.

  Are you sure? yes | no

Simon Greenaway wrote 08/06/2022 at 15:48 point

Anyone had this issue (I've swapped SD cards and SD reader, reformatted card etc):


68k-MBC - A091020-R140221
IOS - I/O Subsystem - S310121-R010721

IOS: Full HW configuration detected
IOS: CP/M Autoexec is OFF
IOS: Current Disk Set 0                                                                                            
IOS: Loading boot program (CPM68.BIN)                                                                              
IOS: SD error 2 (NOT_READY on MOUNT operation)                                                                     
                                                                                                                   
IOS: Check SD and press a key to repeat

-----------------------------------------------------------

The disk led goes on and off at the correct times, trying to boot the other options leads to the same result. The SD card reader lines are connected to the PIC correctly.

  Are you sure? yes | no

Just4Fun wrote 08/06/2022 at 16:06 point

Hi, it seems a problem with the SD card format (error says the PIC can't find a FAT16 or FAT32 volume). Are you sure to use a max. 32GB SD?

  Are you sure? yes | no

Simon Greenaway wrote 08/06/2022 at 16:15 point

I've tried with 4gb and 32gb cards, tried both FAT12 and FAT16. I'll try FAT32.

  Are you sure? yes | no

mobra66 wrote 05/12/2022 at 15:37 point

If you go to http://www.cpm.z80.de/binary.html you can find SVS Pascal and SVS FORTRAN-77 for CP/M-68K. Both compilers and manuals are made available with consent from the original author. I have tested both on my 68K-SBC and they work well. They are provided in REL format, so they can easily be relocated to work on any CP/M-68K system, as far as I know.

  Are you sure? yes | no

Just4Fun wrote 05/13/2022 at 08:45 point

Great! Thanks for the info.

  Are you sure? yes | no

wenij wrote 02/17/2022 at 10:31 point

Have any tools or code that can help to check the SRAM stability?

  Are you sure? yes | no

Jean-Yves wrote 02/07/2022 at 13:39 point

If anyone is looking for a  full screen editor for use with CP/M-68K, I managed to track one down: Simple Kitten Editor, written by a Japanese programmer who goes by the name SkyRiver (@wincp on Twitter)

https://piclabo.blog.ss-blog.jp/CPM68K_SKED

You will need to download the sked68k_v001f.zip file on the page (all in Japanese but the Google Translated version is pretty good), unzip it  and transfer the SKED.REL file over to your board. Then (assuming you transferred it to A:)

A> RELOC SKED.REL SKED.68K

A> SKED name-of-file-to-create-or-edit

CTRL+J brings up the full list of key bindings

Much nicer than struggling with ED! :)

  Are you sure? yes | no

Richard Omer wrote 12/04/2021 at 01:55 point

Here's a crazy one-of-a-kind OS for the 68K: http://cini.classiccmp.org/ht68k.htm

  Are you sure? yes | no

Ian wrote 11/14/2021 at 13:30 point

Any chance of adding SK*DOS 68K as a bootable operating system?

(http://www.bitsavers.org/pdf/peripheralTechnology/PT68K4/stark/sources.html)

SK*DOS is abandonware. People have been trying to contact Peter Stark (the author) since 2013 with no success.

  Are you sure? yes | no

Just4Fun wrote 11/25/2021 at 12:21 point

I currently have no time for that... Anyway I'll give a look.

  Are you sure? yes | no

ermanno wrote 11/13/2021 at 19:43 point

I have the wrong pic I bought pic18f47k42 instead of the pic18f47q10, now the programmer with arduino does not let me program it because it tells me that it is the wrong id.
You can use the same pic18f47k42, what can I do,
maybe change something on the pp3.c source.
Thank you

  Are you sure? yes | no

Just4Fun wrote 11/15/2021 at 12:38 point

The PIC18F47K42 seems to be a supported device by pp3.

Try to do this command (from linux, adapt it if from win):

./pp3  -c /dev/ttyACM0  -s 1700 -p -n -t 18f47k42


to check that it is supported.

BTW: anyway I'm not sure that the PIC18F47K42 can be used with the 68k-MBC. Try at your own risk...

  Are you sure? yes | no

ermanno wrote 11/15/2021 at 13:34 point

Thanks, I had already programmed the pic by changing from 18f47q10 to 18f47k42, but now I miss the 68008 and I don't know if it works. When the microprocessor arrives I will do the tests and I will be able to tell you if it also works with the pic18f47k42..

  Are you sure? yes | no

allen wrote 09/07/2021 at 02:26 point

How about a version that would run OS9-68K?

  Are you sure? yes | no

Just4Fun wrote 09/08/2021 at 07:50 point

Hmmm... I never used it. Have you any link?

  Are you sure? yes | no

wawa.voun wrote 08/08/2021 at 17:42 point

Hello,

Just build successfully the full version. You do a great job !

I have try to use the serial port 2 on J4 (pin 14, 16 and 18) to connect to a vt100 terminal.
Should I get the console directly on this port ? It seems no...

If I use ctrl-p on the normal console (J2) then I see something outgoing on port 2 (pin 14 of J4).

I understand I should probably use "stat" to do that but I am careful not to 'loose' the standard console and then lost control of the board if I do something wrong...

Basically the most easy for me is to have both port (J2 and J4 14-16-18) acting as a console. Of course using only one at a time...

Thanks for the advice.
Regards. Philippe

  Are you sure? yes | no

Just4Fun wrote 08/08/2021 at 18:12 point

Hi, not clear which configuration are you setting...

If you want use the "PC console" (serial 1) on J2 (with the serial-USB adapter) and a legacy RS232 VT100 terminal acting as console too at same time, you could simply connect it (the VT100) on J4 as port 1 too (pin 13, 15 and 17). Of course they will have the same speed and you should use a keyboard a time...

BTW: if you "loose" the console due to a wrong STAT, you can just press the reset button...

  Are you sure? yes | no

wawa.voun wrote 08/08/2021 at 18:35 point

Re,
Just give a try. Works well ! I have made the test on the wrong port.

Thanks. Philippe

  Are you sure? yes | no

Sarala Saraswati wrote 07/21/2021 at 08:59 point

I would love to see a pure 16-bit z8002/z8004 version of the mbc2 platform. These are such great projects. Also wish they sold with a nice case! 

  Are you sure? yes | no

Nick Brok wrote 07/08/2021 at 08:51 point

Hi just4fun.
Is it possible to "relocate" the f83.68k bin? I did not find the sourcecode from it, unfortunataly.

  Are you sure? yes | no

Just4Fun wrote 07/19/2021 at 13:48 point

Being a non-relocatable binary I have to say no.

  Are you sure? yes | no

Nick Brok wrote 06/22/2021 at 14:18 point

I tried this one, but the binary doesn't work.

  Are you sure? yes | no

Just4Fun wrote 07/03/2021 at 09:04 point

Hi, I've analyzed the binary of F83.68K and it is a not-relocatable binary that wants start at absolute address 0x00500. But this address is inside the RAM area where CP/M-68K lives, so out from the TPA. The only way is to try to "re-generate" a new F83.68K that starts from an absolute address inside the TPA (TPA starts at 0x07A00 for the 68k-MBC).

  Are you sure? yes | no

Nick Brok wrote 06/22/2021 at 11:25 point

Hi I succesfully build the full version 68ksbc. There was a little issue with the CPU, but Giovanni has sent me an other CPU that works great now. I've found a forth83, but this will not run under CP/M.  I found this in the m68k CP/M archive.

  Are you sure? yes | no

Just4Fun wrote 06/22/2021 at 11:53 point

Hi, you probably are referring to the kits sold by Giovanni...

About Forth 83 try this one that should run under CP/M-68K (not tested by me): http://cpmarchives.classiccmp.org/cpm/mirrors/www.cpm.z80.de/2000-08-08/download/forth68k.zip

Here a book about Forth 83 by Dr. C. H. Ting:

http://forth.org/OffeteStore/1003_InsideF83.pdf

  Are you sure? yes | no

Similar Projects

Does this project spark your interest?

Become a member to follow this project and never miss any updates