The point of the write-up is to inspire makers to make things with their offspring. I know it’s hard and sometimes impossible. It takes much more time and energy, but his/her accomplishment is priceless.
If you wonder why this shaggy cardboard box has two (instead of four) eyes, you will need to keep reading. If you don’t like tech talk and the journey we took, please skip to the end. I’ll highlight there a few technical things that I learned during this project. The following sections are my way to re-live the fun moments and reflect on some of my decisions. Please don’t complain if you’re bored.
I love the first phase: the design, the dream, limitless potential. It’s fascinating to see the kid’s free-thinking, not scarred by reality — requirements, quality, cost, and deadlines. It’s time for me to be quiet and try not to strike every idea — collaboration without emotions (oxymoron.) We looked at some pictures and went to a craft store to buy fur and eyes. It looked like many people created those books and provided how-to-make webpages and videos. My assumption was to buy a few things such as faux fur, use modeling clay for teeth and tentacles, and print the internals from the internet. Often I’m too optimistic with projects, but this time, I missed every aspect of it! Thus, the few hour’s projects took several days.
The store had many shaggy faux fur, but none of them look like an old gray used piece. All were beautiful and colorful. We compromised to make a newer looking shaggy book. No gray color, so we got brown – we will have a Grizzly Book of Monsters. We picked a smooth brown vinyl fabric so we can stick gold vinyl letters for the title. We spent a lot of time searching for plastic eyes; there were plenty of eyes, but nothing we liked. We picked a pack of four medium and small teddy bear toy eyes. Unfortunately, the eyes were brown, so we would need to change them to yellow. We could order some on Amazon, but we hoped to do the project quickly. All items cost around ten bucks. It seems like a rough start, but we longed to do a new project, and we have experience making them.
To gauge the size for all parts, we picked a cardboard box to see how big the book should be. We played with fur and eyes dreaming of a quick path forward. Now that we invested money and time, we (or me) needed to create a plan so we can collaborate without emotions. To my surprise, there was no examples of how to automate it. I was overly optimistic that I will find something already made on Thingiverse. I just wanted something that I could scale with four eyes. There are many ‘gifted’ artists making those books by gluing the fur on a box, stub eyes on top, sculpt teeth and call it done. That was not what I signed up for. I wanted animatronics, electronics, and servos! That is my strong engineering side – something I can shine in front of my kid. The shaggy parts and sculpture – this was the part where I want my kid to step up and help. It was her idea after all – even if I encouraged it.
When you do a project alone is easier to give up and say it’s not worth it – no one will know. When you do a project professionally, and complexity increases beyond your capability, you increase the cost and involve others, or marketing kills it. But when you make it with a kid, you don’t want to give up. You don’t want to be the bad example. The project has to move on and has to be fun. I like 3d designs, and I am proficient with Fusion 360. The eye controls shouldn’t be that hard. They needed to move right and left, open and close. Plus, go up and down, pulling the heavy fur, and be low profile. And four eyes, with two different sizes and different offset. At this point, I thought it would be easier to make four puppets than one book. I told myself: don’t panic – divide and conquer.
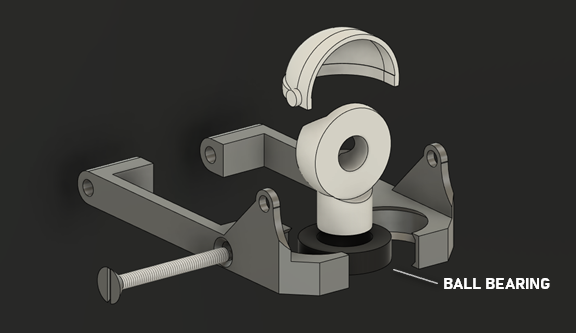
I never drew an eye mechanism, but research it and I saw a common strategy. One servo per function and wire links span to couple of eyes. I study how the eyes moved on the movie prop and made a sketch of eyes placement. The movie showed that the middle eyes are independent, and all eyes are hinged by the book’s spine. Since I should support four eyes, and need scalable design, I made one eye as module. I decided to use a ball bearing to hold the eyeballs from below since I don’t need bottom eyelids. This arrangement gave me stability and room for the top eyelid to move with the fur behind it. I was not sure how to hold the lid – so I tried to use small holes in 3d printed plastic and dimples on the eyelids. I was skeptical that I can print it that small and make it solid. I had to print the sides of the eyes horizontally to the print bed to make it stronger. I was afraid that the eyelids would not hold under pressure. But I had to try. I printed the eyelid wider for a tighter fit and dimple a little bigger. I filed it down to provide a sharper edge and snapped it in. Even with a wall of just 1.5mm, the eyelid hinge was solid and moved smoothly.
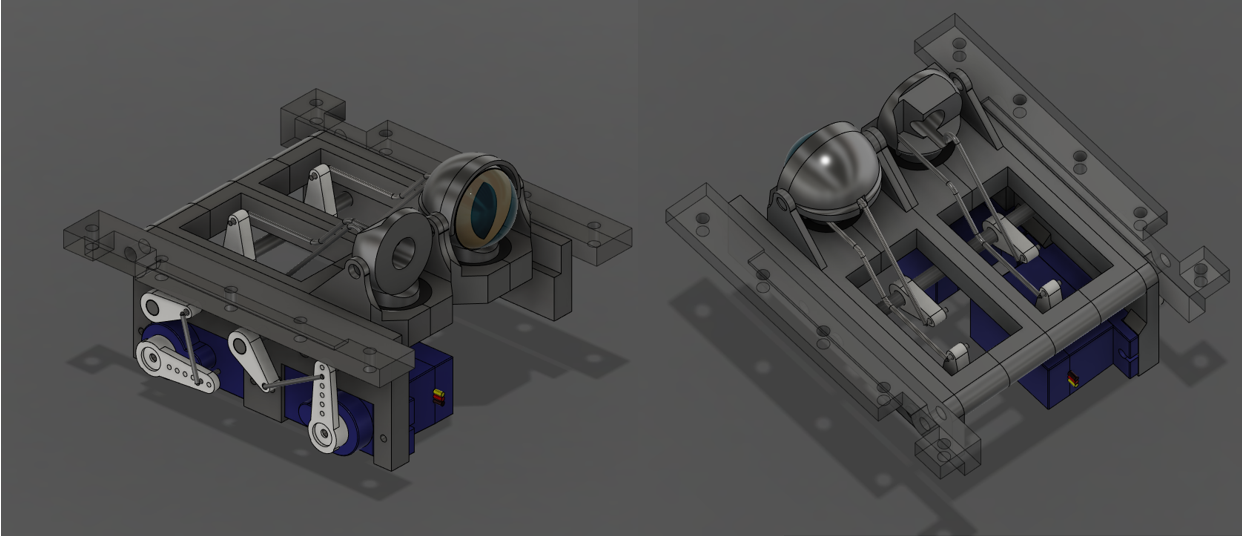
The middle two eyes were bigger and were offset. I decided to print the eye mechanism separately from the servos and pull levers. I had a rough idea of how to drive the movement, but I didn’t know if I can fit all and have enough space in the book. I could try to simulate it, but I wanted to see how smoothly it operated when the eyes and eyelids moved. It isn’t easy to describe the interaction between mechanical components with words. A picture is worth a thousand words. I’ll stop, and if someone wants me to elaborate, I’ll do it then. I printed the second eye and servo mount. As a crossbar, I used long 4x40 screws. I used a thick paper clip wire as a link to move the eye.
Once I got two eyes working I was happy with the progress. I was filled with renewed hope that we could finish it this year. Still, I was unsure if the blinking mechanism will work with the material and if the servo will move with multiple links. The fur material should be connected directly to eyelids, and it’s hard and very stiff. I made an executive decision to make a smaller prototype to try different components and learn. Then we will be able to do the final book even ‘better.’ We had enough materials to make more than two books. We already had the cardboard box, so we trimmed it and continued with an intermittent step. Plus, less pressure to make it perfect.
The book has many moving parts, but I knew I needed at least four servos: cover, eyes raise, eyes horizontal movement, and eyelids. (The actual movie prop also moves all tentacles, tongue, and upper lip.) Three of those servos would need to be in the book cover and need to flap up and down. (I digress; later on, we found a picture of the actual book prop from the movie. The eyes mechanism is all metal and is driven by cable links – similar to a bicycle hand brake. I used those before, but I felt that there wasn’t enough room in a small book. Additionally, the movie had a few copies of the book, each with different features used for different shots.) I decided to use smaller sg90 servos for eye movement and eyes lids and MG995/6R for the eye raising and book cover. I like and hate SG90 – they’re very inexpensive, small, noisy, and not precise. But the eyes and lids could move slowly, so the motor noises will be camouflaged by growling of the book.
While I worked on eye assembly, I got my teen to work on the tentacles. (Yes, I could sculpture it in Fusion, but this was her contribution.) We took a piece of paper and drew the rough size and spacing. We wanted them to be soft – not brittle and light. She used the Crayola Model Magic which was the wrong choice. The tentacles looked nice, but I had to embed a wire in each of them to make them stronger. We did the teeth in using Crayola Air-Dry Clay – an even worse choice. The stuff is nice to work with but is very brittle when dry, especially for sticking out teeth. We bought polymer clay – the perfect material. It was easy to work, light, flexible, and takes 30 minutes to cure (in my PCB reflow toaster oven.) This material can be easily shaped with a knife, sanded, and painted. We got a big brick of it for ten bucks, but you could buy small already colored pieces. We didn’t re-do the tentacles for the smaller prototype book, but we planned to use them for the final build. We finished painting it all and were ready for the next step.
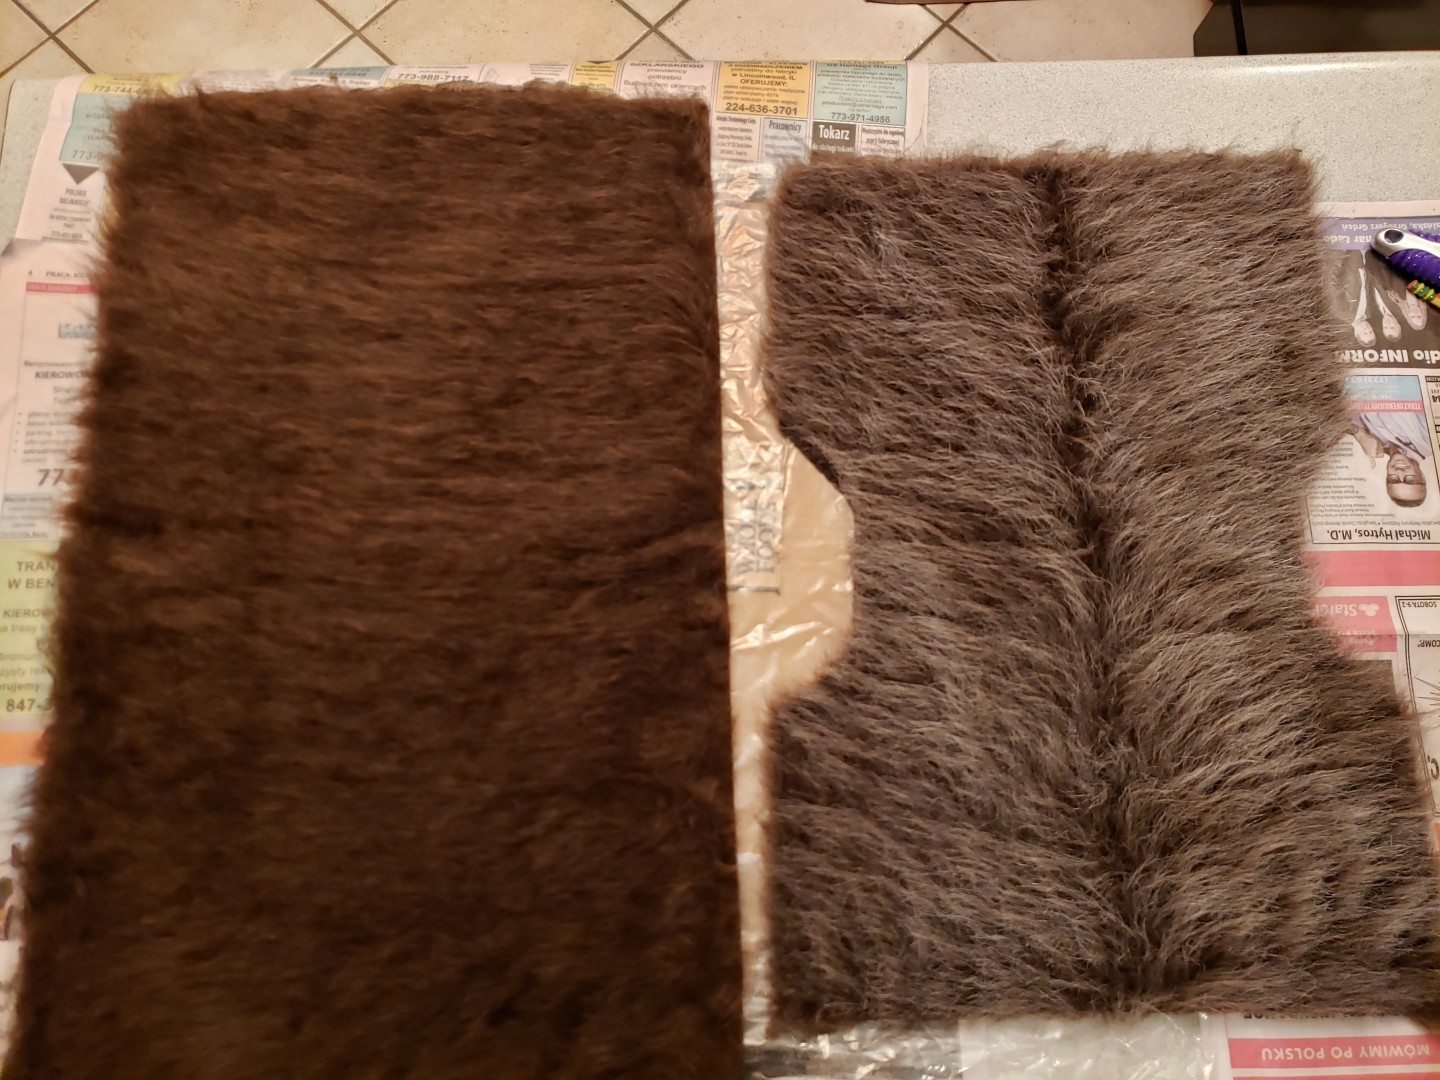
We could buy different eyes but decided to try using the ones we got. I already scaled the eye assembly to fit them. I didn’t need another obstacle. And my kid was able to sand the brown paint from the acrylic’s back and painted it yellow. But we couldn’t make vertical-slit-shaped (predator) pupils because the pupils were embedded in. Although, we would try to correct it for the final build. I was still bothered with the grizzly colored fur and looked around for suggestions on how to change the color of faux fur. Again, all suggestions seemed too crazy, but on one of the previous builds, we used ColorShot Instant Fabric Spray (https://www.tulipcolor.com/colorshot-white $4) with good results. I cut a piece to try it. It worked surprisingly well on the topcoat, and the fur was still soft. It took 20 minutes of brushing in all directions to ensure good coverage and prevent hair from sticking together. The color didn’t penetrate deep, so I will need to re-do it if I give a trim.
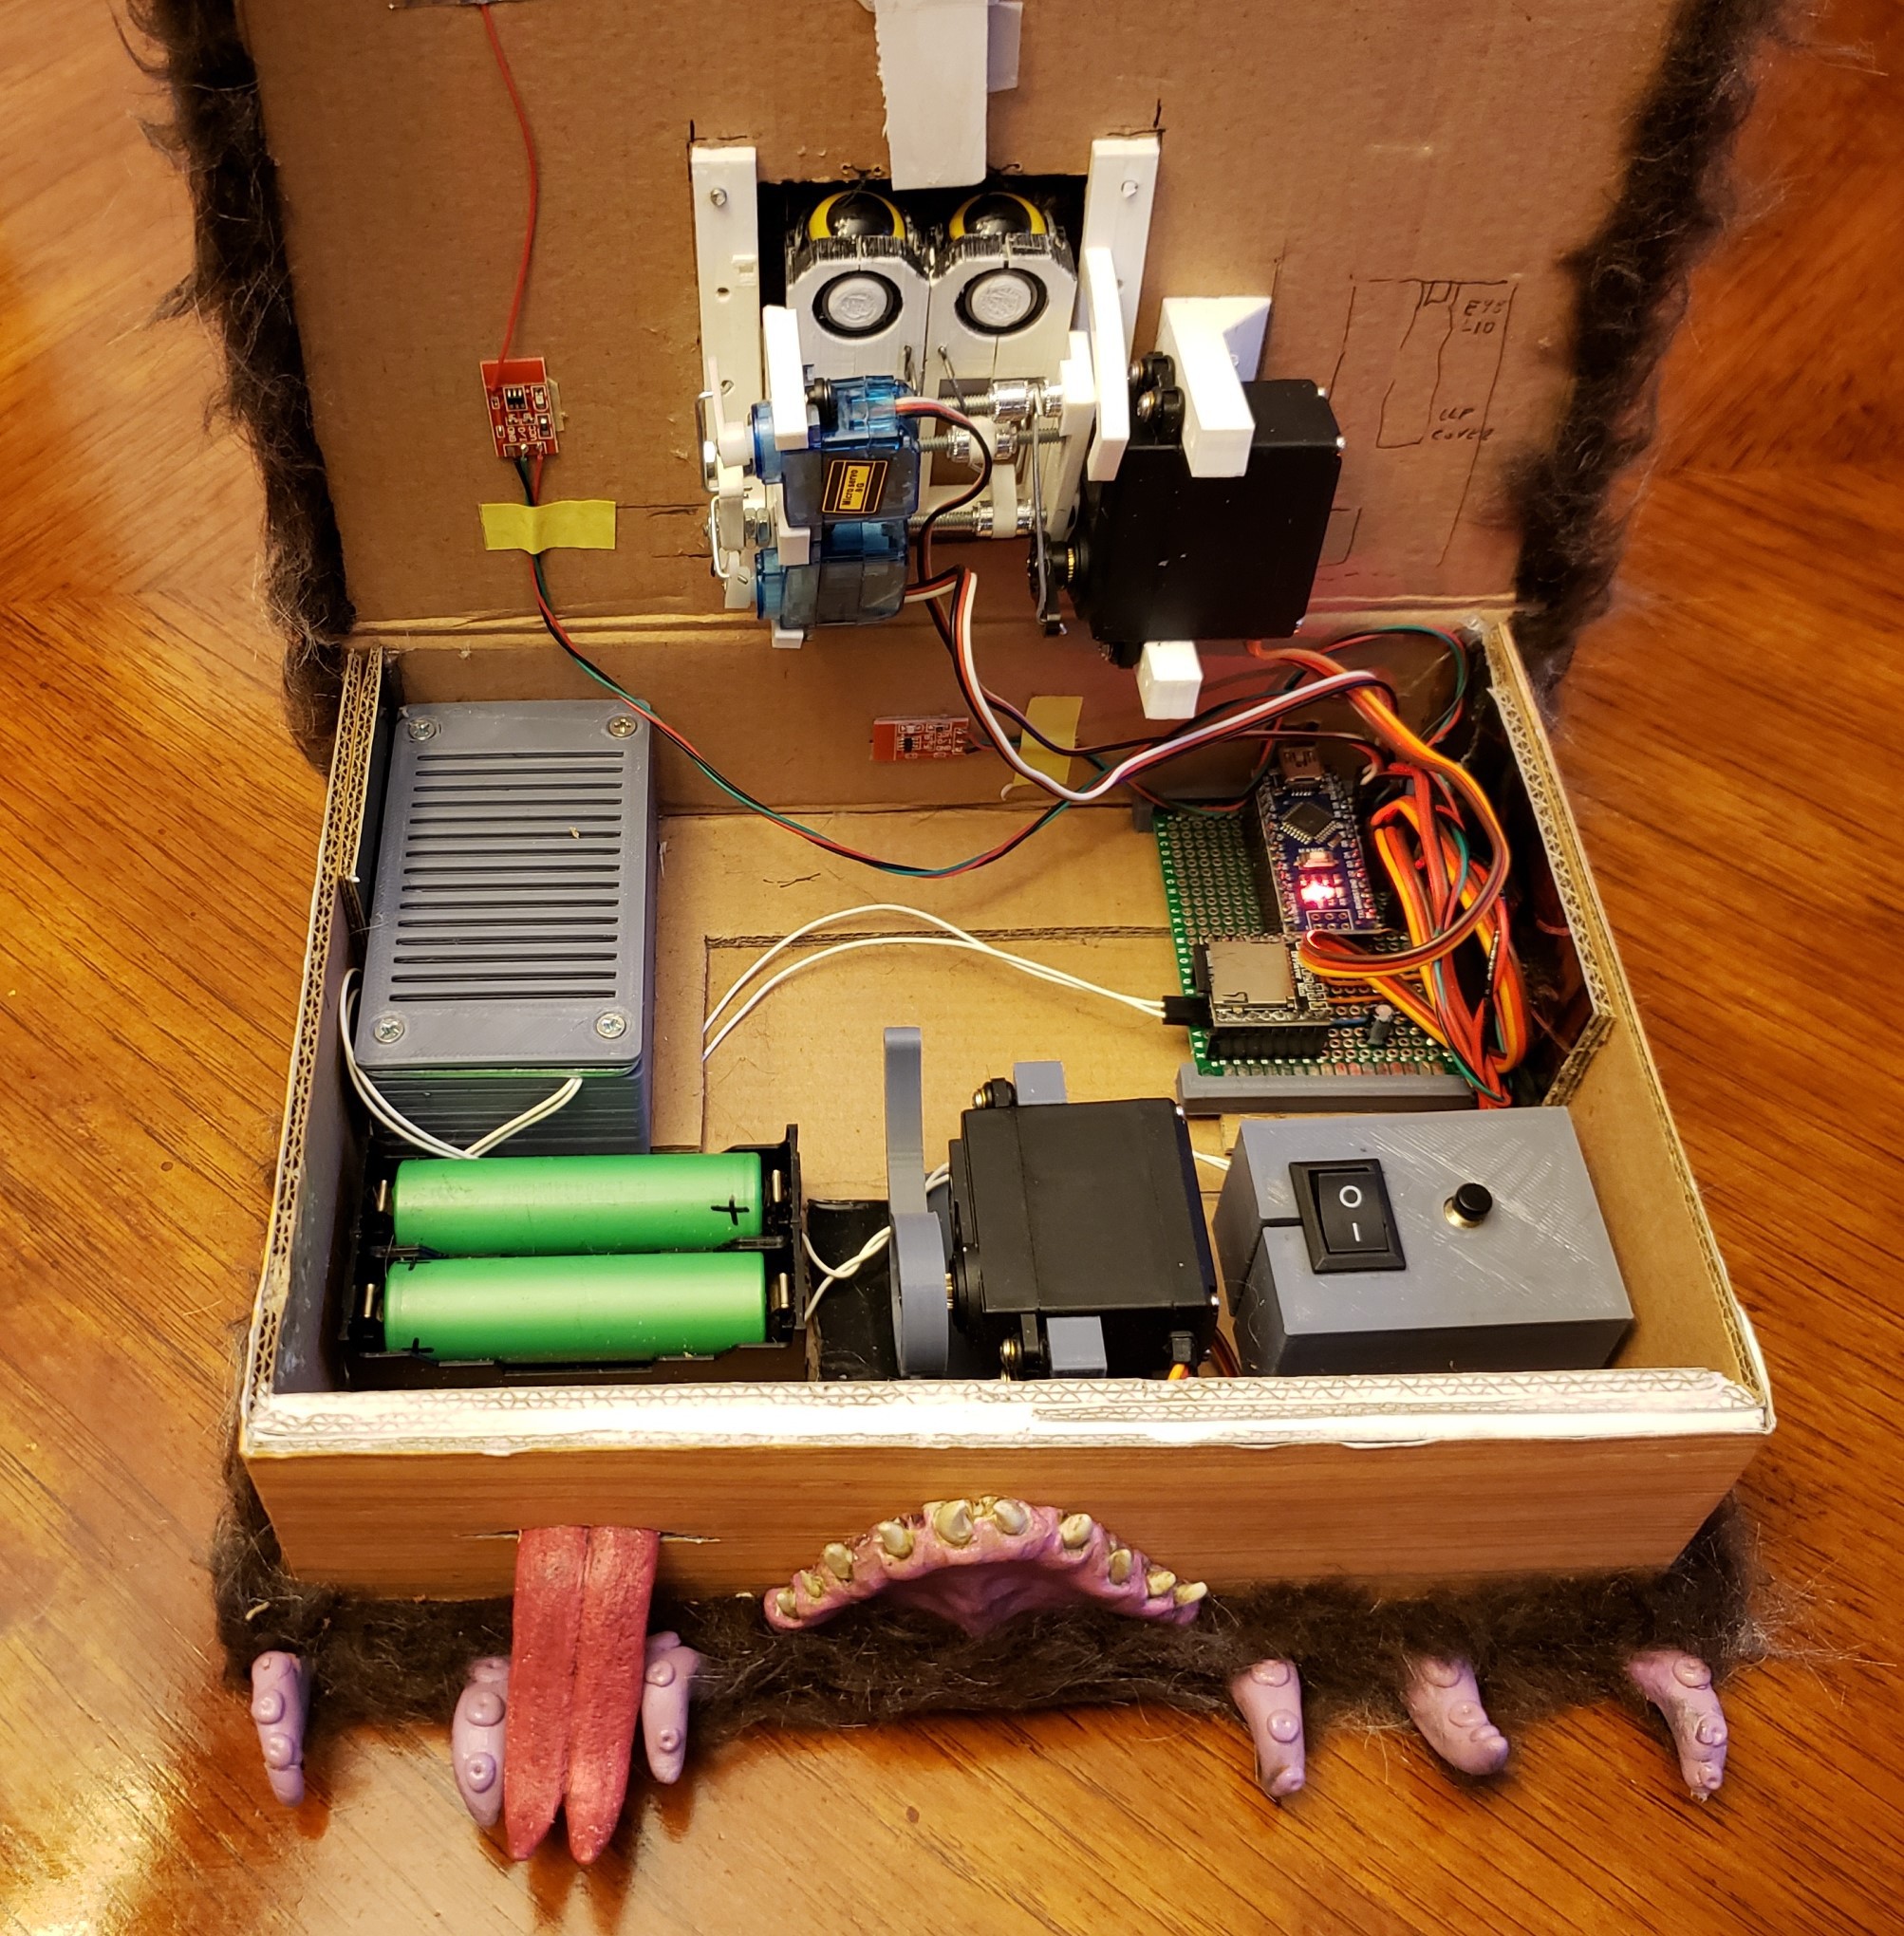
The electronics were a simple copy from another of our projects – whack-a-minion. An Arduino Nano with four servos, with few buttons and a sound module. All for less than ten bucks. I use two Capacitive Touch Switch Button Module TTP223. One as a proximity sensor in the front to detect a hand in front and one by the spine to detect stroking it. In the movie, the book was tamed by stroking its spine, so that was my goal. I like cap-touch and used them. (A lot of people confuse cap-touch. The cap sensors electrode shall never be touch and should be well isolated. If you touch it, you could damage it by ESD discharge.) Since I never used them as proximity sensors, I wonder if they will work if I connect them to a large aluminum tape surface in front of the book. It worked – 5 to 10 inches detection distance. But sometimes it oscillated for a while (2Hz). One second denounce fixed the issue, and the book growled when it needed to. I put an extra button inside to debug and change the volume. For audio, I used DFPlayerMini with a large speaker for a better low pitch growl. I could not find easy code to move servos in a predefined sequence, so I wrote a simple one to control all items. All servo auto-deactivate after a few seconds to save the battery. The book is powered by two 18650 with dc/dc.
We were so far, but we haven’t started the main book, were prototyping. We both wanted to see the end, so we decided to finish the prototype the best we can. If we didn’t make the final one, at least we would have something. The cardboard box would need to be the final enclosure – but the servos could easily rip through it. All mounting components had holes and were screwed into the box. I put the second layer of dense cardboard to make it more solid and added screws through all layers. With all the motors and the eye’s assembly, the book gains some weight. To my surprise, the servo had no trouble flopping the cover, maybe not the fastest, but had a good effect. I sneaked in two improvements: I added a clutch to this servo in case someone holds the cover down. The servo was strong enough to break the cardboard mounting. Additionally, I was able to add a control bar on the opposite side of this servo to move all bottom tentacles slightly.
I cut gold vinyl letters and started gluing things together. Since the book was smaller and had only two eyes, my teen suggested renaming it to the mini-book. Of course, she did it after I cut all the pieces. I initially thought to glue the fabric to eyelids, but I made small holes in eyelids and connected them with a few stitches. I didn’t want to glue in case I need to service it. All parts can be removed without breaking them. With the extra piece of smooth vinyl fabric and 3d printed buckle, we made a belt. I gave it a good trim, and we patch tentacle paint in some places. A word of caution; I wanted the teeth gums to look shiny, and I painted them with Mod Podge – bad idea, it never fully cured and is slightly sticky.
A few hours project end up taking a few weekends. In total, we spent 40 hours including a few store trips. But we had a lot of fun, and both are incredibly satisfied with it. We have no plans to make the full version at this time. Anyway, she already moved on with her interest. With all my efforts to engage her as much as possible I lost her in mechanical and electronic part of it. It’s not that she didn’t want to do more; there weren’t enough simple items for her to do. But she is the only reason we completed this fantastic project, and I loved the time spent with her. Even if we didn’t make it, the journey would be worth it. I don’t expect her to improve her engineering skills quickly, but I know that she will come back with the new crazy idea, and I will fall for it again. I also know she will be able to learn something new every time we make something.
I welcome you to build something with a kid. An easy and satisfying project is “cardboard coin eating robot.” We make it in one evening with some old CD-ROM drive motor. It was a huge hit years ago on a maker-fair. You can find many DIY on YouTube.
Technical postmortem:
- -The clay polymer is perfect for making small items. It cures in 30 min by baking; it’s flexible, can be easily shaved after hardening and it’s strong.
- -The small ball bearings make good support for moving parts. (I used 10x16x4 from sciplus.com)
- -Don’t use Mod Podge if you want it to cure fully.
- -Magic model clay and air-dry clay are very fragile.
- -The thick paper clips make excellent servo lever links.
- -Searching for a perfect library can take as long as making one yourself and will be easier to use.