 Michael Gardi
I have integrated the Console functionality (being able to read the buttons and show the lamps ) with the Emulator. With just this in place I now have a fully functional KENBAK-1. I can load and run programs and view memory locations from the front panel as described in the Programming Reference Manual and Laboratory Exercises.
But that's not all I wanted to accomplish. With the further integration of my KENBAK-1 Assembler, the IDE that I had envisioned for this project is really taking shape. As can be seen in a previous log, the Assembler has no "passes". The assembler instructions are continuously parsed as you type and when the corresponding binary code no longer has any question marks you know the syntax for the line is correct. It all works quite well.
I'm running the Raspberry Pi 4 inside my reproduction headless, but when I VNC into it, this is what I see.
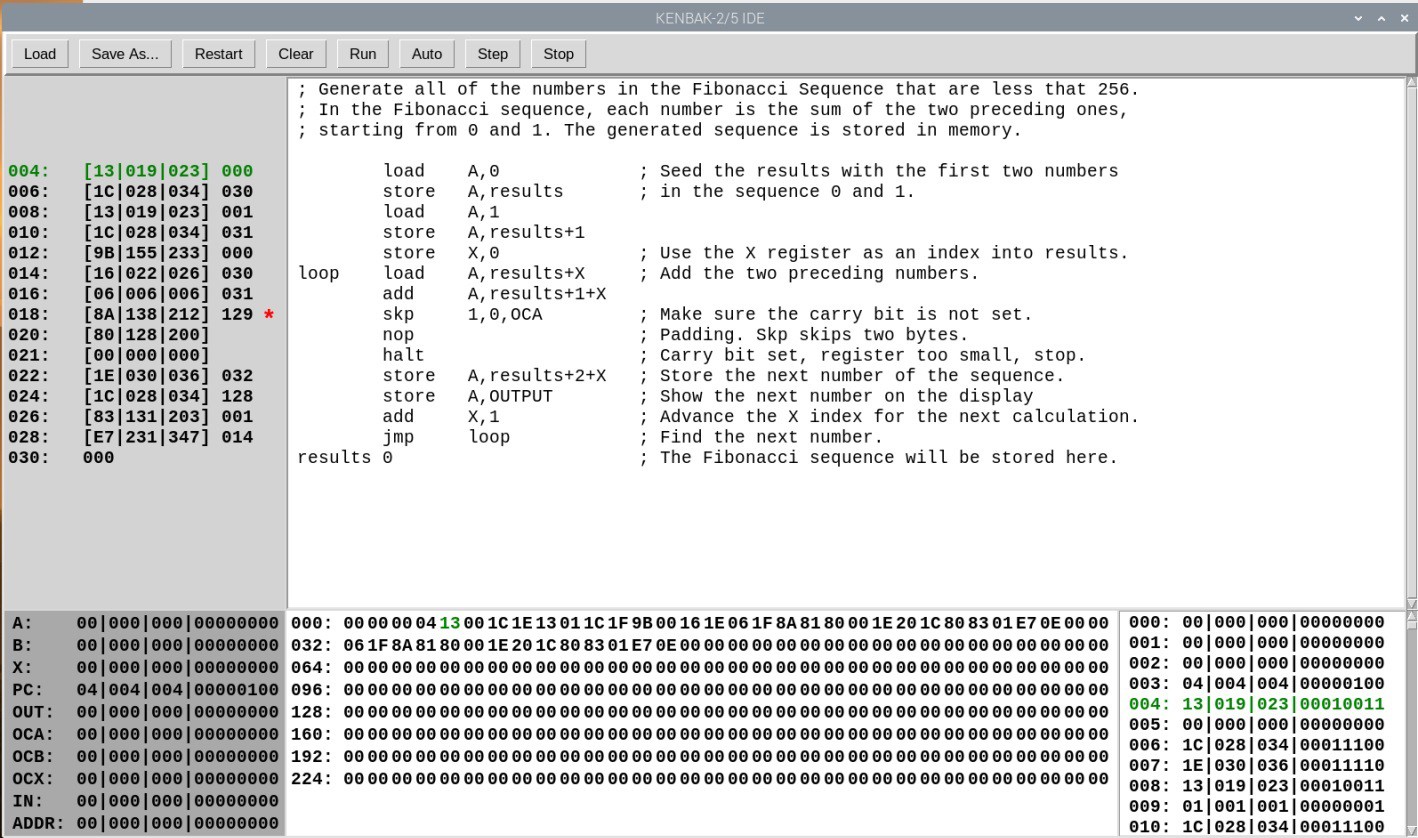
Here I have just loaded the Fibonacci program seen in previous logs. The upper right quadrant is of course the assembler code and to it's left the equivalent binary instructions. By clicking on the binary instructions you can set or clear breakpoints (the skp instruction has a breakpoint set for instance).
To the lower left is the state of the predefined "registers" including the address register which is used to load and read memory locations. Middle bottom is a hex dump of all 256 memory locations, and lower right shows the same memory locations in more detail with hex, decimal, octal and binary representations for each location. All references to memory locations are in decimal (leftmost columns in the instruction, hex dump, and details panels and rightmost column in the instruction panel).
The entries rendered in green represent the memory location currently pointed to by the program counter (PC).
The front panel console is fully integrated with the IDE. So for instance you could start the Fibonacci program shown above by pressing the physical START button on the console or by clicking the Run button in the IDE. Similarly pressing and holding the STOP button and then pressing START will perform a single step as will the IDE's Step button.
Anything written to the OUTPUT register will show up on the data lamps on the console. Data stored from the console to memory locations through the address register will be reflected in the IDE.
The IDE does offer some additional features. Your programs can be saved and loaded to disk (the assembler code and the binary memory image both). The Restart button will reset everything to the last loaded image. Clear will zero out memory and the assembler program space then set the PC to memory location 4. Auto will run the program at a rate of about one instruction per second.
You can debug your program by single stepping or by setting breakpoints and observing the memory and registers.
If you just want to play around with KENBAK-1 code, you can run the IDE "standalone" on any platform that supports Python, but of course you will only be able to integrate the KENBAK-2/5 console on a Raspberry Pi since it's bound to the wiringpi library.
Over the next couple of days I'm going to try and put together a video of all of this in action.
Discussions
Become a Hackaday.io Member
Create an account to leave a comment. Already have an account? Log In.