 kutluhan_aktar
Since Telegram is a cross-platform cloud-based messaging service compatible with iOS and Android, I decided to create a Telegram bot to manage my security system on disparate devices easily. In Telegram, it is effortless to create bots with a command list unalike any other messaging application, which are special accounts that do not require an additional phone number to set up. IoT Surveillance System, the Telegram bot I created for this project, allows me to change the camera type option, request surveillance footage, and display the entry log with these commands:
- enable_night_vision
- disable_night_vision
- status_check
- last_access
- entry_log
To fetch and transfer data via the Telegram bot, I developed a PHP web application (outgoing) that gets updated from the Telegram Bot API, sends surveillance footage to the bot, and saves information to the database.
When the fingerprint sensor detects a fingerprint (enrolled or unmatched), I programmed my Raspberry Pi to capture an image and record a video with the selected camera type (night vision camera or USB webcam) to send them to the bot as surveillance footage via the web application. Also, it sends surveillance footage when directly requested by the bot:
- access
- failed
- requested
Finally, I added an electromagnetic lock to lock or unlock the door if the fingerprint sensor detects an enrolled fingerprint.
Huge thanks to DFRobot for sponsoring this project.
Sponsored products by DFRobot:
⭐ DFRobot Fingerprint Sensor | Inspect
⭐ 5MP Night Vision Camera for Raspberry Pi | Inspect


Step 1: Building a bot for Telegram with BotFather
BotFather is a Telegram bot that lets us create and manage bots on Telegram without any coding required.
⭐ First of all, open BotFather on Telegram and enter /start to view the available command list and manuals.

⭐ Use the /newbot command to create a new bot. Enter the name of your bot when BotFather asks you for a name. It is displayed in contact details and elsewhere.
IoT Surveillance System
⭐ Then, enter the username of your bot. Usernames are 5-32 characters long and are case insensitive, but may only include Latin characters, numbers, and underscores. They must end in 'bot', e.g. 'tetris_bot' or 'TetrisBot'.
surveillance_system_bot
⭐ After these steps, BotFather generates an authorization token for your new bot. The authorization token is a string along the lines of 123456:ABC-DEF1234ghIkl-zyx57W2v1u123ew11 that is required to authorize the bot and send requests to the Telegram Bot API. Keep your token secure and store it safely.

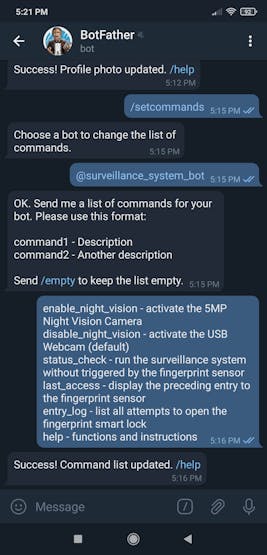
⭐ Also, you can change your bot's profile picture by using the /setuserpic command.

⭐ Finally, enter the /setcommands command to create the list of commands supported by the bot. Users will see these commands as suggestions when they type / in the chat with the bot.
⭐ The command list I created for my Telegram bot (IoT Surveillance System):
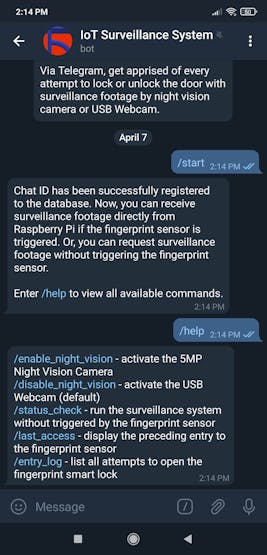
- /enable_night_vision - activate the 5MP Night Vision Camera
- /disable_night_vision - activate the USB Webcam (default)
- /status_check - run the surveillance system without triggered by the fingerprint sensor
- /last_access - display the preceding entry to the fingerprint sensor
- /entry_log - list all attempts to open the fingerprint smart lock
- /help - functions and instructions
Step 2: Developing a web application in PHP to communicate with the bot via the Telegram Bot API
I developed this web application in PHP, named telegram_surveillance_bot, in order to:
- get updates from my Telegram bot (IoT Surveillance System) via the Telegram Bot API,
- fetch captured surveillance footage (image and video) transferred by Raspberry Pi,
- send messages and surveillance footage to my Telegram bot,
- save information to the database to send commands from the bot to Raspberry Pi.
⭐ First of all, I created a class named telegram_surveillance to define database settings and functions to communicate with the bot, fetch surveillance footage (files), send (print) commands, and save information to the database.
⭐ In the __init__ function, the class requires four parameters to execute functions:
- token - authorization token of the bot
- web_path - Telegram Bot API server
- conn - database connection settings
- table - database table name
⭐ In the send_message function, the application sends the given text to the bot via the Telegram Bot API by using its authorization token.
Syntax: https://api.telegram.org/bot<token>/sendMessage?chat_id=<chat_id>&text=<string>
⭐ In the send_photo function, the application sends the given picture to the bot via the Telegram Bot API by using its authorization token.
Syntax: https://api.telegram.org/bot<token>/sendPhoto?chat_id=<chat_id>&photo=<link>&caption=<string>
⭐ In the send_video function, the application sends the given video to the bot via the Telegram Bot API by using its authorization token.
Syntax: https://api.telegram.org/bot<token>/sendVideo?chat_id=<chat_id>&video=<link>&caption=<string>
// Define the telegram_surveillance class and its functions:class telegram_surveillance { public $token, $web_path, $conn, $table; public function __init__($token, $server, $conn, $table){ $this->token = $token; $this->web_path = $server.$token; $this->conn = $conn; $this->table = $table; } // Telegram: public function send_message($id, $string){ $new_message = $this->web_path."/sendMessage?chat_id=".$id."&text=".urlencode($string); file_get_contents($new_message); } public function send_photo($id, $photo, $caption){ $new_photo = $this->web_path."/sendPhoto?chat_id=".$id."&photo=".$photo."&caption=".$caption; file_get_contents($new_photo); } public function send_video($id, $video, $caption){ $new_video = $this->web_path."/sendVideo?chat_id=".$id."&video=".$video."&caption=".$caption; file_get_contents($new_video); } ...
⭐ In update_id, update_access, update_camera, and update_surveillance functions, the application saves information transferred from the bot and Raspberry Pi to the database:
- Chat ID
- Last Access (Entry)
- Camera Type
- Surveillance Footage Request
... // Database: public function update_id($chat_id){ $sql = "UPDATE `$this->table` SET `id`='$chat_id' LIMIT 1"; mysqli_query($this->conn, $sql); } public function update_access($access){ $sql = "UPDATE `$this->table` SET `access`='$access' LIMIT 1"; mysqli_query($this->conn, $sql); } public function update_camera($camera, $status){ $sql = "UPDATE `$this->table` SET `camera`='$camera', `status`='$status' LIMIT 1"; mysqli_query($this->conn, $sql); } public function update_surveillance($surveillance, $status){ $sql = "UPDATE `$this->table` SET `surveillance`='$surveillance', `status`='$status' LIMIT 1"; mysqli_query($this->conn, $sql); }...
⭐ In get_last_access and get_chat_id functions, the application returns access and id variables saved in the database.
⭐ In the get_entry_log function, the application returns the entry log of the security system chronologically by decoding the saved surveillance footage file names with glob and explode functions.
... // Fetch: public function get_last_access(){ $sql = "SELECT * FROM `$this->table` LIMIT 1"; $result = mysqli_query($this->conn, $sql); if($row = mysqli_fetch_assoc($result)){ return $row["access"]; } } public function get_entry_log(){ $entries = ""; foreach(glob("*captured/*.jpg*") as $entry){ $entries .= explode(".", explode("/", $entry)[1])[0]."\n"; } return $entries; } public function get_chat_id(){ $sql = "SELECT * FROM `$this->table` LIMIT 1"; $result = mysqli_query($this->conn, $sql); if($row = mysqli_fetch_assoc($result)){ return $row["id"]; } }...
⭐ Define the required database settings and create the surveillance object.
// Define database and server settings:$server = array( "name" => "localhost", "username" => "<_username_>", "password" => "<_password_>", "database" => "telegramsurveillance", "table" => "entries");$conn = mysqli_connect($server["name"], $server["username"], $server["password"], $server["database"]);// Define the new 'surveillance' object:$surveillance = new telegram_surveillance();$surveillance->__init__("<_bot_token_>", "https://api.telegram.org/bot", $conn, $server["table"]); // e.g., 123456:ABC-DEF1234ghIkl-zyx57W2v1u123ew11
⭐ Get updates from the Telegram Bot API.
// Get updates from the Telegram Bot API.$updates = json_decode(file_get_contents('php://input'), TRUE);
⭐ If the application receives data from the Telegram Bot API, get the chat ID and message.
⭐ Depending on the type of the incoming message - photo, video, document, or text - reply to the chat with the given chat ID.
⭐ The web application is compatible with these commands from the bot:
- /start
- /enable_night_vision
- /disable_night_vision
- /status_check
- /last_access
- /entry_log
- /help
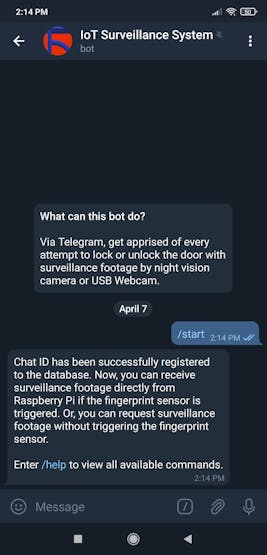
⭐ If the /start command is received, the application registers the chat ID to the database to send messages without an update by the bot.
⭐ If /enable_night_vision or /disable_night_vision command is received, the application changes camera and status variables in the database.
⭐ If the /status_check command is received, the application changes surveillance and status variables in the database.
⭐ If the /last_access command is received, the application sends the last entry (access) saved in the database to the bot.
⭐ If the /entry_log command is received, the application sends the entry log (access, failed, and requested) to the bot.
if($updates['update_id']){ $chat_id = $updates['message']['chat']['id']; $message = $updates['message']['text']; if($updates["message"]["photo"]){ $surveillance->send_message($chat_id, "Thank you for sending me a photo but I cannot process it yet 🎞"); }else if($updates["message"]["video"]){ $surveillance->send_message($chat_id, "Thank you for sending me a video but I cannot process it yet 📹"); }else if($updates["message"]["document"]){ $surveillance->send_message($chat_id, "Thank you for sending me a file but I cannot process it yet 📜"); }else{ // Commands: switch($message){ case '/start': $surveillance->update_id($chat_id); // Register the chat ID to send messages without an update by the bot. $surveillance->send_message($chat_id, "Chat ID has been successfully registered to the database. Now, you can receive surveillance footage directly from Raspberry Pi if the fingerprint sensor is triggered. Or, you can request surveillance footage without triggering the fingerprint sensor.\n\nEnter /help to view all available commands."); break; case '/enable_night_vision': $surveillance->update_camera("night", "changed"); $surveillance->send_message($chat_id, "📌 Night Vision Camera => Activated!"); break; case '/disable_night_vision': $surveillance->update_camera("USB", "changed"); $surveillance->send_message($chat_id, "📌 USB Webcam => Activated!"); break; case '/status_check': $surveillance->update_surveillance("footage", "changed"); $surveillance->send_message($chat_id, "📌 Footage => Requested!"); break; case '/last_access': $access = $surveillance->get_last_access(); $surveillance->send_message($chat_id, "🕑 Last Access: \n\n$access"); break; case '/entry_log': $entries = $surveillance->get_entry_log(); $surveillance->send_message($chat_id, "📓 Entry Log: \n\n$entries"); break; case '/help': $surveillance->send_message($chat_id, "/enable_night_vision - activate the 5MP Night Vision Camera\n/disable_night_vision - activate the USB Webcam (default)\n/status_check - run the surveillance system without triggered by the fingerprint sensor\n/last_access - display the preceding entry to the fingerprint sensor\n/entry_log - list all attempts to open the fingerprint smart lock"); break; } }}


⭐ With the web application, to collate and register data transferred by the Telegram bot and Raspberry Pi, create a database table and insert default variables.
telegramsurveillance > entries > variables:
- id
- access
- camera
- surveillance
- status
CREATE TABLE `entries`( id varchar(255) PRIMARY KEY NOT NULL, access varchar(255) NOT NULL, camera varchar(255) NOT NULL, surveillance varchar(255) NOT NULL, `status` varchar(255) NOT NULL);INSERT INTO `entries`(`id`, `access`, `camera`, `surveillance`, `status`) VALUES ('default', 'default' , 'USB', 'default', 'default')


Getting updates by making requests to https://api.telegram.org/ requires an SSL connection, so I used my web server to host the web application.
theamplituhedron.com
However, the Bot API server source code is available at telegram-bot-api. You can run it locally and send the requests to your server instead of https://api.telegram.org.

Step 2.1: Setting up the web application to fetch and send data
After developing the web application, I specified the URL of the application for my Telegram bot (IoT Surveillance System) by using the setWebhook method to receive incoming updates from the Telegram Bot API.
https://api.telegram.org/bot/setWebhook?url=https://www.theamplituhedron.com/telegram_surveillance_bot/

⭐ After specifying the URL of the application, the Telegram Bot API throws this message: Webhook was set.
⭐ Then, to check the bot functions and register the chat ID to the database, open the bot and enter /start.

⭐ Enter /help to view descriptions.
Step 2.2: Saving surveillance footage from Raspberry Pi and sending it to the bot
When the web application receives surveillance footage (video and image) from Raspberry Pi, it registers the access (last entry) variable to the database and saves the fetched files to the captured folder after checking file extensions and sizes.
After saving files successfully, the application sends the recently uploaded files to the Telegram bot by getting the registered chat ID in the database.
// Save the captured photo and video transferred by Raspberry Pi. And, send them via Telegram Bot API.if(!empty($_FILES["rasp_video"]["name"]) && !empty($_FILES["rasp_capture"]["name"])){ // Update the last access (entry). $access = (isset($_POST['access'])) ? $_POST['access'] : "Not Detected!"; $surveillance->update_access($access); // Get properties of the uploaded files. $video_properties = array( "name" => $_FILES["rasp_video"]["name"], "tmp_name" => $_FILES["rasp_video"]["tmp_name"], "size" => $_FILES["rasp_video"]["size"], "extension" => pathinfo($_FILES["rasp_video"]["name"], PATHINFO_EXTENSION) ); $capture_properties = array( "name" => $_FILES["rasp_capture"]["name"], "tmp_name" => $_FILES["rasp_capture"]["tmp_name"], "size" => $_FILES["rasp_capture"]["size"], "extension" => pathinfo($_FILES["rasp_capture"]["name"], PATHINFO_EXTENSION) ); // Check whether the uploaded file extensions are in allowed formats. $allowed_formats = array('jpg', 'png', 'mp4'); if(!in_array($video_properties["extension"], $allowed_formats) || !in_array($capture_properties["extension"], $allowed_formats)){ echo 'SERVER RESPONSE => File Format Not Allowed!\r\n'; }else{ // Check whether the uploaded file sizes exceed the data limit - 5MB. if($video_properties["size"] > 5000000 || $capture_properties["size"] > 5000000){ echo 'SERVER RESPONSE => File size cannot exceed 5MB!\r\n'; }else{ $URL = "<_save_files_to_>"; // e.g., https://www.theamplituhedron.com/telegram_surveillance_bot/captured/ $capture_path = $URL.$capture_properties["name"]; $video_path = $URL.$video_properties["name"]; // Upload files: move_uploaded_file($video_properties["tmp_name"], "./captured/".$video_properties["name"]); move_uploaded_file($capture_properties["tmp_name"], "./captured/".$capture_properties["name"]); echo "SERVER RESPONSE => Files Uploaded Successfully!\r\n"; // Send the recently uploaded files to the Telegram Bot with the registered chat ID: $chat_id = $surveillance->get_chat_id(); $surveillance->send_photo($chat_id, $capture_path, $capture_properties["name"]); $surveillance->send_video($chat_id, $video_path, $video_properties["name"]); } }}

Step 2.3: Transferring (printing) information sent by the bot to Raspberry Pi
If the data variable is received, the web application sends information registered in the database to Raspberry Pi:
https://www.theamplituhedron.com/telegram_surveillance_bot/?data=ok
// If requested, print information to update Raspberry Pi.if(isset($_GET["data"])){ $surveillance->print_and_manage_data();}
⭐ If the status variable is set as "changed", the web application prints camera and surveillance variables registered in the database in JSON:
{"camera":"night", "surveillance":"default"}
{"camera":"USB", "surveillance":"footage"}


⭐ The application changes the status variable from "changed" to "default" after printing information to prevent sending commands repetitively to Raspberry Pi.

... // Print: public function print_and_manage_data(){ $sql = "SELECT * FROM `$this->table` LIMIT 1"; $result = mysqli_query($this->conn, $sql); if($row = mysqli_fetch_assoc($result)){ if($row["status"] == "default"){ echo "Waiting new commands..."; }else if($row["status"] == "changed"){ $data = array( "camera" => $row["camera"], "surveillance" => $row["surveillance"] ); // Set variables to default. $this->update_surveillance("default", "default"); echo json_encode($data); } } }...
Step 3: Creating the Telegram Surveillance System application in Python on Raspberry Pi
In this section, I will discuss how I developed an application, named Telegram Surveillance System, in Python on Raspberry Pi to control the fingerprint sensor, the electromagnetic lock, the night vision camera, and the USB webcam in order to create this project.
The application consists of two code files:
- surveillance_system.py
- fingerprint_sensor_settings.py
The fingerprint_sensor_settings.py file includes functions to enroll, search, and delete fingerprint images by utilizing the Adafruit Fingerprint Library for Python. In the following steps, I will give more information on this code file and the fingerprint sensor.
The surveillance_system.py file includes the main code of the security system under the Surveillance_System class. Subsequently, I will scrutinize each function under this class to provide more information.

⭐ In the surveillance_system.py, after importing the required modules, define the GPIO settings and set up the relay pin.
from picamera import PiCameraimport jsonfrom time import sleepimport datetimefrom subprocess import call import requestsimport RPi.GPIO as GPIOimport adafruit_fingerprintimport serial# Set up BCM GPIO numberingGPIO.setmode(GPIO.BCM)GPIO.setwarnings(False)# Set up Relay pins:lock = 4GPIO.setup(lock, GPIO.OUT)GPIO.output(lock, GPIO.HIGH)
⭐ In the __init__ function, the Surveillance_System class defines the fingerprint sensor settings (USB/serial converter) and the server settings (the Telegram bot). Then, it specifies the night vision camera settings and the default camera type option (USB) for the security system.
# Create the Surveillance System class with the required settings:class Surveillance_System: def __init__(self, server, file_location): # Define the fingerprint sensor settings (USB/serial converter). uart = serial.Serial("/dev/ttyUSB0", baudrate=57600, timeout=1) self.finger = adafruit_fingerprint.Adafruit_Fingerprint(uart) # Define the server (Telegram Bot) and the file location (captured). self.server = server self.file_location = file_location # Define the Night Vision Camera Settings. self.night_cam = PiCamera() self.night_cam.resolution = (640, 480) self.night_cam.framerate = 15 # Define the default camera type setting (USB Webcam). self.camera_type = "USB" self.surveillance_request = "default" ...
⭐ In the get_updates_from_web_app function, the class gets data in JSON (camera and surveillance) from the Telegram Bot via the PHP web application.
... # Get updates from the Telegram Bot via the PHP web application (telegram_surveillance_bot). def get_updates_from_web_app(self): data = requests.get(self.server+"?data=ok"); # If incoming data: if(data.text == "Waiting new commands..."): pass else: self.commands = json.loads(data.text) self.camera_type = self.commands["camera"] self.surveillance_request = self.commands["surveillance"] ...
I will explain the remaining class functions in the following steps.
⭐ Define a new class object named surveillance.
⭐ After obtaining updates via the web application, send surveillance footage (requested) to the Telegram bot if requested without triggering the fingerprint sensor.
⭐ If an enrolled fingerprint is detected by the fingerprint sensor, activate the relay to lock or unlock the door and send surveillance footage (access) to the Telegram bot via the web application.
⭐ Otherwise, send surveillance footage (failed) to the Telegram bot via the web application.
surveillance = Surveillance_System("https://www.theamplituhedron.com/telegram_surveillance_bot/", "/home/pi/Telegram_Surveillance_System_w_Fingerprint/captured/") # Change with your settings.while True: # Get updates from the Telegram Bot via the PHP web app. surveillance.get_updates_from_web_app() sleep(5) # If surveillance footage requested without triggering the fingerprint sensor: if(surveillance.surveillance_request == "footage"): surveillance.surveillance_request = "default" print("Bot => Footage Requested!\r\n") date = datetime.datetime.now().strftime("%m-%d-%y_%H-%M-%S") surveillance.capture_last_attempt(date, "requested_"+date, surveillance.camera_type) surveillance.send_last_attempt("requested_"+date) # Detect whether the fingerprint is found or not. fingerprint_sta = surveillance.detect_fingerprint() if(fingerprint_sta == "Waiting"): print("Waiting for image...") elif(fingerprint_sta == "Found"): # Lock or unlock: if(GPIO.input(lock)): GPIO.output(lock, GPIO.LOW) else: GPIO.output(lock, GPIO.HIGH) print("Fingerprint => Detected!") date = datetime.datetime.now().strftime("%m-%d-%y_%H-%M-%S") surveillance.capture_last_attempt(date, "access_"+date, surveillance.camera_type) surveillance.send_last_attempt("access_"+date) elif(fingerprint_sta == "Not Found"): print("Fingerprint => Not Found!") date = datetime.datetime.now().strftime("%m-%d-%y_%H-%M-%S") surveillance.capture_last_attempt(date, "failed_"+date, surveillance.camera_type) surveillance.send_last_attempt("failed_"+date)
You can inspect and download the code files separately or within the application folder - Telegram_Surveillance_System.zip.


Step 4: Enrolling and searching fingerprints with the fingerprint sensor on Raspberry Pi
In this project, I used this optical fingerprint sensor which detects and verifies fingerprints. It includes a high-powered DSP chip that does the image rendering, calculation, feature-finding, and searching. Although these sensors were incipiently developed for Arduino, they can be connected to any microcontroller or system with TTL serial to enroll and detect fingerprints.
I utilized a USB-to-Serial Converter (CP2102) to connect the fingerprint sensor (5V) to Raspberry Pi since the built-in UART on the Pi's TX/RX pins (pin 8 / GPIO 14 and pin 10 / GPIO 15) works with 3.3V.
- Sensor VCC (red wire) to USB Converter 5V
- Sensor GND (black wire) to USB Converter Ground
- Sensor RX (white wire) to USB Converter TX
- Sensor TX (green wire) to USB Converter RX

⭐ After connecting the sensor to Pi, download the Adafruit Fingerprint Library by entering this command to the terminal:
sudo pip3 install adafruit-circuitpython-fingerprint

⭐ If you want to use the built-in UART, disable the serial console and enable the serial port hardware in raspi-config.

After installing the library, to test the sensor and enroll fingerprints, I modified the example code provided by Adafruit (fingerprint_sensor_settings.py).

⭐ First, run the fingerprint_sensor_settings.py that gives three options:
- e) enroll print
- f) find print
- d) delete print

⭐ Enter e to template a new fingerprint and store it in the given location (from 1 to 127) - that means assigning an ID number to the print.

⭐ Enter f to test the fingerprint sensor by searching enrolled fingerprints and identifying which ID (if any) is currently being photographed.
⭐ Enter d to remove an enrolled fingerprint model from the sensor.

After enrolling fingerprints to the sensor by running the fingerprint_sensor_settings.py, I added the detect_fingerprint function to the Surveillance_System class in the main code file (surveillance_system.py).
⭐ In the detect_fingerprint function, the Surveillance_System class gets a fingerprint image, templates it, and checks if it matches the enrolled fingerprints.
⭐ After being executed, depending on the sensor's response, the function returns these variables:
- Waiting
- Not Reading
- Not Found
- Found
... # Get a fingerprint image, template it, and see if it matches. def detect_fingerprint(self): if self.finger.get_image() != adafruit_fingerprint.OK: sleep(1) return "Waiting" print("Templating...") if self.finger.image_2_tz(1) != adafruit_fingerprint.OK: return "Not Reading" print("Searching...") if self.finger.finger_search() != adafruit_fingerprint.OK: return "Not Found" print("Detected #", self.finger.finger_id, "with confidence", self.finger.confidence) return "Found"...
Step 5.1: Capturing pictures and recording videos with the USB Webcam and sending them to the web application
As explained in the previous steps, this project supports two camera type options - a USB webcam and a 5MP night vision camera - to capture surveillance footage. When the PHP web application receives /enable_night_vision or /disable_night_vision command from the Telegram bot, it changes the camera variable in the database:
- night
- USB
Then, as shown in the previous steps, the web application sends the camera variable to Raspberry Pi to change the selected camera type.
Before changing the camera type option, the USB webcam (USB) is the default option. If the fingerprint sensor detects a fingerprint or surveillance footage is directly requested by the Telegram bot: Raspberry Pi captures surveillance footage (image and video) and sends it to the bot via the web application.
Raspberry Pi requires two Python modules to capture images and record videos with a USB webcam:
- fswebcam
- ffmpeg (built-in)
⭐ Open the terminal and install the fswebcam module with the command below.
sudo apt install fswebcam

⭐ In the capture_last_attempt function under the Surveillance_System class, Raspberry Pi captures an image and records a video with the USB webcam by adding the date as the timestamp to the file names by these categories:
- access_date (enrolled fingerprint)
- failed_date (unmatched fingerprint)
- requested_date (requested by the bot)
⭐ After installing the fswebcam module, capture an image by using the subprocess module.
fswebcam -D 2 -S 20 -r widthxheight file_name
⭐ By using the subprocess module, record a 5 seconds video with the ffmpeg module (built-in).
ffmpeg -f video4linux2 -r 20 -t 5 -s widthxheight -i /dev/video0 file_name
⭐ Install the MP4Box module:
sudo apt install -y gpac
⭐ Then, with the MP4Box module, convert the AVI format to the MP4 format since the Telegram video player does not support the AVI format.
MP4Box -add file_name.avi file_name.mp4
... # According to the selected camera type (Night Vision or USB Webcam), capture the recent attempt to lock or unlock the door. def capture_last_attempt(self, _date, file_name, camera_type): file_name = self.file_location + file_name ... # USB Webcam: elif (camera_type == "USB"): # Capture an image with Fswebcam module. width = "640" height = "480" command_capture = "fswebcam -D 2 -S 20 -r " + width + "x" + height + " " + file_name + ".jpg" call([command_capture], shell=True) print("\r\nRasp_Pi => Image Captured!\r\n") # Record a 5 seconds video with FFmpeg. command_record = "ffmpeg -f video4linux2 -r 20 -t 5 -s " + width + "x" + height + " -i /dev/video0 " + file_name + ".avi" call([command_record], shell=True) print("Rasp_Pi => Video Recorded! \r\n") # Convert the AVI format to the MP4 format. command = "MP4Box -add " + file_name + ".avi" + " " + file_name + ".mp4" call([command], shell=True) print("\r\nRasp_Pi => Video Converted! \r\n") sleep(3)...


⭐ In the send_last_attempt function under the Surveillance_System class, Raspberry Pi transfers surveillance footage (captured image and recorded video) to the web application by using the requests module. Also, it sends the recently captured file's name as the access (last entry) variable.
... # Send the recently captured files to the server (web app). def send_last_attempt(self, _file_name): file_name = self.file_location + _file_name # Files: files = {'rasp_video': open(file_name+".mp4", 'rb'), 'rasp_capture': open(file_name+".jpg", 'rb')} # Last Entry: data = {'access': _file_name} # Make an HTTP Post Request to the server to send the files. request = requests.post(self.server, files=files, data=data) # Print the response from the server. print("Rasp_Pi => Files Transferred!\r\n") print(request.text+"\r\n")...

Step 5.2: Capturing pictures and recording videos with the Night Vision Camera and sending them to the web application
The 5MP night vision camera can be connected to the camera module port via the camera module ribbon cable. Thus, it works with the built-in picamera library.
⭐ First of all, select the Interfaces tab and ensure that the Camera is enabled.
⭐ In the capture_last_attempt function under the Surveillance_System class, Raspberry Pi captures an image and records a video with the night vision camera by adding the date as the timestamp to the file names by these categories:
- access_date (enrolled fingerprint)
- failed_date (unmatched fingerprint)
- requested_date (requested by the bot)
⭐ Annotate the date on the generated files.
⭐ Capture an image and record a 5 seconds video by using the picamera library.
⭐ Then, with the MP4Box module, convert the H264 format to the MP4 format since the Telegram video player does not support the H264 format.
MP4Box -add file_name.h264 file_name.mp4
... # According to the selected camera type (Night Vision or USB Webcam), capture the recent attempt to lock or unlock the door. def capture_last_attempt(self, _date, file_name, camera_type): file_name = self.file_location + file_name # Night Vision Camera: if(camera_type == "night"): # Add date as timestamp on the generated files. self.night_cam.annotate_text = _date # Capture an image as the thumbnail. sleep(2) self.night_cam.capture(file_name+".jpg") print("\r\nRasp_Pi => Image Captured!\r\n") # Record a 5 seconds video. self.night_cam.start_recording(file_name+".h264") sleep(10) self.night_cam.stop_recording() print("Rasp_Pi => Video Recorded! \r\n") # Convert the H264 format to the MP4 format. command = "MP4Box -add " + file_name + ".h264" + " " + file_name + ".mp4" call([command], shell=True) print("\r\nRasp_Pi => Video Converted! \r\n") ...


⭐ As shown in the previous step, in the send_last_attempt function, Raspberry Pi sends surveillance footage (captured image and recorded video) to the web application after saving (/captured) and converting files.

Connections and Adjustments
First of all, I had to cut, strip, and solder thicker jumper wires to the current wires of the fingerprint sensor to connect the sensor to the USB-to-Serial Converter (CP2102).


Then, I attached the USB-to-Serial Converter (CP2102) to Raspberry Pi via a USB Cable.

I connected the 5MP night vision camera to Raspberry Pi via the camera module port and ribbon cable.

After that, I connected the USB webcam to Raspberry Pi.

Finally, I attached the electromagnetic lock and the 12V battery to the 2 Channel relay. And, I connected the 2 Channel relay to Raspberry Pi:
- GND ➡ Ground
- IN1 ➡ pin 7 / GPIO 4
- VCC ➡ 3V3

Modes and Features
📸🔒 The security system scans fingerprints and waits for commands from the Telegram bot (IoT Surveillance System).

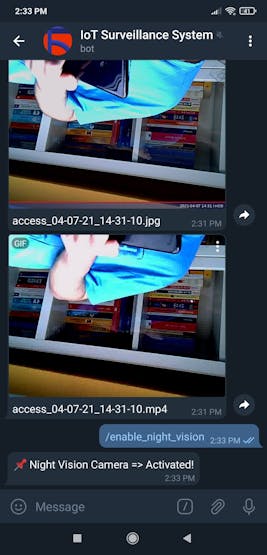
📸🔒 If the Telegram bot sends the /enable_night_vision command, the security system uses the 5MP night vision camera to capture surveillance footage (image and video).
📌 Night Vision Camera => Activated!
📸🔒 If the Telegram bot sends the /disable_night_vision command, the security system uses the USB webcam to capture surveillance footage (image and video).
📌 USB Webcam => Activated!

📸🔒 If the fingerprint sensor detects an enrolled (matched) fingerprint, the security system captures and sends surveillance footage depending on the selected camera type. Then, it locks or unlocks the electromagnetic lock.
access_date
access_04-07-21_14-31-10


📸🔒 Otherwise, if the fingerprint sensor detects an unmatched fingerprint, the security system captures and sends surveillance footage depending on the selected camera type.
failed_date
failed_04-07-21_14-48-30

📸🔒 If the Telegram bot sends the /status_check command, the security system captures and directly sends surveillance footage depending on the selected camera type without triggered by the fingerprint sensor.
📌 Footage => Requested!
requested_date
requested_04-07-21_14-53-09


📸🔒 If the Telegram bot sends the /last_access command, the security system sends the last entry (access) as the reply.
🕑 Last Access:
failed_04-07-21_14-48-30

📸🔒 If the Telegram bot sends the /entry_log command, the security system sends all registered entries to the system chronologically under these categories:
📓 Entry Log:
- access_date
- failed_date
- requested_date

Videos and Conclusion
After completing all steps above, I installed the security system on my balcony garden door, and it works stupendously with the Telegram bot :)