 Benjamin Blundell
There are many designs of for plague doctor masks out there. I went with a design very similar to the one here. It's fairly simple, with few parts. Once printed on A4 paper, I taped it together, taking care to get the pieces in the right place. With that done, I could cut out the pieces one by one, occasionally using our glass coffee table with a lamp underneath so I could see what I was doing.
I'd settled on leather for the mask, as I had some reclaimed leather left over from an old chair I saved from a skip. Rather than pin down the pattern onto the leather, I used a combination of pritt stick (a light paper glue) and some tiny bulldog clips to hold the pieces in place.
Cutting out the leather is a tricky job. We have an incredibly sharp 'pizza-cutter-like' wheel for this sort of thing. I've nicknamed it 'The Thirster' as it's drawn my blood a couple of times! Of course, it has to be sharp if it stands any chance of cutting the leather. Between it and a sharp pair of material scissors, I managed to get the pieces cut out. Since the glue isn't too sticky, removing the paper pattern pieces wasn't too hard.
For the eyepieces, I ordered a pair of steampunk plastic goggles from eBay. They were cheap and nasty on their own, but with a little trimming and some adjustment, they would fit the eye holes perfectly.
Sewing
We have a few sewing machines in our household, but the one we use the most is an old, foot treadle singer. You'd think this wouldn't manage leather but with the correct needle, even this machine will sew leather. most needles aren't super sharp as they are designed to push between the threads of a woven material. Not so with leather - you need to make your own holes. A leather needle is very sharp with a wide point, made for punching through the material. Even with this needle however, I had to hand crank the machine and go pretty slow.
Most of the parts went together fine, however the smaller eye pieces were a bit of a problem. We attached them with glue first, which seemed fine, but as we began to top-stitch them, our needle got stuck and caused a couple of severe snarl-ups. Not ideal at all! Still, we managed to unpick the knots that had formed and carried on.
The straps were sewn on, rather than riveted as I don't have a riveter yet. It's a shame really as I quite like the more steampunk look. I can always add them later, along with some fancy decorative stitching. We added a sliding buckle to adjust the strap length.
The electronics
I quite enjoying mixing hi-tech with other forms of craft and art. For this build I had a few ideas - a heads-up display, some sort of voice box affair? In the end I settled for animated eyes as I had most of the parts and could get it done within a reasonable time.
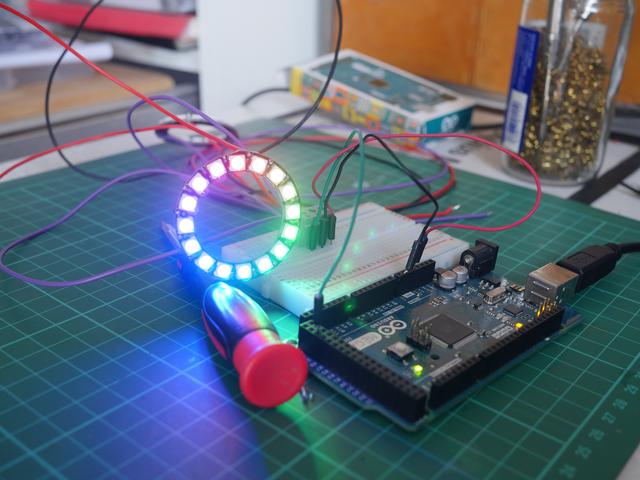
In a nutshell, the electronics revolves around two neopixel rings, an arduino nano, an HC-05 bluetooth module and a battery. The plan was to be able to control the eyes from my mobile phone. I had a quick look around and found that the HC-05 module was pretty popular and could be wired into the arduino fairly easily. Plenty of code is available online so that would cut down development time. Despite this module not being Bluetooth-Low-Energy, I bought a couple and set to testing.
Various schematics on the internet variously show the HC-05 connected via level shifters, voltage dividers or just straight into the digital ports on the arduino. I went with the latter and it seemed to work fine. I suspect some models have level shifters built into them. The arduino uses 5V TTL whereas most devices these days use 3.3V or even less. However, the model of HC-05 I bought seems to work just fine with things wired straight in, so I went with that.
I tend to breadboard things before soldering them up. I generally don't like doing through-hole soldering these days as it involves a lot of wire which I have real trouble with....
Read more »
 nGoline
 Int-Mosfet
 Victor Frost
Love the blinking effect!