First, I will describe the details of the final product. Then, I will walk you through how I got here - start to finish!
Hardware Details
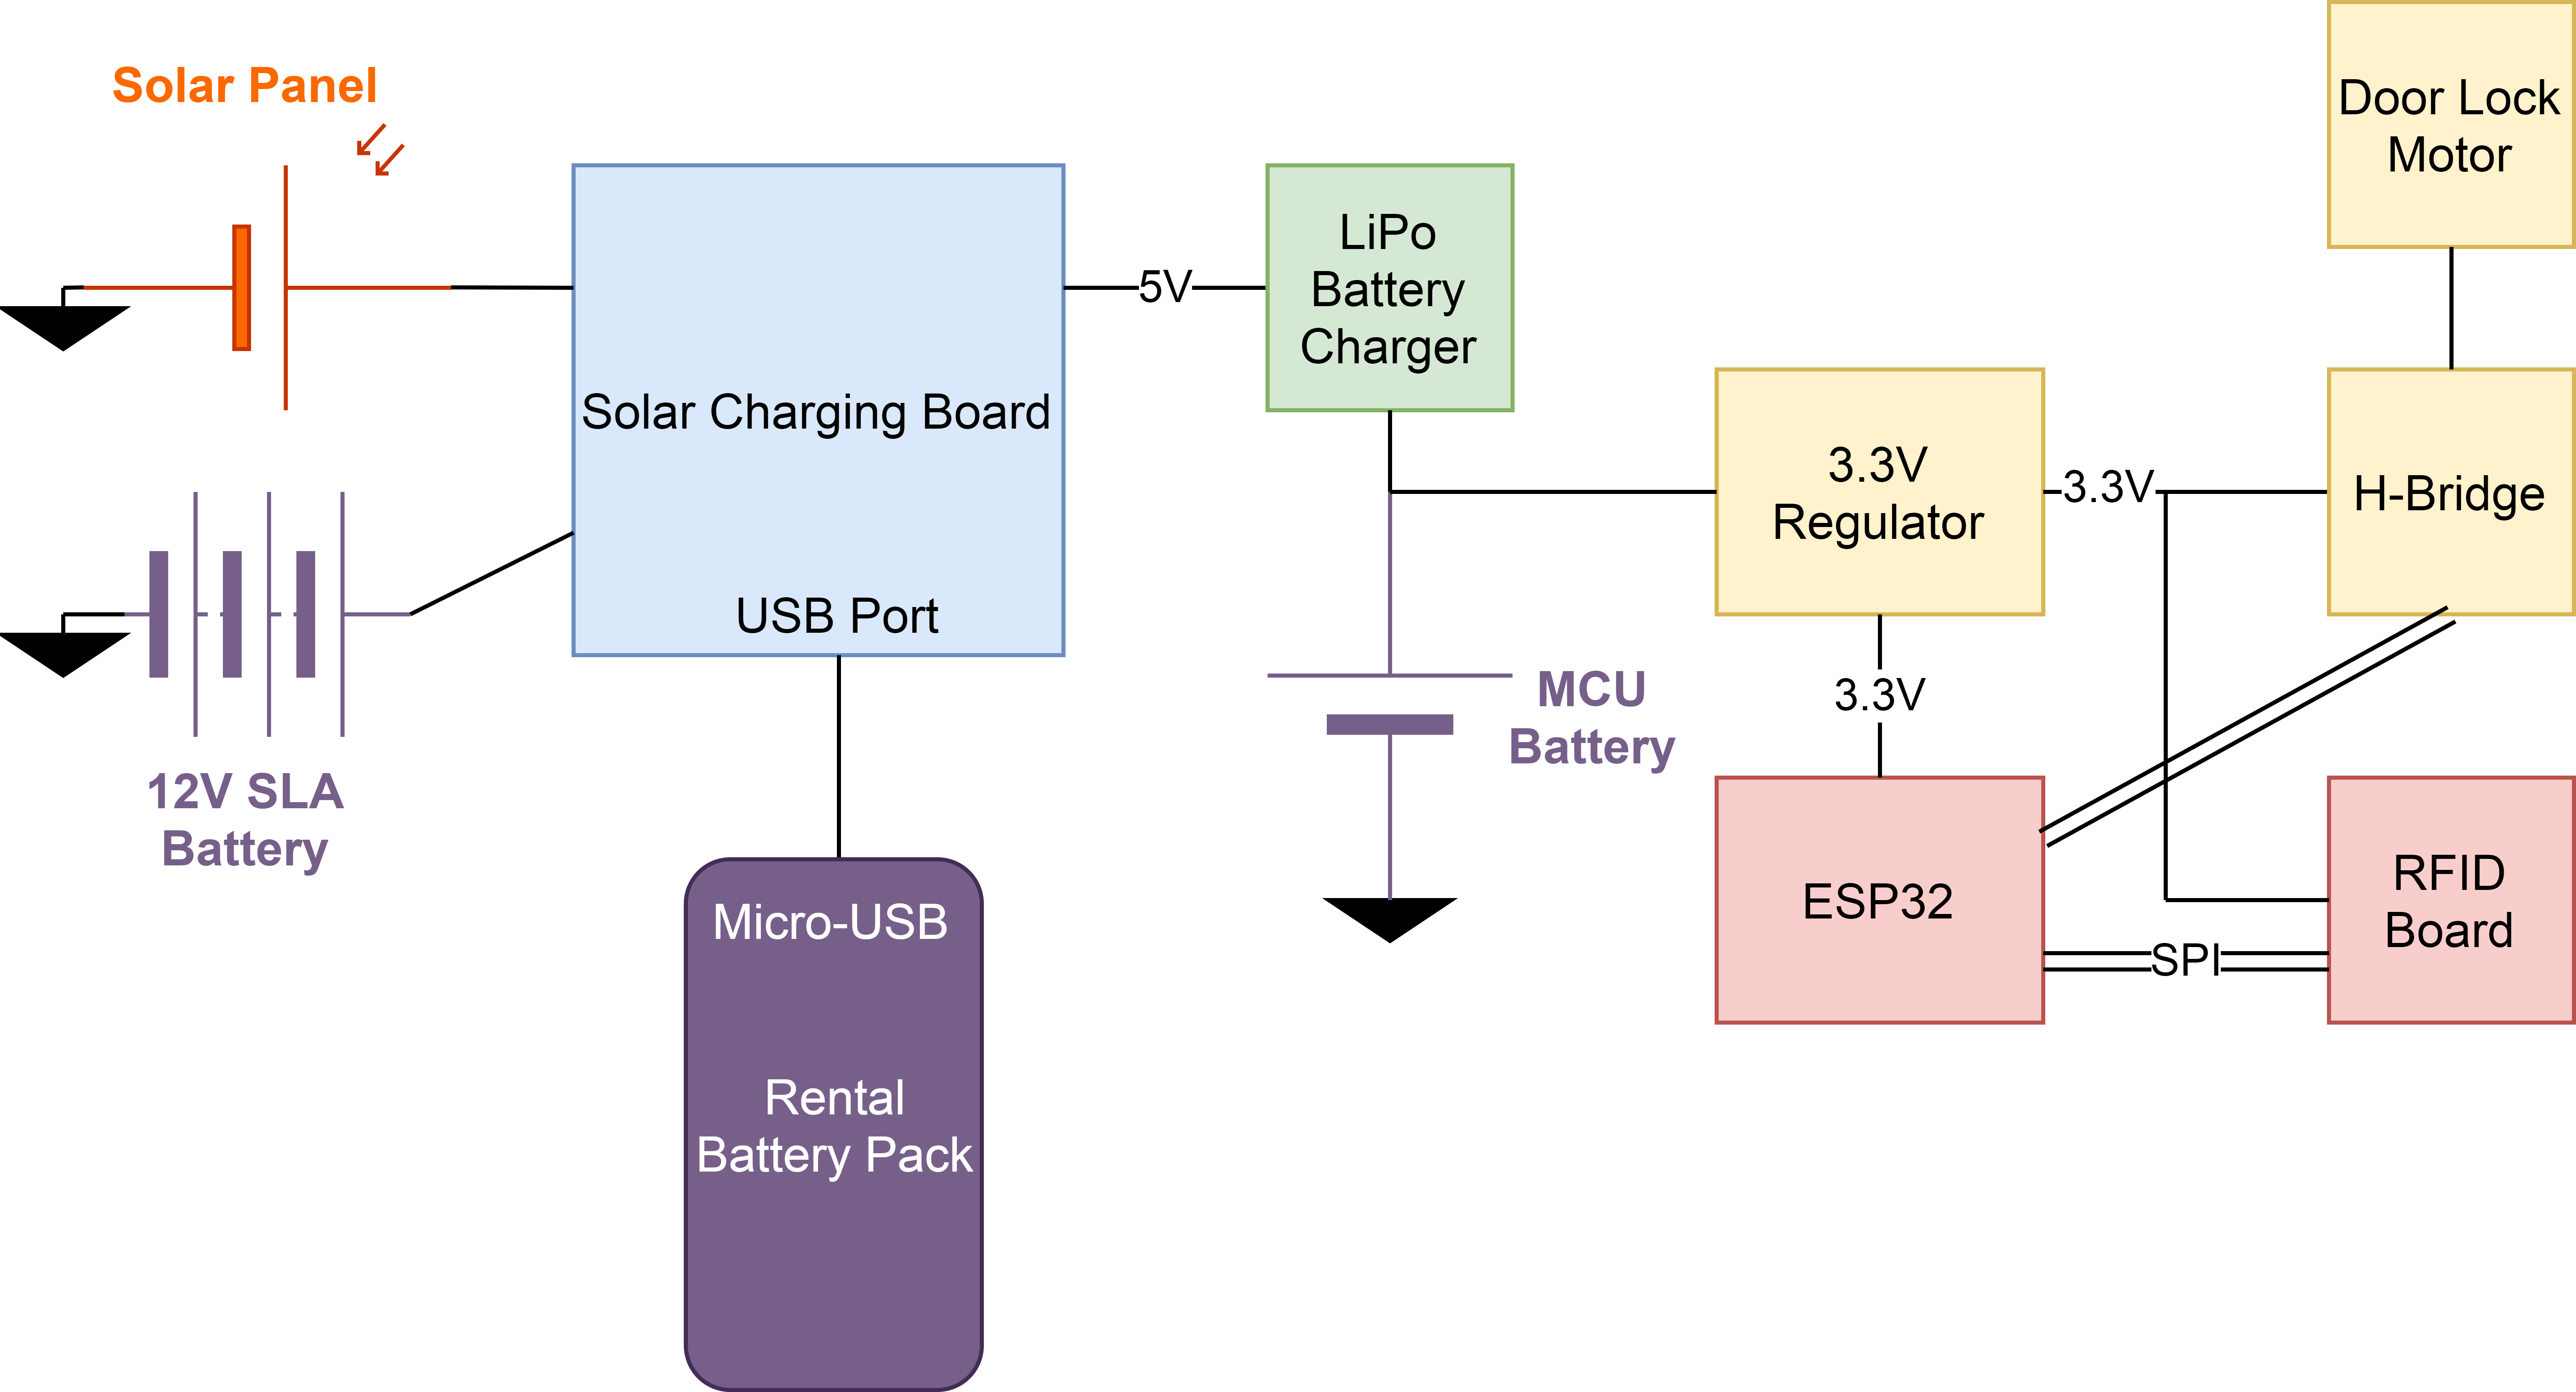
The hardware for the Outpost station is based on an ESP32. This ESP32 connects via SPI to an RFID reader and via GPIO to an H-Bridge. All of these components are powered by a 3.7V LiPo battery which is regulated down to 3V by a DC-DC switching regulator. The 3.7V LiPo battery also powered a small motor connected to the H-Bridge - this motor functions as the station door lock.
The solar panel is an 18V 9W panel and the large battery is a 12V 7Ah battery. These two power components are connected to a solar power manager which can work with any 18V panel and any 12V lead-acid battery. This power manager board has USB ports that are used to charge the rental batteries. It also has a 5V output which is used to power the LiPo battery charger.
Here is a diagram that says it all:
Software Details & System Topology
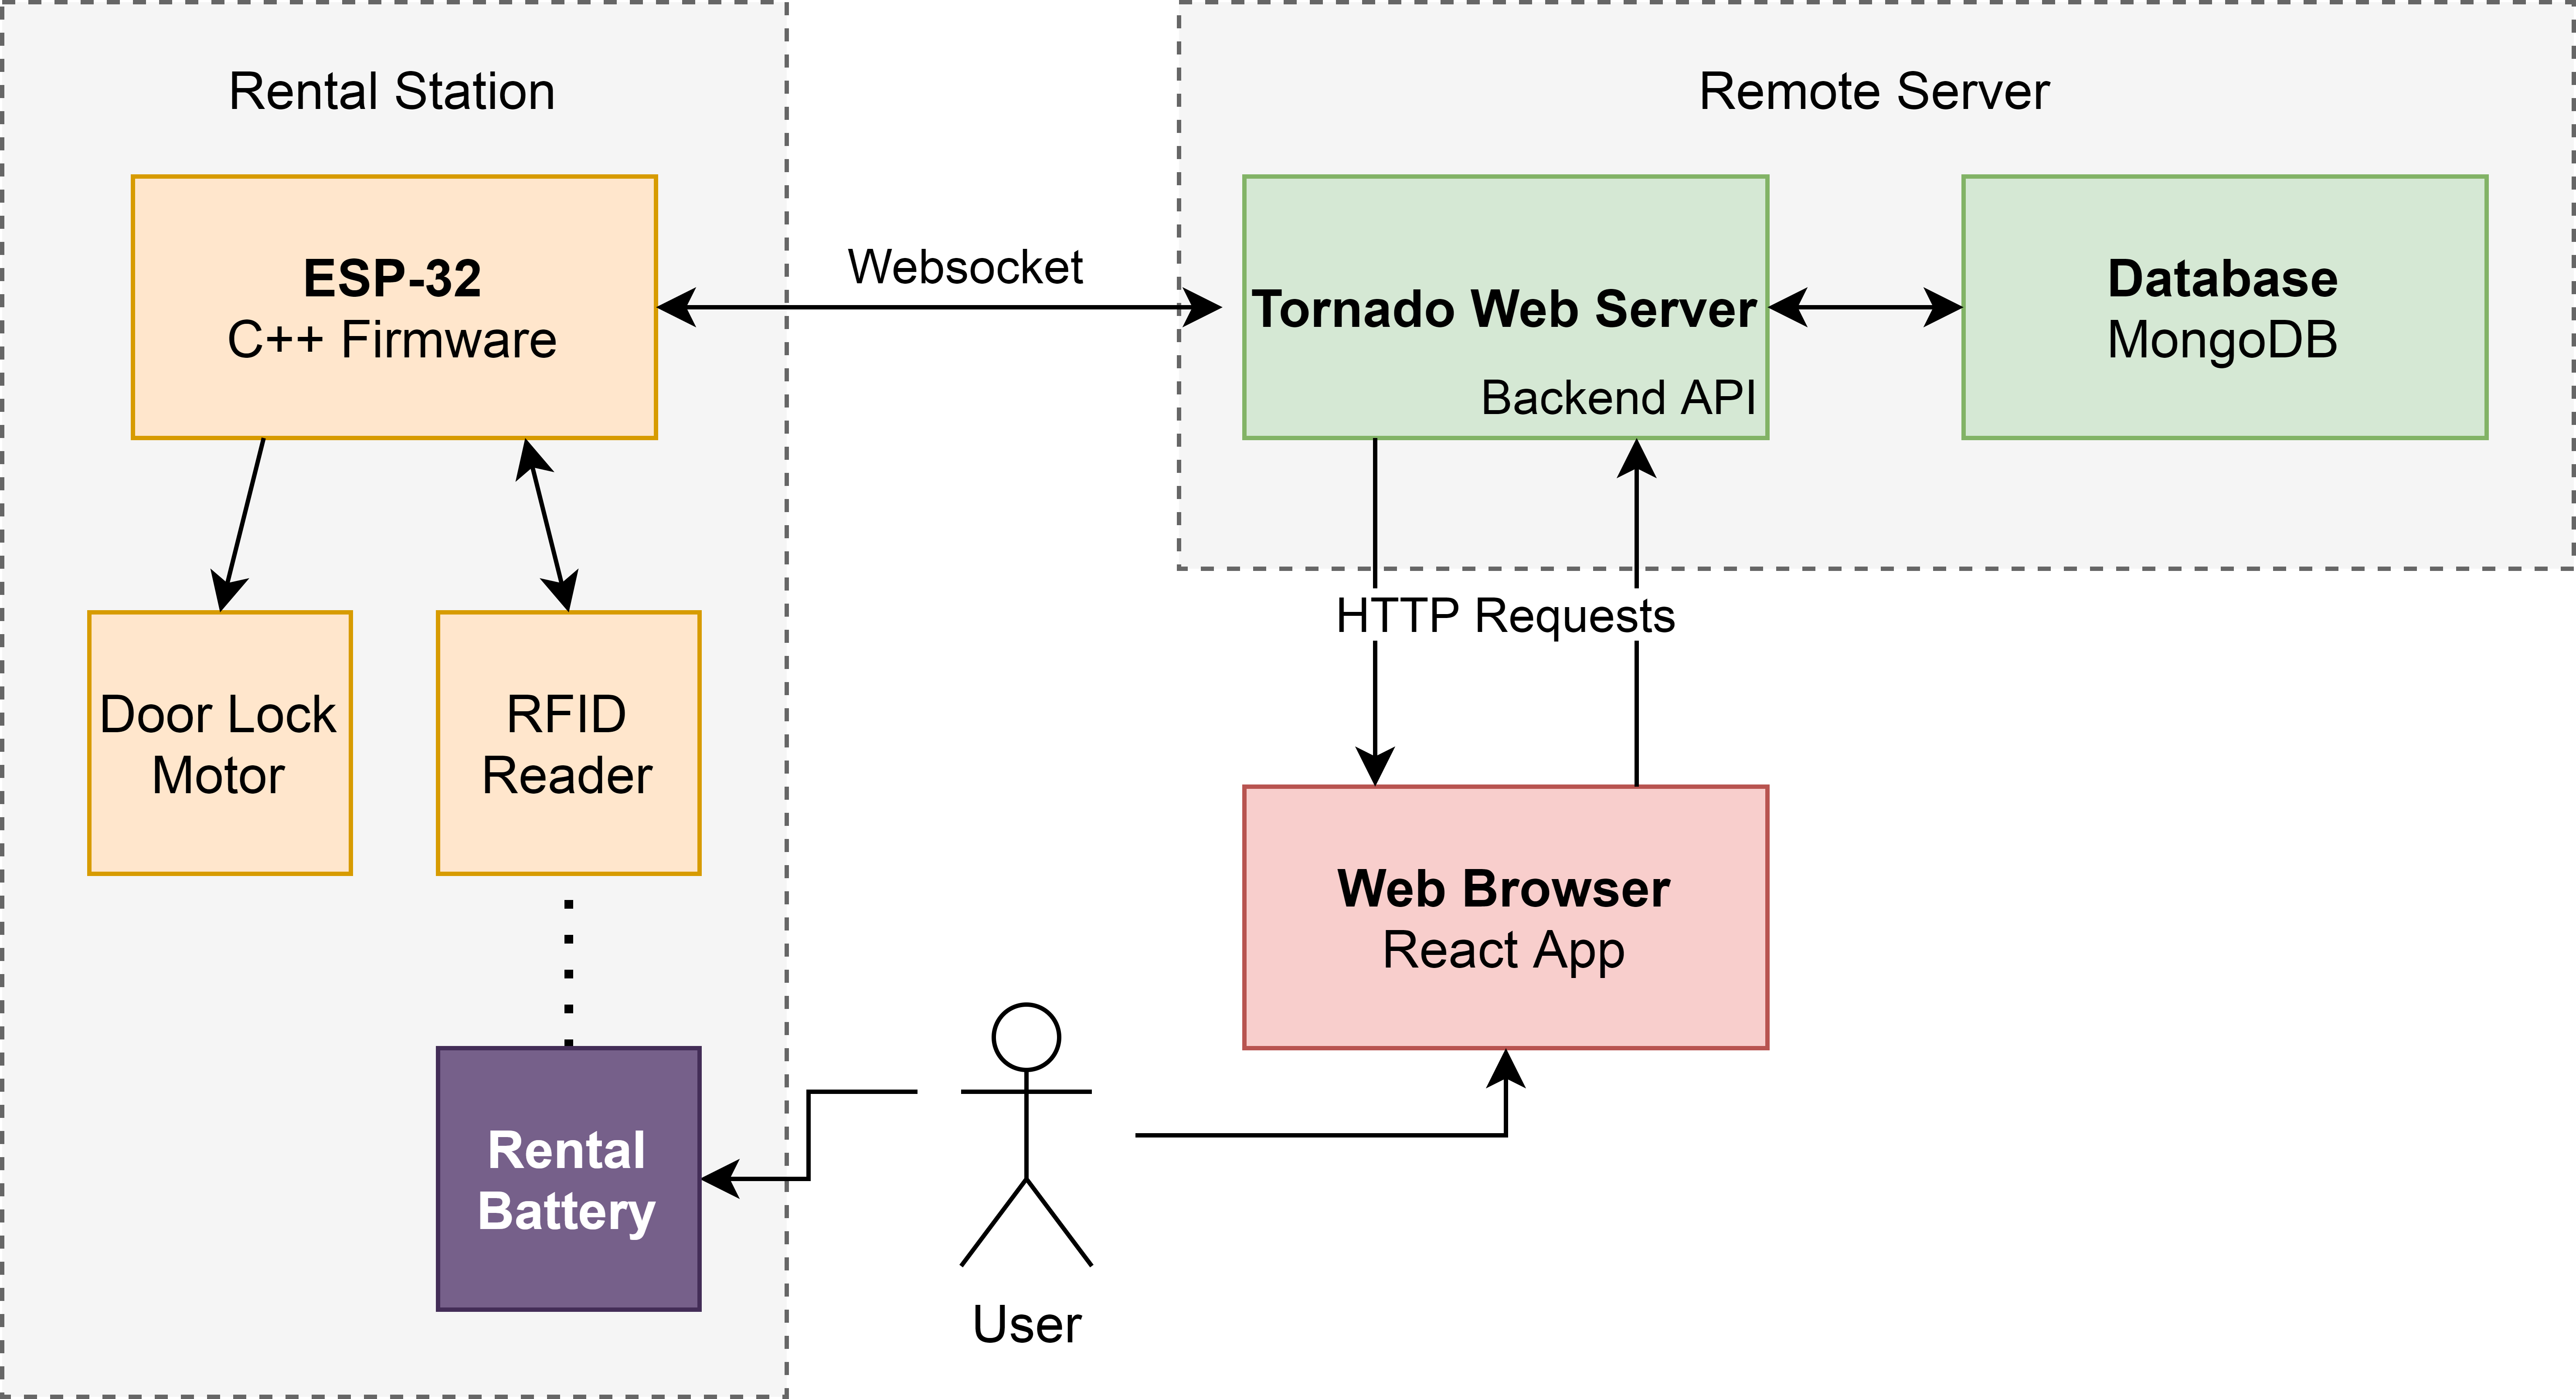
The individual Station described above connects to the Remote Server via WebSockets (currently over Wi-Fi). The user interacts with the product via a React Web App (which I styled with BootstrapMD). This Web App and the WebSocket both connect to the backend which is a Tornado Web Server. This Tornado keeps user and station details in a Mongo Database which it connects to via Pymongo. The salting and hashing of passwords are handled by the Bcrypt library for Python.
The Station's firmware is written in C++ in the Arduino IDE (more on this later...) and primarily handles WebSocket commands from the Remote Server by either locking the door, unlocking the door, or reading an RFID tag.
The entire system topology is depicted below:
Build Process
Despite how functional the project may seem at this point in time, it was not always this way - everything has to start somewhere!
Initially, this project was designed without a solar manager board and simply relied upon a second DC-Dc regulator to regulate the panel voltage down to 5V. This, however, was quite naive and cause a couple of issues. First, the aforementioned regulator was not able to provide enough current to fully utilize the 9w solar panel at peak power. This project is just a prototype so perhaps some inefficiency is okay though. The real issue was charging the rental batteries. My initial plan was to simply get a USB header and plug it right into the 5V line - I mean, USB does supply power at 5V, right? Well, this did not work at all like expected and each time I plugged the battery in the power draw would crash the system repeatedly. The battery would overdraw power and the regulator would shut off and the whole process would repeat 4 seconds later just as the system stabilized itself again and again. So obviously, this needed to be fixed.
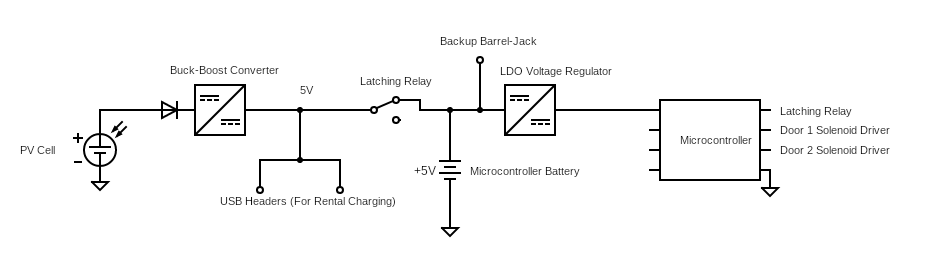
Above: The initial station electrical design, with 2 regulators.
This brought me to one of two major project revisions - adding a solar charge controller. When designing this revision, I had initially set out to find a maximum power point tracking solar controller and also a separate USB controller. However, after searching for many, many, many hours I had come across the solar power manager board from DFRobot. This board saved me a ton of work and immediately solved multiple problems and was relatively affordable too and honestly it was the relief I needed after several long nights of component research.
Just this revision alone though was not enough to create a project which had met all of my original goals. I still could not tell if the user was actually returning the battery they had rented in the first place. I decided to solve this issue by adding RFID tags to the batteries themselves. Right away I found a helpful Arduino RFID library and it seemed like this integration was going to be a piece of cake! But unfortunately, it was not quite that easy. Remember how I had said that the firmware was written in the Arduino IDE earlier? Well, up until this point it was not at all. Initially, I had been relying on the esp-idf in VS Code and I thought I could get away with it too! But after several days of attempting to make the Arduino library work with the esp-idf I gave up. I then spend the next day porting my code right into the Arduino IDE and changed it so that it fully relied on Arduino libraries instead. This revision was thankfully done.
Aside from these two revisions, there was still more work done concurrently in the background, mostly centered around the backend and frontend development. This full-stack development however was relatively new to me and the process was really a huge learning experience. I will spare you the details of me learning web development from scratch but one thing I can say is that I am thankful for React. Initially integrating it into my front-end test sight was a disaster due to JSX needing to be interpreted, so I gave up on the integration and simply decided to build a React App separate from my test front end. This worked like magic and when it was time to deploy it was as simple as running
npm run build
which created a production quality build of my app, just like that. Overall I would highly recommend React.
But that essentially is the entire build process at a high level. It was an amazing learning experience and I thankful to be able to share it with anyone who has managed to read this far. Thank you and happy hacking!