Hey there! Welcome to the WeFlow project page! Below you'll find more details about the inspiration for the project and the work that went into it. If you would like to see a demo of the WeFlow in action, check out the demo video in the links section!
Overview
The WeFlow is a water leak detection system that functions by using water pressure sensors to measure the water pressure in different sections of a piping structure. Depending on the pressure level that the sensors read in, a solenoid valve can be triggered to close off a section that detects a low pressure so as to prevent an excessive loss of water from the leak. Current states of the system are sent via WebSockets from the ESP32 clients to a server made using Tornado Web Server, and the server will then send the data to a webpage client for a user to interact with.
The inspiration for this project comes from a problem I personally experienced recently. Back in February, a huge snowstorm came through Texas and dropped at least a foot of snow onto my hometown and many other cities across the state. While my town wasn't one of the towns that suffered from the major power outages and other serious damage like that seen in Houston, there were still waterlines around town that were damaged by the unexpected weather. The water company that sources the water to my home had to repair damaged pipes after the snow melted, but since their usual method for finding leaking pipes is to look for a wet spot on the ground, locating the damaged pipes was difficult given that the entire ground at the time was soaked. They had to reach out for help from the community in order to find the problem.
I didn't think this was very efficient, so I thought it would be fun to design a theoretical system that could've been used in February for my senior project.
Materials
The Components section below contains the list of components used for the functionality of the current version of the WeFlow. There is also a Bill of Materials file listed in the Files of the project that has a full list of parts used throughout the project, including components that didn't work for the project such as the LiPo batteries, and parts that aren't absolutely essential for the systems functionality like the PVC pipe.
For the WeFlow, water pressure sensors were chosen to detect leaks in the pipes because I thought that detecting drops in pressure would be a good way to determine if there was a leak in a certain area. From research done at the beginning of the project, I've learned that there are other methods to detect leaks in a pipe, such as using acoustic technologies, and that a drop in water pressure can mean something other than a water leak, but for the sake of this project I still decided to go with the pressure sensor method since it was simple to implement, and it could still function as a feasible method of detecting water leaks.
As for the solenoid valves, I wanted to implement some kind of mitigation system if a leak was detected, and the options that I was considering were either closing off the problem area in the pipes, or shutting off the water at the source. I decided on the former since if this system happened to be used in an actual city water system, it wouldn't make sense to turn off everybody's water because of an issue at a single house. Solenoid valves specifically were chosen because they're already a useful tool in closing off access to a pipe, and the normally open configuration allowed for continuous water flow when needed without having to continuously keep a current induced in the solenoids in order to keep them open.
The DOIT ESP32 devkits with the Arduino IDE were a good choice to use due to their ease of use and WebSocket capabilities, and I didn't require anything super sophisticated for what I planned. The 3V relays were important in helping properly trigger the solenoid valves when they needed to be closed, and the power adapters were an easy way to provide power to everything.
Project Description
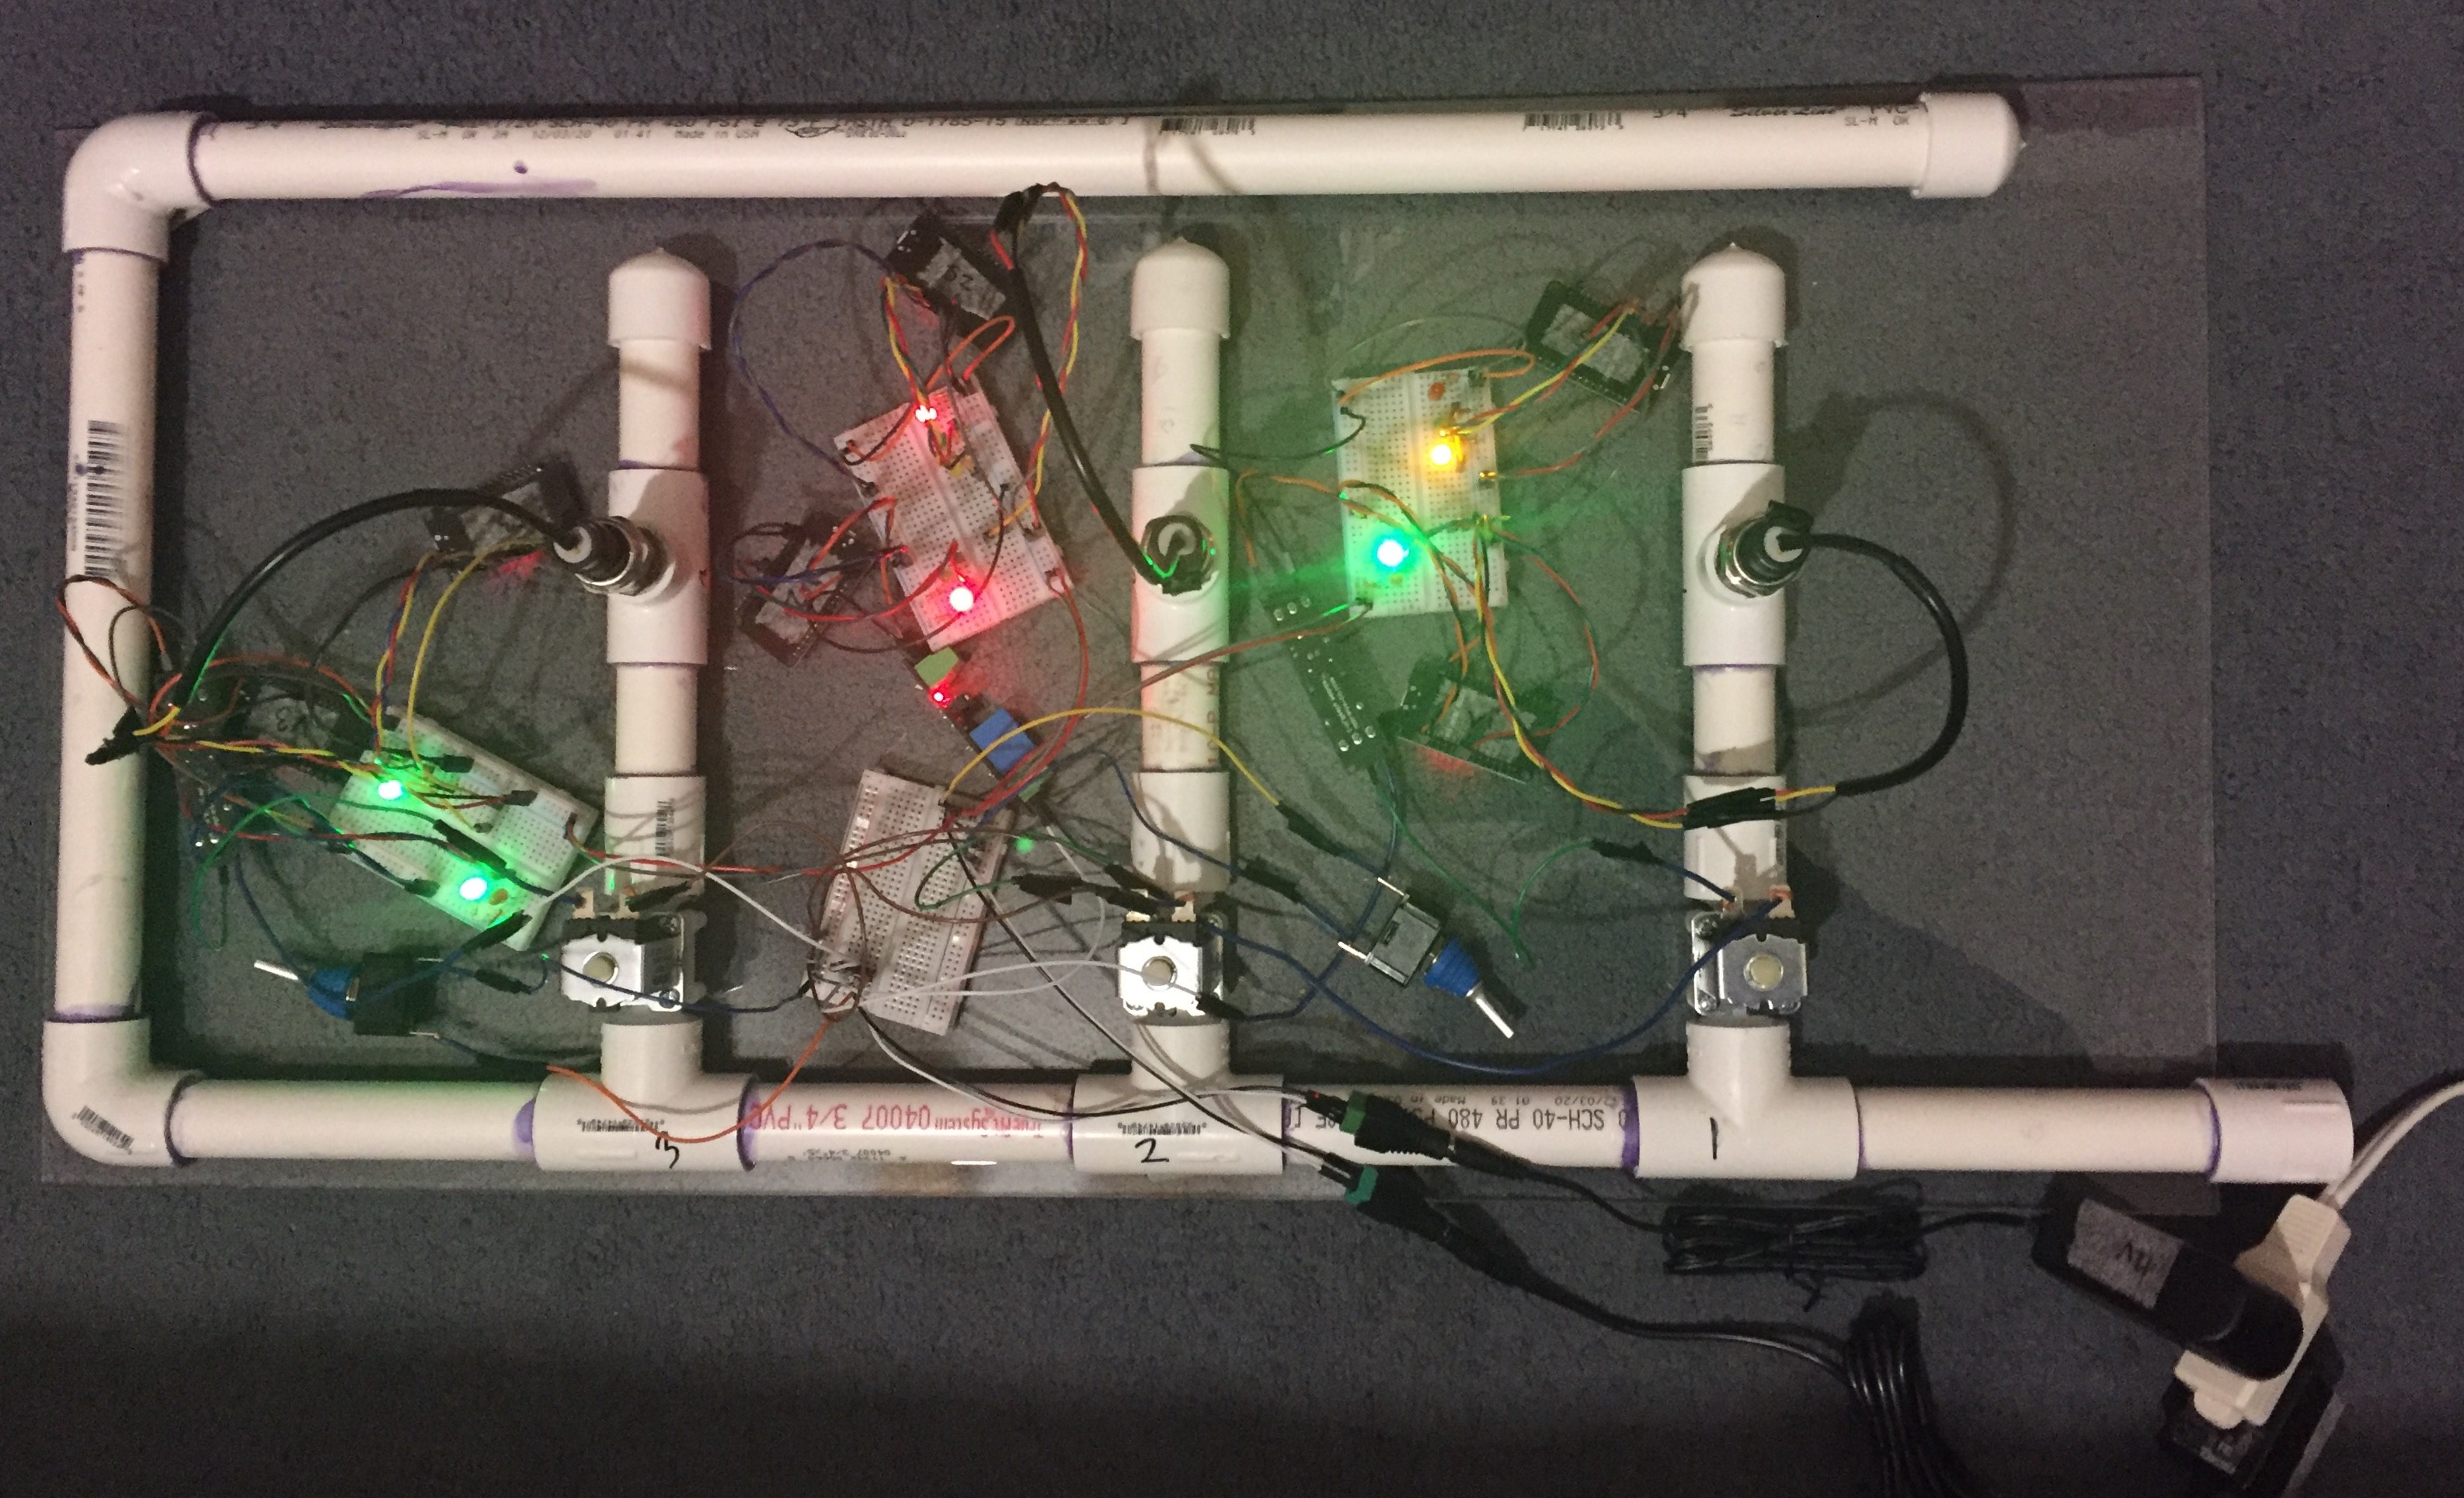
Above is a full view of the WeFlow. It consists of three main piping sections, each with its own pressure sensor to monitor the water pressure inside of it, a solenoid valve to block off the water supply if needed, and indicator LEDs to display the state of the two components.
Hardware
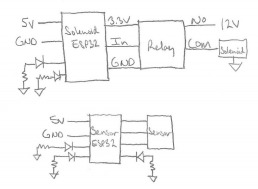
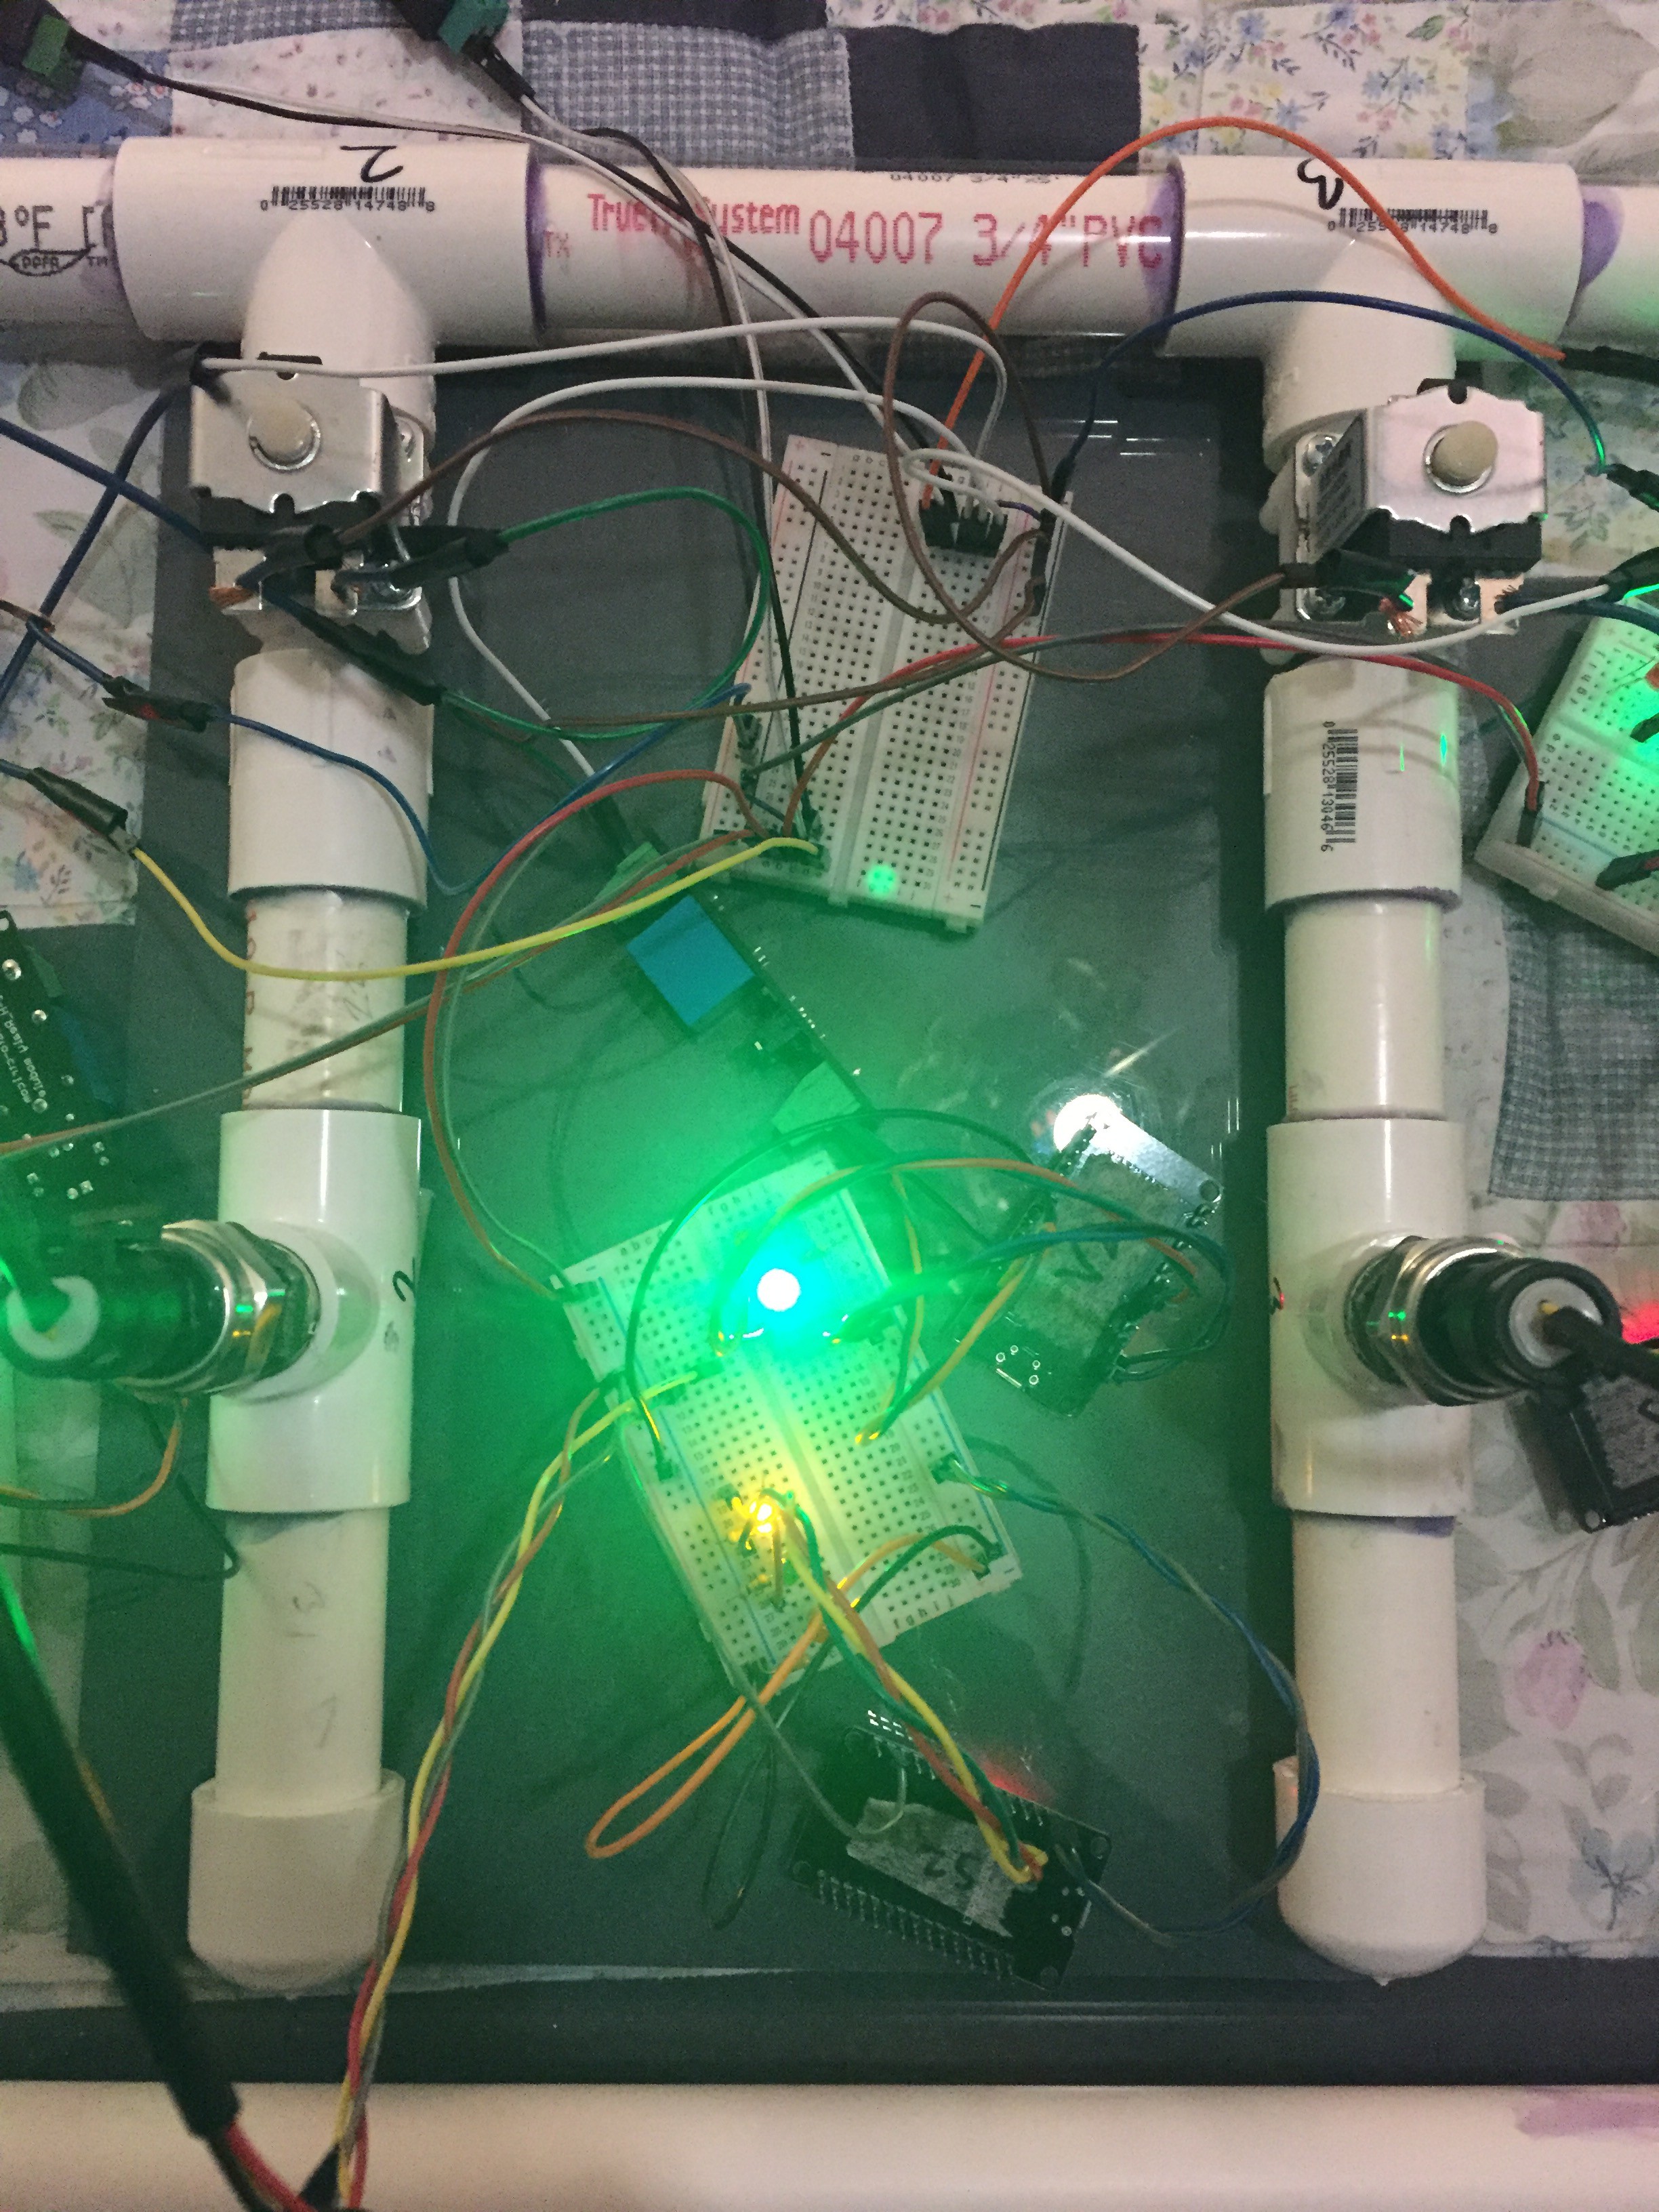
The layout of the circuitry for each piping section is shown in Figures 2 and 3 below. For the pressure sensor, the pressure is read into the ESP32 by an analog input, and the red, yellow, and green indicator LEDs are toggled depending on the pressure level. For the solenoid valve, one of the leads is connected to the COM port of the relay while the other is connected to ground, and the input of the relay is connected to a GPIO pin of a separate ESP32. When the pin goes high, it will trigger the COM port of the relay to output the 12V needed to induce a current in the solenoid and shut the valve.
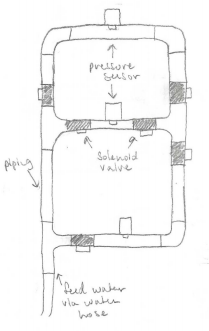
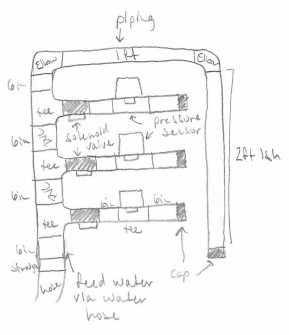
Originally when I was designing the piping structure that I would use to test my system, I wanted it to look like Figure 4 below. I figured that having the different loops in the system would allow for a decent imitation of the continuously-flowing water that's in city pipe systems, and the design also allows for continuous flow even if one of the sections is closed.
However, due to budget constraints for the project, I had to reduce the number of solenoid valves that I planned to purchase, which lead me to change the pipe design to what it currently is, which is also shown in Figure 5 below.
Software
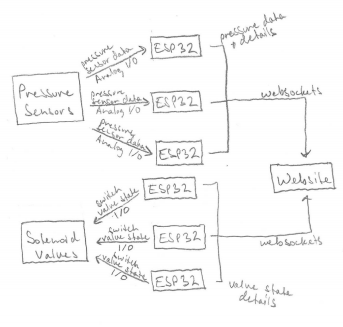
WebSockets were the main communication scheme between the different parts of the system. In total, there were 7 WebSocket connections: three for the three pressure sensors, three for the three solenoid valves, and one for the webpage displaying the information about the system. The code used for the sensor and valve ESP32 clients was done in the Arduino IDE, and the webpage client code was done in Javascript. The server file was made using Tornado Web Server in Python; this was probably the most difficult part of the project since I was unfamiliar with Tornado and web servers in general, but I managed to get it completed. The server file contains all the WebSocket handles for each of the clients, and it is primarily responsible for sending messages and other data between each of the clients. The ESP32 clients handle updates to the system and sending this information to the webpage, and the webpage displays all of this information about the system and sends messages back to the valve ESP32s in case they need to be opened or closed. A summary of the data flow for the system can also be seen in Figure 6 below.
While the system and the webpage are connected to the Tornado server, messages are continuously being sent between each device so as to maintain real-time updates on the webpage. In order to do this, any WebSocket onmessage callbacks as well as any function in the Python file that handles transferring data had to be declared asynchronously since Tornado usually uses a synchronous method to transfer data between the server and its clients.
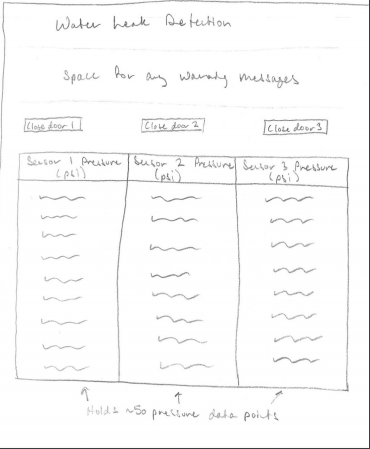
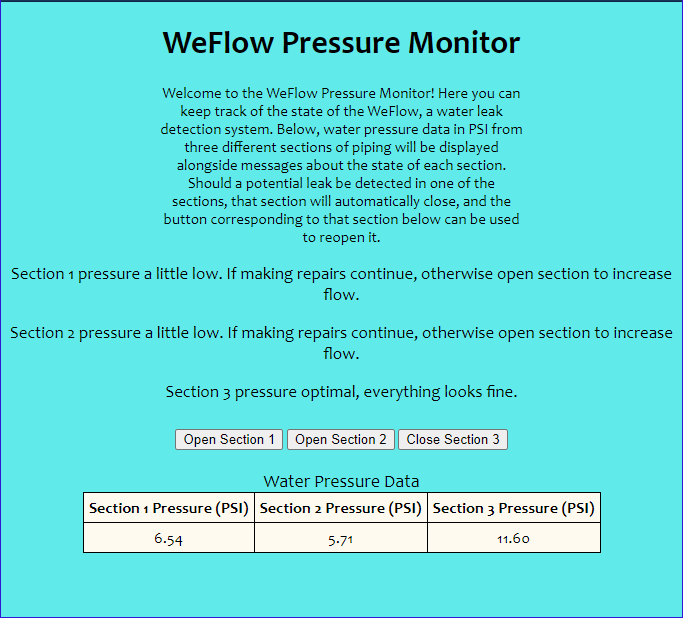
Figure 7 and Figure 8 below contain the rough version and final version of the WeFlow monitor webpage, respectively. Ideally, this would be the main part of the system that the user would be interacting with. It consists of basic information about the WeFlow and how it works, messages about the different sections of the system, buttons to open and close the solenoid valves in each section, and a table displaying the current water pressure reading in each section. The pressure readings update about every half second, and there's a delay of about one second between when the data is initially read in by the sensor and when the value is displayed on the webpage. While the buttons on the webpage have eventListeners attached so that the user can open and close the valves whenever they want, the valves are also configured to close and stay closed whenever a pressure deemed too low is read in. This is to allow for quick mitigation to prevent a lot of water loss in the case of a leak, and the user is able to reopen the section from the webpage whenever they're ready as long as the water pressure is high enough, otherwise the valve will immediately reclose.
All of the code used for this project can also be seen in the Github repository that I have linked with this project.
Improvements
For the most part, the project described above is the prototype for the WeFlow, but I was able to make a couple small adjustments to the system. First, I included toggle switches with waterproof components on the power distribution breadboard so that power to the system can be quickly and easily shut off should anything happen. Second, initially the opening and closing of the solenoid valves was completely controlled by the buttons on the webpage, but I have edited the Javascript code so that the valves can close on their own as described above.
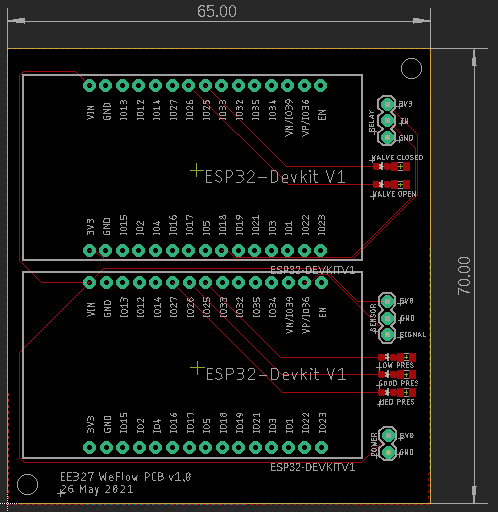
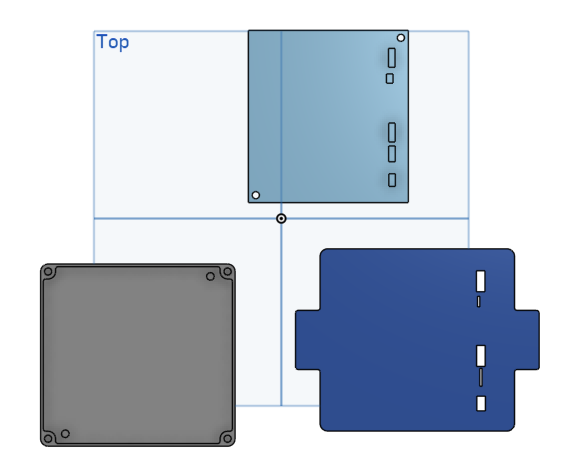
Also, as a proof of concept, I designed a PCB and a 3D-printed enclosure for the circuitry in each of the three sections. I wasn't able to have these manufactured, but they would be useful to have so as to hopefully reduce the amount of wiring in the system, as well as have a decent amount of the circuitry protected from potential water splashes. These designs can be seen in Figures 9 and 10 below, and the .sch and .brd files are included in the files section of the project.
Shortcomings
While I'm happy with how the WeFlow turned out, there are a few things that I wished I could have implemented or fixed that I wasn't able to. One thing I would like to fix is an issue I have with the ESP32 clients randomly disconnecting from the server. It hasn't been too much of an issue, as I can simply press the reset button on the development boards and they'll reconnect to the server in a few seconds, but I would still like to know why this is happening and how it can be fixed.
Another issue I had was the addition of LiPo batteries as the power source of the system. I had purchased a 2s and a 4s battery as well as 5V and 12V voltage regulators so that they could provide the needed voltages for the system, but I believe that the batteries don't source enough current for everything to function properly. I should have looked further into the electrical needs of each component before choosing the replacement batteries.
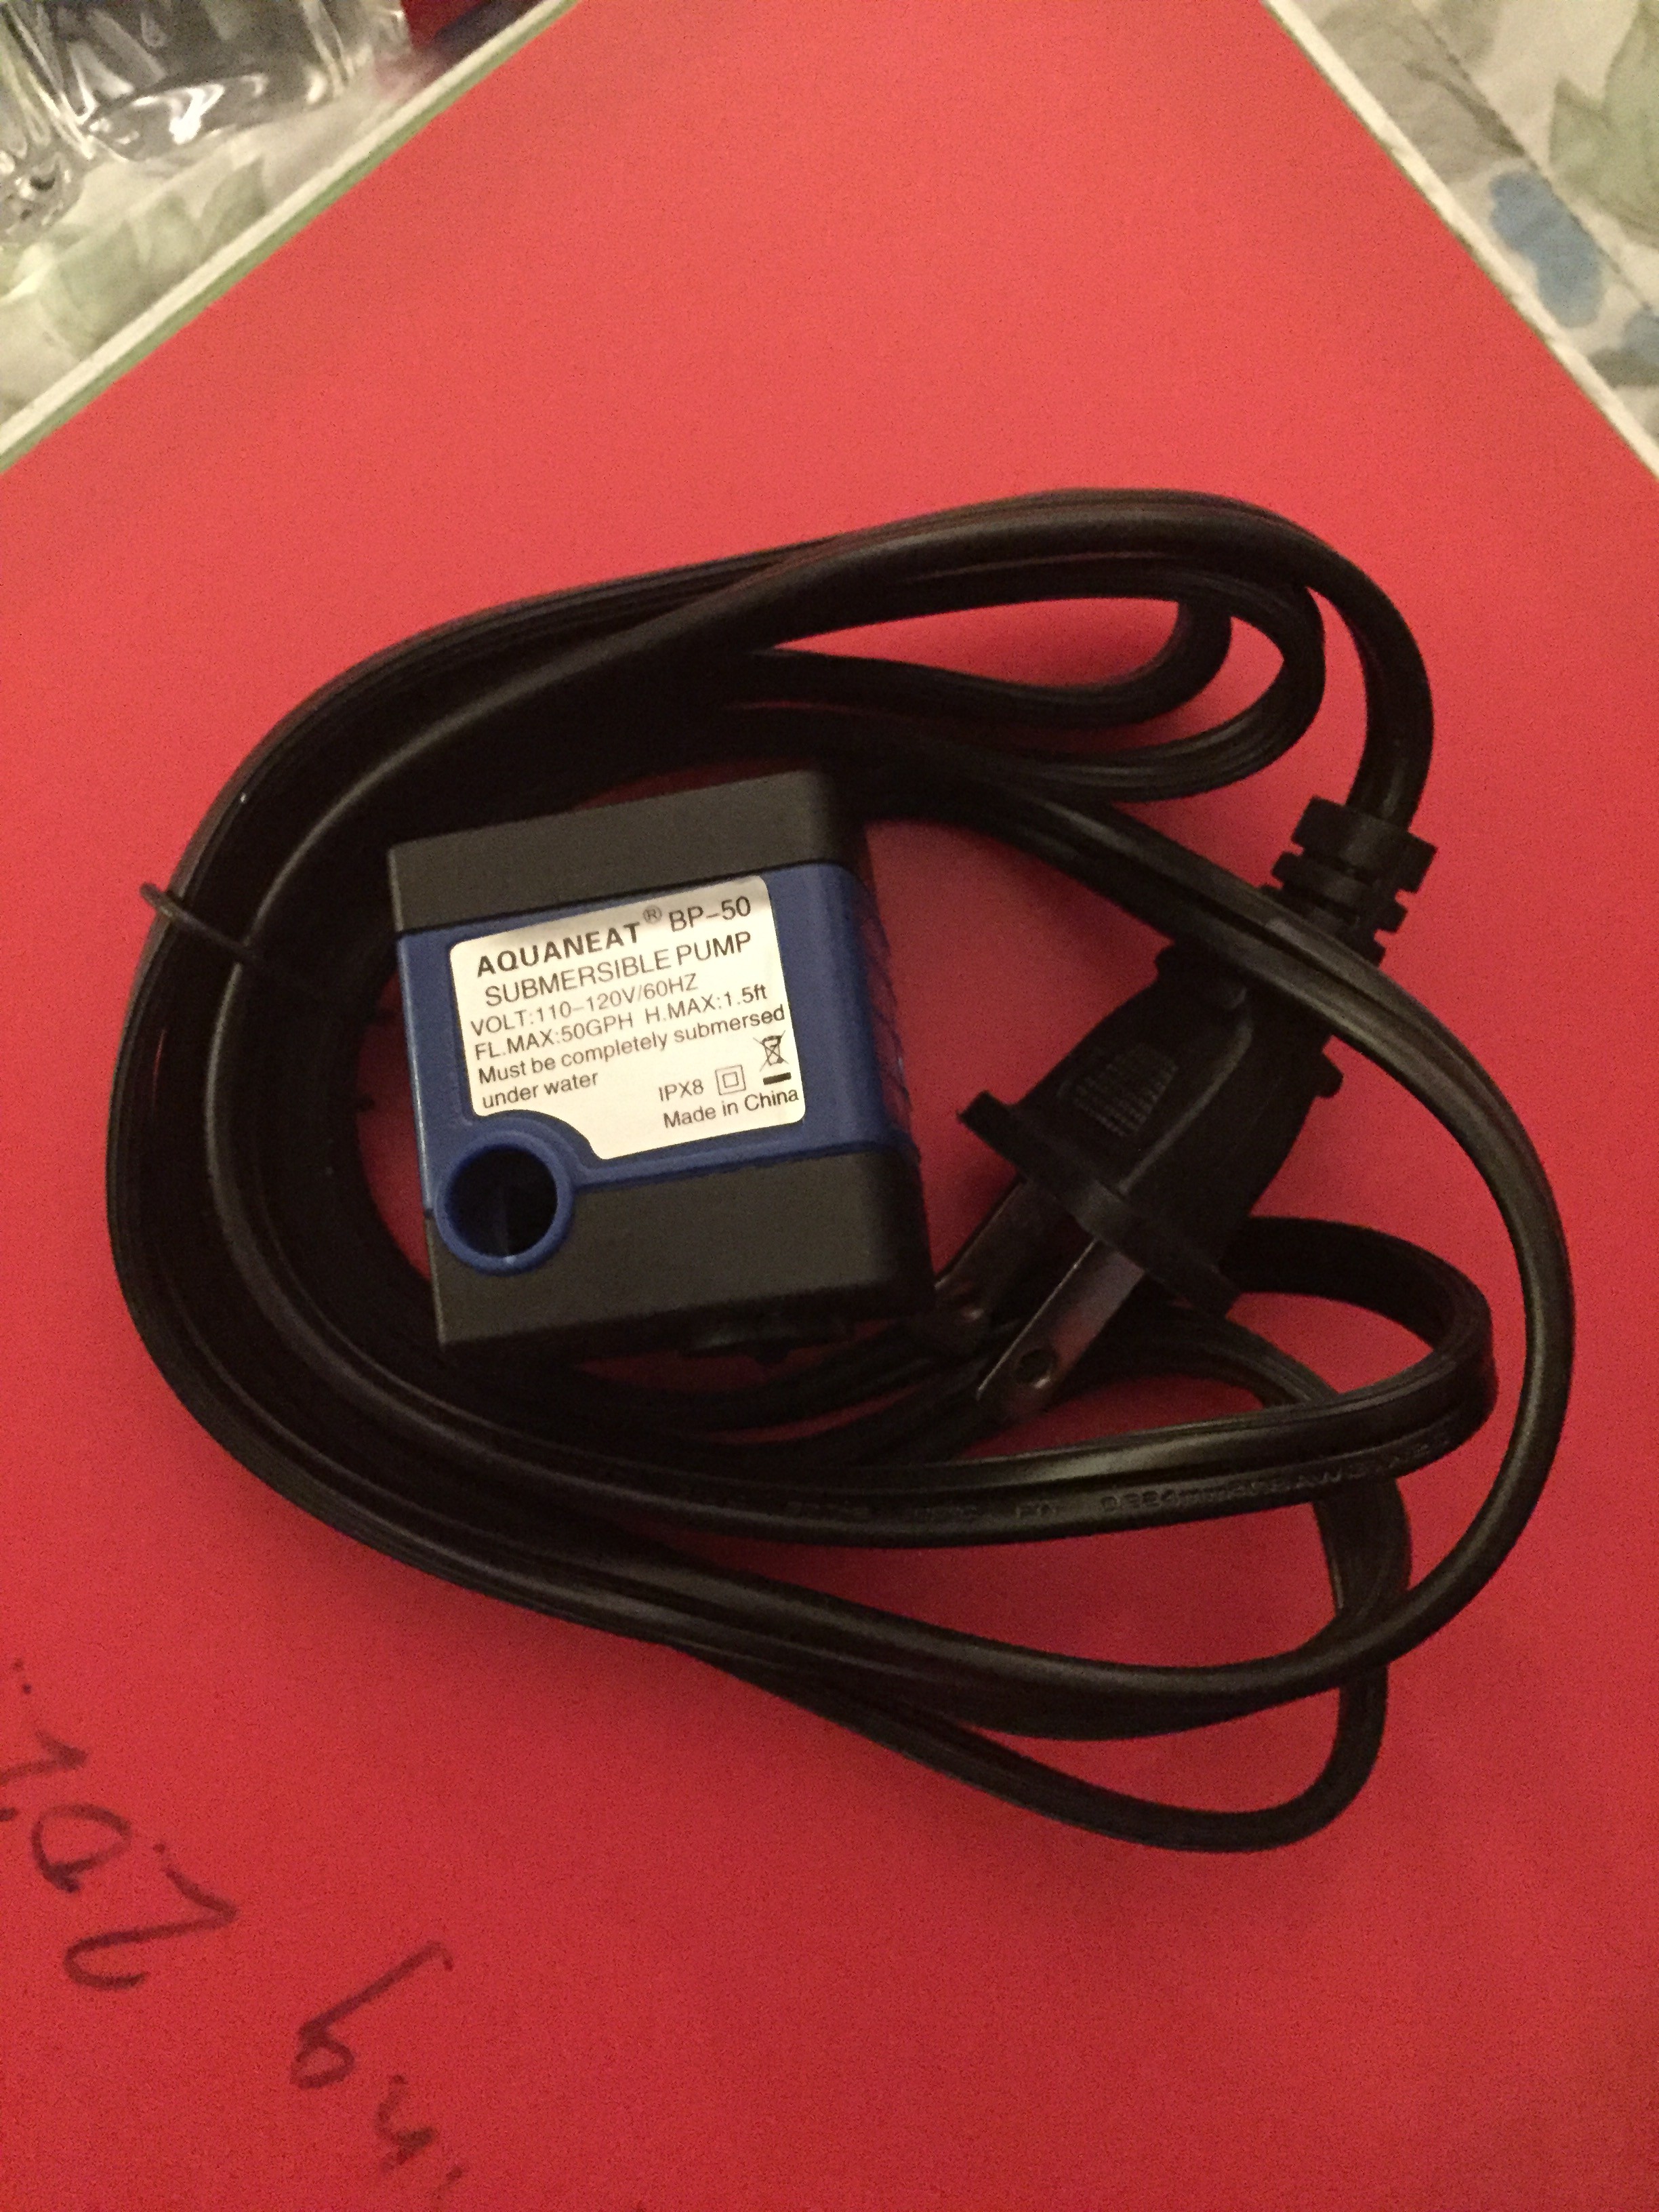
A third issue was that throughout the project, I wanted to try and simulate the moving water in a city piping system as best as I could. Based on feedback from my instructor and classmates, I decided to purchase a fountain pump that could be attached to the feed line of the piping structure. Unfortunately, I looked at the sizing specifications wrong when I put the order in, and it ended up being too small to attach. You can see it in Figure 11 below.
Future Considerations
Since I did this project for my undergraduate senior design project, I'm not sure if I will continue to make adjustments to it. I did have a few ideas for things that I could add if I did continue to work on it, however:
- System database: When I first came up with the idea of this system, I wanted the pressure data that's displayed on the webpage to be a table with new pressure values being appended to the top of each column rather than a single value that updates every half a second, so that all the data that was sent can be seen and scrolled through, or at least the most recent 50 or so pieces of data. I was made aware that the ideal way to accomplish this would be to create a database for the WeFlow, that way a history of the system's states can be saved and accessible by users. I don't have any experience with making databases, but if I do end up continuing this project, this is something that I would like to add.
- Correct LiPo batteries: I would need to probably look at the datasheets for all the components used to see how much current they continuously use, but having this information could help me decide which size LiPo batteries would be best to power my system.
- Expanding usability: While talking about the WeFlow with my instructor as well as during user interviews, it was brought to my attention that the WeFlow could potentially be used for more than leak detection. For instance, since the system monitors the water pressure in the pipes, if there's a pressure dip, the system could maybe give a reason for the pressure drop. Maybe it's actually not enough water getting to that section rather than a leak, or if it is a leak it can explain what caused it. Having this information could potentially save time and money for the user should an issue occur. The WeFlow could also potentially be used for water conservation efforts. For instance, maybe the pressure being read to the monitor is the water pressure for each house attached to the system, and one of the houses isn't using all the water that's being sourced to it. A message could be sent to the webpage or something that could let the user know, and the extra water could be diverted somewhere else where it might be needed more. I would like to look into how the WeFlow's functionality could be expanded for other uses.
Even if the WeFlow is forever shelved, I'm still happy with what I was able to accomplish while developing it!