Close
0%
0%

MINITEL + ESP32

Télétel network is dead. Long live the Minitel !

Similar projects worth following
The minitel is a french great-uncle of internet that comes back frequently in retro computing projects. This well documented old guy has a peripheral port from which we can access to screen display and keyboard input, so it can basically be used for any terminal application. The semi-graphic mode also makes GUI development possible with 80x72 resolution and 8 grayscale colors.

My past projects with minitel were always ending up as breadboard prototypes with external power supply and arduino / rpi. This kind of bulky delicate stuff is hard to take out of the garage and can dissuade software devs from working with. Well, here comes the idea.

The objective is to make a dev board:
- as generic as possible, to support the widest range of projects,
- accessible for the greatest number of people, being arduino IDE compatible with USB port
- self-powered and with a good form factor so that it can be used as a dongle plug and play

HARDWARE

As generic as possible

The ESP32 is powerfull, open source and supports Wifi & Bluetooth, making it the first choice for this project.

Accessible for the greatest number

ESP32 is affordable and compatible with Arduino IDE & micropython. USB / UART conversion based on CH340 chip is implemented so that we can program and debug with nothing but a USB-C cable.

Self-powered and Plug-n-Play

The board is powered from Minitel port (8-13v) with a buck converter based on TPS62162, so it doesn't require external power supply. It can also be powered from USB port when it needs to stay on while Minitel is shut down.

SOFTWARE

Minitel library for Arduino

The communication with minitel is made using the library from Eserandour. This library is a faithfull traduction of the Minitel technical specifications, very pleasant to work with. Great thanks to him ! Some commands have been added to the library that will be posted soon.

Minitel library for Micropython

uPyMinitel library is available for micropython ! This library is an adaptation of  python3 PyMinitel from Zigazou which is also a very good translation of minitel protocol specifications, and is of great help to discover how the minitel had been conceived 40 years ago.

Project examples

The source code of the demo can be found in Minitel-ESP32 repository.

You will find sample codes to e.g.:

  • SSH remote machine like putty but on your minitel (Arduino code)
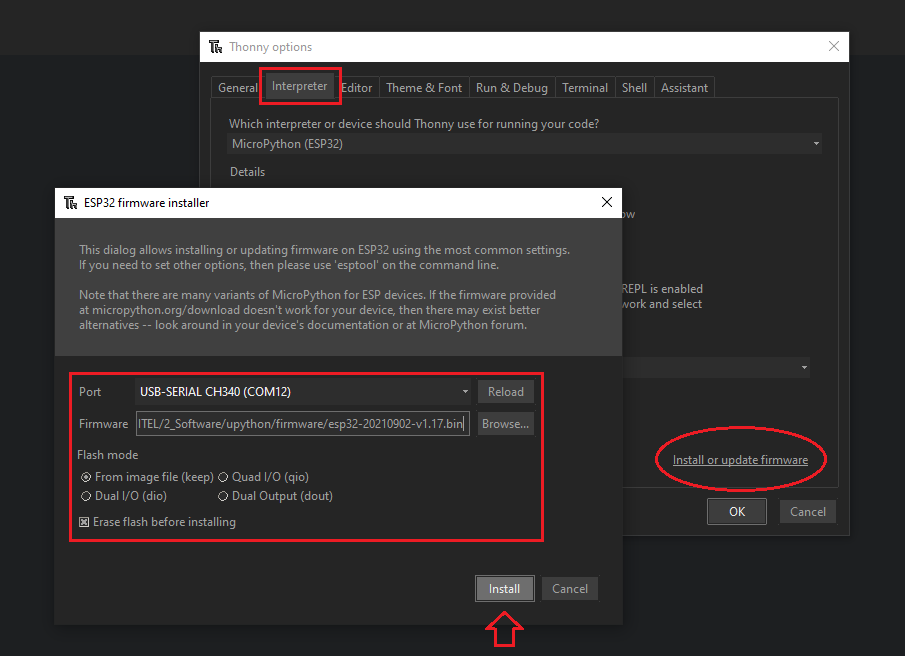
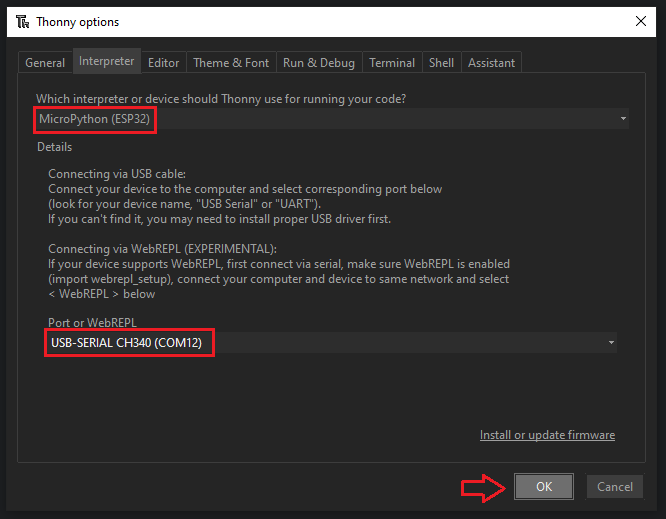
  • Start programming in micropython (Thonny IDE)

Socketel application

Not everybody knows that some minitel services are still alive ! Indeed, while the network has been terminated in 2012, some services has been adapted to work on voip and/or websockets (see MuseeMinitel.fr for more information).

The socketel application provides a nice user interface to connect to these services with nothing but a minitel, an esp32 and an internet access ! It is written in micropython and available in Socketel repository.

Telnet Pro application [NEW !]

Telnet Pro application offers a multiprotocol client fitted with UI and presets to save host configurations. The supported protocols are Websockets (mainly minitel services), Telnet (mainly bbs.retrocampus.com) and SSH to use your minitel as a terminal for interactive remote shell session ! Many thanks to Francesco for gathering all clients demo and giving them this nice UI.


Let's (re)discover the minitel experience !

DEMO

  • 1 × ESP32 module
  • 1 × Buck converter
  • 1 × USB/UART converter
  • 1 × Minitel Serial converter

  • simple websocket client for Arduino

    Louis H03/02/2022 at 14:36 1 comment

    I've just added a new sample code for Arduino that connect to minitel websocket servers.

    That is an other way to (re)discover the minitel experience ! (see previous log about Socketel)

    Compared to Socketel :

    • it is written in C (instead of micropython), so it boot quickly,
    • it is more stable thanks to the very nice websocket library available for Arduino. Some bugs have been observed with socketel seemingly due to memory issues,
    • it does not have a user interface for minitel, wifi and server configuration. so you need to recompile with your own parameters.

    Conveniently, you can connect to teletel or 3615.de which are "kiosk service" which provide access to other minitel services.

    Link to source code : Minitel1B_Websocket_Client.ino

     Enjoy !

  • socketel: Minitel services via websocket

    Louis H01/11/2022 at 21:49 0 comments

    An application has been developped to enable visit minitel webservices without coding, iin the hope to enable the greatest number to (re)discover the minitel experience !

    The application is named Socketel and is written in micropython.

    https://github.com/iodeo/Socketel

    Here are some screenshots of the user interface :

  • telnet to BBS or Minitel services

    Louis H12/10/2021 at 15:52 0 comments

    After SSH, Telnet client software example for Arduino IDE is available on project repo.

    This software can be used to access the Minitel service hosted by teletel.org which provides an authentic minitel experience via telnet. Many thanks to him !

    There are other minitel services available via websocket:  Sample code coming soon

    We can connect to BBS as well, but I have to admit that it is slow and graphically limited.

    Here are some screenshots:

    teletel
    synchronet

View all 3 project logs

  • 1
    Hardware set-up

    Option 1: Using breadboard circuit

    You can use your own modules with some components as shown in breadboard cricuit below.
    NB: This circuit has no power management, so you need to be carefull with voltage levels: don't put power simultaneously from minitel and usb port.

    Option 2: Using ESP Minitel devboard

    If you don't want to bother with modules and wiring, or if you want to have a more "end product" looking for your application, you can purchase a devboard for around 46 EUR excl. shipping, depending on some options.

    Just send an email at contact@iodeo.fr for more information.

    Or you can get it on Tindie

    devboard din and jst versions
  • 2
    Get started with Arduino IDE
    1. Install software Arduino IDE
    2. Add Arduino-ESP32 core to the IDE as described here
    3. install Minitel1b library as follows
      1. download Minitel 1b library as ZIP file
      2. in Arduino IDE, go to Sketch / Include Library / Add .ZIP Library and select your ZIP file
    4. Connect your device using USB-C cable
    5. In Arduino IDE, select the corresponding serial port in Menu Tools/Port
      ! If you have difficulties with usb driver, check this sparkfun article
    6. Select ESP32 Dev Module in Tools/Board type/ESP32 Arduino

    Done!

    You can already start programming with the default settings You can also custom the board settings to set correct flash size and partitionning if needed

    As a starting point, you can run the example codes from Minitel1b library (File/Example/Minitel1b ...), by changing port to Serial2.

    #include <Minitel1B_Hard.h>
    Minitel minitel(Serial2);

    You will find examples dedicated to ESP32 in Minitel-ESP32 repository

  • 3
    Get started with Thonny IDE

    This section is about programming ESP32 in micropython which can be very usefull to explore ideas quickly using interactive prompts (even wirelessly !) and to port some python applications.

    There are several ways to do it, but Thonny IDE has built-in functionnalities that makes it quick and easy.

    Here are some guidelines to get started.

    Install software on your computer

    Simply download and Install from Thonny IDE website

    Flash micropython firmware to your ESP32 device

    1. Download latest stable micropython firmware for ESP32
    2. Connect your ESP32 device to your computer via USB
    3. Open Thonny IDE
    4. In menu, Go to Tools / Options
    5. In Options window, go to Interpreter tab select ESP32 and click Install or update firmware
    6. Select the serial port corresponding to your ESP32
      (see Arduino section if you have difficulties)
    7. Select the firmware downloaded in step 1.
    8. Choose keep flash mode
    9. Check erase flash option
    10. Click install

    Done!

    Start using the shell

    When you open Thonny IDE, make sure it is set to run your device in micropython:

    1. Connect your ESP32 device on usb port
    2. Go to Interpreter tab of Options window (menu Tool/Options)
    3. Set the interpreter to MicroPython (ESP32)
    4. Set the serial port corresponding to your ESP32 device
    5. Click OK

    Done!

    You can already try some command in the shell, such as

    print('hello world')

    This seems nothing, but it is actually your ESP32 printing to the shell in real time without compiling.

    Starting application development

    1. As a starting point you can download upynitel example from Minitel-ESP32 repo
    2. Copy folder to your computer to a known location
    3. Open Thonny IDE and navigate to this location in Files view tab
    4. To upload the files to your ESP32, simply right click on the files and click Upload to /
      You wil see it appear in MycroPython device tab
    5. Now, you need to know that micropython programs are written in boot.py and main.py which are run automatically at boot, similar to setup and loop in Arduino.
    6. After uploading your files, simply reboot your device to run your application

    Some Tips

    1. in File window, you can upload / download files between computer and ESP32 using right clicks. You can also delete files easilly
    2. in Shell window, the following shortcut are usefull
      1. CTRL+D to soft reboot your device
      2. CTRL+C to interrupt execution
        This is handy when you want to stop your main loop to regain shell interactive prompts

View all 3 instructions

Enjoy this project?

Share

Discussions

Migli wrote 02/09/2023 at 05:27 point

Excellent. Ce projet nous plonge directement dans le Minitel et nous fait gagner un temps fou pour la suite!

  Are you sure? yes | no

Louis H wrote 12/09/2022 at 21:36 point

This project inspired a consumer product currently in search of crowd funding !

https://fr.ulule.com/minimit/

Looks like a travel back to the 80's 

  Are you sure? yes | no

goguelnikov wrote 02/19/2022 at 09:12 point

hello,

is there other program sample I could use ? like a clock ? a "picture frame" ? or even a simple text editor for my kids ;-) ?

  Are you sure? yes | no

Keith wrote 12/18/2021 at 01:05 point

I heard about these as electronic replacements for telephone directories. They could have been even cheaper if they'd used common TV's for displays, or teletext chips as the display controllers.

  Are you sure? yes | no

Yann Guidon / YGDES wrote 11/24/2021 at 00:13 point

Farpait :-D

  Are you sure? yes | no

Louis H wrote 11/24/2021 at 22:47 point

ci-mer ;)

  Are you sure? yes | no

Ken Yap wrote 11/25/2021 at 08:01 point

No no, if you follow the scheme, it should be Cermi ); 😉

  Are you sure? yes | no

PixJuan wrote 08/15/2021 at 13:33 point

Make Minitel great again ;-)
It would be a really nice way to access may SSH machines.

  Are you sure? yes | no

Louis H wrote 11/11/2021 at 00:13 point

I finally made it !

See https://github.com/iodeo/Minitel-ESP32 / arduino / LibSSH_Shell

  Are you sure? yes | no

PixJuan wrote 11/25/2021 at 05:18 point

Well done!

  Are you sure? yes | no

Similar Projects

Does this project spark your interest?

Become a member to follow this project and never miss any updates