Close
0%
0%

Bottle pomodoro

Portable version of water pomodoro that will remind you to stay hydrated through your workday

Similar projects worth following
Improved version of Water pomodoro https://hackaday.io/project/180593-water-pomodoro

A smart bottle that will remind you to drink some water, so you stay hydrated on your workplace (at home, or even an office, because it is portable !)

This portable version will fix a few flaws fromt he previos desktop water dispenser version https://hackaday.io/project/180593-water-pomodoro. This version will not flood your desk, it is portable, and all you need to do is fill the water bottle. 

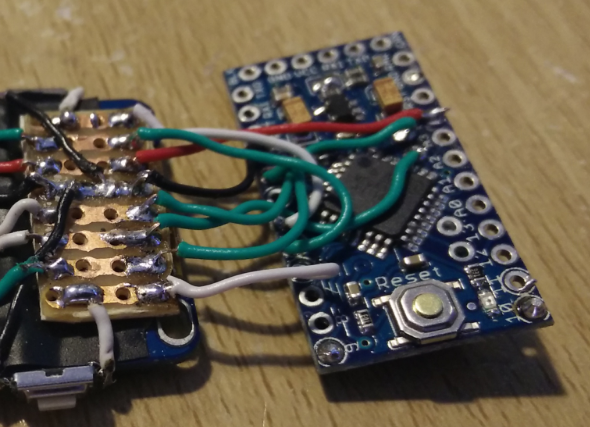
Portable version attached to a bottle. Using an Arduini Pro Mini 3v/8mhz, an accelerometer, powered by a 3V cell battery.

The accelerometer will detect the position of the bottle, if it remains in vertical position for more than 1 hour, it will light up a LED (I'm using the builtin led from Arduino Mini). 

If the bottle goes horizontal (you are drinking) on any axis, then the accelerometer will turn off the LED and it will wait again. 

ino - 1.72 kB - 07/08/2021 at 08:24

Download

  • 1 × Accelerometer MPU6050
  • 1 × Arduino Pro Mini 3v/8mhz
  • 1 × 3V coin cell battery
  • 1 × A wristband To wrap the component around the bottle

  • Power consumption

    Javier Rengel07/08/2021 at 09:26 0 comments

    One of the reasons to choose the Arduino Pro Mini is because I've used it before in battery power projects and I know I can reduce its consumption a lot so you I don't have to recharge my smart devices every day. Let's calculate:

    MPU6050 datasheet https://www.invensense.com/wp-content/uploads/2015/02/MPU-6000-Datasheet1.pdf  4mA (3.9mA) or less


    Arduino Pro Mini power consumption test https://www.iot-experiments.com/arduino-pro-mini-power-consumption/ from 13mA to 3.5mA or less

    So assuming 1800mAh (a regular rechargeable LiPo battery 1x2 inches)

    1800/ (4 + 3.5) = 240 hours

    240 hours/24 hours in a day = 10 days.

    So 10 days it should last the bottle, working 24h on a single charge, without too much optimization. 

    But we can make it even better, by powering down the Arduino (eg: once the LED is ON). 
    Or removing the status LED from the Arduino or the Accelerometer. Or disabling some features from the MP6050 (accelerometer , gyroscope , DMP)

  • Breadboard prototype assembly

    Javier Rengel07/08/2021 at 08:59 0 comments

    The code has been uploaded to arduino mini, all components are connected toguether using a single breadboard and jumper cables. Which makes everything a bit bulky. 

    Next steps 

    Reduce size: Ideally this hardware should be all in a single board, maybe about 1'' x 1.5'' in total. Similar to what I did with my watchduino project (also powered by Arduino Pro Mini) https://hackaday.io/project/7244-watchduino2

    Battery: I'd like to replace the 3V cell battery with a 3v Lipo battery and USB charguer 

View all 2 project logs

  • 1
    Connect all hardware components

    Connect the accelerometer to the Arduino Mini

    VCC -> VCC

    GND -> GND

    SCL -> A5 

    SDA -> A4 

    Don't connect the battery, we will have to power up the Arduino Mini and upload the code first using an FTDI basic USB converter

  • 2
    Import MPU6050 library and upload the code

    For this code you need first to add the MPU6050 library to Arduino, you can do it manually , or use Include Library -> Manage Libraries... and search for MPU6050 

    Then copy this code and Upload it to your Arduino. If you are using Arduino Pro Mini, make sure you select the right board and frequency (3v / 8mhz) 

    //GND - GND
    //VCC - VCC
    //SDA - Pin A4
    //SCL - Pin A5
    #include "I2Cdev.h"
    #include "MPU6050.h"
    #include "Wire.h"
    const int mpuAddress = 0x68;  //Puede ser 0x68 o 0x69
    MPU6050 mpu(mpuAddress);
    int ax, ay, az;
    int gx, gy, gz;
    
    const unsigned long ONE_HOUR = 60UL * 60UL * 1000UL; 
    //const int warningLed = 13;
    unsigned long elapsedDrink ;
    unsigned long lastDrink;
    
    void printTab()
    {
       Serial.print(F("\t"));
    }
    void printRAW()
    {
       Serial.print(F("a[x y z] g[x y z]:t"));
       Serial.print(ax); printTab();
       Serial.print(ay); printTab();
       Serial.print(az); printTab();
       Serial.print(gx); printTab();
       Serial.print(gy); printTab();
       Serial.println(gz);
    }
    void setup()
    {
      
       pinMode(LED_BUILTIN, OUTPUT);
       // pinMode(warningLed, OUTPUT);
    
       Serial.begin(9600);
       Wire.begin();
       mpu.initialize();
       Serial.println(mpu.testConnection() ? F("IMU iniciado correctamente") : F("Error al iniciar IMU"));
    }
    void loop()
    {
       // Leer las aceleraciones y velocidades angulares
       mpu.getAcceleration(&ax, &ay, &az);
       mpu.getRotation(&gx, &gy, &gz);
      // printRAW();
    
       elapsedDrink = millis() - lastDrink;
       Serial.println(elapsedDrink);
    
       if (elapsedDrink > ONE_HOUR) {
          digitalWrite(LED_BUILTIN, HIGH);   // turn the LED on (HIGH is the voltage level)
       } else {
          digitalWrite(LED_BUILTIN, LOW);    // turn the LED off by making the voltage LOW
       }
       
       if (ax > 15000 || ax < -15000 || ay > -5000 ) {
          //digitalWrite(LED_BUILTIN, HIGH);   // turn the LED on (HIGH is the voltage level)
          Serial.print(ax); Serial.print("/");  Serial.print(ay);
          lastDrink = millis(); // drinking now 
          
       } else {
          //digitalWrite(LED_BUILTIN, LOW);    // turn the LED off by making the voltage LOW
       }
       
       delay(100);
    }

    If you want to test this first, change the ONE_HOUR variable to just a 5 seconds (ONE_HOUR= 5000) . Once restarted, the LED should turn on after 5 seconds

    Note: If you place the accelerometer in a different position (with VCC at the bottom) , you might need to swap the following position check in the code:

    ax > 15000 || ax < -15000 || ay > -5000
  • 3
    Disconnect from PC and add 3v battery

    Now disconnect the FTDI from the Arduino Pro Mini, and then add the 3V battery on VCC and GND.

    Then the Arduino should turn ON and start working as expected.  Make sure the Accelerometer is in the right position  before you restart the Arduino. 

View all 4 instructions

Enjoy this project?

Share

Discussions

Similar Projects

Does this project spark your interest?

Become a member to follow this project and never miss any updates