Close
0%
0%

Multi VC Mute Button

On a daily basis I use many different VC programs. I wanted a way to mute that was software agnostic.

Similar projects worth following
I wanted a simple way to mute my mic regardless of what Video Conferencing software I was using. Like most parents throughout various lockdowns I've had my children at home with me. After a particularly embarrassing incident (one of my children shouting "Daaaad I've done a poooo" from the toilet) while presenting to various people inside and outside my organisation, I wanted a panic button that would mute my microphone immediately. As I was presenting, and have run many presentations and demonstrations throughout lockdown, in most cases the VC wasn't the active window, so shortcuts and macro keyboards weren't sufficient (as most in my situation have probably discovered, finding a window in a panic is just short of finding a needle in a haystack). I also wanted a way to turn off my camera too as my kids regularly appear in various costume changes or without a costume at all once they hear me in a meeting (they're very curious who I work with).

While its a work in progress (there are still bugs and issues to work out and cleanup on the code), all files have been published to the github project page VCAgosticMute.  I'll try to update this as I go.

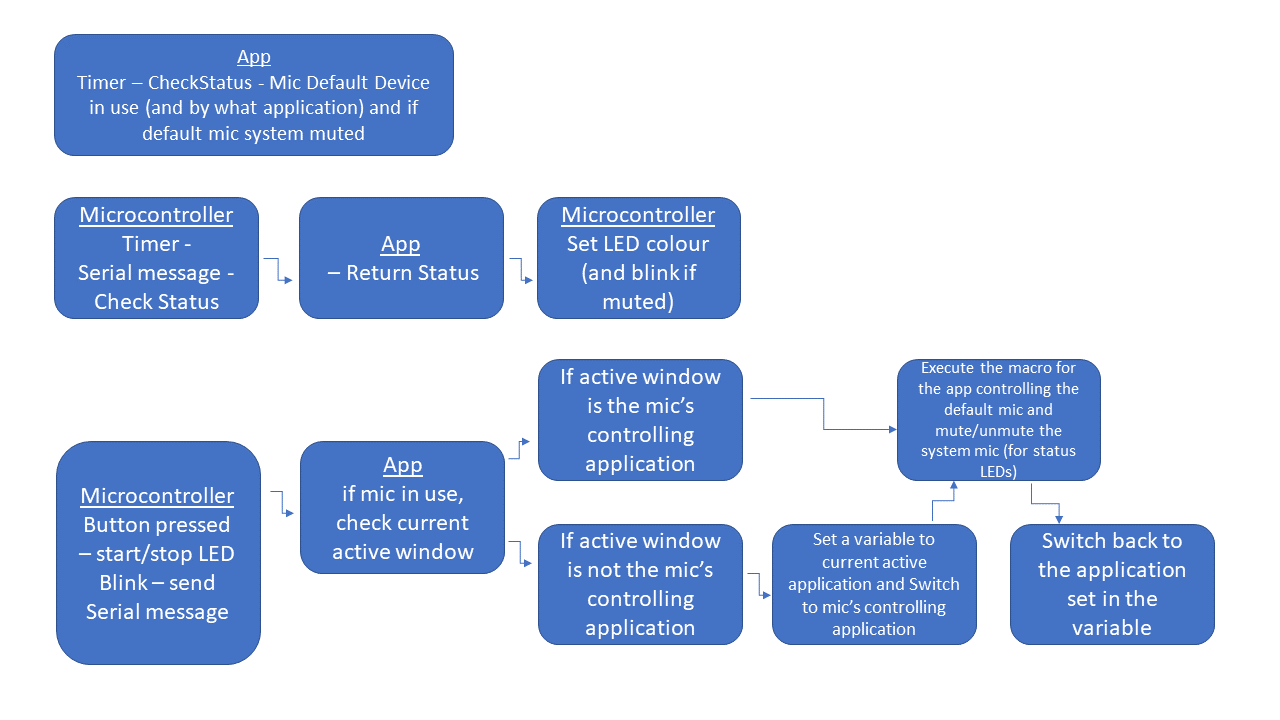
I wanted something that would work on its own without a companion app on any computer that it was connected to, but also where I could use a companion app to give it some additional functionality.

The device boots into an 'unconnected' state, whereby holding down the rotary encoder for two seconds will switch between each of the 'vc modes' and each mode, when clicked once or double clicked, will send the macro for the mute/unmute and video off/on shortcuts respectively.  

When the device receives a serial instruction from the companion app it switches into 'connected' state and just uses serial instructions to issue commands to the companion app.  It also receives updates from the companion app on current status.  The media keys are unaffected (play, skip and volume controls) by either mode and will still send commands via usb keyboard for these functions.

Demo video of it in action - https://youtu.be/qabKWWq_SRY 

Just a point to note, the companion app and arduino code will work with any serial device, preferably with native usb-hid (otherwise modify the arduino code and remove the hid stuff and keep it as a serial device for the companion app only).

The notification icon for the companion app allows the user to select a com port and will try to send/receive from that.  Once a device is selected it writes to an .ini file that's loaded when it starts up.  

Libraries (and Licenses) include:

hid-project (Free?) https://github.com/NicoHood/HID

Adafruit NeoPixel (LGPL v3) https://github.com/adafruit/Adafruit_NeoPixel/blob/master/COPYING

Simple Rotary (GPLv3) https://github.com/mprograms/SimpleRotary

AudioSwitcher (Ms-PL) https://github.com/xenolightning/AudioSwitcher/blob/master/LICENSE

INIFileParser (MIT) https://github.com/rickyah/ini-parser/blob/master/LICENSE

Input Simulator (MIT) https://github.com/michaelnoonan/inputsimulator/blob/master/LICENSE

And I'm releasing this under GNU GPL v3

https://github.com/Collie147/VCAgnosticMute/blob/main/LICENSE

  • 1 × Seeeduino Xiao
  • 1 × Rotary Encoder (with push button)
  • 3 × momentary push buttons
  • 1 × perf board
  • 4 × M3 countersunk bolts (20mm)

View all 8 components

  • Lessons Learned

    Colin Russell-Conway08/20/2021 at 12:26 0 comments

    I'm going to elaborate on what I've learned in both my career and for building/hacking devices/software (I'm sure this has been documented many times in different ways but this works for me).

    First things first - what are you setting out to do?  The best way I've found is to set out a functional diagram of the project.  Start with writing it all down on paper, a whiteboard or OneNote or whatever you use, doesn't matter the order.  As you write it down, more cogs will start turning and you'll realise what you need to do to get to that point or what is required after that point (thinking ahead to any improvements that can be made as a follow up or is there a possible requirement to allow for a change later on, additional button etc.). As a bad habit, when it comes to software I tend to do this in an IDE like Arduino or Visual Studio and have functions that follow each step, when really it should be on a whiteboard or some sort of block diagram (as below).  The more you do this the easier it is but also the more you'll see the pitfalls from previous projects (and recognise steps you've taken previously where you can take the lessons/designs or code from those into the new project).

    My Project Scope tends to grow ad infinitum.  It is a good idea to have an initial scope once you've decided what you set out to do and at least get that far before you start your "Change Management" process - or add more features and functions. Sometimes the ideas come to me well before I finish and I redevelop parts to allow for new features as I'm doing it.  While its good to have the capability to do these things, I've found that if I try to make something, whether its software or hardware (hardware is harder to readjust afterwards), continuously redeveloping while still in the development phase leads to instability and very little of the satisfaction of actually completing something, so weighing up usability vs completion is something to take a step back and think of if a milestone is dragging on.  I've boxes of projects that are half finished that I intend to get back to because I was waiting on cheap parts from china or a way to figure out how to fix or modify this or that and it never works.  

    Setting milestones can help (I know this sounds like a Project Management course), mind you I'd advise not setting a specific date, because, like all hobbies and past times, they tend to fit in around what we're doing or we may need to do another hobby or thing at the time we've allocated for our project. That said, after each session of working on the project, I really helps to write down what you've achieved or accomplished.  That alone will give you satisfaction, while it may not be what you've set out to do, its work you've completed, set out to complete or value added to the overall project.  

    Anyway, when you finish a milestone its a good idea to step back see what you've done (give yourself a congratulatory pat on the back) and take a second to enjoy it before doing a quick lessons learned.  Lessons Learned exercises will help can help with the rest of the project or future projects.  Write down a few things, a couple of sentences or bullet points, it doesn't matter. You can come back to it at the end of the project or during the next milestone if it is something that's relevant.  

    Personally I dont have any methodology when it comes to my personal projects, but if it works for you, it works.  I would suggest looking at either Waterfall or Agile or a hybrid of both.  I think I do a bit of both when I do my own, I do it in sprints, look at what I've done and see if I'm happy with it.  Whats required for the next step etc. and it tends to rattle around in my brain again for a few days on what can be improved or the next step in the build but I have a definite image of what I want it to be when I've...

    Read more »

  • Testing

    Colin Russell-Conway08/20/2021 at 11:27 0 comments

    I've tested it now on Zoom, Teams, WebEx and Starleaf and all seem to work well, disabling the camera also works well too.  I'll add a video of it working at a later stag (maybe when the kids go back to school and I'm not juggling so much)!

  • Milestone Five - Webcam detection and toggle

    Colin Russell-Conway07/14/2021 at 23:25 0 comments

    After some messing and tinkering and going down a tonne (metric of course) of rabbit holes, I managed to get webcam detection working thanks to this lovely stackoverflow page, and now that I see the search terms and the title of the page question I wonder why it took me 3 days to find it???? 

    Anyway, there was some tinkering and a for loop running against Teams processes (in reverse order) as Teams (with its many, many memory hogging instances) didn't want to play nicely with a shortcut key.  Thanks Microsoft.

    I'm sure there are still bugs in different VC Software, and I can only guarantee this works on 3 versions of Windows 10 on 3 different computers (I wont say which to keep you guessing), but it works for me, and you know what I say about that?

  • Goal IV - Make it look nice

    Colin Russell-Conway07/08/2021 at 16:33 0 comments

    Once it was tested and somewhat stable, I didnt want to wait until I could get a PCB fabricated, so I put it together onto a piece of perf board.  I had all of the components hanging around and had some neopixels on a strip I could take from and solder handy enough on perfboard with some wires.  Not the most professional but it was cheap and handy at the time.  Once I had that done I trimmed down the perf board with a rotary multi-tool and started putting together a case.  I know I should get the hang of Fusion 360 or Solidworks, but I find 123D Design super easy and quick to use, so I made a basic case for it there.  I printed out the buttons and the rotary knob in translucent PLA and raised the media controls slightly and coloured them in with a black sharpie.  The rest of the case was printed in black PLA.  Simples.  It's small enough, probably a bit too light for the cable as thick USB-C cables tend to push it around, however its sturdy and durable.  

  • Task III - C# Companion

    Colin Russell-Conway07/08/2021 at 16:31 0 comments

    As I wanted it to be software agnostic I needed something on the computer to detect what process was active at a particular time.  The easiest way for me to do this was to through WMI and check the default sound device microphone, and if it was any if the popular VC software EXEs this was communicated to the device which glowed a particular colour depending on the software (ie blue for zoom/starleaf, purple for Teams, green for webex etc.).  I wanted a way to feed back whether it was muted or not to the device (to flash the neopixels) so I attempted to mute the VC mic and the mic in the OS level as, generally speaking, once unmuted the VC software unmuted it at an OS level but this was not always the case and proved problematic and was axed in the final version.

    Coms with the device was simple enough as I've done it a few times before and the companion app waited for response from the device as it queried it from time to time to check the active software.  

    Whatever program was in control of the microphone was noted (by software and process ID).  Once the mute button was detected, the companion app noted the current active window process, switched the active application to the VC, entered the mute command and switched back to the process that was previously active.  This, in most cases was seamless, however Teams is a resource hog and required a few milliseconds to switch, enter the key combo and switch back, all in about a 1.5 seconds.  Immediate enough for my requirements.

    The encoder acted as the panic button in this case with a single click for mute and a double click for disabling/enabling video.

  • Job B - Arduino alpha

    Colin Russell-Conway07/08/2021 at 16:18 0 comments

    Once I had a basic idea breadboarded I put it together in arduino with basic macro keys to check that it worked.  Fairly simple.  

  • First Attempt - Hardware

    Colin Russell-Conway07/08/2021 at 16:16 0 comments

    I started by building the hardware, something ubiquitous but didnt want to wait for a turnaround getting a PCB fabricated.  I started with a Seeeduino XIAO, tested it with a few buttons and a rotary encoder.  

    I added some neopixels as status indicators.  I also wanted to double this as a media controller for music to chill out when I had time so I added some media controls too.

View all 7 project logs

  • 1
    Build the board

    Wire up the components according to the schematic. For the design to work you'll need to place the buttons, neopixels and encoder as I did on a perf board 15 x 26 (holes I'm counting here).  The buttons can be placed right at either edge and 1 hole up and the middle one in the middle at the bottom.  As for the encoder I have in the 12th from the bottom and placed in the middle with the Xiao at the very top so the USB-C port lines up.  Neopixels arent as fussy but somewhere in line with the encoder and at the edges of the perf board.  I've also drilled some 3.5mm holes in the board for the screws to pass through.  Just make sure your jumper wires dont pass over those points. 

  • 2
    Print the case

    Print the components.  I used transparent for the buttons and the knob for the neopixels to shine through and black for the case.  It worked well as the black doesnt allow the light to pass through.  

  • 3
    Assemble

    Assemble the 3d printed pieces of the case.  The buttons should go on first, top down.  They should fit but depending on your printer might require a little filing or deburring around the holes.  Then the board in next and the bottom and then screwed in flush with countersunk 20mm M3 bolts.  Then the encoder knob should fit snugly onto the encoder.  

View all 4 instructions

Enjoy this project?

Share

Discussions

Similar Projects

Does this project spark your interest?

Become a member to follow this project and never miss any updates