 Malte
Malte1.Introduction
As part of our student project called Speak4Me we want to help people who are unable to communicate verbally and suffer from severe physical disabilities by providing a wearable “eye-to-speech” solution that allows basic communication. By using our device, users can express themselves with customizable phrases using situational and self-defined profiles that allow them to communicate with their environment with 128 phrases.
Through simple eye movements within certain timeframes and directions, Speak4Me will output audible predefined phrases and allow basic communication. A simple Web-Interface allows the creation of profiles, without any limitation on word complexity or length.
Following a simple step by step video tutorial Speak4Me can be built for around 100$, which is way below given solutions. All product related information regarding needed materials and construction manuals are provided via a central homepage.
We won the 2021 Hackaday Prize challenge 03: Reimagine Supportive Tech Finalist Award, which is endowed with $500: WINNERS OF THE HACKADAY PRIZE SUPPORTIVE TECH CHALLENGE
Project GitHub page including step-by-step video tutorials and the no-code customization tool: https://speak4me.github.io/speak4me/
1.1 Motivation
The UN has defined 17 Sustainability Goals (SDGs) that all members of the UN have adopted in 2015. Main focus of the SDGs is the desire to create a shared blueprint for more prosperity for the people and the environment by 2030 (cf. UN, 2015). Speak4Me embraces SDG 10 which aims to remove inequalities within and among countries, especially in poorer regions. Within this SDG our solution can bring value to people with speech related disabilities by giving them a way to communicate. Worldwide over 30 Million people are mute and therefore unable to communicate using their voice. (cf. ASHA, 2018)
Our main focus are patients with serious mental and or physical disabilities, that are not only verbally mute, but are also unable to communicate using gestures and other means. This includes patients with ALS, Apraxia and other degenerative diseases that lead to a slow loss of control over body functions, as well as patients affected by spine damage that makes it impossible to communicate via body language and other means. Birth defects, damage to vocal cords and accidents that damage relevant organs and many other conditions, can also lead to muteness.
Physical muteness is rarely an isolated condition. Most commonly it is just the result of other underlying conditions like deaf-muteness which is the most common reason, for people to be unable to communicate verbally (cf. Destatis 2019).
Speak4Me could also provide help to patients with temporary conditions. Just in Germany over 250.000 people suffer from strokes every year (cf. Destatis 2019). During recovery our solution can help strongly affected patients to communicate with their environment, which otherwise might be impossible. Other nursing cases like patients suffering from the Locked-In syndrome could also benefit, as only control of the eyes is required.
1.2 Objectives
Speak4Me wants to provide an affordable, customizable, easy to build and use device to support handicapped people to communicate with their environment. Language synthesizers and speech computers exist, but are very expensive which can make them unaffordable depending on socio economic background including the country of residence. Our target is to deliver a solution below 100$ in total cost, to reach as many affected people in the world as possible. By providing blueprints and code basis of the entire solution we want to encourage others to build upon our work an improve or adapt it.
1.3 Background
Our entire solution is based on the open Arduino platform, which is built around standardized hardware and a basic coding language. Previous projects based on the Arduino platform, have shown promising results in relation to eye tracking (cf. Arduino, 2018). Using infrared sensors attached to an ordinary pair of glasses, a project team was able to visualize the eye movement on LEDs arranged in a way that resembles a human eye. This allowed them to visualize the direction the user was looking at (right or left) in real-time and also allowed to track blinking.
We iterated on this capability and transformed the eye tracking functionality into an eye-controlled user interface. Using this interface, we are able to track the eye movement to up, down, left and right and put predefined phrases behind certain combinations of movements. Should a user for example look up, followed by looking right, Speak4Me can interpret this movement (“up” followed by “right”) and the integrated text-to-speech module will synthesize the phrase that was placed there in the profile.
2. Design Method
Speak4Me was created in several iterations. In its initial form, the sensors were directly attached to the glasses, which was insufficient for our needs. The distance between the eye and the sensors were too far, which led to unreliable data streams. While it was able to follow movement, the directional tracking was too vague to sufficiently register movement patterns. To overcome this challenge, we decided to attach a 3D printed sensor ring directly onto the glasses to reduce the distance between eyes and sensors. This change drastically increased the quality of sensors and yielded much better results.
As our solution is intended to work in close proximity to the human eye, we firstly had to verify the feasibility in regard to long term health effects. We had to make sure that our sensors would not be in any form harmful to the wearer, even over longer periods. From our first prototypes, we could assume a distance of 7-10mm from the sensors to the eye. With support, we managed to estimate the optical power of our sensors, which is below the exposure limit value mentioned in the corresponding guideline.
The “worst-case” exposure limit value (2, 8*10^4)/(C(α))*W*m^-2*sr^-1(Guideline BGI5006, 3.6.1). If we now look at the aperture or directivity of the optics at about total angle 90° (±45°, after that it drops significantly) at 7mm distance, we get a circle with an area of (tan(30) × 7𝑚𝑚)^2 × 𝜋 = 51, 3𝑚𝑚^2. The semiconductor junction of the QTR-1RC Reflectance Sensor works with 1.2V nominal and a forward current of 20mA, so 24mW (Fairchild Semiconductor Corporation). If you then calculate well with an efficiency of 20%, the optical power should be in the range of around 5mW with 940nm wavelength. Combining these calculations leads this to a result of 5mW/51, 3mm^2 = 0, 0974*mW/mm^2. This is below the exposure limit value. Even with 10mW optical power, it would still comply with it.We assume no liability and advise you to familiarize yourself with the subject matter before use so that injuries can be avoided.
We initially used the Arduino Uno which met all of our requirements and built our first working prototype around this platform. Although sufficient in regards to features and our intended pricing policy, we later transitioned to another model. By switching to an Arduino Nano, we managed to get the same feature set into a much smaller form factor. As Speak4Me is intended to be used inside and outsides we had to ensure usability attributes like size and weight.
In its final form, the entire needed hardware fits onto a 64x55mm circuit board. For our solution we decided to use a custom-made circuit board that was optimized for our needs, but the use of standard sized boards is also possible. To further protect the device, we modeled and built 3D printed casing with exact measurements and needed cutouts.
One of our first hardware decisions was the text-to-speech module that we wanted to use. Our research has shown several solutions with text-to-speech capabilities that only cost around 10$ and fulfilled all our product requirements. Further research has shown that although sufficient, the output quality of those cheaper modules was adequate at best. We made the decision to select a more expensive Parallax Emic 2 that cost around 60$, but also provided far superior playback quality. This decision drove up the price of Speak4Me and is the most expensive part of our product, by far. Although expensive, we chose this module as the entire feasibility of Speak4Me depends on the ability to be understood when using it.
All relevant design files.stl files (3D Printing case) as well gerber files (circuit board) that are needed to deploy and build our solution are listed at the bottom of the project post under Enclosures and custom parts.
3. Solution Design
Within this chapter we describe the hardware and software aspects of our solution and how they are setup. We also provide the list of needed materials with pricing and quantity and possible purchase options.
3.1 Hardware
Our architecture for the solution design consists of two self-constructed components and a proper power source, all connected by wire. The first component is our main device and contains everything which is necessary for the device to operate but the sensors and the power supply. The second component is a pair of glasses on which we mount infrared reflectance sensors to detect the viewing direction of the wearer of the glasses. Since we are working with an operating voltage of 5 V with maximum amperage of around 400 mA, any common USB power bank is sufficient for our device.
3.2 Material List
The required material to build your own Speak4Me glass as well as a list of recommended tools for assembly can be found at the top of this project post in the section COMPONENTS AND SUPPLIES and NECESSARY TOOLS AND MACHINES.
3.3 Architecture
The hardware architecture is described below. The individual components and their connections are described in detail to provide an overview.Architecture
3.3.1 Cable
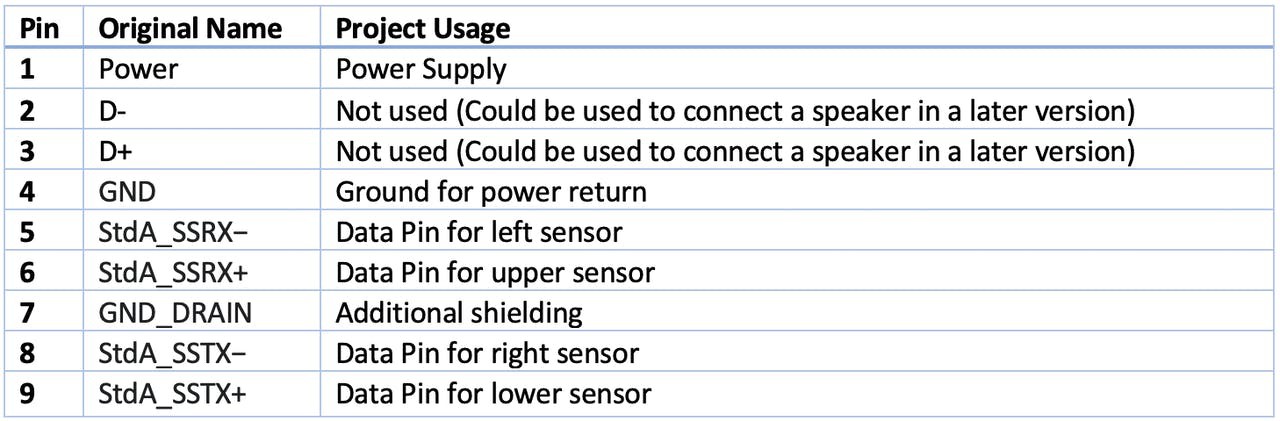
To connect the four sensors with the main device, we needed four data lines and two lines for the power supply of the sensors. The cable should be at least 1, 5 meters long, so that the main device can for example be mounted to a wheelchair and stays independent from the placement of the glasses and potential head movements. Due to its high distribution, assured quality and low cost, we used a simple USB 3.0 cable. However, did not implement a real USB device. To make sure that users cannot damage other hardware, we complied to the pin usages of the USB standard. By that, when connecting the device to a computer for example the sensors will run as usual, even if the computer will not be able to communicate with them. A USB 3.0 cable includes 6 lines intended for data communication. We used the two pairs of separately shielded cables to maximize the reliability of the communication. The resulting pin assignment can be seen in Table 1. The relevant wires of the dismantled USB cable were directly soldered to the sensors; all sensors use the same wire for power supply and ground connection.
3.3.2 Glasses
To keep the sensors at a steady position in front of the eyes of the user, we used a simple pair of glasses, which can be very cheap since they only serve as a holder for the sensors. The sensors get attached to it using a self-constructed and 3d printed plastic mount. First, we glued the sensors on the mount by using high quality glue pads. Afterwards, we glued the component directly onto the right lens of the glasses using the same sort of glue pads, cut out to fit to the bottom side of our mount.
3.3.3 Main Device
The main device needs a microprocessor which serves as the “brain” of the device, orchestrating the input, calculations and resulting output while keeping track of sequential tasks etc. An Arduino Nano is used for this task. As a relief for the Arduino, we add a high-quality text-to-speech controller to reliably segregate the audio output functionality so that the Arduino remains available for further input like the control of the LED, etc. after sending the output texts to the controller. To perform this task, we used a “Parallax Emic 2”. We then add a socket to connect the glasses, a 3.5mm AUX port for the external speaker and connected it with an additional 2 pin header for optional use with an internal speaker and also add a status LED to give feedback to the user besides the audio output. Since the whole device has a very low power consumption, most modern powerbanks can eventually shut off since the amperage will be too small to be detected by the powerbank as a relevant device. To prevent this behavior, we add an additional circuit which we will be using to sequentially waste a little bit of energy on purpose. This is still a neglectable small amount of energy and can later be disabled on the software side, when not being necessary in a specific set up. After connecting the components, the resulting electric circuit can be seen in Figure 1 (a).
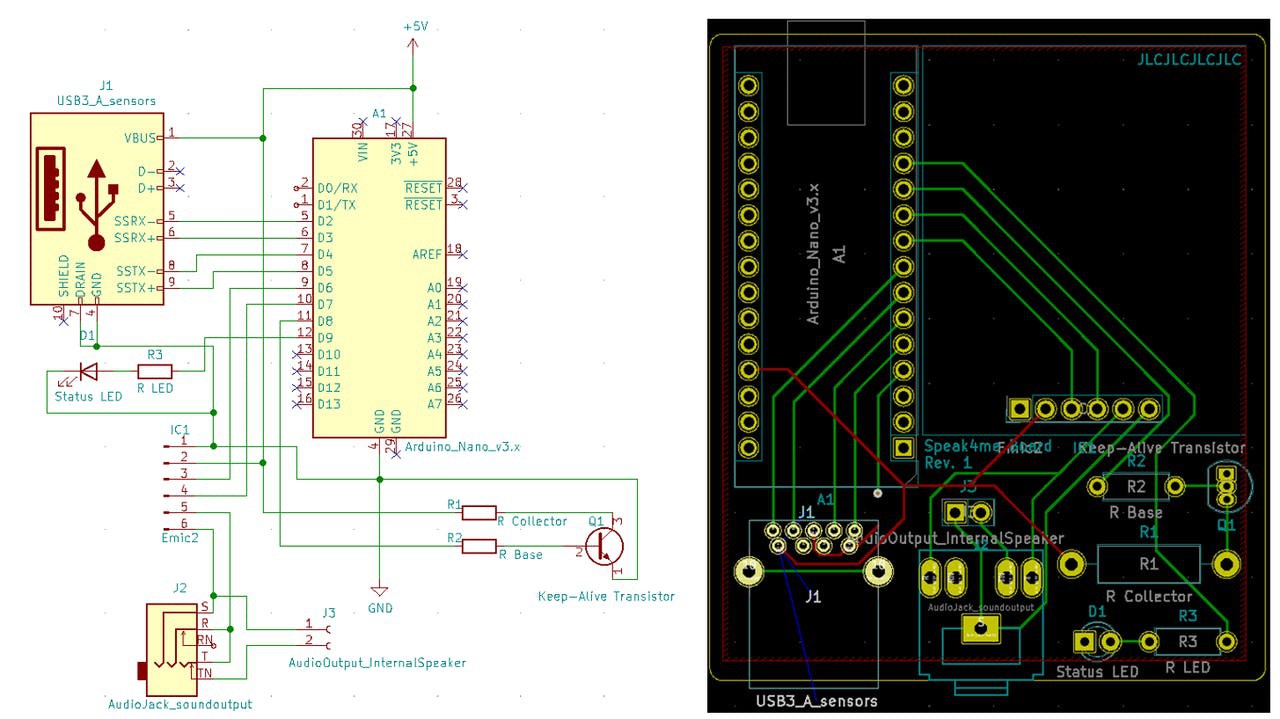
Figure 1: Circuit board (left) and and resulting PCB layout (right)
This electric circuit can be used as a basis to design a proper printed circuit board layout. The resulting PCB layout can be seen in Figure 1 (b). The according Gerber files can be sent to a manufacturer like “jlcpcb.com” for manufacturing. The components then get soldered onto the board and the main device is functionally ready to use.
To ensure portability of the device, a proper case is necessary. To be able to use a case as small as possible while having the right connector omissions and a speaker grill for the internal speaker, we created a 3D model of the case. We then printed the model using a 3D printer, relying on PLA as a suitable material due to its low cost and sufficient quality regarding stability and longevity.
3.4 User Interface and Implementation
The following sections describe the logic of measuring the directions, the structure of the user interface and the implementation of these logics in Arduino code.
3.4.1 Logic of the eye measurement
The four sensors which are attached to the glasses are measuring the brightness of specific areas of the eye every 100 milliseconds. The measurement of brightness is expressed in a number from 0 to 5000, which represents the time it takes for an infrared LED beam to reflect off a surface and return to the sensor. The faster, i.e., the lower the value, the brighter the surface, as brighter surfaces reflect more.

Figure 2: Sensory reaction to eye movement
As seen in figure 2, to check whether the eye is looking left, right, up or down, the brightness of the four spots must first be measured in a neutral eye position. To do this, the user must look straight ahead for 3 seconds when starting the device. These values represent the initial value with which we compare the new measurements. A direction is detected as soon as the value on the opposite side becomes lower than the neutral value for 500 milliseconds. The reason for this is that when the eye looks to the right, for example, the left spot in the eye is white. The value must be above a certain factor in order not to recognise minimal movements as direction. This method gave the most stable results in our tests. After a direction is detected, the direction detection pauses for 500 milliseconds to prevent double detections. The LED on the device, which flashes as soon as a direction has been detected, serves as an orientation aid. If two successive directions could be measured within 5 seconds, we speak of a combination. We only allow combination of two directions which then leads to an output of a phrase.
3.4.2 Profiles
A profile is the summary of all possible combinations of the 4 directions, which results in 16 possible combinations. With our solution is it possible to use 8 profiles. We have prefabricated five of these profiles according to themes (Home, Caretaker, Doctors Visit, Friends, Chess Game), the remaining three must be created by the user.
 Figure 3: Overview of the caretaker profile
All profiles can be completely modified via our customizing tool on the website. As can be seen in the visualisation of the "caretaker profile” in figure 3, we have also tried to separate the quadrants of the profiles thematically or logically in order to increase usability. In addition, the upper quadrant is the same in every profile, as it contains necessary phrases that we consider useful in every profile in order to express oneself without having to change the profile. The profiles can be selected via the menu.

Figure 4: Overview of the main menu
If you close the eyes for 2 seconds, you switch back to the main menu which can be seen in figure 4. This duration can be customized in the settings of the customization tool. The menu itself is operated like the profiles themselves with combinations of eye movements. The volume can also be set, and the device muted here. To make it easier for the user to operate, we have used additional acoustic and visual signals. For example, the LED always flashes when a direction has been detected. This gives the user a good support, especially in the learning phase, to be able to use the tool safely and efficiently. Furthermore, the selected menu items are indicated acoustically in the menu. For example, when the user increases the volume, "Volume Up" is played.
3.4.3 Implementation
In the following, the most important key points and special aspects of the implementation in the Arduino code are explained.
Libraries
The Arduino-library for the sensors is called QTRSensors. It enables an easy communication between the Arduino and the infrared sensors. It´s necessary to read and setup the sensors. We use the SoftwareSerial to communicate with the EMIC. The EMIC has its own library, but we do not use it because we would only use one function (output a string). Since the library requires a lot of memory, we decided to address the EMIC manually via this library. Another important library for our device is the Arduino-Timer. We use the timer functionalities to loop through our process and coordinate the logic of the different queries using protothreading. Avr/pgmspace is a library we use to store the variables which contain the phrases in the program memory to save Random Access Memory (RAM). This is important as the strings of phrases are long and would therefore exceed the RAM capacity of the Arduino.
Storing the phrases
The phrases we output with the EMIC are stored in char variables which, as described, are not saved in the RAM but in the program memory. This is done via the PROGMEM function.
const char textdata_16[] PROGMEM = "I want to wash myself";
To be able to access the resulting 144 variables, we need an additional table which contains the pointers to the variables. This table is stored in the program memory as well.
const char *const data_table[] PROGMEM = {textdata_0, textdata_1, …
Input Processing
To reliably detect the user input, a reliable input processing routine is needed. As can be seen in Figure 5 every 100ms the readSensors function is being called. This activates a measurement of the four sensors reporting a duration between 0 and 5000ns which can be interpreted as a measurement of the brightness of the surface (in our case: the part of the eye and surrounding area) in front of the sensor. Applying thresholds derived from an initial calibration during startup, we can evaluate the measure and detect if the user was looking up, down, left or right, closing his eyes or doing none of these actions.
The detected direction can then be used as an input for the processing logic. The processing logic makes sure that the same direction has been detected for a defined timespan to avoid unintended input. After a first direction has been detected, it gets rejected again if the user is not inputting a second direction during an appropriate time span. Once the logic receives a valid detected direction pair or a valid detection of closed eyes, it triggers an according method to perform the relevant command.
A diagram of the resulting logic can be seen in Figure 5.
 Figure 5: Sensor logic with decision points
Phrase-Selection
We select the phrases which are stored in the table with the following logic. The combinations are numbered from 1 to 16. The starting point is Left + Left with 1 and the quadrants are numbered clockwise. Down + Down is therefore 16. Now to get the phrase for a combination for the corresponding profile, we multiply the number of the profile by 16 and then add the number of the corresponding combination. For the combination Up + Right in profile 3, the phrase is consequently picked at position 55 (3 x 16 + 7) of the table.
3.5 Homepage
The Speak4Me homepage (https://speak4me.github.io/speak4me/) offers a single point of contact for the entire solution. A step-by-step video playlist explains all relevant features to the customer. This includes a detailed construction blueprint and guides as well as product capabilities. Needed materials and recommended tools are also listed here.
The webpage is designed in multiple pages instead of one continuous blog type layout to avoid sensory overload. As our product requires self-assembly by the user, it made sense to slowly bring in new information only when necessary. Therefore, the entire setup process is presented in the form of time coded Vimeo videos, which can be watched and replayed at the user's own pace.
When visiting the homepage, only our teaser is shown initially, while each additional video has its own subpage with additional information relevant to the current topic.
At the same time, the homepage provides the basic functionality of profile creation and modification. To make it unnecessary for the user to have any coding experience, the created configuration file will not only include the created profiles, but also the entire needed codebase for the Arduino. This allows a simple transfer process to be handled by anyone without in depth knowledge.
Through the homepage the user can customize phrases and settings using a single output file. Settings include timeouts, to allow for faster or slower reaction by the system depending on need and preference. Especially new users can test settings and find their own timeframes. When creating a profile, a PDF document can be created, showing the current phrase setup so users can refer to the current configuration without needing a computer.
3.6 Tutorials
To further improve the instructions, several parts of the explanations are covered in videos. Visual and auditory information can be processed considerably faster from the brain (cf. Sibley 2012) and it is easier for the viewer to imitate the steps of the process. As a result, this approach seemed superior to textual instructions. The elements used to create the videos are screen recordings, filming, pictures and voice.
As a general design standard, the videos were aimed to be motivational. A specific part of this was communicating enough, that also people with less technical knowledge can cope with all given challenges. Furthermore, a clear and minimalistic design approach was used to improve learning by preventing an overload of the sensory register. The videos were divided in seven parts:
4. Discussion
In closing we would like to share recommendations, limitations and possible future upgrades regarding the entire product.
4.1 Evaluation
The final prototype supports all features set out at the beginning. However, to optimize usability several factors should be considered while using the device.
Within the current setup the peripheral sight might be decreased due to the presence of the sensor ring. While looking straight ahead the sensor ring is only slightly obstructing, but horizontal visibility might be limited due to its presence. During assembly the sensor ring should be placed in a central position to optimize functionality and minimize the loss of vision. Depending on setup, the sensor ring might be too close to the eye to be worn comfortably. Before printing the sensor ring it should be double checked how much space there is between sensors and the eye, as each wearer is different adjustments should me made accordingly. Due to the sensor design the placement is important and should be considered should first trials not yield expected results.
In its current design die glasses require a direct cable connection to the device. The weight of the cable on the frame might move the glasses or make it more uncomfortable to wear than usual. To optimize read outs the glasses should always be placed in the same position.
Our device includes a build in speaker that has shown to provide good audio quality even over distances. Due to its size the volume and range of the speaker can be limiting in some cases. To allow for flexibility, we have added AUX jacks to provide support for external audio solutions should the onboard speaker not suffice.
Our solution is designed as a complete package, so no user needs coding experience to use and customize the device. In order to move the online created config file however, the Arduino IDE is necessary to actually move the files onto the device, a simple Explorer based copying command is currently not possible. For installation and setup, please refer to the official Arduino homepage. (see Arduino, 2020)
4.2 Theoretical and practical contribution
As our entire solution is designed around an Arduino as its foundation, we were able to develop a simple and inexpensive solution using standard technologies and frameworks. We have shown that an easy to build solution can provide considerable help to people in need. Our eye-to-speech setup using sensors to track eye movement can provide base level communication with the environment at a very low cost. Speak4Me can provide value for people in need and could have applications in other fields we have not considered, yet.
To provide other developers a basis for future changes, the entire solution and code base will be released as open source under the General Public License v3 (GPL) on GitHub (https://github.com/speak4me/speak4me)
4.3 Outlook and extensibility
Future iterations of Speak4Me could offer additional APIs like WIFI/Bluetooth to make open communication with other devices possible. A connected smartphone App could allow users to change and create profiles on the fly and transfer them directly to the device, without needing to connect to external devices like laptops or PCs to transfer profiles and settings. At the same time, those settings could allow the customization of the UI like specific movements controlling timeouts; resets or mute functionality based on user needs am abilities. Usability could also be improved by making Speak4Me attachable and removable to avoid permanent changes to glasses and frames. A simple clip design could be used to hold the device in place while in use, while allowing taking it off on demand. This would also allow for easy changing between glasses like sun- or reading glasses without the need off time-consuming assembly. To optimize usability, Speak4Me could also be attached to different types of face ware in the future. Additional storage would allow for active profiles and combinations beyond the current 4x4x8 design.
Ideally the number of active profiles would be in the hundreds to provide the biggest range in communication possible. External storage like standard SD-Cards could increase the given storage to allow ever further customization and profiles to be permanently stored on the device. By using online APIs like Google Speak or Amazon Polly, future products might be able to type in words on demand instead of using predefined profiles and phrases.
In its current form the speech module only supports English and Spanish as output languages. Future iterations should offer support for at least the 10 most spoken languages to offer the best possible coverage.
Regarding the distribution, Speak4Me could also be offered as a Do-it-Yourself package to further decrease the cost of the final product. The users could have the choice to either order a completely built product, or a cheaper package for self-assembly.