 Nicola Wrachien
Let's add another entry to the list of unusual things running Doom!
Introduction
Recently, a Nordic employee published his project about Doom running on an nRF5340 MCU. Some videos were published too, and in the longest of them, the gameplay on the first two maps was shown at the default difficulty level (“hurt me plenty”). In such video, the frame rate is generally between 33 and 35 fps, even if some times it falls below the 30 fps threshold on complex scenes.
Such speed is however not surprising: the MCU features a dual core Cortex M33, the main one running at 128 MHz, 512kB RAM and a 96 MHz QSPI interface.
By searching on the net, I also found that this was not the first attempt to port Doom to a Nordic MCU. In fact, a video from 2019 shows a proof of concept of Doom running on the nRF52840. The nRF52840 is much less powerful: it is a single core Cortex M4, running at 64MHz, it has half the RAM of the nRF5340, and the QSPI speed is one third (32 MHz vs 96MHz).
In the 2019 video, Doom runs extremely slow (about 3-5 fps), and many textures are missing, replaced by a placeholder. This is probably because in that video the data is directly fetched from the SD card, which introduces quite a heavy overhead (I can't see an external QSPI).

I wanted to see if I could do better than this. Beside, this was a nice opportunity to increase the list of things that can run Doom.
The Target Device
I did not just want to port Doom to the nRF52840, e.g. using a Nordic development board. Such boards do not have the constraints you will typically find in a finished product, where only few I/O are actually routed out and sconnected to other components and not to "comfortable" pin headers, where you can easily make connections.
What I actually wanted was to:
- find an existing nRF52840-based off-the-shelf device
- modding it by adding all the I/O hardware to being able to run Doom (basically an external QSPI flash and a display, if the device does not come with one)
- port Doom to the modded system.
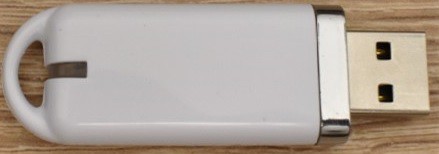
There are really many devices that are based on the nRF52840, like some gaming mice, however for this project I wanted to find something cheaper. The choice fell on this Bluetooth LE USB dongle.

Another Challenge!
In my previous projects, I have dealt with systems having limited resources yet giving interesting performance. However miracles can't really be done. Therefore here is a reasonable list of constraints and "permissions":
- A display can be added, if not present. The resolution should be "fairly high" enough. More specifically, I wanted the number of pixels of the 3D viewport to be close the default viewport size on Doom. Noticeably, the default viewport size on Doom is not the full 320x200 resolution (11 screen blocks), and not even the full screen with the status bar (10 screen blocks, i.e. 320 x 168), but it is just it just 9 screen blocks, i.e. 288 x 144 pixels.
- To store the WAD file, an external QSPI memory can be added (no limit in size).
- The WAD can be modified using an external tool (before upload) to rearrange or precalculate data so that it can be easier to handle by the code and it does not need to be (entirely) copied to RAM. However no loss on the details (either in maps, number of "map things" or texture resolution) is allowed. For instance, it is ok to pre-convert the integers to fixed point data, and it is ok to pre-convert composite textures to single patch ones (keeping the final texture detail unchanged). However, reducing the number of enemies in a map, or changing the map by using texture placeholders is not permitted. However, it is ok to change the status bar elements, to adapt to the different resolution.
- The microcontroller cannot be changed. Doom must run on the same nRF52840.
- No RAM can be added (not even a SPI one).
- No other device, that offloads the MCU for the game engine can be used. Glue logic, however (shift registers, logic gates, multiplexers, etc.) can be used e.g. to expand the number of available pins.
- Audio must be implemented in any way, provided there is the same quality (8 bit PCM samples 11025 Hz). Music is not necessary.
- The full commercial Doom shall run at a decent speed in any case. No need for multiplayer though.
- Gamepad can be implemented in any way.
The port
This port is based on my previous work of optimizing for memory the already excellent unofficial Doom port to the Gameboy Advance by doomhack (note: I am using the lowercase user name as present in github. If this was not intentional, let me know!) with Kippykip additions. In that port, I focused on memory -rather than perfomance- because less than one ninth of MB RAM was available on the target.
This time I have much more RAM available (256 kB, i.e. one quarter MB), but a much less powerful microcontroller (64MHz Cortex M4 vs 80 MHz Cortex M33. In terms of DMIPS: 66%). Therefore, I "wasted" some of RAM to increase performance, as I will discuss later. Also, several other software-level optimizations allowed to increase performance even more.
Noticeably, 256kB RAM is still much less than the GBA, which has 256 kB of main RAM, 32 kB of fast IWRAM, and 96kB for the display data, i.e. a total of 384kB RAM (i.e. 50% more than what we have here).
Despite I'm using a lot of RAM for speed, almost all the memory optimization which I achieved on the past project are kept. In fact, the stock unofficial GBA port RAM usage would not allow to implement the most important feature (in terms of performance boost) of this port: double buffering.
Amongst the most important memory optimization I just cite a few here: short pointers, optimized memory allocator, and reduced object structure size for bonuses and decorations. I discussed more in details the optimiztion here.
Double buffer
To write data to the display you have two ways: either directly, or via DMA. In our case, DMA is quite an overkill with a single buffer: the CPU would still have to wait until the DMA has sent the last byte, before the new 3D scene can be rendered (note that the game logic engine, executed before the 3D rendering, takes only a negligible time).
The time the CPU has to wait until the frame has been sent is the number of pixels (240x240) multiplied by the display pixel format (16 bpp), divided by the SPI speed (32MHz). This also sets the maximum theoretical frame rate to 34.7 fps, because that time is about 28.8ms. In practice, we only reach 34.5 fps (about 29 ms), because there is some delay introduced between two consecutive SPI transfers: it's a pity, but we can live with this.
If we used a single buffer, we should add to these 29ms the time required for the 3D rendering. We will see soon that this would kill framerate in an unacceptable way.
Instead, by using a double buffer, the CPU is free to calculate the new frame, while the DMA is sending the old one to the display.
The way I implemented the double buffering needs an intermediate step, more details here. The cumulative CPU time taken by this intermediate step is about 3.5ms, therefore during this 29 ms, the CPU is actually free for only 25.5 ms.
To understand the massive improvement of the double buffer, let's make an example. Let's suppose that with double buffering Doom is running at 30 fps on some scene. This means that each frame is taking 33ms. Assuming negligible the game logic CPU time, and taking into account the aforementioned 3.5 ms time, the 3D rendering scene is taking 29.5ms. Now, assume that no double buffer is used: these 29.5ms must be added to the time it takes to send all the display data: 29ms. This results in 58.5 ms per frame, i.e. 17 fps. In other words, if with double buffer one could achieve a nice 30 fps value, without it, only a mediocre 17 fps value would be achieved. While 17 fps is still somewhat playable, it would be still a waste of CPU time. Similarly, if with double buffer we achieved a playable 17 fps speed, we would achieve an almost unplayable 11-fps game without it.
Other speed optimization
Despite double buffer provided a high performance boost, I made other optimizations. A more detailed list can be found here.
Among these, I modified the floor/ceiling drawing routine (so that 4 pixels are written at once on the frame buffer), and sprites and walls (which are drawn by columns) are drawn while next column is being fetched by DMA.
Another big speed optimization was to modify the WAD so that composite textures are already pre-rendered as a single patch texture.
Only 8 GPIOs
The nRF52840 has a BGA-like package that, once soldered, does not allow to easily access pins (or better, leads). Therefore, in the device I wanted to port Doom to, I had to use only those GPIOs that were actually routed out, i.e. used in the original design. There were 8 GPIOs, but for my purpose I needed 11. One for audio, 6 for QSPI, 4 for display.

I used some glue logic to have two more GPIOs, as detailed here. Another GPIO saving was achieved by implementing a Wii-style remote: sound is sent wireless to the gamepad.
Development board
To develop everything I used the Adafruit CLUE board, Segger Embedded Studio and a Jlink EDU programmer. I modified the CLUE board by replacing the internal QSPI with a 16MB one. I also verified that you can use the micro:bit connector and add another external QSPI memory, and it will work as well, despite not using Nordic recommended GPIOs for QSPI (incidentally I used also GPIOs that are recommended only for low-frequency signals, to avoid disturbing the RF part. It still works).
This means that yes, Doom runs also on the Adafruit CLUE board too. Actually, this port allows you to run Doom to any nRF52840 devices, if you can have access to enough pins (at least 8).
Display
I chose to use a 240x240 RGB display, for a number of reasons:
- this is the display resolution of Adafruit CLUE board.
- the display has a good image quality, is widespread, easy to use, and cheap.
- taking into account that the status bar is 32 pixel high, the 3D effective resolution is 240x208. Following the same consideration, the original Doom, as well as Nordic ports have 320x168 3D pixels. In other words, our port has 92% of the original Doom 3D pixels, i.e. we are decently close, therefore some fair comparison can be made. This is also above the threshold I set on the challenges, i.e. having at least the same number of 3D pixels of the default Doom viewport size (288 x 144 pixels).
- 256kB is a lot of memory (well, if compared to about 110kB), so we can support this relatively high resolution, with double buffering too.
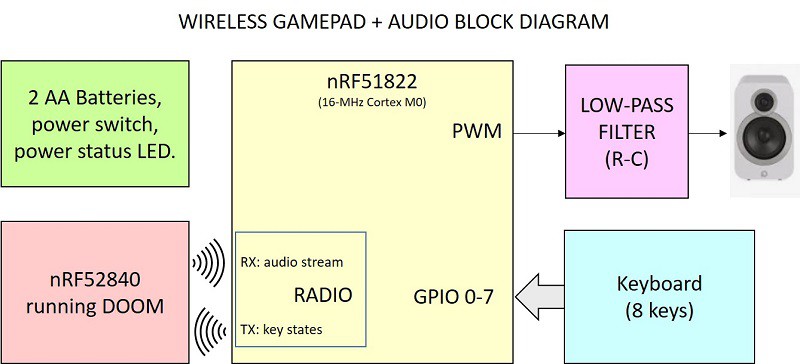
Gamepad and Audio
I have implemented 3 solutions. Of these, 2 are available for those devices, like the Adafruit CLUE, which provide enough external GPIOs: parallel (i.e. each key is routed to a single gpio) or I2C port expander. You might want to implement a cheaper synchronous SPI-like version using a standard 74HC165 shift register. This should be very easy, and I leave to you as exercise :)
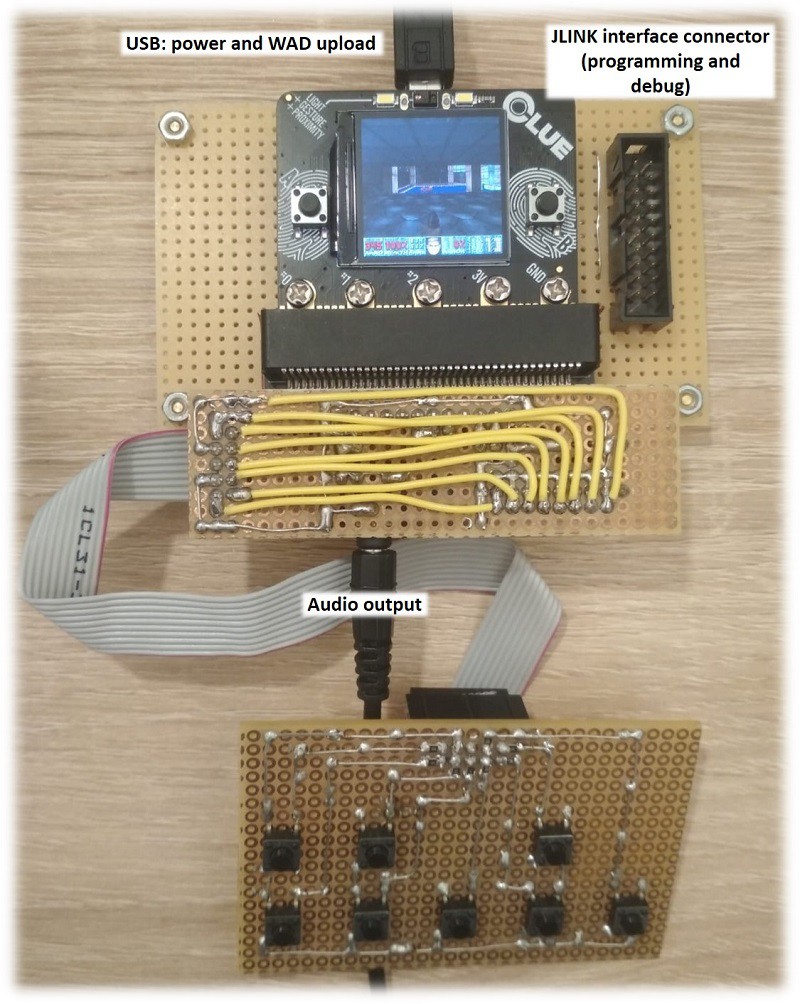
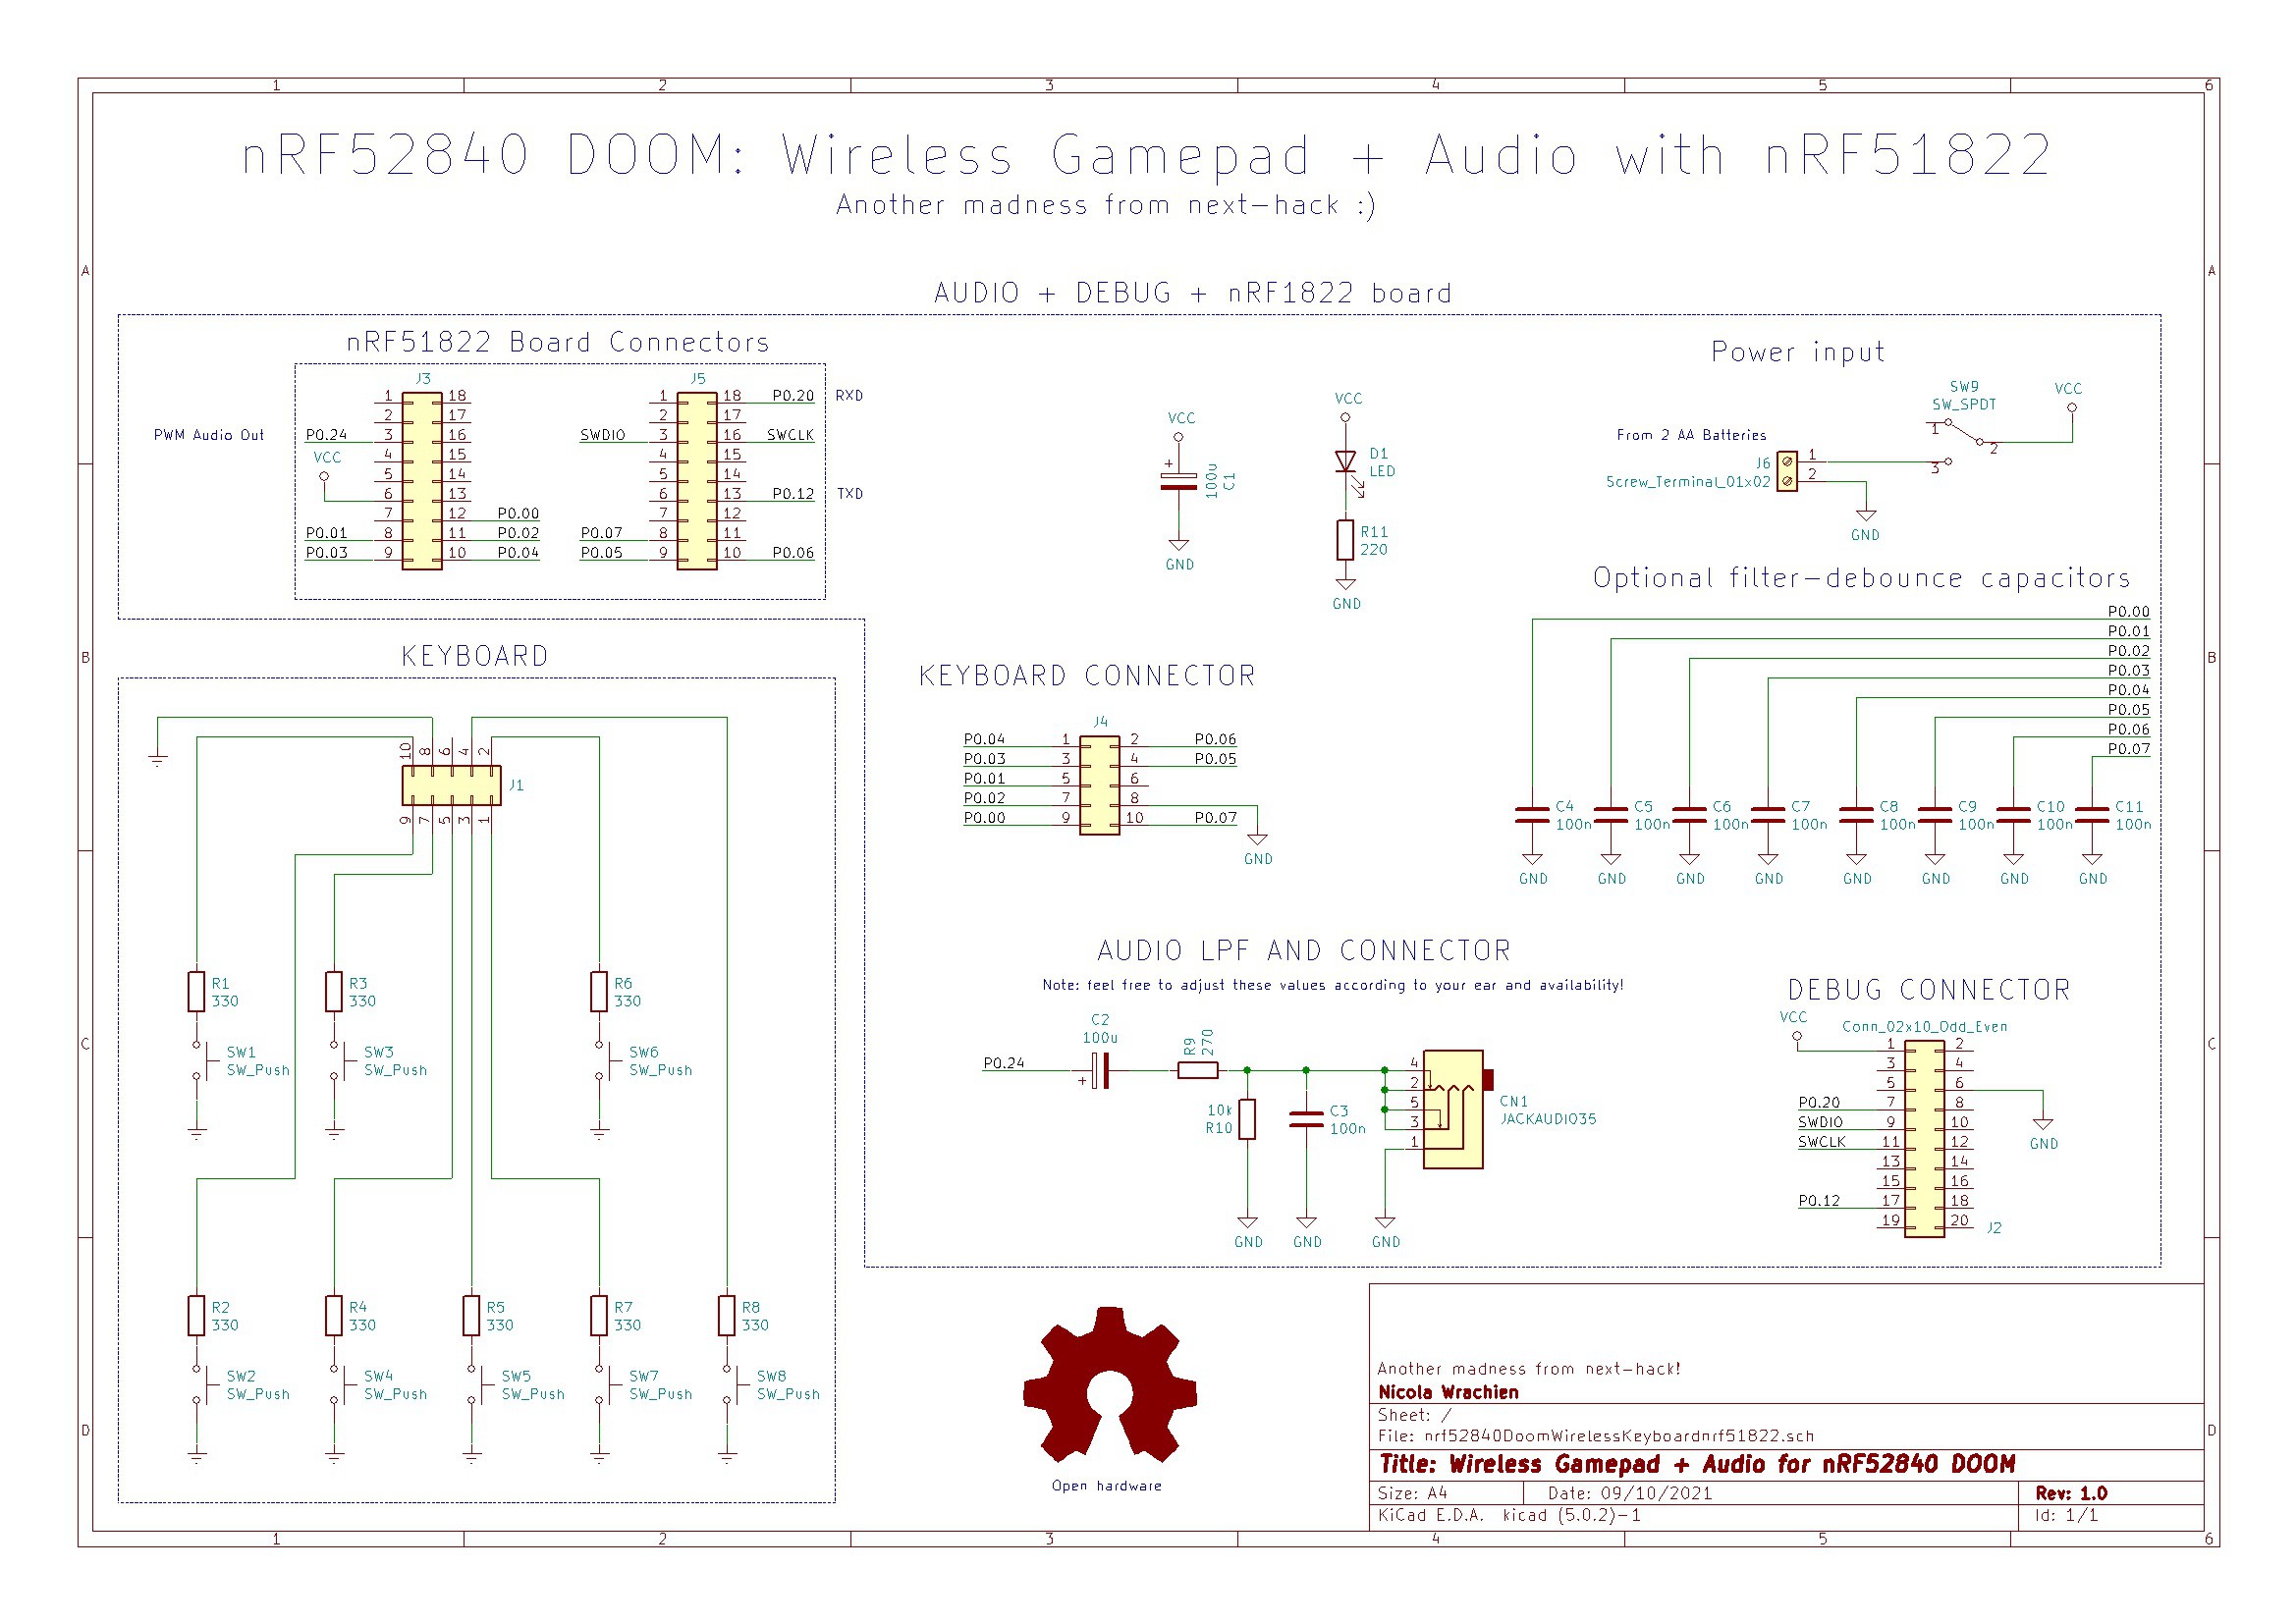
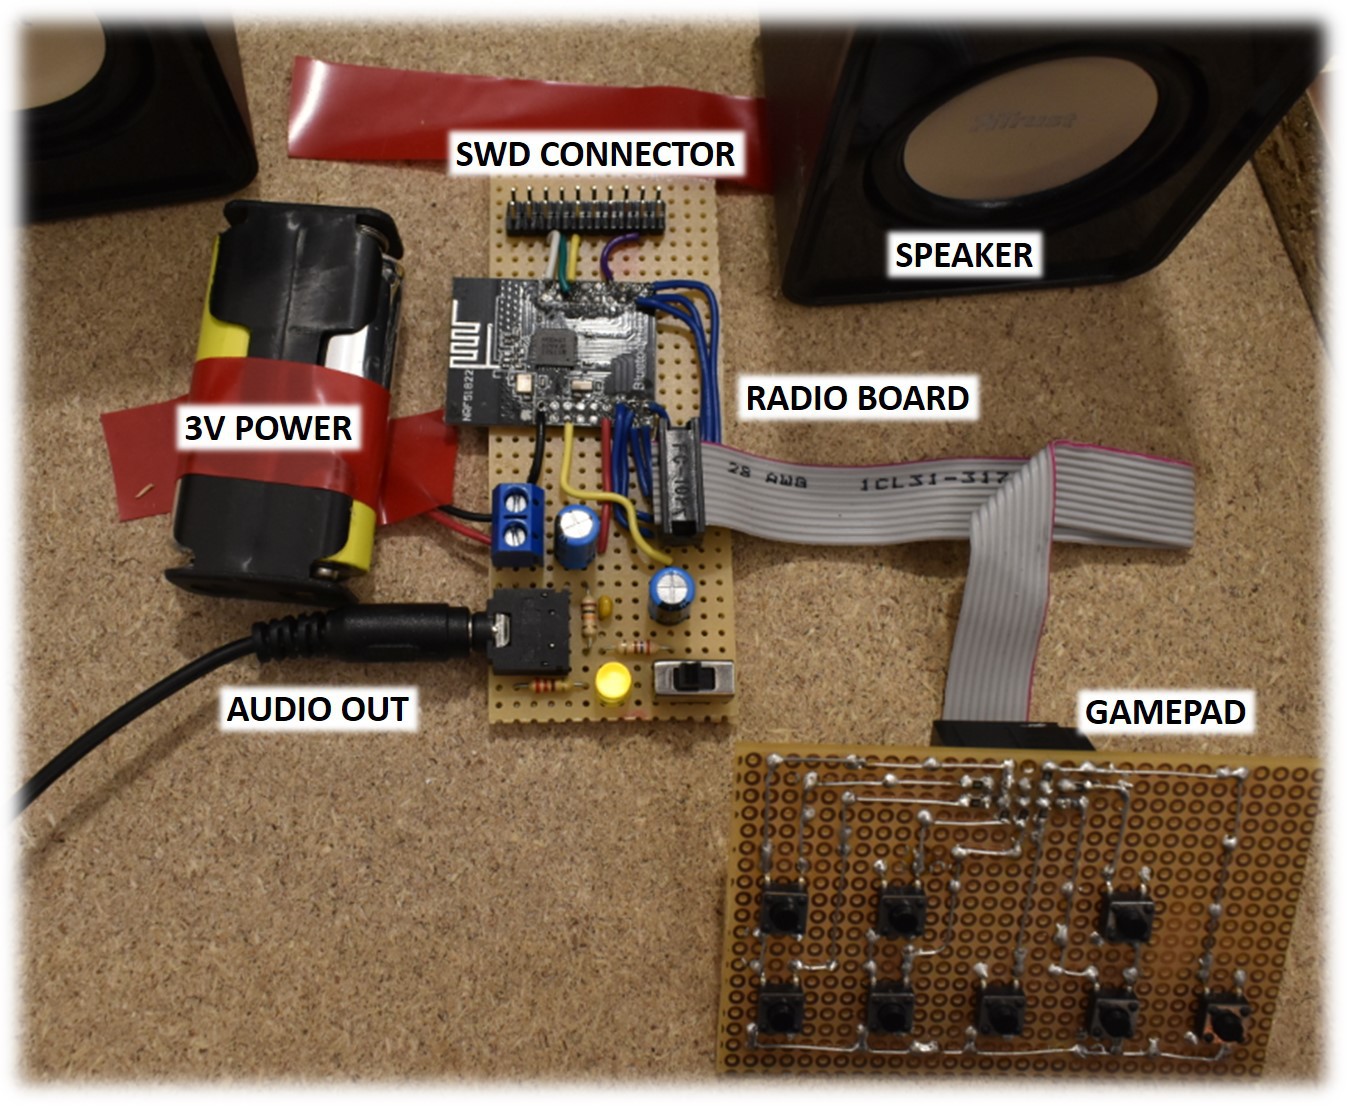
However the nRF52840 is an RF MCU, so we can easily implement a rudimentary RF protocol to receive keystrokes. For this purpose I used the cheapest nrf51822 module and implemented a simple wireless gamepad (it looks somewhat familiar, doesn't it?).
What about Audio? On a device which has at least 9 GPIOs, then you can simply use the PWM unit and route it to one GPIO. In the device I had, however, there were not enough GPIOs, so the audio was streamed back to the gamepad, like Wii remote.
Here I have described in details the protocol I have implemented, but basically this is a typical master-slave implementation: the nRF52840 is the master, and the gamepad (which receives the audio packet and replies with the key status) is the slave device. The gamepad won't send anything on its own.
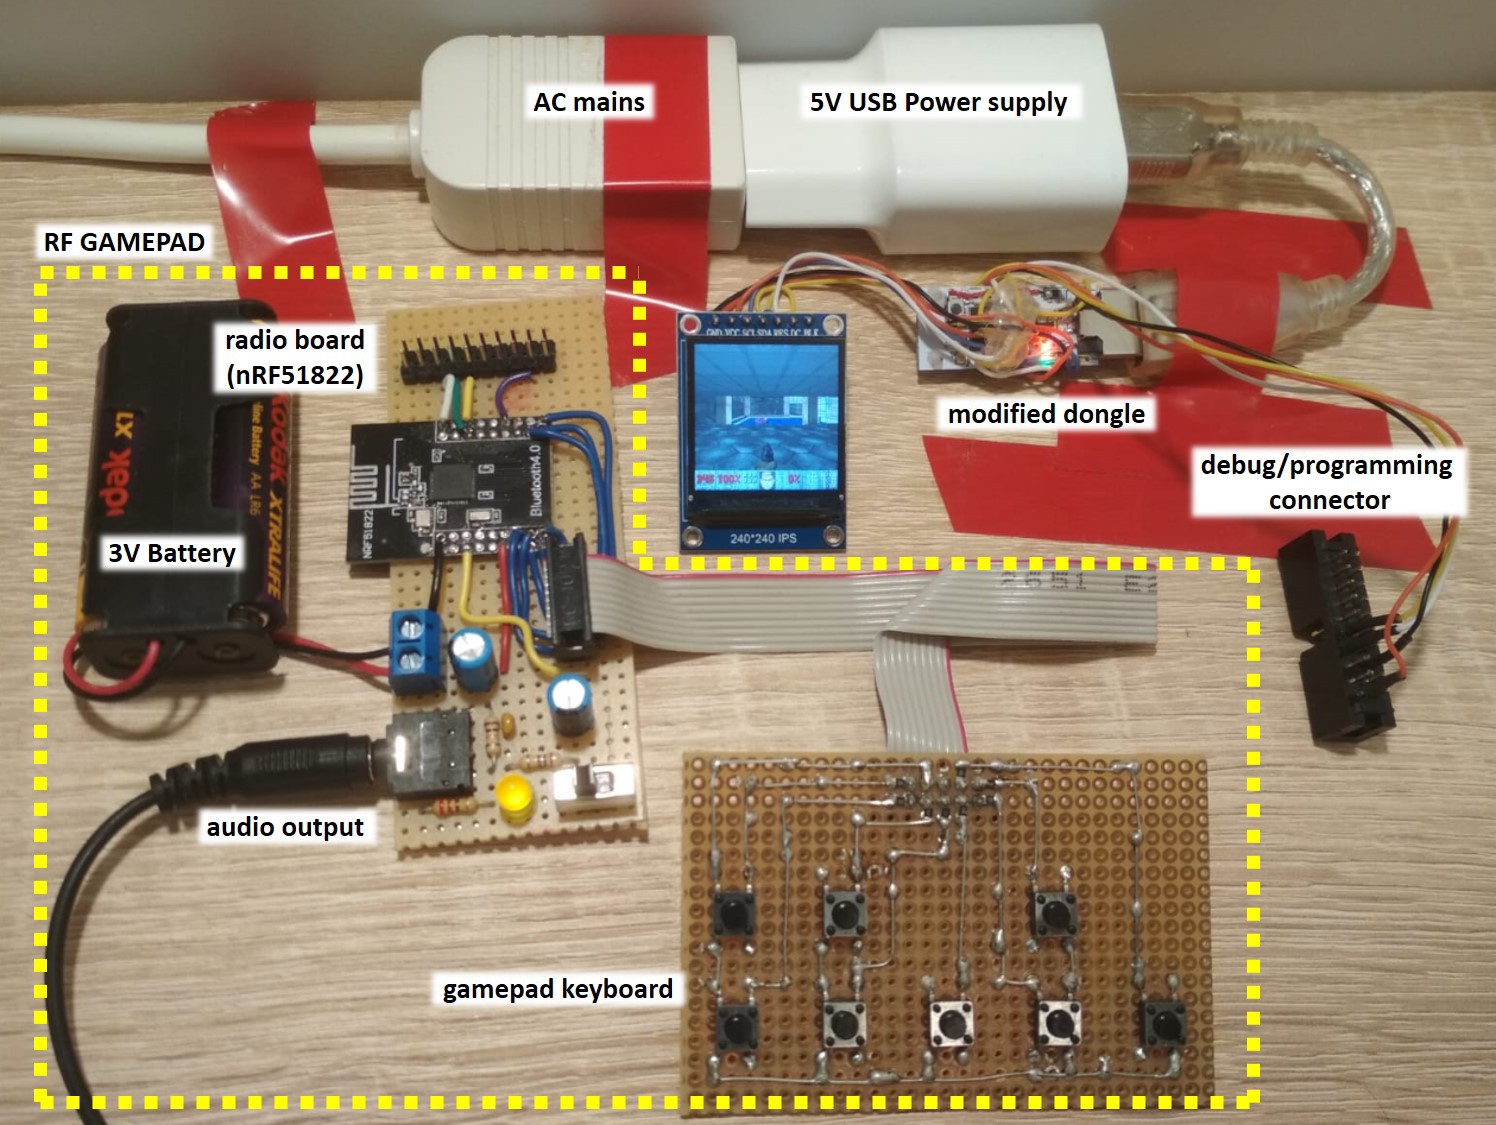
The block diagram and schematics are shown below.
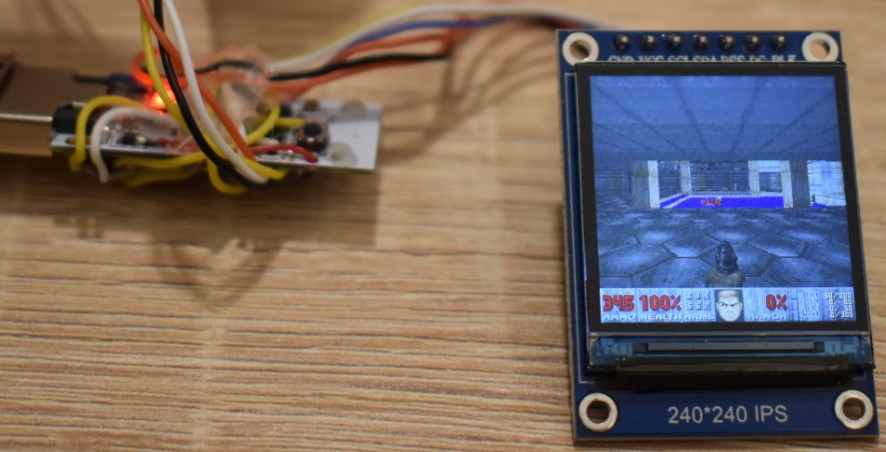
Modding the Dongle
This is the block diagram of the whole system.

I soldered some wires to the dongle and connected them to the 3 ICs, glued on the bottom side, according to the schematics shown here.
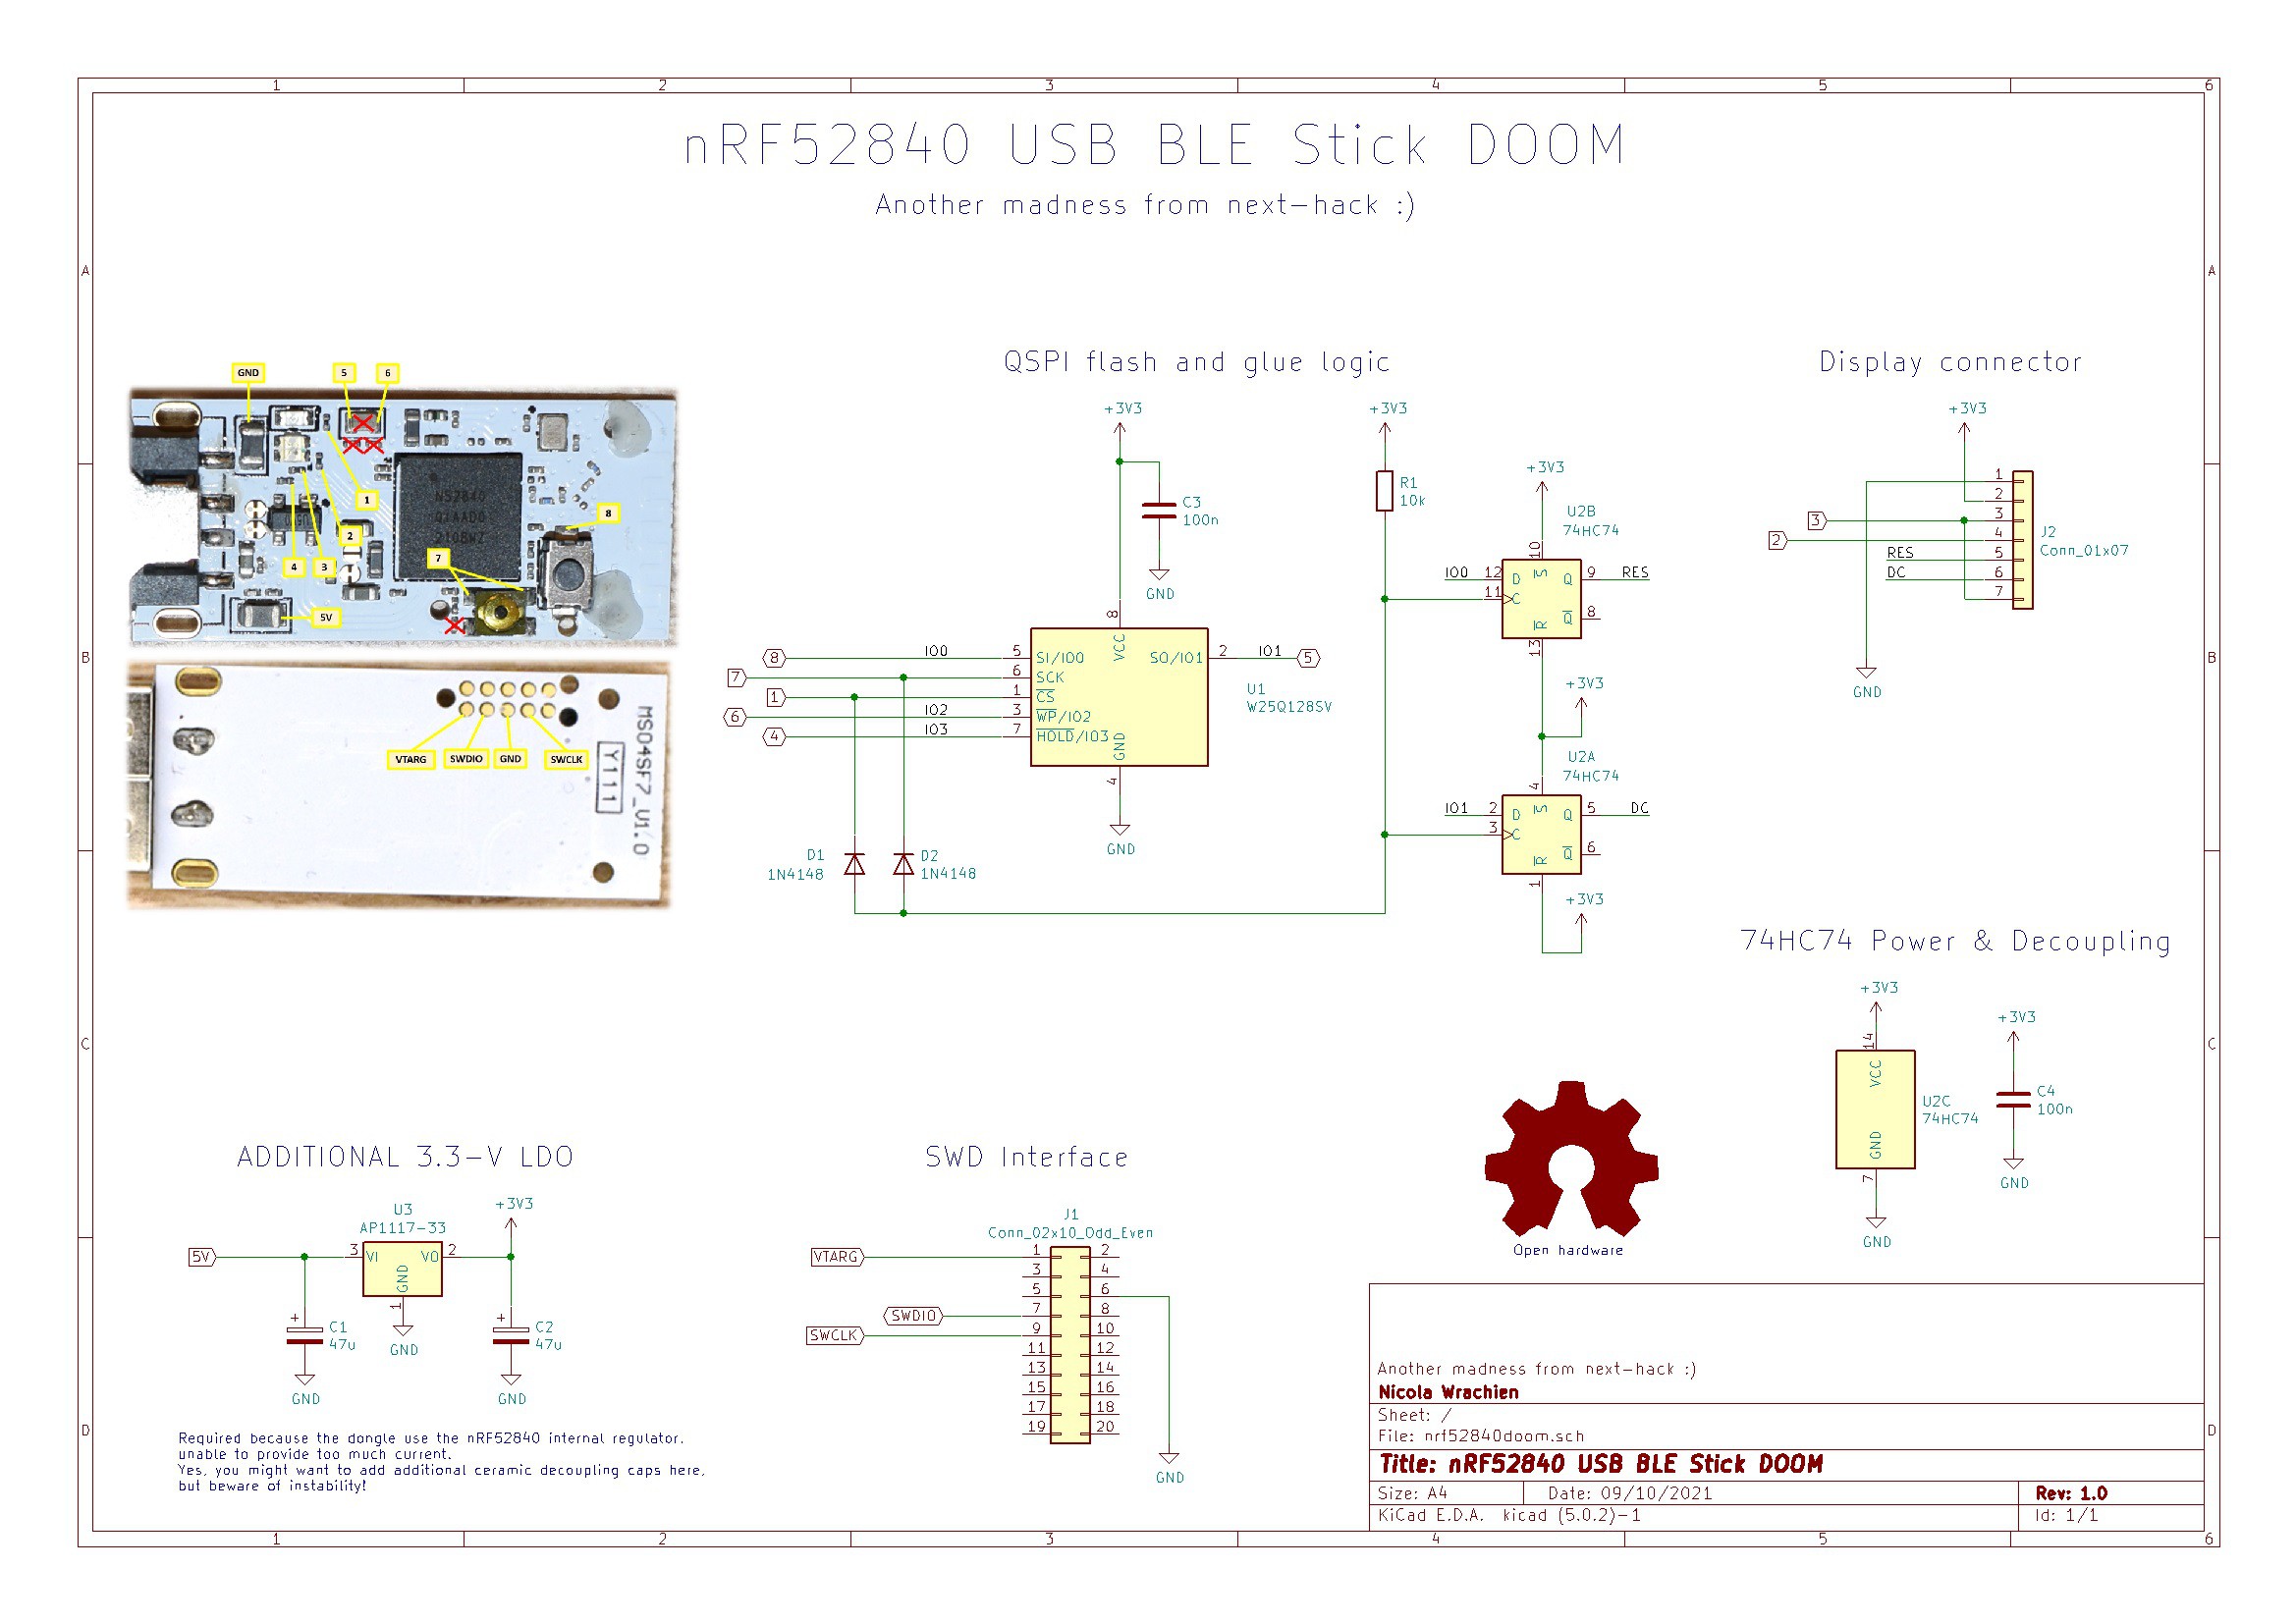
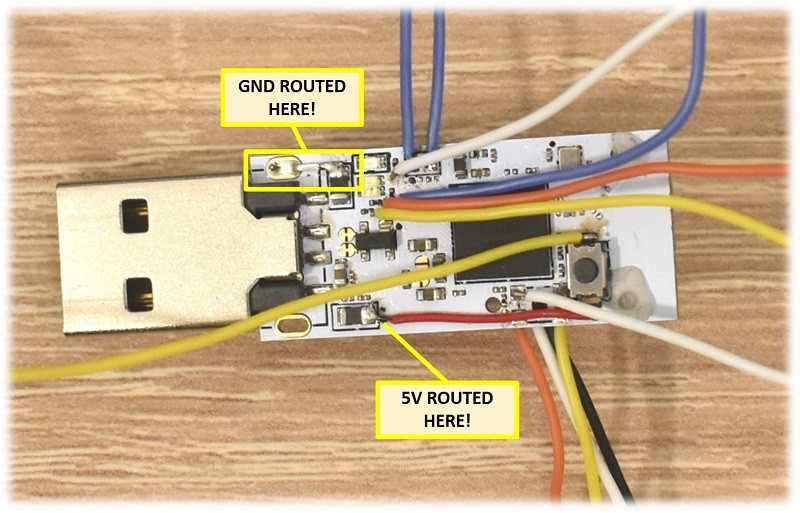
These 3 ICs are: a 5V to 3.3V regulator, a dual edge triggered flip-flop, and the QSPI flash. USB is used to upload the modified full WAD image, using a command line utility, I will discuss later.

I have discussed about the hardware modification more in details here.
This is the final complete system:
Device programming
The nRF52840 must be programmed using an SWD programmer. The project has been developed using Segger 5.5. A part from MCU register and constant definitions, as well as errata and startup code, I used no other library from Nordic. No hardware abstraction library from Nordic, just bare metal programming. Even the USB part was programmed from scratch.
The WAD converter
The WAD file must be converted using a utility present in the samegithub repository, before it is uploaded to the external QSPI via USB. Noticeably, the utility does not reduce the graphics detail or maps complexity. It just converts integers to fixed point data, and add column length information to patches (sprites and walls). This allows to avoid copying some structures to RAM, and helps fetching graphics data quickly. The utility also converts (without loss of details) multi-patch textures to single patch ones. This increases the WAD size (because now each texture requires its different patch, instead of reusing the same patches for many textures), but also speeds up noticeably the rendering. We verified that the full commercial Doom, The Ultimate Doom, and Doom 2 WADs will fit in the 16 MB QSPI flash.
The utility also adds status bar digits optimized for 240 pixel wide screens.
Noticeably, a part from the aforementioned column length information and multi-patch texture conversion, this utility is a plain C port of the C++ application made by doomhack for his magnificent Doom port.
The full 15.5 MB "The Ultimate Doom" WAD converted file is uploaded via Y-Modem, using the USB port within 5 minutes. The speed is limited by the QSPI flash programming/erase times. You will need Windows 10 or linux/Mac, as CDC support is embedded in these three OS. I used a free USB PID/VID pair, so users of Windows 8 or less will need to find some CDC drivers that support those PID/VID.
Performance
The premises were not very encouraging:
- Less than half the speed of Nordic nRF5340 port attempt, whilst keeping 92% of their resolution in terms of 3D pixel.
- 66% of the CPU speed of our previous project, with 3 times the 3D resolution.
- And by looking at Nordic's attempt of running Doom on the same MCU... so slow I initially thought that this was the limit (at least before I realized they were not using the QSPI but the SD card).
These left me without many hopes of having some playable speed.
Instead, the first time I managed to have it working, I was impressed I could achieve a 24.8 fps initial frame rate on E1M1, without any of the aforementioned optimizations.
After several weekends of optimization, this speed was brought to 34.5 fps, i.e. the maximum frame rate that can be achieved due to hardware limitation (i.e. due to the maximum SPI speed).
More optimizations finally lead to a frame rate that rarely falls below 30 fps in all the levels of the first three episodes (i.e. all levels of the original Doom). Episode 4, introduced in The Ultimate Doom is much more complex, and the frame rate falls down to 20 fps in congested scenes, (E4M2) but it is still playable.
Doom 2 is supported as well, despite it is way more memory hungry. This is thanks to the huge memory optimization (see here for more information).
Comparison with other ports
Unfortunately there is no simple way to compare speeds between different ports, as every one features different screen resolution and there is no clear data (besides this document by doomhack and this and this videos from Nordic). I have discussed this in details here.
Anyway, this port runs:
- much faster than the GBA port by doomhack. If we consider the different CPU speed (ours is at least 5.3 times faster, in terms of DMIPS), and the different 3D resolution (we have 3.25 times the number of 3D pixels), and the different frame rates, we can state that this port has at least the same optimization level (if not more) of the GBA port. This is also probably due to the availability of some hardware assisted-tricks that cannot be implemented in the GBA. Still, in my port, composite textures are rendered in full detail, and Z-depth lighting is present. I also restored the screen melt effect: useless, but "it's almost half Doom". However, doomhack‘s port features music, not present yet on mine.
- Insanely faster than Nordic attempt on the nRF52840, even when considering that the the number of 3D pixel is only 92%. My port runs about 10 times faster.
- About the same speed as the Nordic port on nRF5340, and sometimes my port is even faster, even considering the different resolution, as shown here. This, despite the nRF52840 is at least 2 times slower than the nRF5340 (actually 2.4 considering the different DMIPS/MHz of Cortex M33 and M4. 3 times considering that the QSPI speed is one third on the nRF52840).
What about the comparison with a 1993-era PC?
This comparison is even more difficult as PCs are very different from an embedded system. In fact, on a PC one must load everything to RAM: program code, constant data and variable data. In an embedded/microcontroller system code and constant data can stay in flash, and they have a relatively limited RAM amount for variable data. PCs that ran Doom had also very different specs: not only on the processor, but also on level 2 cache, chipset, and graphics card, so the same microprocessor (e.g. 486DX2 @ 66MHz) might perform better or worse, depending on the aforementioned specs.
Memory access speed and sizes are also quite different between embedded systems and 1993 era PC.
On our microcontroller, for instance, internal flash can be randomly accessed quite fast, with respect to a 1993-era PC. For instance, it can be as low as 16 MB/s for byte access (the nRF52840 flash requires 2 wait states, which must be added to the load instruction timings, 2 CPU clock cycles. This means that at 64 MHz, one byte can be read every 4 cycles). Aligned 32-bit word reads are 4 times faster, therefore 64 MB/s can be achieved. RAM is much faster, as it is 0 wait states: the read speed can go between 32 MB and 128 MB (even more using multiple register, but at this point it would not be random read). However, as discussed in detail here, the QSPI random read speed can be as slow as 250kB/s, because of the 4 us latency required by the QSPI interface implemented on the nRF52840 (hardware bug?).
Instead, a 1993-era PC has much more RAM, but the read speed is smaller. However, the same 1993 era PC might have had also 256 kB of level 2 cache: as big as the nRF52840 RAM!
Despite this, by looking at the data reported here, this port runs faster than most 486 DX2-66MHz configurations, and it is on a par even with some Pentium-based PCs! Here you might find more information about such comparison.
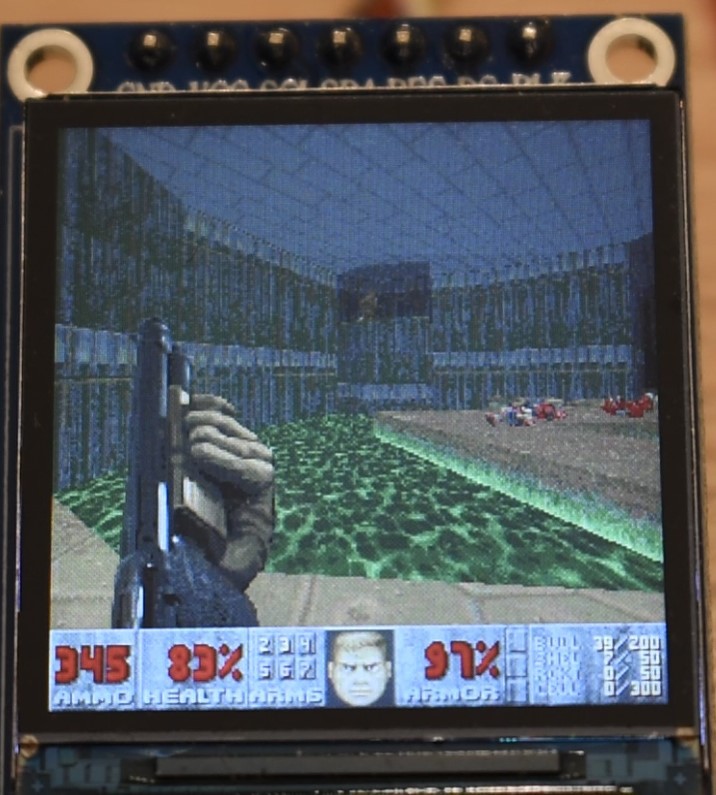
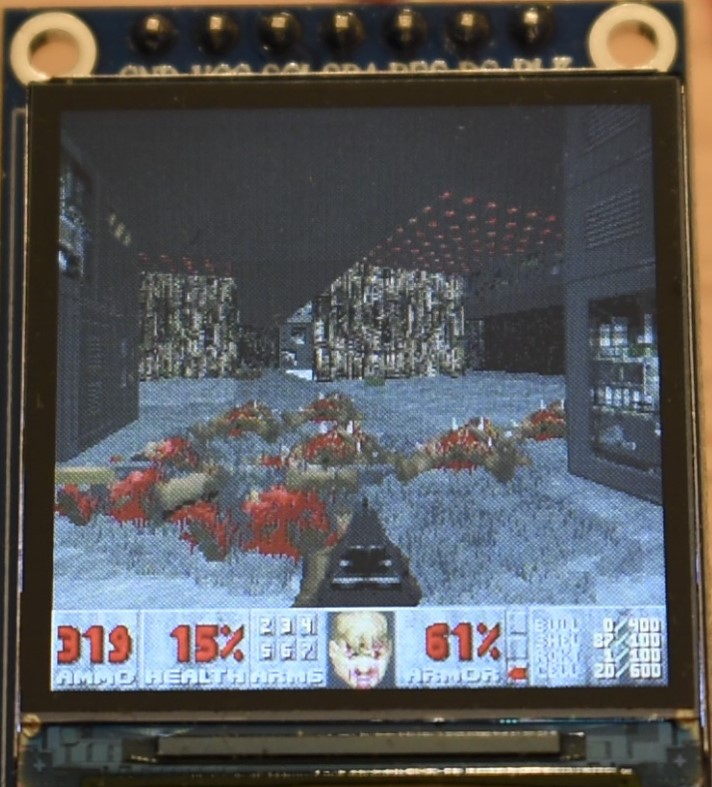
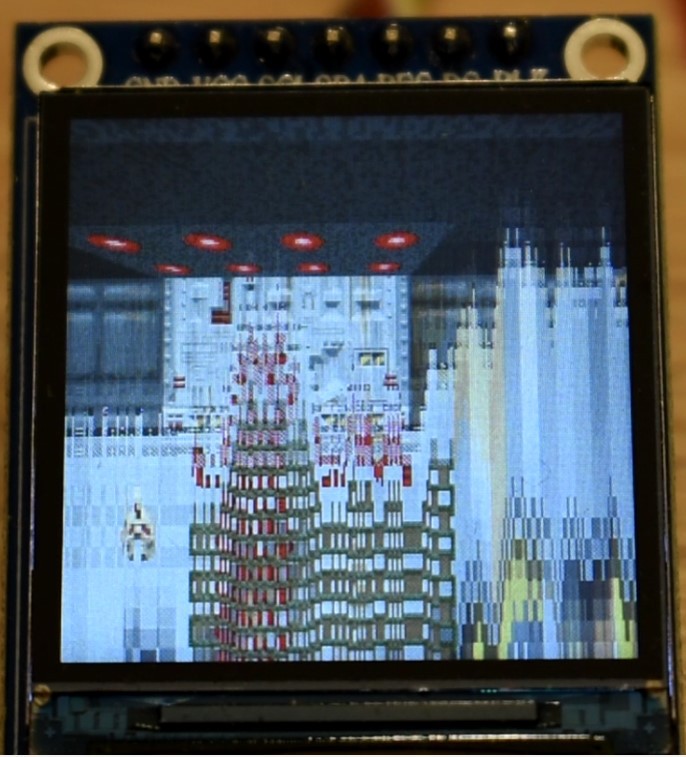
Some Pics, Github Repository and Video
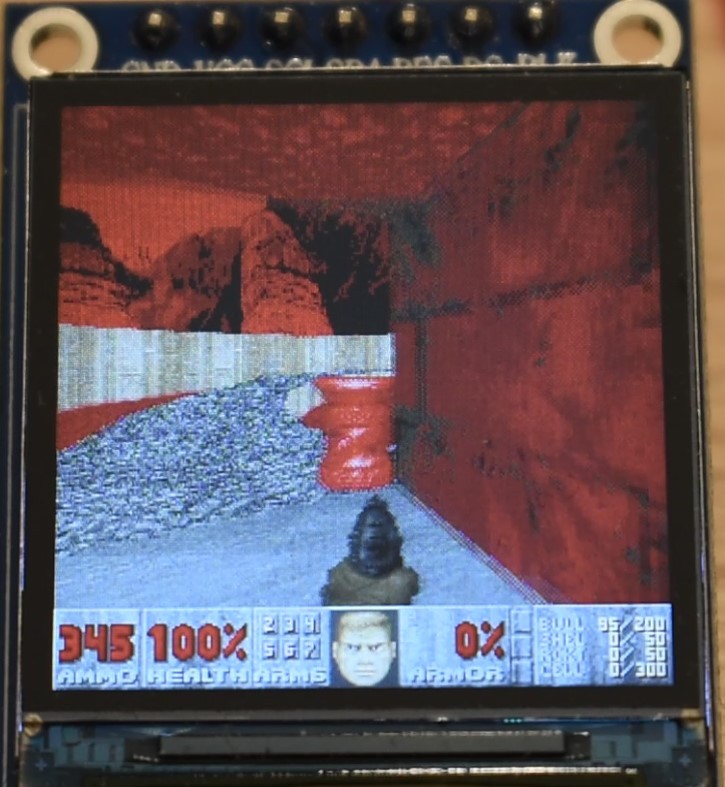
Note! In all the pics and video, the ammo counter shows the frame rate multiplied by 10. 300 means 30 fps. In the code on github the ammo is shown instead.
Here you can find the code, schematics, etc.: https://github.com/next-hack/nRF52840Doom.
Here is a video:
And here are some pics!

Conclusion
Here you are, now Doom runs also on a BLE USB dongle too. And quite fast I’d say.
Yes, an USB dongle has no display, or keyboard, but even for a console or a desktop pc, the monitor and controller are external peripherals.
Unlike the fake pregnancy test port (where not only all the hardware was replaced by the author, including display and MCU, but also Doom was running on a PC and the scaled video was streamed to the display via USB), in this project no hardware was replaced. In particular, the original microcontroller is running Doom. Only the 32kHz crystal and 3 capacitors were removed.
Yes, the QSPI flash addition is quite an upgrade though, but this is a mandatory step in order to store the massive data of Doom. It would be like if one upgraded the hard disk of a PC/console.
Noticeably, this port allows also any device using the nRF52840 to run Doom (provided that at least 8 I/O are available), and even with quite a high performance: you just need to edit a handful of #define lines the main.h header file, to chose the GPIO pin and port numbers and you are set.
Still missing: music, multiplayer and demo support.
Finally, this project is another evidence that even "simple" devices as a Bluetooth LE adapter might be much more powerful than people might think, and now a $10-$20 device might pack more horsepower than the $1500 PC on which gamers played Doom 28 years ago.