 Jithin Sanal
Story
While I waited for my flight, my thoughts turned to the people back home. Of all of them, it was those who were older than worried me most in this new stage of life—the time when work would take place remotely and from a distance. So far so good though: their house is well-protected thanks to COVID 19 filters installed around every opening through which air can pass (windows/doors). They are also comfortable with security cameras set up throughout their property as added protection against intruders or other potential dangers they might face at night while alone.
Why do we need a Smart Home Monitoring System?
The age of COVID 19 makes the quality of air crucial for ensuring that elders live comfortably and safely.
This is why we have to make sure their environment has a suitable indoor climate too, especially since they are not physically present there themselves!
DIY Arduino Based Real-Time Home Monitoring System
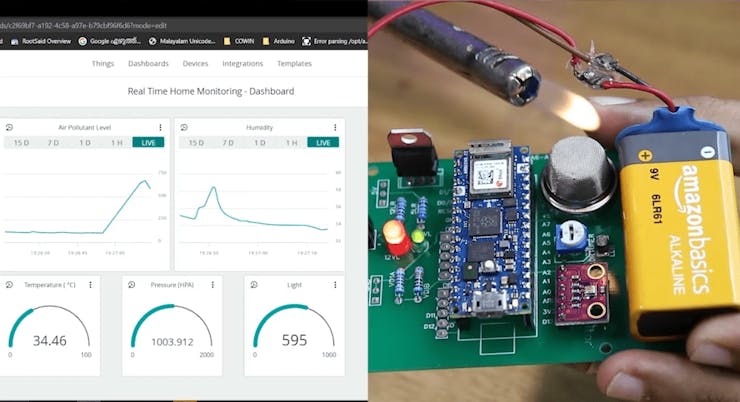
We made a device that can monitor the environmental conditions inside our homes like room temperature, air quality, humidity, and ambient light. This helps us get instant alerts when something goes out of normal range.
In this tutorial, I will show you how to build your own DIY Arduino-powered real-time data dashboard. You’ll learn everything from the circuit design and layout all the way down to writing code for it!
In this tutorial, we’re going tomake our very own smart Internet of Things (IoT) device that can be used at home or in a professional setting such as an office space. We are also fortunate enough where there is already plenty of documentation online with instructions on building one yourself using off-the shelf parts so even if you have never done anything like this before but feel intrigued then read on because today’s post might just pique your interest further into figuring out what exactly IoT devices do and why they matter when trying
Components Needed
- Arduino Nano 33 IoT
- BME 280
- Gas sensor
- LDR
- Home safety monitor PCB
The reason why I chose Arduino Nano 33 IoT is, they are very small, pin to pin compatible with Arduino Nano r3 and it even has an inbuilt wifi module that will come in handy.
Learn Arduino the Easy Way
Are you new to Arduino? Do you want to improve your skills in Arduino programming? You are in the right place. We have a complete beginner-level tutorial for Arduino which covers everything from scratch. In this free Arduino Tutorial for Beginners guide, we will be taking a look at Introduction to Arduino platform, getting started with Arduino IDE, different types of Arduino boards, and a lot of DIY projects using Arduino. Check it Out!
Create your Own Home Monitoring System
Step 1 – Designing the Circuit
Let’s get started! I designed a circuit and PCB using Altium PCB Designer. It is great for designing complicated circuits, as well as multi-processor boards and industrial use cases. The link to the trial version will be in this description; definitely check it out if you’re interested!

This is the circuit. Here we have Arduino Nano, a gas sensor, LDR, and a BME 280 sensor. This is the voltage input terminal, where we can connect a nine-volt battery or a 12-volt dc adapter. This 7805 voltage regulator will convert any voltage between 7 to 32 volt to a steady 5 volt supply. This 5v can be fed to Arduino and other components or if you are using Arduino Nano you can connect this Vin directly to the Vin pin of Arduino.
And then we have a gas sensor. There are different types of gas sensors depending on which gas you want to measure – there are methane sensors, carbon monoxide sensors, LPG sensors, you can choose the one depending on your needs. The output of the gas sensor is connected to pin a1 of Arduino.
Then we have an LDR. A trimmer is connected at this point so that we can adjust the sensitivity of this LDR and the output of LDR is connected to pin a2 of Arduino. The...
Read more »
 ElectronicABC
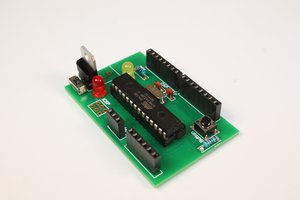
 Patchr
 Clovis Fritzen
 Pratik Makwana