We developed this project in partnership with JLCPCB and Robo Lúdico School. The used board files are available for download. Download the 2 boards for projects with Arduino.

Figure A - An Arduino Board for your projects.

Figure B - Shield for easy connection of your sensors and other devices to Arduino.
Link to download the Arduino compatible board: https://bit.ly/ArduinoGerberFilesPCB
Link to download the shield: https://bit.ly/3fNSNRI
I made the project with JLCPCB. They released a coupon to earn 5 units of that card. The coupon is: JLC-REBE
The process is simple:
- Download the gerbers files from the project link;
- Visit the website: https://www.jlcpcb.com/PFC
- Upload the Gerber files;
- Apply the JLC-REBE coupon in the payment area.
Let's start the project!
In this second part we will develop the receiver to collect the temperature and pressure data from the field transmitter.
The HC-12 transceiver will be used to receive the data. We will use the Arduino MEGA 2560 to process the code and present the data on the 20x4 LCD display with I2C.
This project will help you:
Using the HC12 module to receive data via wireless communication with the Arduino;
Now, we will start the complete presentation of the development of the project Reception of temperature and pressure data through the HC 12 module.
DEVELOPING THE PROJECT RECEIVING TEMPERATURE AND PRESSURE DATA THROUGH THE HC 12 TRANSCEPTOR MODULE
Set up the circuit below for data reception.
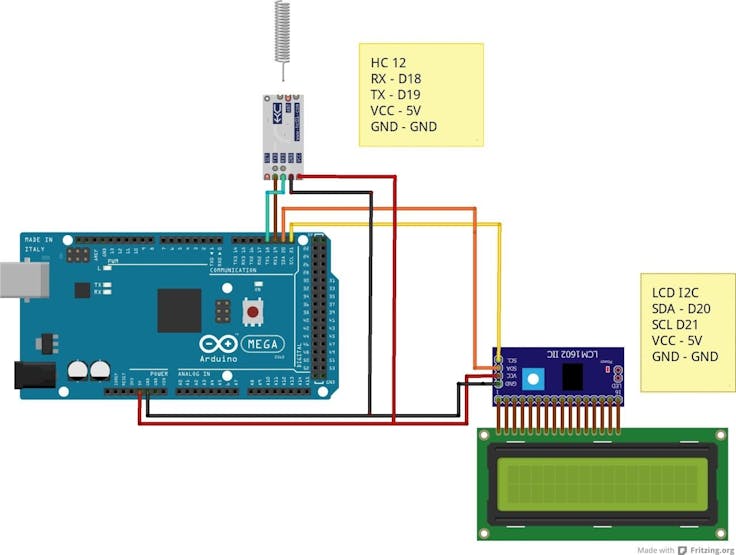
Figure 1 – Schematic circuit of the temperature and pressure data receiver circuit.
Now let's go to the list of components needed to assemble the circuit in Figure 1.
- 01 Arduino Mega 2560
- 01 LCD Display 20 x 4 I2C
- 01 HC 12 module + helical antenna
- 6 Jumpers
Now, let's program the Arduino Mega 2560.
Transfer the code below to receive all data of our transmitter.
#include <Wire.h> #include <LiquidCrystal_I2C.h> LiquidCrystal_I2C lcd (0x3F,2,1,0,4,5,6,7,3,POSITIVE); byte RX[4]; float temp; int pressao;void setup(){ Serial.begin(9600); Serial1.begin(9600); lcd.begin(20,4);}void loop() { while(Serial1.available()>0) { for (int i=0; i<4; i++) { RX[i] = Serial1.read(); } temp = ((RX[0] *255) +RX[1])/100.0; pressao = ((RX[2] *255) +RX[3]); } Serial.print("Temperatura : "); Serial.print(temp); Serial.println(" oC "); Serial.print("Pressao : "); Serial.print( pressao ); Serial.println(" Pa (Pascal)"); lcd.setCursor(3,0); lcd.print("MONITORAMENTO "); lcd.setCursor(0,1); lcd.print("TEMPERATURA: "); lcd.setCursor(12,1); lcd.print(temp); lcd.setCursor(18,1); lcd.print("*C"); lcd.setCursor(0,2); lcd.print("Pressao: "); lcd.setCursor(9,2); lcd.print(pressao); lcd.setCursor(16,2); lcd.print("Pa"); delay(2000); lcd.clear();}
We will use wire and LiquidCrystal_I2C libraries in this application.
#include <Wire.h>#include <LiquidCrystal_I2C.h>
Creation of LCD Object with display address and pinout.
LiquidCrystal_I2C lcd (0x3F,2,1,0,4,5,6,7,3,POSITIVE);
0x3F is the address of our LCD display. If this code does not work, you should check the address of your lcd display. After this, we declare the global variables.
byte RX[4]; float temp;int pressao;
Within the void setup function you must configure the communication speed of the Arduino serial 0 and the serial 1 (HC12 Module).
Serial 0 is the default Arduino serial. It communicates with the computer through the USB port, and serial 1 is being used to communicate with the HC12 module.
Also, we have LCD display initialization.
lcd.begin(20,4);
Now, let's go to the void loop function.
void loop(){while(Serial1.available()>0){for (int i=0; i<4; i++){RX[i] = Serial1.read();}temp = ((RX[0] *255) +RX[1])/100.0;pressao = ((RX[2] *255) +RX[3]);}
In the excerpt below we load the 4-position RX vector with the data coming through serial 1.
for (int i=0; i<4; i++){RX[i] = Serial1.read();}
The system will calculate the temperature and pressure value after the for loop ends.
temp = ((RX[0]...Read more »
 Peter Mowen
 Guillermo Perez Guillen
 Dilshan Jayakody