 G. Rosa
Inspiration comes from many places:
I have always been fascinated by robotics for as long as I can remember. My first initial interest began with a remote control toy robot I was given as a child which I really loved. Later on, I was also taken by “Robby the Robot” from the sci-fi movie “Forbidden Planet”, a film really ahead of its time. And of course, I was in awe of how robotics were eventually used on auto assembly lines to help manufacture cars. And now many years later being that my granddaughter has started taking an interest in robotics herself and even takes a “junior robotics class” at her elementary school, this has inspired me to put together a simple robotic arm using thumb joysticks for her to play with and perhaps inspire her further in her study of simple machines and robotics at school.
-----------------------------------------------------------------------------------------------------------
The software will be written differently from my previous automated robotic arm build in that it will not be using the “for loops”, but rather “If-Then” statements in order to function better with the joysticks. Although the programming does work well, the use of the joysticks along with the type of code implemented in the software does result in a more jerky type of movement among the servos. In other words, although the servo movements are fast, they are not as smooth or fully controllable as in the automated version. Also, the programming code used was taken from another source since I had been only familiar with the “for loop” design used in the automated robotic arm design. This particular code was rather tricky and needed frequent tweaking just to get it to work just right.
Click on link below to view video: Robotic arm using thumb joysticks
https://video.wixstatic.com/video/301c36_f19ee8cdc16b42229818e809b82366ab/1080p/mp4/file.mp4
Note: The robotic arm servos will be set up in the code and on the Arduino as follows:
servo1.attach (8); // servo1 attached pin - Rotating Base
servo2.attach (9); // servo2 attached pin - Shoulder
servo3.attach (12); // servo3 attached pin - Elbow
servo4.attach (11); // servo4 attached pin - Wrist
servo5.attach (10); // servo5 attached pin – Claw
// -----------------------------------------------------------------------------
int joystick_x = A0; // horizontal joystick movement & control of Rotating Base
int joystick_y = A3; // vertical joystick movement and control Shoulder
int joystick_z = A4; // vertical joystick movement and control of Elbow
int joystick_a = A5; // horizontal joystick movement and control of Wrist
int joystick_b = A1; // vertical joystick movement and control of Claw
Interestingly enough, this build only required just one 12V DC regulated power supply as opposed to two. Here the 6 - 7 volts supplied to the 5 servos were sufficient enough to power all of them without any discernible issues. And it is very important to connect the servo negative wires to both the Arduino ground and the 12V DC regulated power supply. I emphasize the use of a regulated DC power supply since regular batteries drain rather...
Read more »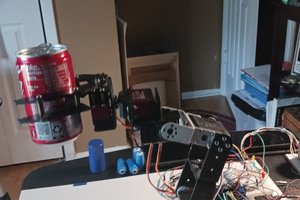
 bornach
 ProgressTH
 MrDreamBot