 kutluhan_aktar
In terminology, littering is the improper disposal of waste products. Although littering can happen intentionally or unintentionally, litter can cause serious and pernicious consequences for the environment[1]:
1) Litter causes water, soil, and air pollution. As litter degrades, chemicals and microparticles are released. These chemicals aren’t natural to the environment and can, therefore, cause several problems. They can make their way into the soil and freshwater sources, impacting both humans and animals regardless. Also, researchers estimate that more than 40% of the world’s litter is burned in the open air, inducing toxic emissions. These emissions can cause respiratory issues, other health problems, and even acid rain.
2) Litter kills innocent animals every day. Researchers estimate that over one million animals die each year after ingesting or becoming entrapped in improperly discarded waste. Plastic litter is the most common killer of animals, and marine animals are the most notably affected.
3) Litter facilitates and expedites the spread of diseases through direct and indirect contact. Improperly discarded waste is a breeding ground for bacteria, viruses, germs, and parasites. Germs can be transmitted directly by physically interacting with litter. Bacteria, parasites, and infectious pathogens can be transmitted to humans indirectly through an affected vector. Vectors are animals or insects that contact with contaminated litter and then transmit those contaminates to humans.
Even though knowing mentioned pernicious consequences, unfortunately, we pollute the Earth with our waste even more quickly than it recuperates and replenishes itself. If this incessant and interminable polluting continues to expand, it will eventually stymie ecosystem cycles and instigates the process of petrifying portents to become our day-to-day reality. While the Earth has been deluged with our waste, the imminent danger of waking to an unrecoverable world approaches. Therefore, in this project, I focused on contemplating a solution to avert waste from spreading and expanding.
Examining landscapes to find scattered litter requires an unreasonable workload and is challenging economically even before starting to clean up. Since one of the biggest problems in fighting the waste invasion is to find the littered locations before it is too late to avert waste from spreading, I decided to develop this autonomous (self-driving) robot that tracks and monitors litter with object detection. With the assistance of this robot, it is effortless to search and find the littered areas with a minuscule workload. Even if it is a small step, I hope this prototype will be beneficial and practical in fighting the waste invasion.
I employed Edge Impulse to build a neural network model for detecting litter with object detection under these three categories:
- Bottle (glass and plastic)
- Can (metal)
- Packaging (plastic, paper, cardboard, etc.)
Edge Impulse also provides a live video stream after being connected to Raspberry Pi. So, I did not have to create a webcam server (Motion) to be able to live stream with Raspberry Pi for this project.
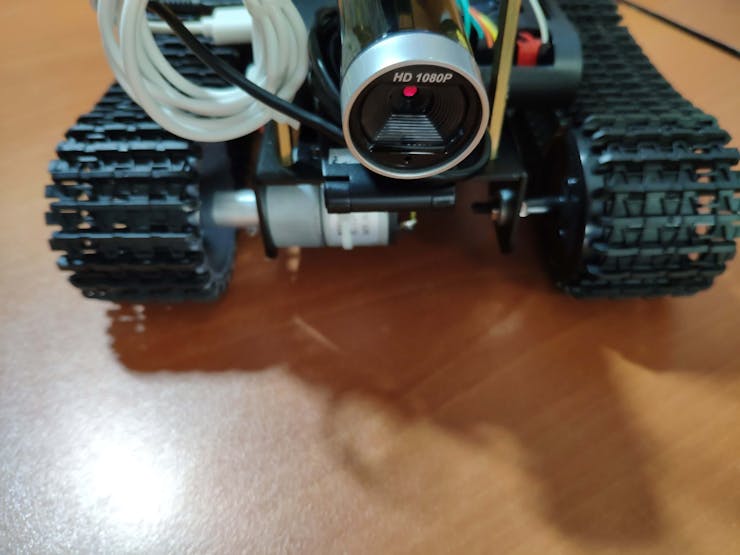
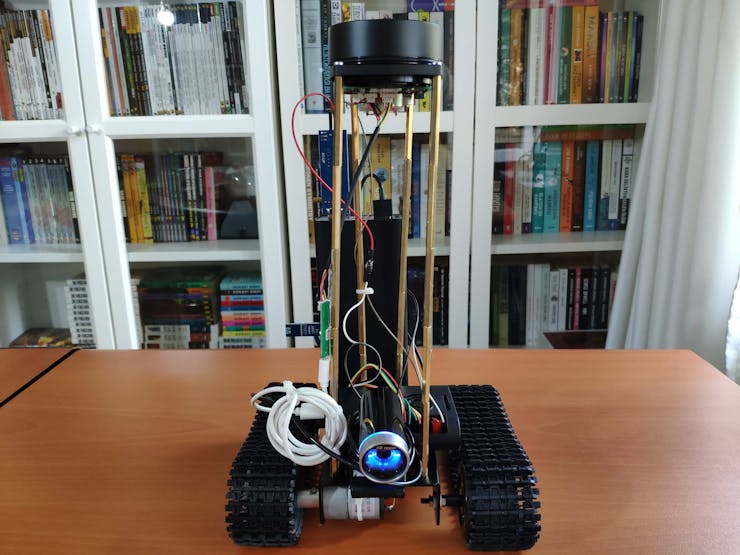
After training the model and running it on Raspberry Pi, I designed and assembled my autonomous litter detection robot with an RPLIDAR A1M8 360 Degree Laser Scanner (Lidar), a robot chassis, and a USB webcam. Then, I built a fall detection system with an Arduino Nano and a 6-axis accelerometer for the robot to forfend it against crashes.
So, this is my project in a nutshell 😃
In the following steps, you can find more detailed information on coding, data collection, and building a neural network model with Edge Impulse.
Huge thanks to DFRobot for sponsoring this project.
Sponsored products by DFRobot:
⭐ RPLIDAR A1M8-R6 - 360 Degree Laser Scanner | Inspect
⭐ DFRobot Black Gladiator - Tracked Robot Chassis | Inspect
⭐ DFRobot Serial 6-Axis Accelerometer | Inspect
⭐ DFRobot 8.9" 1920x1200 IPS Touch Display | Inspect


_Litter_Detection_Robot_w_Edge_Impulse/Pictures/working_demo.gif)
Step 1: Building a well-balanced dataset in Edge Impulse
Edge Impulse is a free embedded machine learning development platform for developers (novices or experts) from learning to deployment. It has lots of features and built-in neural network models for various requirements, such as transfer learning for multiple object detection. Also, the platform provides a live video stream from the connected device's camera. Therefore, I decided to utilize Edge Impulse in this project to recognize and monitor litter.
Before building a neural network model for object detection, I needed to create a well-balanced dataset to detect multiple litter categories:
- Bottle (glass and plastic)
- Can (metal)
- Packaging (plastic, paper, cardboard, etc.)
I combined two different datasets for waste and trash by handpicking the most fitting images related to the above litter categories:
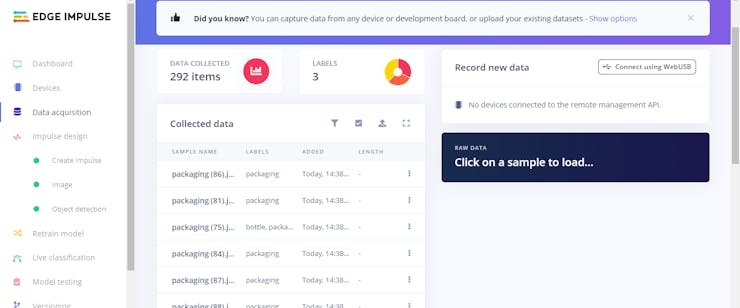
After selecting, I had approximately 100 images for each category, in total 292. Normally, a small data set like this could not be utilized to get accurate results in detecting litter. However, Edge Impulse employs transfer learning while training the model, so I elicited pretty good results with high accuracy.
⭐ First of all, sign up to Edge Impulse and create a new project (Litter Detection Robot).

⭐ To be able to utilize the object detection model, go to Dashboard ➡ Project info ➡ Labeling method and select Bounding boxes (object detection).

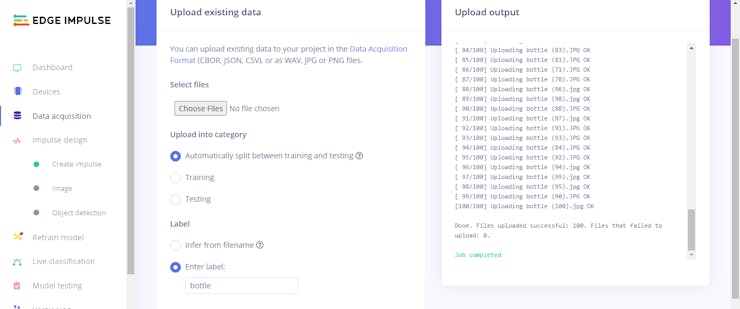
⭐ Then, go to Data acquisition and select Upload data (Upload existing data).


⭐ Finally, upload images for each litter category to Edge Impulse to create the dataset. It can automatically split them between training and testing sets.

Step 1.1: Labeling data (waste) for multiple object detection
After uploading my litter dataset successfully, I labeled each image with the mentioned three litter categories - bottle, can, packaging. In Edge Impulse, labeling an object is as easy as dragging a box around it and entering a label. Also, Edge Impulse runs a tracking algorithm in the background while labeling objects, so it moves boxes automatically for the same objects in different images.
⭐ Go to Data acquisition ➡ Labeling queue (Object detection labeling). It shows all the unlabeled images remaining in the dataset.
⭐ Then, select an unlabeled image, drag the boxes, click Save labels, and repeat this until the whole dataset is labeled.


After completing labeling, I had a well-balanced dataset listed under Data acquisition for litter detection.
Step 2: Designing an impulse (neural network model) in Edge Impulse
An impulse is a custom neural network model in Edge Impulse. In this project, I designed an impulse that takes the raw image data, adjusts the image size, uses a preprocessing block to manipulate the image, and then utilizes a learning block to classify new data:
- Images preprocessing block ➡ takes data in the color image, optionally makes the image grayscale, and then turns the data into a features array.
- Transfer Learning learning block - Object Detection (Images) ➡ takes all the images in and learns to distinguish between the three (bottle, can, packaging) litter classes.
Preprocessing blocks always return the same values for the same input (e.g., convert a color image into a grayscale one), while learning blocks learn from past experiences. In addition to the built-in preprocessing blocks, Edge Impulse lets the user create custom preprocessing blocks (steps).
⭐ Go to Create impulse, set the image width and image height to 320, the resize mode to Fit shortest axis. Then, add the Images and Object Detection (Images) blocks. Finally, click Save Impulse.

Step 2.1: Configuring the processing block and features
⭐ To configure the processing block, go to Image under Impulse design, select the color depth as RGB, and click Save parameters. The processing block formats raw image data appropriately for the model.

⭐ Then, on the Feature generation screen, click Generate features to:
- resize image data,
- apply the processing block on image data,
- and create a 3D visualization of the complete litter dataset.

Step 3: Training the neural network model (impulse) with transfer learning
It is struggling to build an accurate computer vision model from scratch, as the model requires a wide variety of input data to generalize well, and training such models can take days on a GPU. However, Edge Impulse employs transfer learning while training a neural network model for object detection. The transfer learning method retrains the upper layers of a well-trained neural network model for object detection, leading to much more reliable models that train in a fraction of the time and work with substantially smaller datasets.
Although transfer learning makes training object detection models effortless, recognizing and monitoring litter with machine learning is still challenging. Since the variety of litter differs in color, shape, and material, I handpicked 292 most-fitting images from two different datasets, as explained in the previous steps. After processing my dataset, I trained the model with the whole dataset to distinguish between three different litter categories (bottle, can, packaging).
After training the model with my dataset, Edge Impulse evaluated the precision score (accuracy) as 60.2%.
⭐ Go to Object detection under Impulse design, select the default base model, and set:
- Number of training cycles ➡ 40
- Learning rate ➡ 0.01

Step 3.1: Validating the neural network model
Since I utilized my whole dataset for training the model, I uploaded new images as the testing dataset to validate the model.
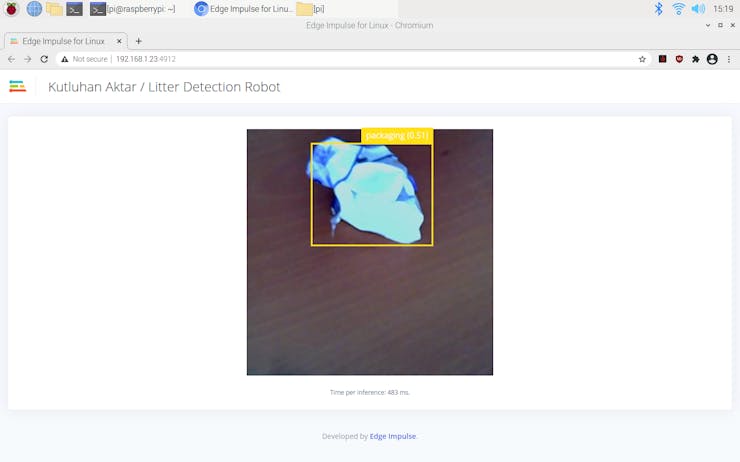
After validating the model, I inferred that it distinguishes between bottles (plastic and glass) and cans (metal) with high accuracy of more than 88%. However, it struggles to detect packaging (plastic, paper, cardboard, etc.) since packaging differs in many aspects - shape, color, material, etc. Due to its miscellaneous collection, the accuracy is between 45% and 55% for packaging. Therefore, I am still collecting data to improve my dataset and the accuracy of packaging.
With the testing dataset (approximately 50 images), Edge Impulse evaluated the model accuracy as 84.11%.
⭐ To validate the model, go to Model testing and select Classify all.

Step 4: Connecting Raspberry Pi 4 to Edge Impulse
After being designed, trained, validated, and verified, I deployed my model to the Raspberry Pi 4. Since Raspberry Pi 4 is officially supported by Edge Impulse, it is simple to deploy and run models with this development board.
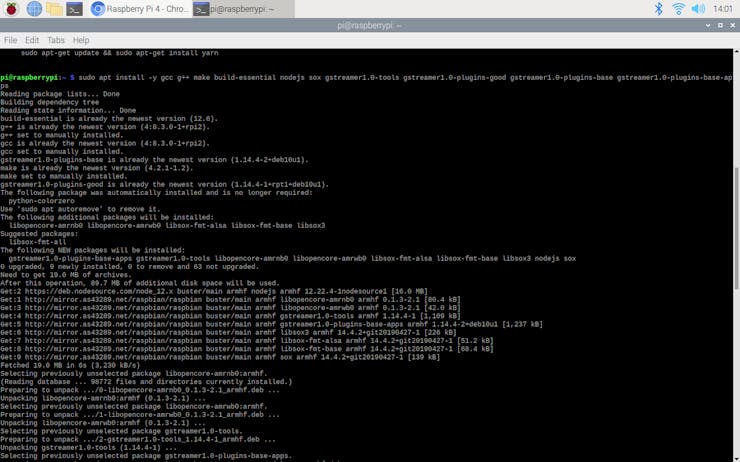
⭐ First of all, open the terminal and run the following commands to install dependencies and modules:
curl -sL https://deb.nodesource.com/setup_12.x | sudo bash -
sudo apt install -y gcc g++ make build-essential nodejs sox gstreamer1.0-tools gstreamer1.0-plugins-good gstreamer1.0-plugins-base gstreamer1.0-plugins-base-apps
npm config set user root && sudo npm install edge-impulse-linux -g --unsafe-perm

⭐ After installing dependencies, connect the USB webcam to the Raspberry Pi 4 and run this command:
edge-impulse-linux
⭐ Then, log in and choose an Edge Impulse project (Litter Detection Robot) with the terminal wizard.
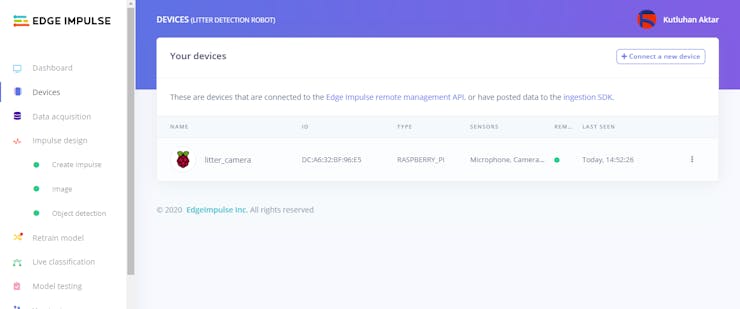
 ⭐ To verify whether the Raspberry Pi 4 is connected to the selected Edge Impulse project successfully, go to the project page and click Devices.
Step 5: Deploying and running the model on Raspberry Pi 4
⭐ To deploy and run the model locally on the Raspberry Pi 4, open the terminal and enter this command below:
edge-impulse-linux-runner
⭐ Then, Edge Impulse automatically compiles the model with full hardware acceleration and downloads it to the Raspberry Pi 4. In that regard, the model runs with minimum latency and power consumption.


After deploying my model on the Raspberry Pi 4, I connected it and the USB webcam to the robot chassis. Then, I ran the model, and it started to classify between the three litter categories immediately.
- Bottle (glass and plastic)
- Can (metal)
- Packaging (plastic, paper, cardboard, etc.)


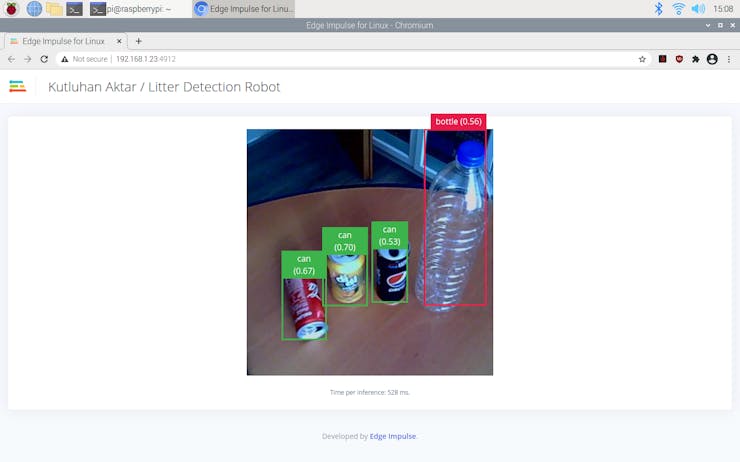
Since Edge Impulse provides a live video stream with the classification results from the connected webcam while the model runs, I did not need to create a webcam server with Motion or other modules to display the classification results while the litter detection robot operates.
⭐ To display the live video stream and classification results, go to the given URL in the terminal after running the model:
Want to see a feed of the camera and live classification in your browser? Go to http://192.168.1.23:4912
According to my experiments with the litter detection robot, my object detection model is stupendously successful in recognizing and monitoring litter categories while the robot moves autonomously :)


Step 6: Setting up the RPLIDAR A1M8 360 Degree Lidar on Raspberry Pi 4
To make the litter detection robot move autonomously, I utilized an RPLIDAR A1M8-R6 - 360 Degree Laser Scanner (Lidar). This lidar can perform 360-degree scans within a 12-meter range and generate up to 8000 samples per second.
Instead of mapping the environment to navigate the robot (SLAM), I used the lidar to detect obstacles in three different directions (right, left, and front) because I wanted to make the robot operate without any limitations regarding the environment (indoor or outdoor).
To obtain the 360-degree scan data generated by the RPLIDAR A1M8 with Raspberry Pi, I used the Adafruit CircuitPython RPLIDAR library.
Before collecting data with the library, I connected the RPLIDAR A1M8 to my computer (Windows) and ran the Frame Grabber application to inspect angle directions and distance measurements while it scans the surrounding environment.

⭐ To install the Adafruit CircuitPython RPLIDAR library, open the terminal and enter the command below:
sudo pip install adafruit-circuitpython-rplidar
⭐ If the terminal throws an error like this:
Command "python setup.py egg_info" failed with error code 1 in /tmp/pip-install-AV32Zl/adafruit-circuitpython-rplidar/
⭐ Update the pip setup tools by entering these commands below:
sudo python3 -m pip install -U pip
sudo python3 -m pip install -U setuptools

Step 7: Detecting obstacles with the RPLIDAR A1M8 and controlling the robot chassis
Instead of taking a step-and-read approach, the RPLIDAR A1M8 drives the rotating scanner with a DC motor and generates distance readings with obtained angles by the scanner. In that way, a single revolution is not guaranteed to produce distance values for each possible angle (from 0 to 360). In only over several rotations, a full 360-degree scan can be elicited with this lidar. Therefore, using the RPLIDAR A1M8 for obstacle avoidance can be tricky and struggling without debugging the generated scan data points.
After setting up the RPLIDAR A1M8 and including the required modules, I debugged and processed the incomplete 360-degree scan data generated by the scanner for each revolution to detect obstacles in three different directions. For each direction, I defined a starting angle and an ending angle (clockwise):
- Right ➡ starting: 60, ending: 120
- Left ➡ starting: 240, ending: 300
- Front ➡ starting: 340, ending: 20
In each direction range, the code searches for accurate distance measurements as starting point and ending point:
- Starting point ➡ from starting angle to starting angle + 15,
- Ending point ➡ from ending angle to ending angle - 15.
In that way, the code covers a 30-degree range for each direction to elicit accurate distance measurements (starting point and ending point) without errors or omissions. Then, if the elicited starting point and ending point of a direction are smaller than the given threshold (40 cm), the code activates the robot chassis (L298N) to avoid the detected obstacle in that direction.
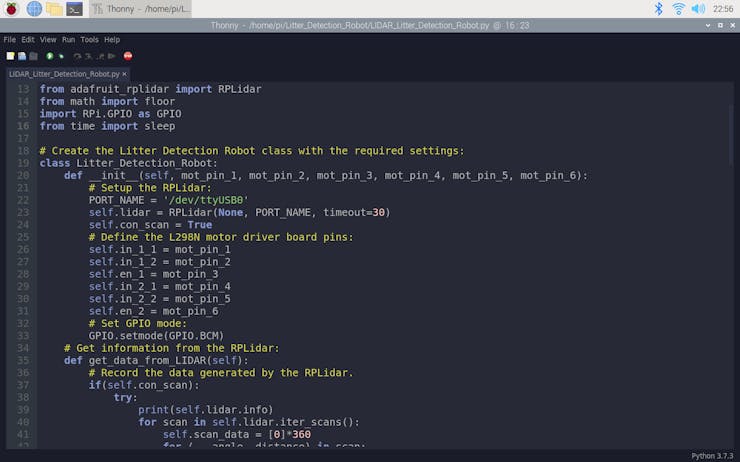
⭐ Include the required modules.
from adafruit_rplidar import RPLidar
from math import floorimport RPi.GPIO as GPIO
from time import sleep
⭐ Create the Litter_Detection_Robot class with the required settings.
⭐ In the __init__ function, define the RPLIDAR scanner settings and the L298N motor driver module pins.
class Litter_Detection_Robot:
    def __init__(self, mot_pin_1, mot_pin_2, mot_pin_3, mot_pin_4, mot_pin_5, mot_pin_6):
        # Setup the RPLidar:
        PORT_NAME = '/dev/ttyUSB0'
        self.lidar = RPLidar(None, PORT_NAME, timeout=30)
        self.con_scan = True
        # Define the L298N motor driver board pins:
        self.in_1_1 = mot_pin_1
        self.in_1_2 = mot_pin_2
        self.en_1 = mot_pin_3
        self.in_2_1 = mot_pin_4
        self.in_2_2 = mot_pin_5
        self.en_2 = mot_pin_6
        # Set GPIO mode:
        GPIO.setmode(GPIO.BCM)
⭐ In the get_data_from_LIDAR function, obtain the most recent 360-degree scan data for a complete rotation with the iter_scans function and save it to the scan_data buffer.
scan_data[Floor_Angle] = Distance
⭐ If the KeyboardInterrupt is activated, pause scanning and reset GPIO pins.
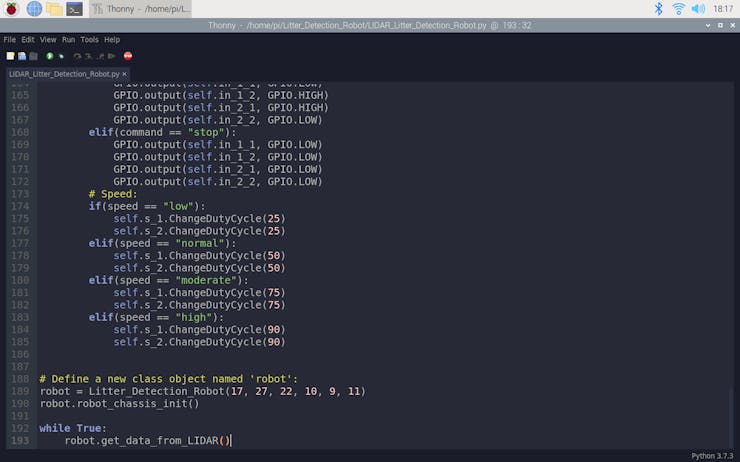
def get_data_from_LIDAR(self):
        # Record the data generated by the RPLidar.
        if(self.con_scan):
            try:
                print(self.lidar.info)
                for scan in self.lidar.iter_scans():
                    self.scan_data = [0]*360
                    for (_, angle, distance) in scan:
                        self.scan_data[min([359, floor(angle)])] = distance
                    self.process_lidar_data(60, 120, 240, 300, 340, 20)
            except KeyboardInterrupt:
                self.con_scan = False
                print("\nLIDAR Stopped!")
                self.lidar.stop()
                self.lidar.disconnect()
                GPIO.cleanup()
⭐ In the process_lidar_data function, search for accurate distance measurements (starting and ending points) for each direction depending on their starting angle and ending angle.
⭐ If the right starting point and the right ending point are smaller than the given threshold (40 cm), make the robot chassis via the L298N motor driver module: stop, turn left, and go forward.
⭐ If the left starting point and the left ending point are smaller than the given threshold (40 cm), make the robot chassis via the L298N motor driver module: stop, turn right, and go forward.
⭐ If the front starting point and the front ending point are smaller than the given threshold (40 cm), make the robot chassis via the L298N motor driver module: stop, revolve, and go forward.
def process_lidar_data(self, r_ang_s, r_ang_e, l_ang_s, l_ang_e, f_ang_s, f_ang_e, t=400, _range=16):
        # Object Distance:
        r_start = r_end = l_start = l_end = f_start = f_end = 3000
        # Debugging the data generated by the RPLidar:
        for i in range(_range):
            _angle = r_ang_s + i
            if(self.scan_data[_angle] > 1):
                r_start = self.scan_data[_angle]
                #print("Right Dis. Start = " + str(r_start))
                break
        for i in range(_range):
            _angle = r_ang_e - i
            if(self.scan_data[_angle] > 1):
                r_end = self.scan_data[_angle]
                #print("Right Dis. End = " + str(r_end))
                break

        for i in range(_range):
            _angle = l_ang_s + i
            if(self.scan_data[_angle] > 1):
                l_start = self.scan_data[_angle]
                #print("Left Dis. Start = " + str(l_start))
                break
        for i in range(_range):
            _angle = l_ang_e - i
            if(self.scan_data[_angle] > 1):
                l_end = self.scan_data[_angle]
                #print("Left Dis. End = " + str(l_end))
                break

        for i in range(_range):
            _angle = f_ang_s + i
            if(self.scan_data[_angle] > 1):
                f_start = self.scan_data[_angle]
                #print("Front Dis. Start = " + str(f_start))
                break
        for i in range(_range):
            _angle = f_ang_e - i
            if(self.scan_data[_angle] > 1):
                f_end = self.scan_data[_angle]
                #print("Front Dis. End = " + str(f_end))
                break

        # Control the robot chassis according to the debugged distance values:
        if((r_start < t) and (r_end < t)):
            print("\nStop!")
            self.robot_chassis_controls("stop")
            sleep(0.5)
            print("Right!")
            self.robot_chassis_controls("left", speed="moderate")
            sleep(1)
            print("Go!")
            self.robot_chassis_controls("forward", speed="low")
        if((l_start < t) and (l_end < t)):
            print("\nStop!")
            self.robot_chassis_controls("stop")
            sleep(0.5)
            print("Left!")
            self.robot_chassis_controls("right", speed="moderate")
            sleep(1)
            print("Go!")
            self.robot_chassis_controls("forward", speed="low")
        if((f_start < t) and (f_end < t)):
            print("\nStop!")
            self.robot_chassis_controls("stop")
            sleep(0.5)
            print("Front!")
            self.robot_chassis_controls("turn", speed="moderate")
            sleep(1)
            print("Go!")
            self.robot_chassis_controls("forward", speed="low")
⭐ In the robot_chassis_init function, define the L298N motor driver pin settings and thus initiate the robot chassis.
⭐ In the robot_chassis_controls function, define the direction and speed settings of the robot chassis.
def robot_chassis_controls(self, command, speed="default"):
        # Directions:
        if(command == "forward"):
            GPIO.output(self.in_1_1, GPIO.HIGH)
            GPIO.output(self.in_1_2, GPIO.LOW)
            GPIO.output(self.in_2_1, GPIO.HIGH)
            GPIO.output(self.in_2_2, GPIO.LOW)
        elif(command == "left"):
            GPIO.output(self.in_1_1, GPIO.LOW)
            GPIO.output(self.in_1_2, GPIO.LOW)
            GPIO.output(self.in_2_1, GPIO.HIGH)
            GPIO.output(self.in_2_2, GPIO.LOW)
        elif(command == "right"):
            GPIO.output(self.in_1_1, GPIO.HIGH)
            GPIO.output(self.in_1_2, GPIO.LOW)
            GPIO.output(self.in_2_1, GPIO.LOW)
            GPIO.output(self.in_2_2, GPIO.LOW)
        elif(command == "turn"):
            GPIO.output(self.in_1_1, GPIO.LOW)
            GPIO.output(self.in_1_2, GPIO.HIGH)
            GPIO.output(self.in_2_1, GPIO.HIGH)
            GPIO.output(self.in_2_2, GPIO.LOW)
        elif(command == "stop"):
            GPIO.output(self.in_1_1, GPIO.LOW)
            GPIO.output(self.in_1_2, GPIO.LOW)
            GPIO.output(self.in_2_1, GPIO.LOW)
            GPIO.output(self.in_2_2, GPIO.LOW)
        # Speed:
        if(speed == "low"):
            self.s_1.ChangeDutyCycle(25)
            self.s_2.ChangeDutyCycle(25)
        elif(speed == "normal"):
            self.s_1.ChangeDutyCycle(50)
            self.s_2.ChangeDutyCycle(50)
        elif(speed == "moderate"):
            self.s_1.ChangeDutyCycle(75)
            self.s_2.ChangeDutyCycle(75)
        elif(speed == "high"):
            self.s_1.ChangeDutyCycle(90)
            self.s_2.ChangeDutyCycle(90)


After completing the code and attaching the lidar (RPLIDAR A1M8) to the robot chassis, I tested the obstacle avoidance system of the litter detection robot on the shell. As far as my experiments with the robot go, the obstacle avoidance system works impeccably :)


Step 8: Building a fall detection system for the robot with Arduino
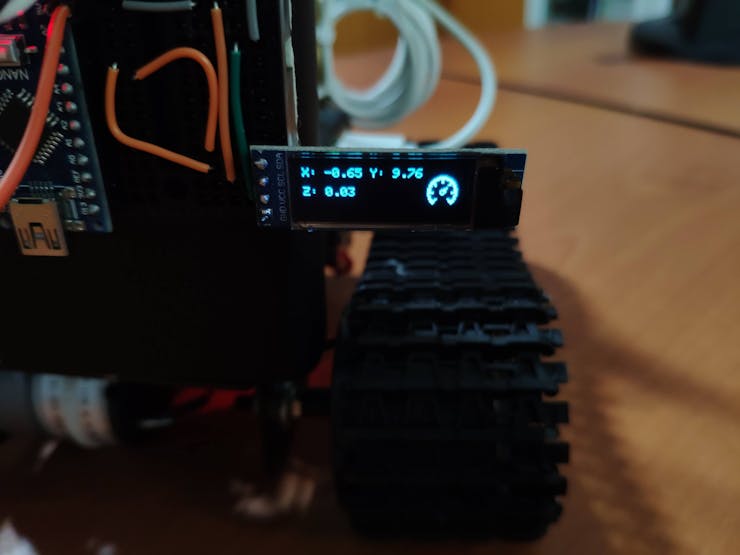
After completing the steps above, I decided to add a 6-axis accelerometer to the litter detection robot as a fall detection system to forfend it against crashes. The fall detection system also shows acceleration measurements of the X, Y, and Z-axis.
Download the required library to obtain data from the DFRobot Serial 6-Axis Accelerometer:
DFRobot_WT61PC | Library
Download the required libraries to control the SSD1306 OLED screen:
Adafruit_SSD1306 | Library
Adafruit_GFX | Library
⭐ Include the required libraries.
#include <DFRobot_WT61PC.h>
#include <SoftwareSerial.h>
#include <Adafruit_GFX.h>
#include <Adafruit_SSD1306.h>
⭐ Initiate the software serial port and define the serial 6-axis accelerometer object.
// Initiate the software serial port. RX:11 TX:12
SoftwareSerial mySerial(11, 12);

// Define the Serial 6-Axis Accelerometer.
DFRobot_WT61PC accelerometer(&mySerial);
⭐ Define the SSD1306 OLED screen settings.
#define SCREEN_WIDTH 128 // OLED display width, in pixels
#define SCREEN_HEIGHT 32 // OLED display height, in pixels
#define OLED_RESET    -1 // Reset pin # (or -1 if sharing Arduino reset pin)

Adafruit_SSD1306 display(SCREEN_WIDTH, SCREEN_HEIGHT, &Wire, OLED_RESET);
⭐ Define the data output frequency of the accelerometer.
⭐ Initialize the SSD1306 OLED screen.
accelerometer.modifyFrequency(FREQUENCY_10HZ);

// Initialize the SSD1306 screen:
display.begin(SSD1306_SWITCHCAPVCC, 0x3C);
display.display();
delay(1000);
⭐ Display acceleration measurements of the X, Y, and Z-axis on the SSD1306 OLED screen.
⭐ If the angle measurements of the X and Y-axis are smaller than the given threshold (-50), activate the buzzer to notify the user about the detected fall.
if(accelerometer.available()){
    // Print the acceleration information of the X, Y, and Z-axis.
    display.clearDisplay();
    display.drawBitmap(100, 6, _speed, 24, 24, SSD1306_WHITE);
    display.setTextSize(1);
    display.setCursor(0,0);
    display.setTextColor(SSD1306_WHITE);
    display.print("X: ");
    display.print(accelerometer.Acc.X);
    display.print(" Y: ");
    display.println(accelerometer.Acc.Y);
    display.print("\nZ: ");
    display.print(accelerometer.Acc.Z);
    display.display();

    // Activate the buzzer depending on the angle information of the X, Y, Z-axis.
    if(accelerometer.Angle.X < -50 || accelerometer.Angle.Y < -50 /*|| accelerometer.Angle.Z < -160*/){
      tone(buzzer, 500);
      delay(250);
    }else{
      noTone(buzzer);
    }
  }


⭐ To display an image with the SSD1306 OLED screen, download the LCD Assistant, upload a monochromatic bitmap, and select Vertical or Horizontal depending on the screen type. Then, convert the monochromatic bitmap to a data array.
⭐ Finally, add the data array to the code and draw it on the screen:
static const unsigned char PROGMEM _speed [] = {0x00, 0x7E, 0x00, 0x01, 0xFF, 0x80, 0x07, 0xFF, 0xE0, 0x0F, 0x99, 0xF0, 0x1E, 0x18, 0x78, 0x3C,0x18, 0x3C, 0x3E, 0x00, 0x7C, 0x76, 0x00, 0xEE, 0x72, 0x00, 0x0E, 0x60, 0x01, 0x06, 0xE0, 0x07,0x07, 0xE0, 0x1E, 0x07, 0xE0, 0x3E, 0x07, 0xF8, 0x26, 0x1F, 0xF8, 0x3C, 0x1F, 0xC0, 0x18, 0x03,0xE0, 0x00, 0x07, 0x60, 0x00, 0x06, 0x60, 0x00, 0x06, 0x73, 0x00, 0xCE, 0x3E, 0x00, 0x7C, 0x3C,0x00, 0x7C, 0x1C, 0x00, 0x38, 0x08, 0x00, 0x10, };

...

display.clearDisplay();
display.drawBitmap(100, 6, _speed, 24, 24, SSD1306_WHITE);

After attaching the fall detection system to the litter detection robot, it immediately started showing acceleration measurements on the screen and detected each fall without an error.

_Litter_Detection_Robot_w_Edge_Impulse/Pictures/working_fall_detection.gif)
Connections and Adjustments
// Connections
// Raspberry Pi 4 :
//                                L298N Motor Driver Module
// GPIO 17 ----------------------- IN_1
// GPIO 27 ----------------------- IN_2
// GPIO 22 ----------------------- EN_A
// GPIO 10 ----------------------- IN_3
// GPIO  9 ----------------------- IN_4
// GPIO 11 ----------------------- EN_B
//
//
// Arduino Nano :
//                                DFRobot Serial 6-Axis Accelerometer
// D11 --------------------------- TX
// D12 --------------------------- RX
//                                SSD1306 OLED 128x32
// A4  --------------------------- SDA
// A5  --------------------------- SCL
//                                Buzzer
// D10 --------------------------- S
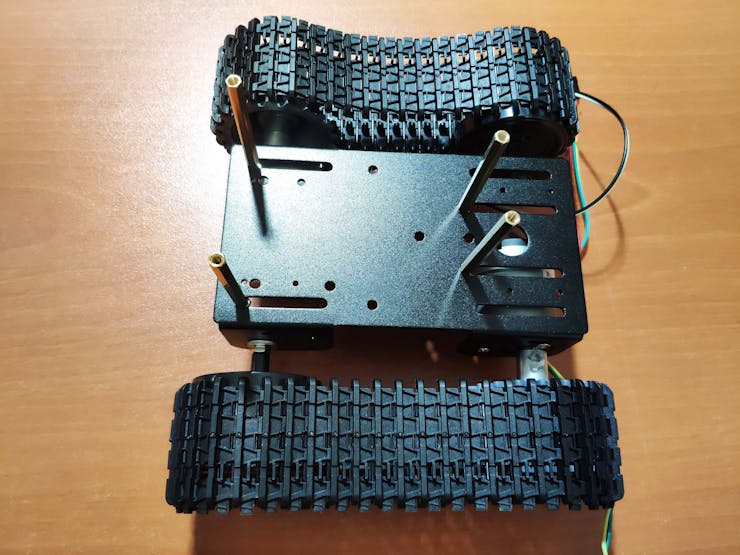
First of all, I assembled the DFRobot Black Gladiator (Tracked Robot Chassis) and connected an L298N motor driver module to the robot chassis to control its DC motors easily with Raspberry Pi GPIO pins. In my previous project, you can inspect step-by-step instructions to assemble the Black Gladiator.
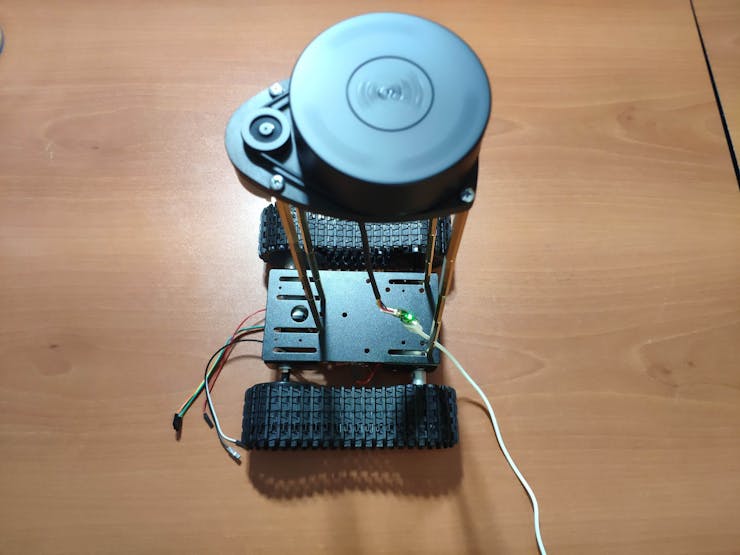
Then, I connected the RPLIDAR A1M8 360 Degree Laser Scanner (Lidar) and the USB webcam to the Raspberry Pi 4.

By utilizing male-female brass hex PCB spacers (standoffs), I attached the RPLIDAR A1M8 to the robot chassis. Then, I connected the L298N motor driver module to the Raspberry Pi 4 via its GPIO pins.

To supply the Raspberry Pi 4 and the L298N motor driver module, I used a Xiaomi 20000 mAh 3 Pro Type-C Power Bank. I connected a USB buck-boost converter board to the Xiaomi power bank to elicit stable 12V for DC motors of the robot chassis.


To build the fall detection system for the robot, I connected the DFRobot serial 6-axis accelerometer, the SSD1306 OLED screen (128x32), and the buzzer to the Arduino Nano. To supply the Arduino Nano, I connected it to the Raspberry Pi 4:
- Arduino Nano ➡ Raspberry Pi 4
- VIN ➡ 5V
- GND ➡ GND

Finally, I connected the USB webcam to the Raspberry Pi 4 and fastened all components to the robot chassis with a hot glue gun.


Videos and Conclusion
After completing coding, designing, and assembling, the autonomous litter detection robot operated flawlessly around obstacles and recognized litter categories impeccably with the object detection model as far as my experiments go :)

Further Discussions
By employing autonomous litter detection robots applying object detection models in beaches, forests, streets, etc., we can achieve to:
🤖🚯 improve air and water quality as well as reduce greenhouse gas emissions,
🤖🚯 conserve natural resources,
🤖🚯 protect wildlife,
🤖🚯 avert bacteria, viruses, germs, and parasites from spreading,
🤖🚯 minimize economically challenging workloads while examining littered areas,
🤖🚯 increase local revenue and development.

References
[1]“How Does Littering Affect the Environment?” Texas Disposal Systems, 04 May 2020, https://www.texasdisposal.com/blog/the-real-cost-of-littering/.