 Angel Cabello
User case
Let's see how the device works and how the different actors interact with it
The first point is to enter the data into the system. We have developed an Alexa Skill that launches a python function that stores that (name and frequency) in a database. So the caregiver can talk to Alexa and update the information about his patient, more details in a later section. A more professional way is to connect the health IT system with our system. It is a standard HL7, and it allows the communication health system. We can import this information as an HL7, OMP ^ O09 message (Treatment Order), SIU^S12 for the doctor appointment, and ORU for the medical test result. With a Mirth Connect (an open-source program that can manage these messages), we can configure a channel that stores the name of the medicine and the frequency of taking it in the database. But we prefer the maker way.
We manage the events with AWS Event Bridge, which fires some lambda functions, csDispensation01 and csDispensation002. It looks in the database and generates a JSON message for each of the pending information in that hour and we send it to the MQTT queues of IoT that are mounted. We get the subject from the database, patient table.
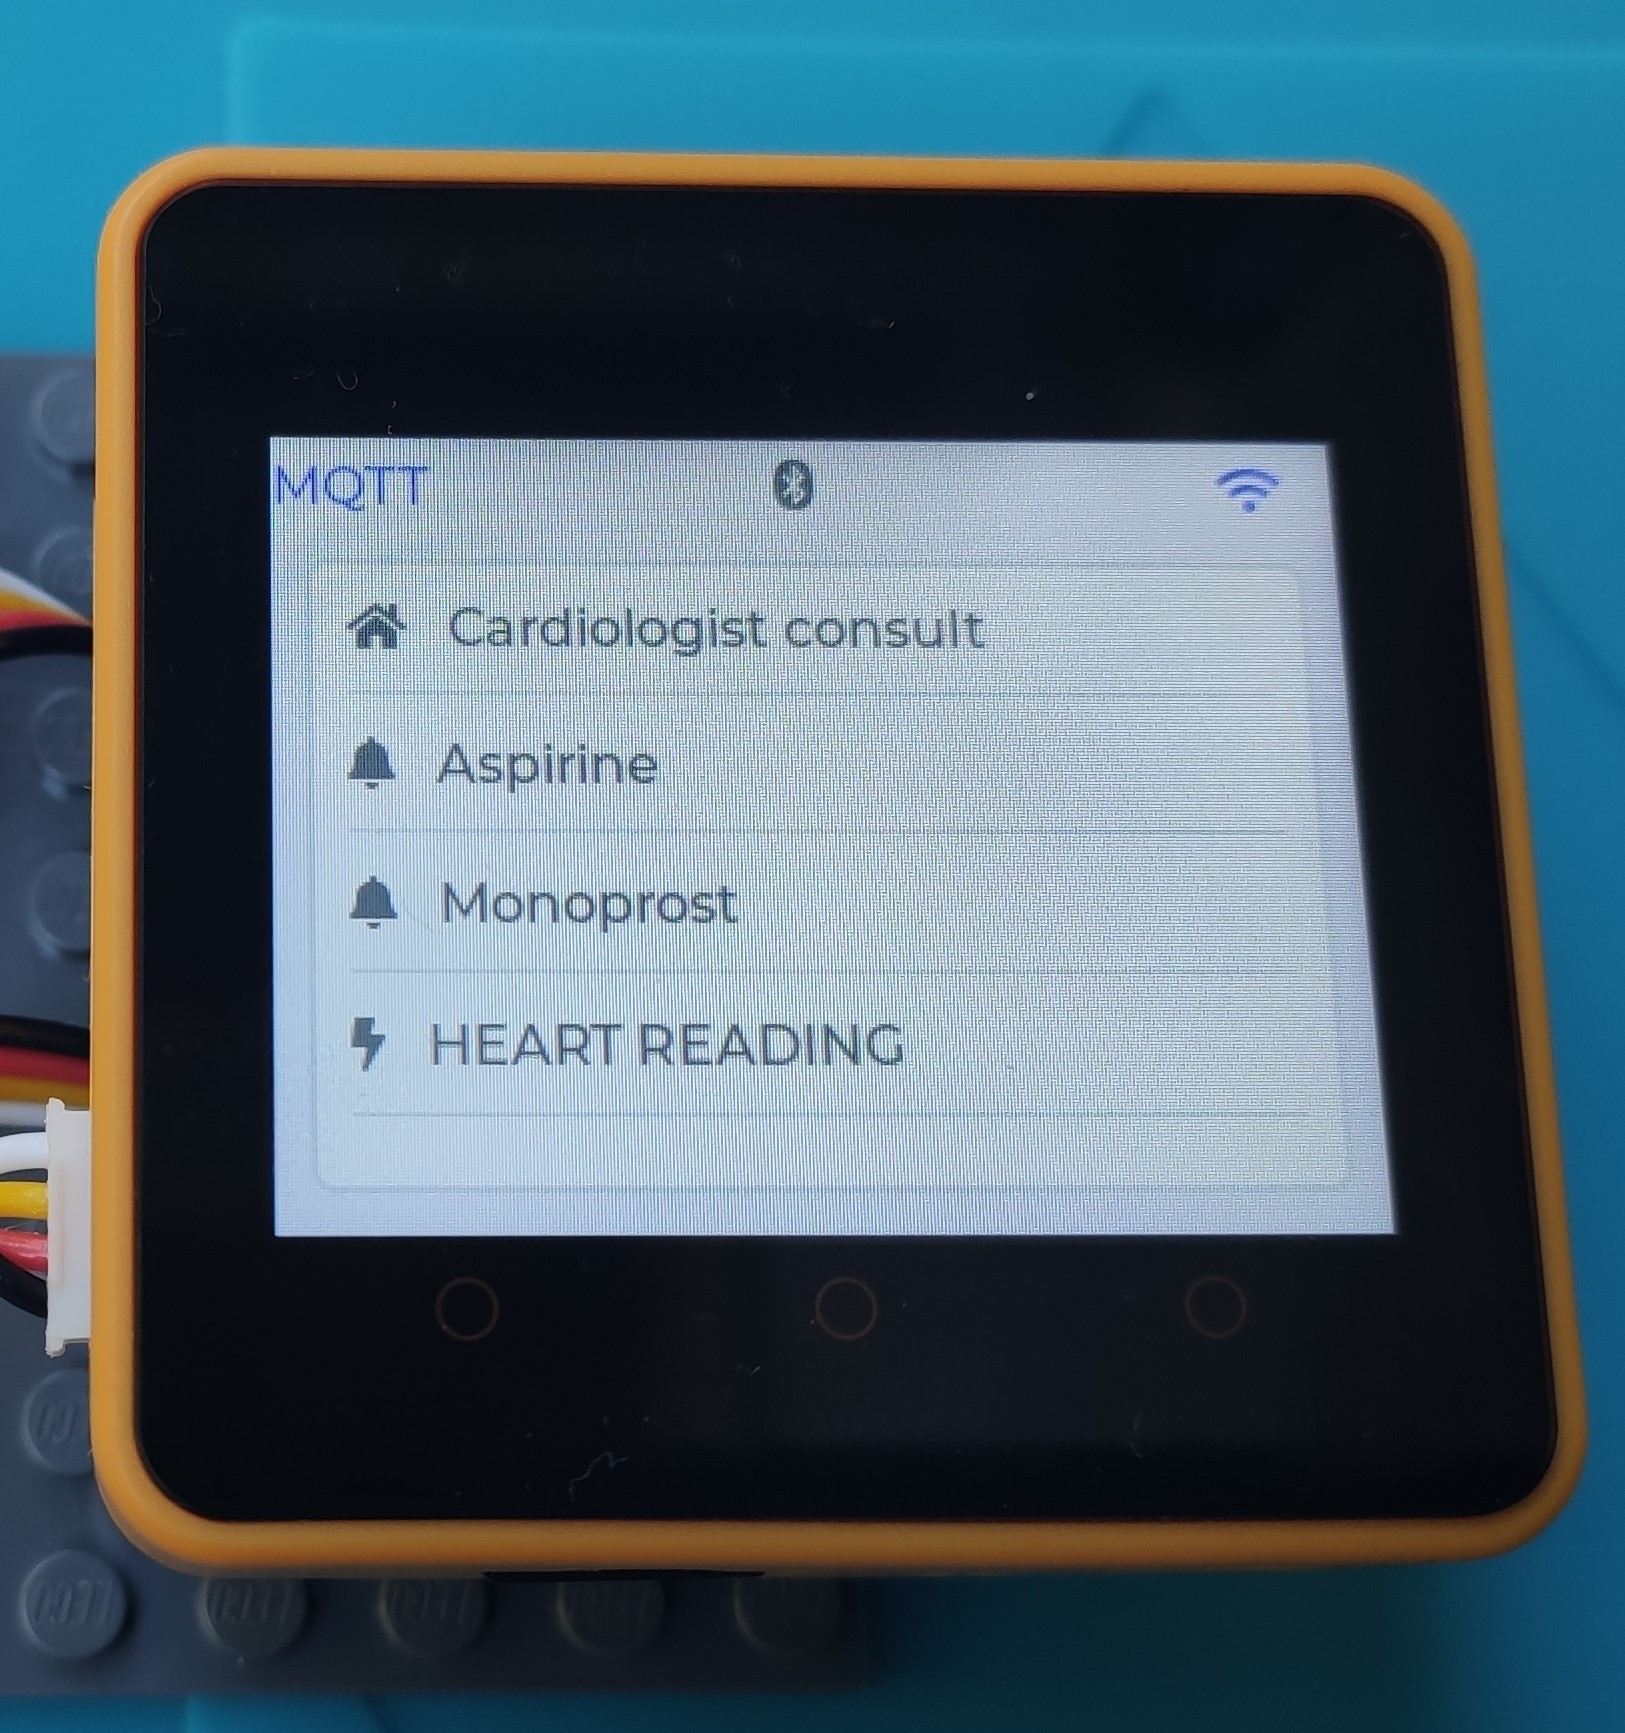
AWS IoT Edukit reads these MQTT messages. I have started from the Cloud Connected Blinky sample. I have added a few more tasks, and I have stored some messages in an SDCard, so I can play them when I need to interact with people. We use blinky LEDs to draw the attention of the person who has to take the medication. It changes the color when it spends a period of time without interaction with the patient. The name of the medicine is written on the screen. we can show ten different medicines. When the patient takes the medicines he touches the screen and the system updates the state of the medicine and clears the screen.
Another daily event (AWS event bridge) fires another lambda function, csNotification02, that looks in the database for medicines not taken in the last 24 hours and sends a message to the phone of the medical caregiver using AWS SNS.
Prescription Medicine, Alexa Skill
We store the medicine that CuramSenes will remember to take in a MariaDB table. As I have told you before, the professional (with several patients, connected directed to the hospital) way is to use HL7. But for now, I have developed a more maker way an Alexa Skill.
We have started from the hello word sample, in python. Some parts of the code are the original. I have changed the name and the invocation phrase, new medicine. For now, it is ok but it is not a self-explaining name.
I have used 2 news slot types, one for the time, the amazon implementation. For the medicine, I have created a new one, when the name of the medicines I use in the sample. But we can populate this list with a Vademecum-like list.
And I have added a new Intent, NewMedicine. It has the ways it can be invoked.
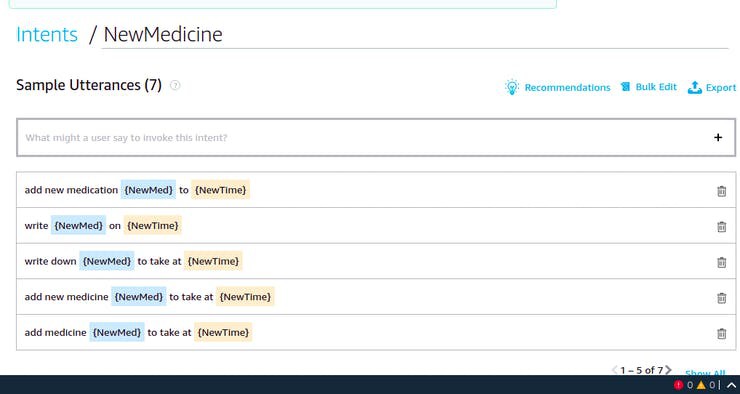
When somebody says these phrases it launches a python function, it connects to the database and stores the information there. The code is in GitHub:
This is a sample interaction:
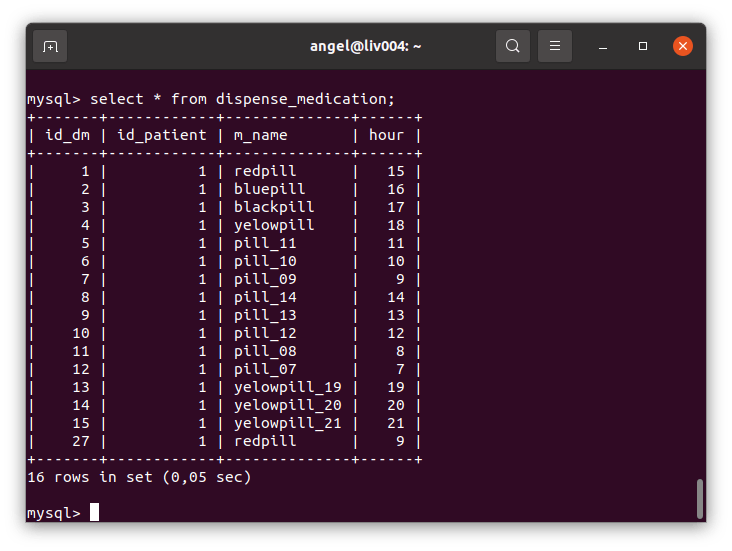
And the table has one more element...
Data model
It is a very simple data model, we will complete it when we add improvements.
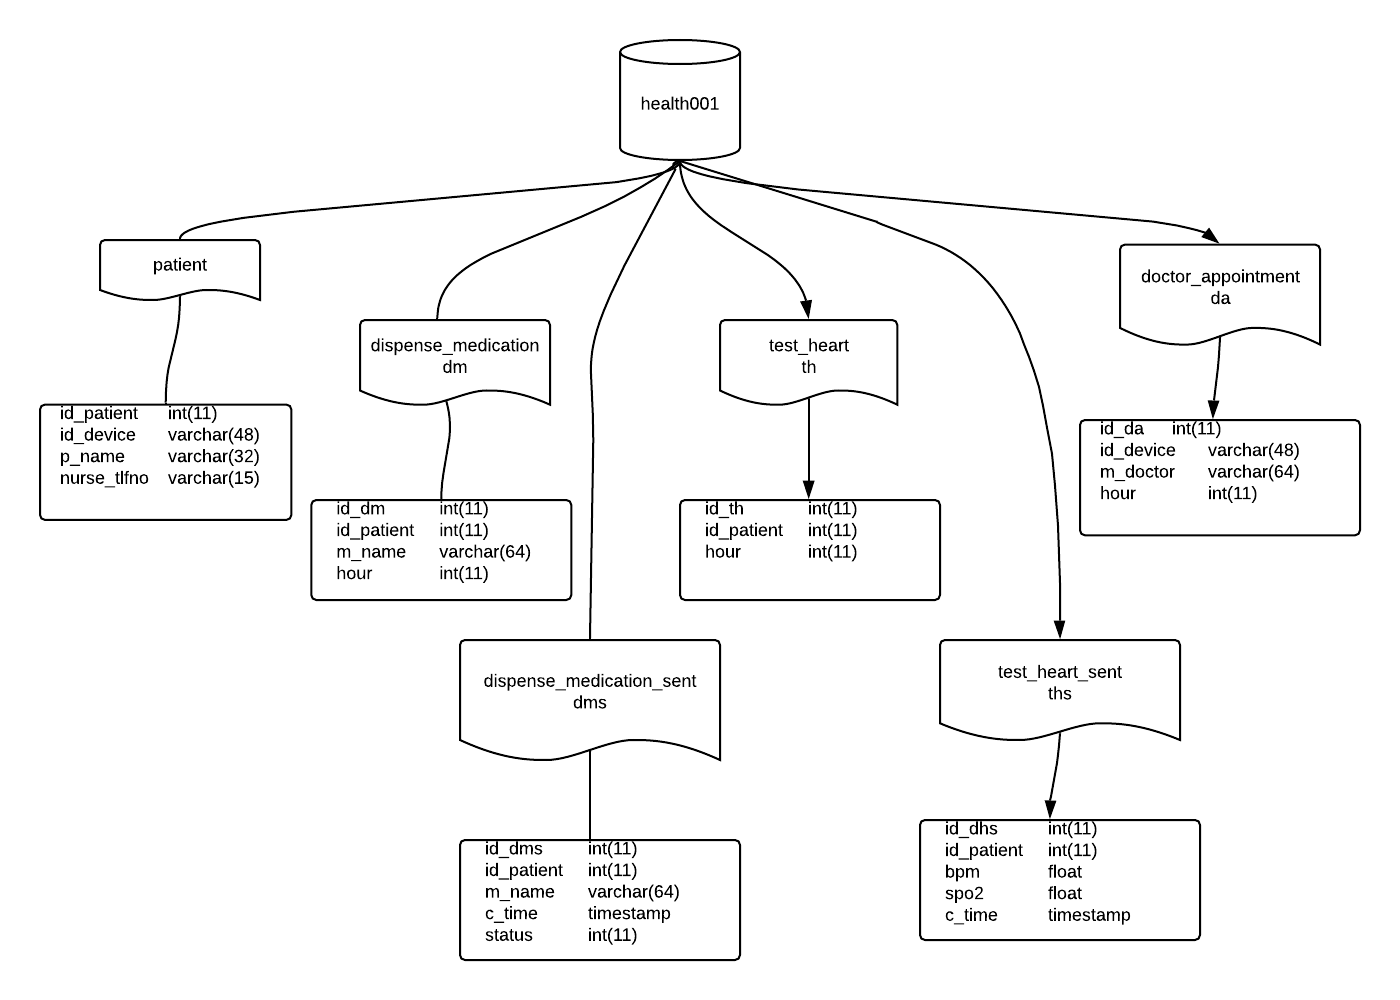
There are six tables:
- patient has the data for any patient, but in this sample, we have only one.
- dispensa_medication, where we store the medicines and at what time our patient has to take them.
- dispense_medication_sent, we add a record for any medicine dose, and the status it has.
- test_heart, stores the time we ask the patient to check his heart rate and O2 saturation
- test_heart_sent, stores the measures of the check
- doctor appointment, where we store the appointment with the doctor, so we can send a warning.
Something relevant is the status of the medicine in dms table, they are:
- NULL, sent a message but not received for the device
- 0, send and an ACK sent
- 1, the patient has taken the medicine
- 2, the patient has forgotten to take the medicine (or acknowledge in the screen)There are six tables:
- patient has the data for any patient, but in this sample, we have only one.
- dispensa_medication, where we store the medicines and at what time our patient has to take them.
- dispense_medication_sent, we add a record for any medicine dose, and the status it has.
- test_heart, stores the time we ask the patient to check his heart rate and O2 saturation
- test_heart_sent, stores the measures of the check
- doctor appointment, where we store the appointment with the doctor, so we can send a warning.
- NULL, sent a message but not received for the device
- 0, send and an ACK sent
- 1, the patient has taken the medicine
- 2, the patient has forgotten to take the medicine (or acknowledge in the screen)
IoT AWS Edukit code. Frontend
Following the advice of the forum administrator, we have used the ESP-IDF development environment, with Platformio, and as IDE Visual Studio Code.
The starting point has been the example of the blinky led. We have kept the task that manages the led, blink_task, with minor modifications, we have only put a variable to indicate the color with which it blinks, and change it to red when some time has passed since the first warning. Five tasks have been added:
- ui_task, where is the code you write on the device screen.
- aws_iot_task, in which we have put the code that communicates with the AWS IoT service through MQTT messages.
- cs_task, which contains the business logic of the application and reads and generates the messages from the backend.
- speakMe_task, manages the audios that are played.
- blueScan_task, manages the connection with the device
- heart_task, manages the medical tests, the heart rate, and blood oxygen saturation reader.
In the main loop, we have a code that tells us what is the maximum memory consumption of the heap of these tasks and of the GUI management task that is started in the Core2forAWS library. It has allowed us to debug memory consumption and minimize the heap that we assign to each task, leaving a safety margin of around 1kb.
ui_task
I have followed the design of the example. We keep the text that indicates whether the WIFI network has been connected or not, changing the color of the icon. Another text has been added to the left when starting it appears as '____' and when connecting to the AWS IoT server an MQTT text appears. We have put this control because sometimes it connects to WIFI but does not connect to the message queue. If we restart the device it reconnects. In the middle part of the upper bar, we have the Bluetooth symbol and it turns blue when it is connected and detects the presence of the Bluetooth monitoring device. It turns gray if the device disappears.
In the central part, there is a list where we write the name of the medication that the user has pending to take, if it is necessary to carry out a medical test (take the pulse and the oxygen saturation in the blood) or if you have an appointment with the doctor. When you have taken the medication, touch this text field and the event that indicates that you have taken the medication is launched (we erase the message, the LED stops flashing and we send an MQTT message to the backend)
This task gives many problems, I think due to a bug in the lvgl library that I have not been able to debug, which we will talk about later.
aws_iot_task
This task is responsible for connecting to the MQTT server, marking one works as a callback for the messages that are received, and sending the messages to the server (we use a control variable for each type of message). We've kept most of the code in the example, simplified it a bit, and put it in another task.
The connection part with the server has been a bit 'sensitive', when the code has been touched there have been connection problems. We have prioritized the development of other parts of the program before optimizing this task.
The MQTT queues that we use are:
- "123DEVICENUMBER123"/medication, receive the medication JSON messages.
- "123DEVICENUMBER123"/med_appointment, here we receive the doctor's appointment.
- "123DEVICENUMBER123"/med_test, we receive the notification to ask for a medical test.
- "123DEVICENUMBER123"/rtn, we return the status of the medicine to the backoffice
- "123DEVICENUMBER123"/test_heart_rtn, we return the result of the medical test, BPM and oxygen saturation (%).
- "123DEVICENUMBER123"/beacon, It is not in use... but it will be used to notify the loss of communication with the device worn by the elderly, assuming that they have left the house.
cs_task
In this task, we control the business logic of the device. It is simple, we compare the time that the messages have been exposed on the screen with a predefined variable, PAST_DUE_TIME (for tests it is 10 seconds, normally it would be an hour) and we take the relevant task: If it is greater than one, we change the color of the LED to red and emit an audio message, we do that by sending an internal message in the qSoundQueue queue.
If it is greater than three, we remove that drug from the list. It seems dangerous to leave the medicines on the list for a long time because you can take two doses in a row. It can be improved in the future, including in the description of the medicine, or in the taking, if it has to be deleted or not. We control whether the text widget where the medication is has been clicked, and we clean it.
We also read an internal queue, where we are informed (via the MQTT callback) if new medication has arrived.
speakMe_task
There is a task blocked in a queue, waiting for a message with the name of the wav file to be played. We mount the SD card, read the file and send it to the speaker. We have created the audio files with AWS Polly services. As the SD card uses the SPI bus, just like the screen, we mount and unmount the device every time we send a message to avoid interference.
There was a small problem with the bitrate at which the audio had to be recorded, but it is configured in the library and has been modified to 22Kh. We have recorded the audios with the AWS Polly service that transforms text into speech. This system can be expanded to allow a more fluid dialogue with the user, such as telling him the name or the time of the medication to be taken.
bluescan_task
This task is the one that has given us the most technical problems.
On the one hand, the implementation of the Bluetooth ble in platformio-ESPIDF is not complete, when executing menuconfig the Bluetooth configuration options do not appear. We have copied the configuration from another project into the sdkconfig file. Also, some header files (*.h) did not read well, despite being in the components directory. We had to copy them back into an include directory. We develop the task and it works perfectly, but when integrating it with the GUI it gives us a problem, the guiTask task gets hooked, and the watchdog alerts us with a backtrace. We have not been able to solve it but it seems a problem with the lvgl library. I have asked in the forums of the bookstore but we still have not been able to solve it.
Many elderly people have switchboards that connect them to a telephone assistant when they have an incident and press a button around their neck. We want to complement this switchboard, in those homes where the elderly have impaired mental capacities. By adding a Bluetooth device to the patient's collar, if he leaves home and shouldn't do so, the device will notify us.
- We link each patient with the terminal, with a Bluetooth mac address, which we save on the patient table.
- We control that there is a connection with this device, we perform a scan of the nearby Bluetooth devices and if we see it, we update the time when we have seen it for the last time.
- If this time exceeds a threshold, we send a JSON message to the backend, which alerts the caregiver by sending an SMS message through the SNS channel advising him.
- If the device is a Bluetooth beacon and it is hanging from the patient, eg. Eg Tile, Airtag, etc, you can use the application of this platform to locate this person.
The functionality is disabled in the code, pending fixing the error.
heart_task
This task has a different life cycle management. The others are started in the main function, this is started when a message arrives requesting a heart test.
At the beginning of the task, the sensor is initialized, a max300100, which reads the record of heartbeats per minute and oxygen saturation in the blood. Then we have the loop, in which we obtain several measurements and calculate the mean. With these values, we form a JSON message that we send to the backend through the MQTT task, and it ends. In the backend, we store the data in bd. Subsequent improvements would allow this information to be passed on to caregivers, either with an HL7 message that incorporates it into the patient's electronic medical record or as a portal with graphics (for example with Grafena) that reads this data directly from the database.

E-ink Display, curamSenes second version
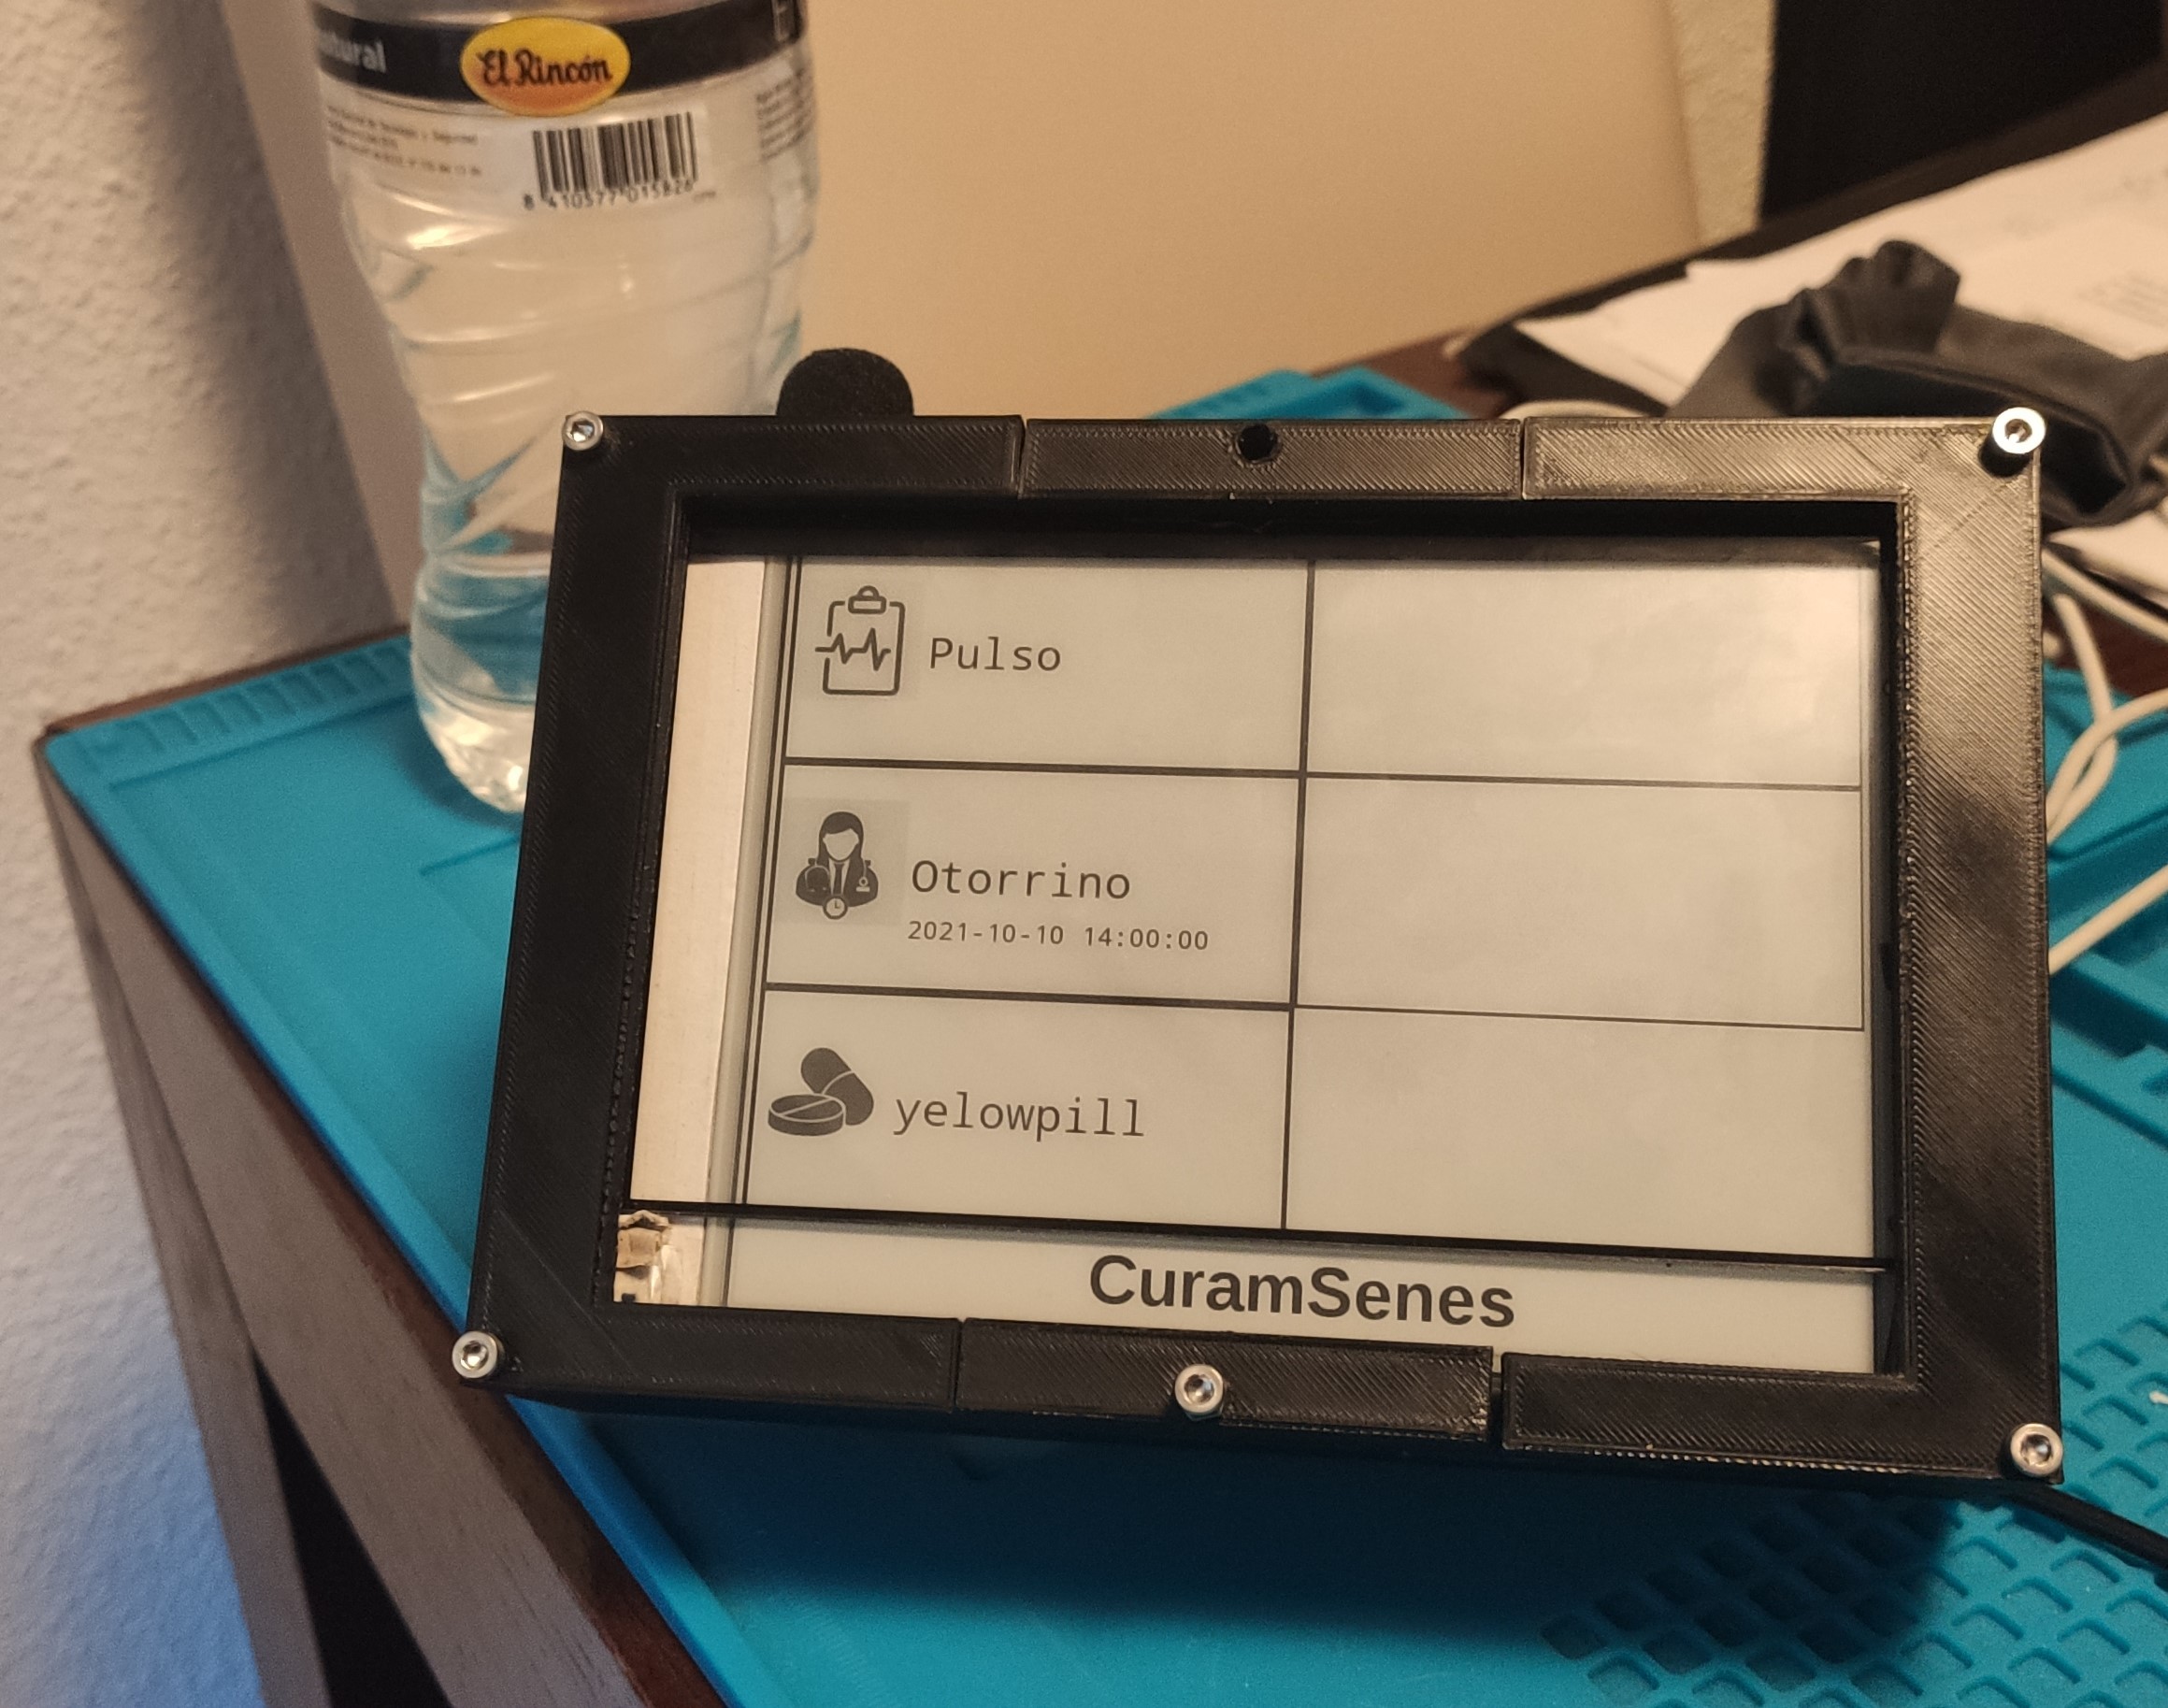
The previous device has some defects, the most important is the display. It is small and hard to read for disable or old people. I have started a second device, that connects to the same backend and it can read the same events (medical appointments and medical dispensation). It is not implemented the Bluetooth connection check with the beacon device nor the heart test events. But in a new evolution of the device, we will add these characteristics and a good status led.
The main device is a raspberry pi, running Raspbian. The is a USB audio device connected to reproduce the audio when a new event is received. The display is a Waveshare e-ink 6' display connected by an IT8951 to the raspberry pi. I have use python to develop this display and the library used to interface with it is Greg D Mayers one.
We have also used the official python library to connect to AWS IoT.
In front of the e-ink device, there is a USB digitalize, that translates all the touch events to mouse events, It is a pity haven`t able to found one with the same measures.
Backend code
The application backend is defined with AWS services.
The data is stored in a MariaDB database, using the AWS RDS service. We have already seen the data model in another section.
The main part of the backend is made up of the lambda functions:
They are trigger by AWS IoT when a message arrives at an MQTT subject:
csMQTT001: the function that reads the JSON messages in the backend of the medicines taken by the patient, that updates the status in dbd (received, taken, forgotten)
csMQTT002: the function that reads the JSON messages in the backend of the medical tests, in this case the heart rate and oxygen saturation.
Triggered by an EventBridge event
A daily event
csNotification002: checks the medication data of the last day, if any medication has not been taken a text message is sent to the caregiver's phone informing him.
csDispense002: consult the tables to see if the patient has an appointment with the doctor. If so, send a JSON-MQTT message to the device to inform the patient.
One event every hour
csDispense001: check the tables to see if the patient needs to take any medicine or have a test in the next hour. If so, create a record in the test table and send a JSON-MQTT message to the device to inform the patient.
The events that launch this functions are:
Instructions to build the project
It is easy to build it, we can only need to follow these points:
- get the hardware, AWS Edukit, Alexa echo, and an AWS account.
- register AWS Edukit in AWS IoT
- download Visual Studio Code, install Platformio and GitHub extension.
- download the device code, compile and transfer to the Edukit device
- create a MariaDB and create the database
- download Alexa skill code and create a new Alexa skill with it
- download the lambda code and create the 5 functions in AWS
- connect these functions, 3 of them are fired by EventBridge events, 2 more are connected to the IoT core MQTT functions, create two rules for them there.
- start having fun
Future steps
- Develop a portal for the caregiver, where they can consult the information of their dependents, he has used a Graphena to connect to the database and show the BMP and oxygen saturation data.
- Create a gateway to HL7 message to communicate with the hospital backend.
- Resolve the bugs in the Bluetooth subsystem, so we can detect when we lost the device's signal to fire an alarm. We also want to read the button on the device in order to start a conversation with a health assistant.
- Create this audio communication subsystem to help people when an alert arises.
- Incorporate the management of new medical tests to be performed and communication (Bluetooth, I2C,..) with the devices that perform them. For example, insulin meters, holter, oxygen pumps,...
- Increase the size of the screen, it is not easy to interact with such a small display.
- Increase the speech interaction.