Close
0%
0%

Halloween Candy Counter

This project will count the number of pieces of candy that are dropped into your child's candy basket!

Similar projects worth following
0 followers
Using a Pimoroni Tiny RP2040 board, a 1.3" OLED, and an ultrasonic sensor, a counter is incremented each time that a piece of candy is put in the candy basket. That way your child will know how much candy they got for the night, and the parents will know if the kids were eating the candy during trick or treating!

Put together a quick project using my kid's Halloween basket, a Pimoroni Tiny RP2040, an HC-SR04 ultrasonic sensor, and a 1.3" 128x64 OLED display that I had laying around.  I hadn't experimented with the Tiny RP2040 much, so this project gave me an opportunity to do that.

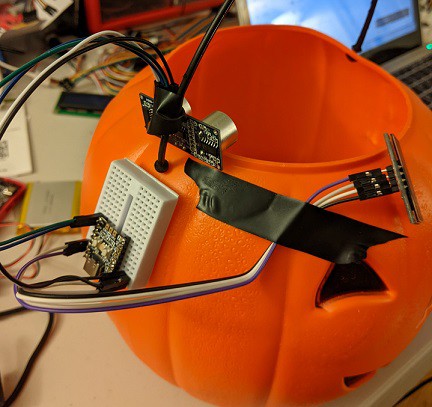
As you can see, pretty simple setup.  I powered the Tiny RP 2040 with a USB C cable and a small power brick.

Code was written in CircuitPython.  I had a real problem with the display driver, initially thinking it was an SSD1306 before finally realizing that it was an SH1106 (good lesson learned for those out there).

Once I had the display working correctly, it was just a matter of adding the ultrasonic sensor, adding logic for the sensitivity (so the basket wouldn't set off a false count), and then incrementing the counter.

A fun little project....demo below:

code.py

The CircuitPython code that runs on the Pimoroni Tiny RP2040. You need the CircuitPython image for the Tiny RP2040 and the adafruit_display_text, adafruit_displayio_sh1106, and the adafruit_hcsr04 libraries in the lib folder on the board's CIRCUITPY drive.

x-python - 2.31 kB - 10/28/2021 at 00:46

Download

  • 1 × Pimoroni Tiny RP2040
  • 1 × HC-SR04 ultrasonic sensor
  • 1 × 1.3" OLED display (128x64)
  • 1 × power brick with USB-C cable

  • 1
    Project setup.

    1. I used a small breadboard for my connections between the components.

    2. Pimoroni Tiny RP2040 with headers inserted into breadboard

    3. OLED display VCC -> 5V, GND -> GND, SCL to pin 1, SDA to pin 0

    4. ultrasonic sensor VCC -> 5V, GND -> GND, trigger -> pin 6, echo -> pin 7

    5. used double-sided tape and electrical tape to secure the components to the Halloween basket.

View all instructions

Enjoy this project?

Share

Discussions

Similar Projects

Does this project spark your interest?

Become a member to follow this project and never miss any updates