Building IoT products is hard because it involves development over a huge technology stack, like you need a hardware, you need an app (because technically that is what it is all about in the end) and a server to sync data between your app and hardware. This becomes much harder when you are doing it at production, like when you are starting a startup (building things to be sold). Then after that there comes scaling and managing your services which is another level of issue.
To make it easier we designed Grandeur which is a backend as a service platform for IoT to help developers and startups in building, scaling and managing their IoT products. It acts as a universal backend so you won't have to build and manage your own server. It comes with SDKs for arduino and web, which literally makes integration a whole lot easier. It is fast and event driven. In short, you can build things similar to Philips Hue right from your couch and make a pretty good business out of them provided that you market and sale like Philips 😛.
This tutorial is for helping you to get started with Grandeur. We will build an app from where we will publish data to a device in real-time. This will be a start and a whole series of tutorials are lined up after that. Before diving in, we urge you to checkout our first article to understand what Grandeur is about. If you have read it already or just want to skip over to real work, follow the steps below.
Step 1: Sign up to Grandeur
Create your account on Grandeur. It's free!
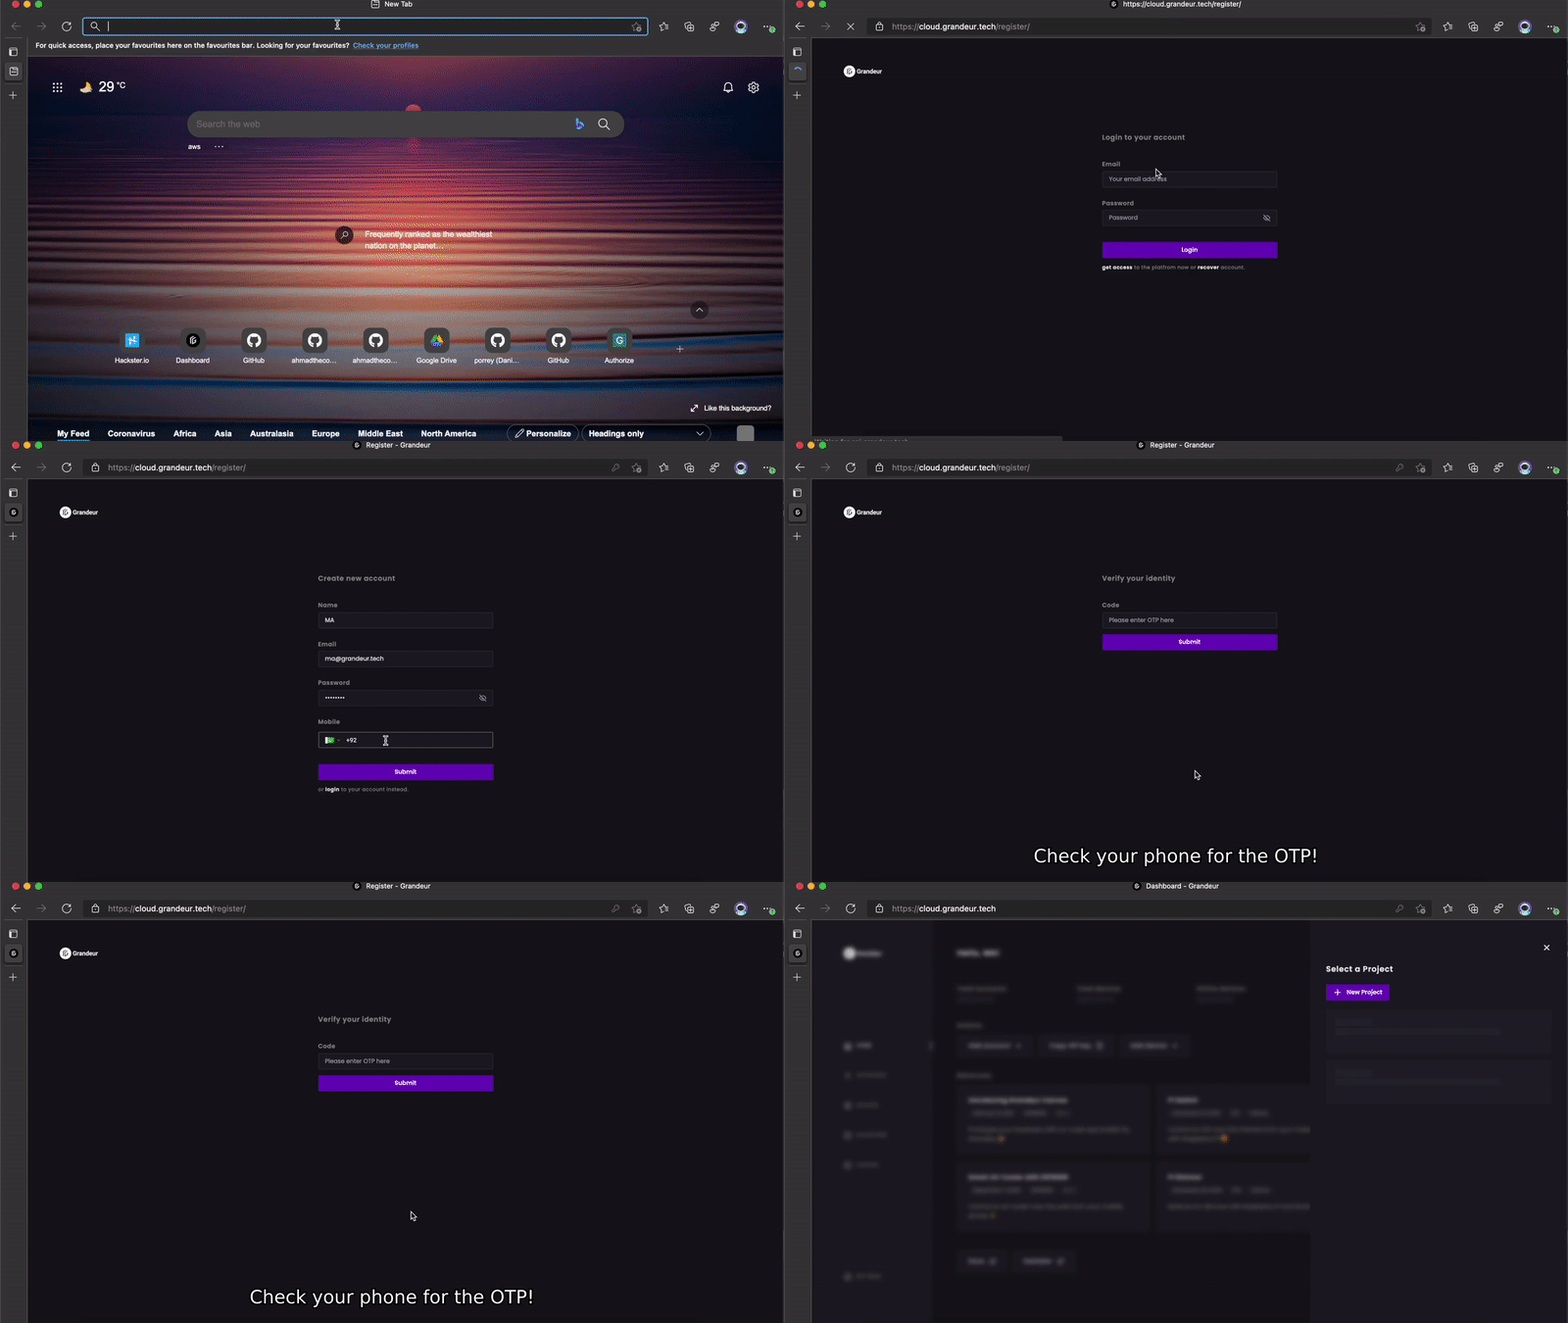
Or if you already have an account, just log in.
Step 2: Create Project
To take a start, create a new project as illustrated below:
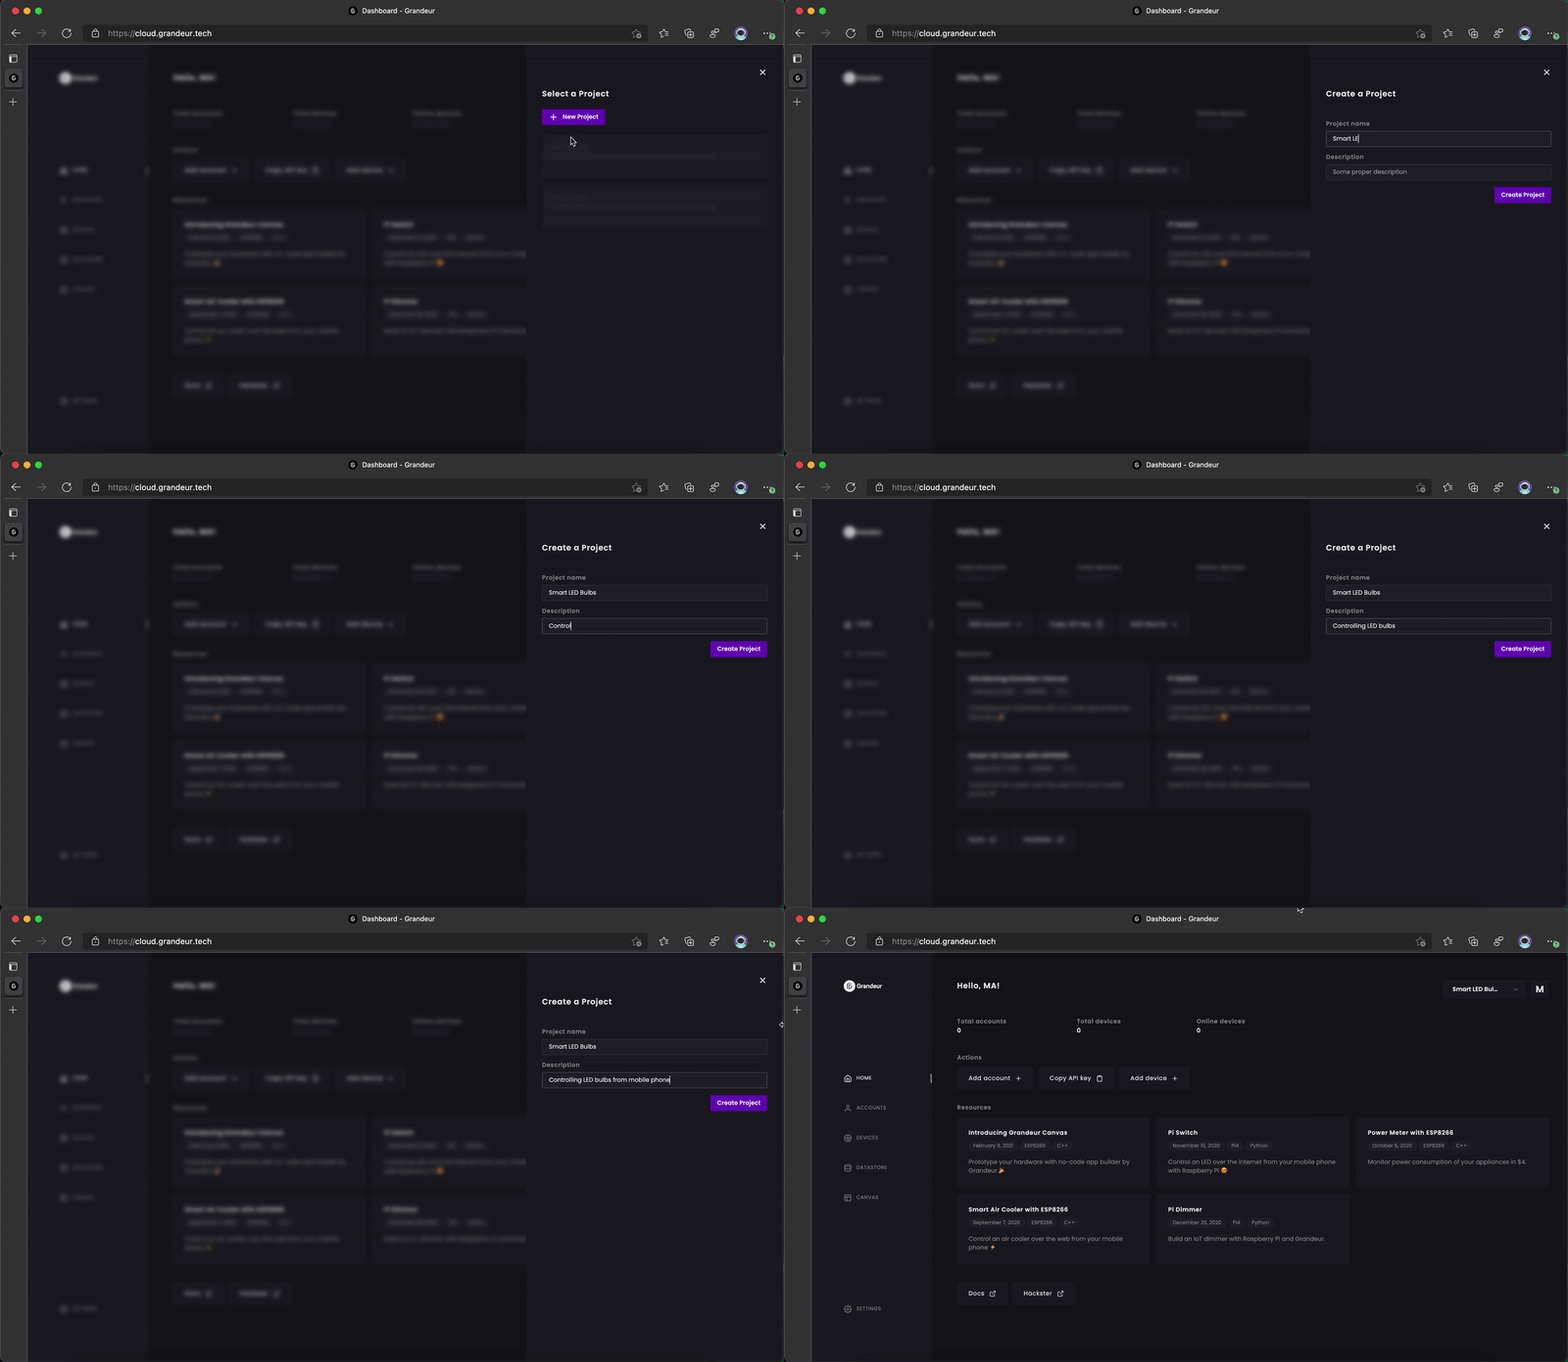
Then using the client SDKs, we will build our first application on Grandeur.
Step 3: Get Started on Web
First step is to create an application through which we will publish data to our device.
If you don't feel like building an application, you can use Grandeur Canvas which is a drag-and-drop no-code App builder. You can follow this tutorial and skip the rest of this Step 3 and Step 7.
Now, for the app, we are using the JS SDK. We start with creating two files index.html and main.js, open the index file in our editor and add basic html to it. The page contains just a heading and a paragraph to show status.
<!-- Index.html -->
<!DOCTYPE html>
<html>
<!-- Head block of our page-->
<head>
    <!-- Title of our page-->
    <title>First Grandeur App</title>
</head>
<!-- Body block of our page-->
<body>
    <!-- Heading of the page -->
    <h1>First Grandeur App</h1>
    <p id="status">Starting</p>
</body>
</html>
Then we link JS SDK and the main.js file to the page. Here is the updated code:
<!-- Index.html -->
<!DOCTYPE html>
<html>
<!-- Head block of our page-->
<head>
    <!-- Title of our page-->
    <title>First Grandeur App</title>
    <!-- Link SDK with CDN -->
    <script src="https://unpkg.com/grandeur-js"></script>
</head>
<!-- Body block of our page-->
<body>
    <!-- Heading of the page -->
    <h1>First Grandeur App</h1>
    <p id="status">Starting</p>
    <!-- Link the main script file -->
    <script src="./main.js"></script>
</body>
</html>
Now we open our script file (main.js) in the editor. To access Grandeur, we are required to init the SDK with our project's api key. This gives us a reference to our project to let us send data to our device. Here's how:
/** main.js
** Initialize the SDK and get a reference to the project
*/

var project = grandeur.init("YOUR-API-KEY", "YOUR-ACCESS-KEY", "YOUR-ACCESS-TOKEN");
You can get your api key and access credentials (key and token) by visiting the settings page.👇🏻
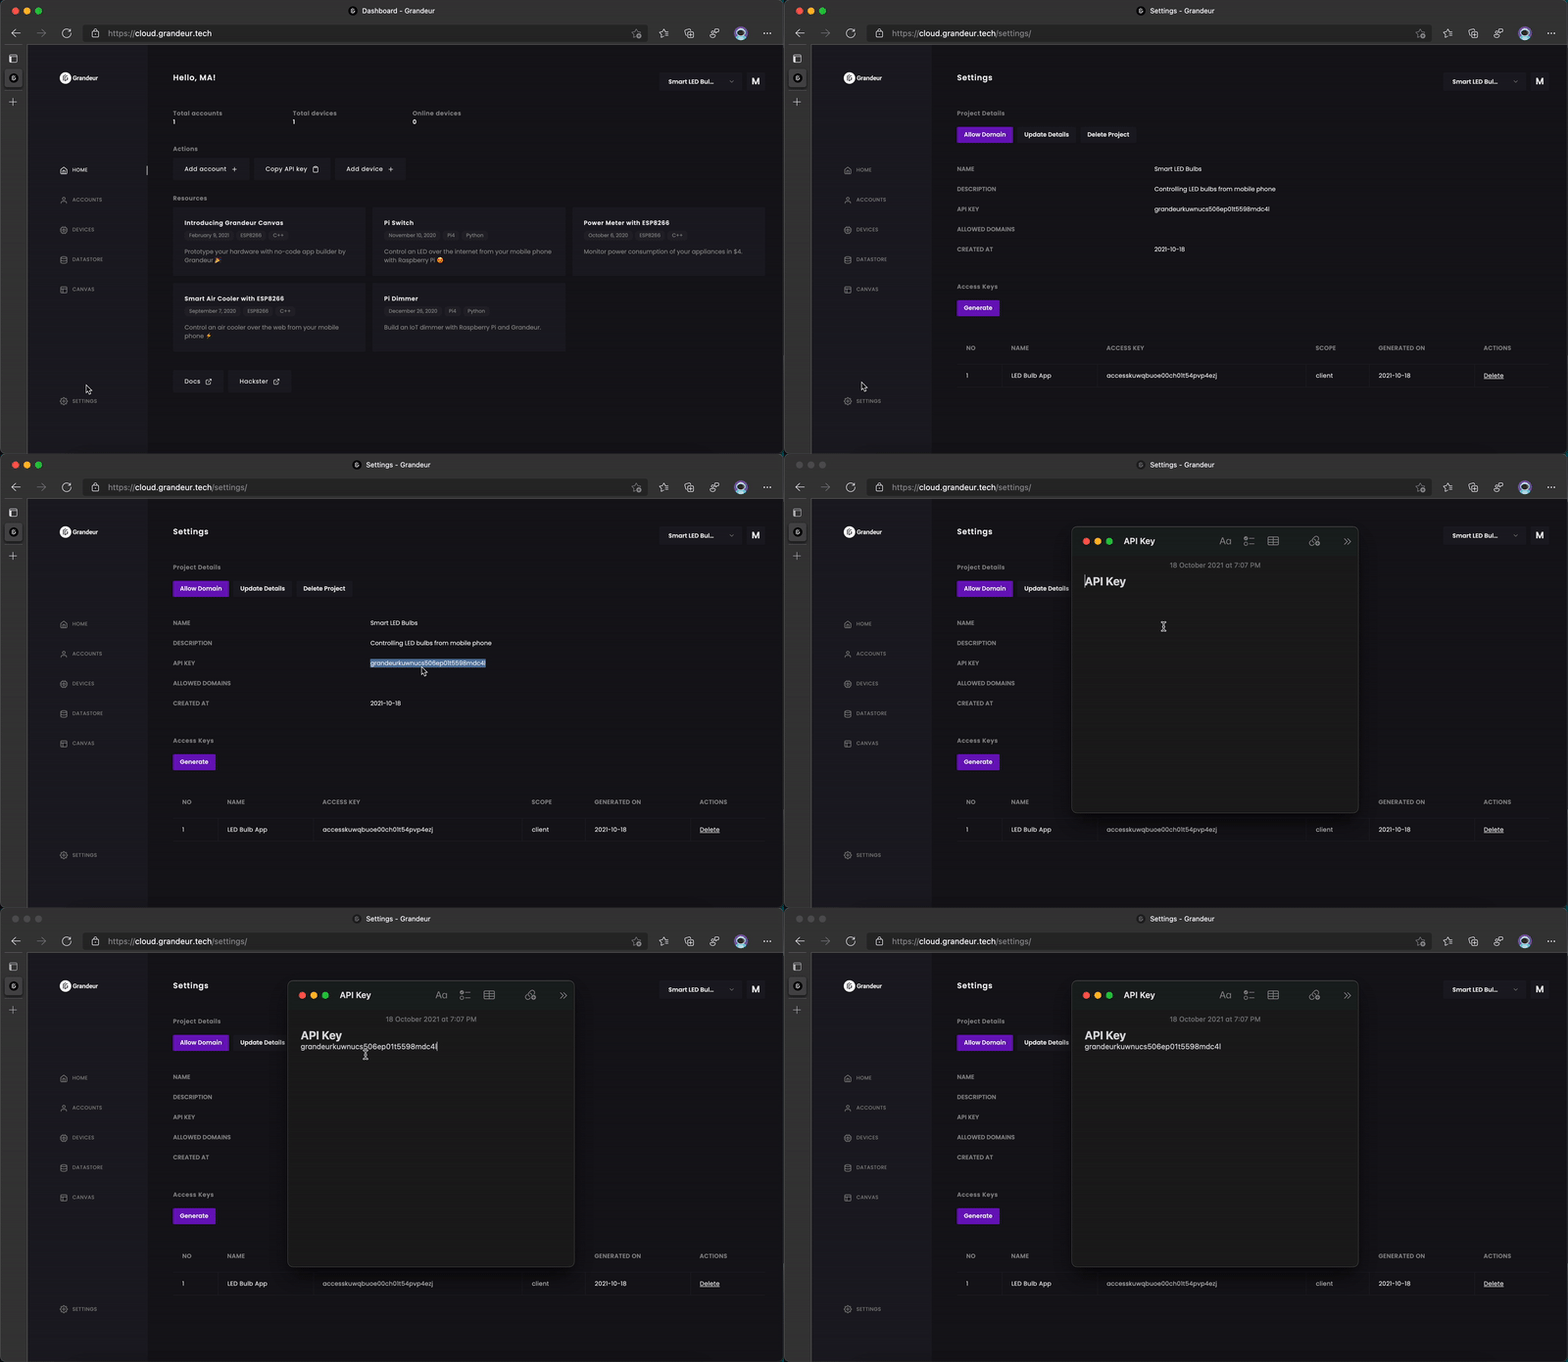
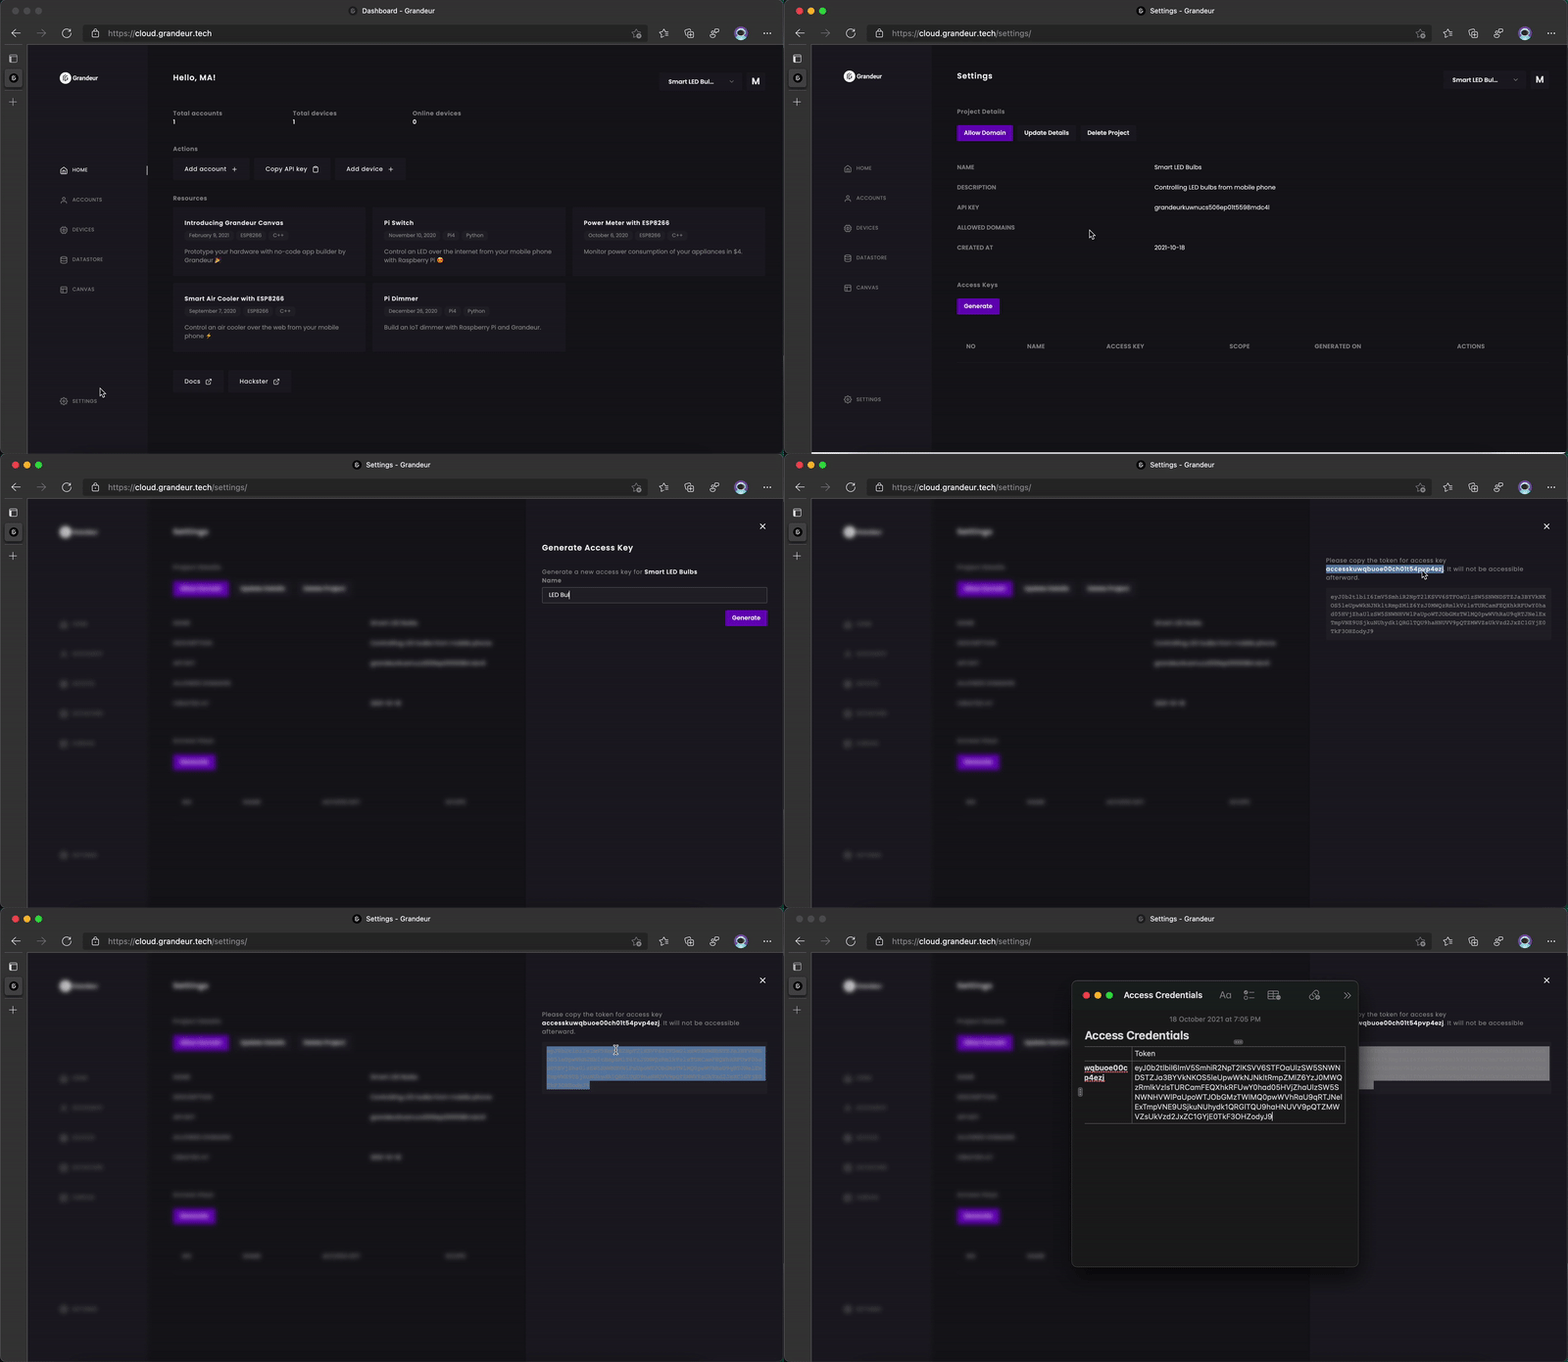
While api key works as an identifier for your project, access credentials proves the validity of the request and the requesting party. Grandeur currently follows the HMAC standard. The SDK uses your access key to sign each request before sending it to Grandeur. Your access key is like a secret and it never gets transmitted on wire. This is why it is of absolute importance to never share it with anyone and keep it in a secure place.
Step 4: Create a User Account
As mentioned in the previous article that only a user can interact with a device in a project, so we have to register a new user first, through accounts page of dashboard. Then we log the user in on our app. It is illustrated as below:
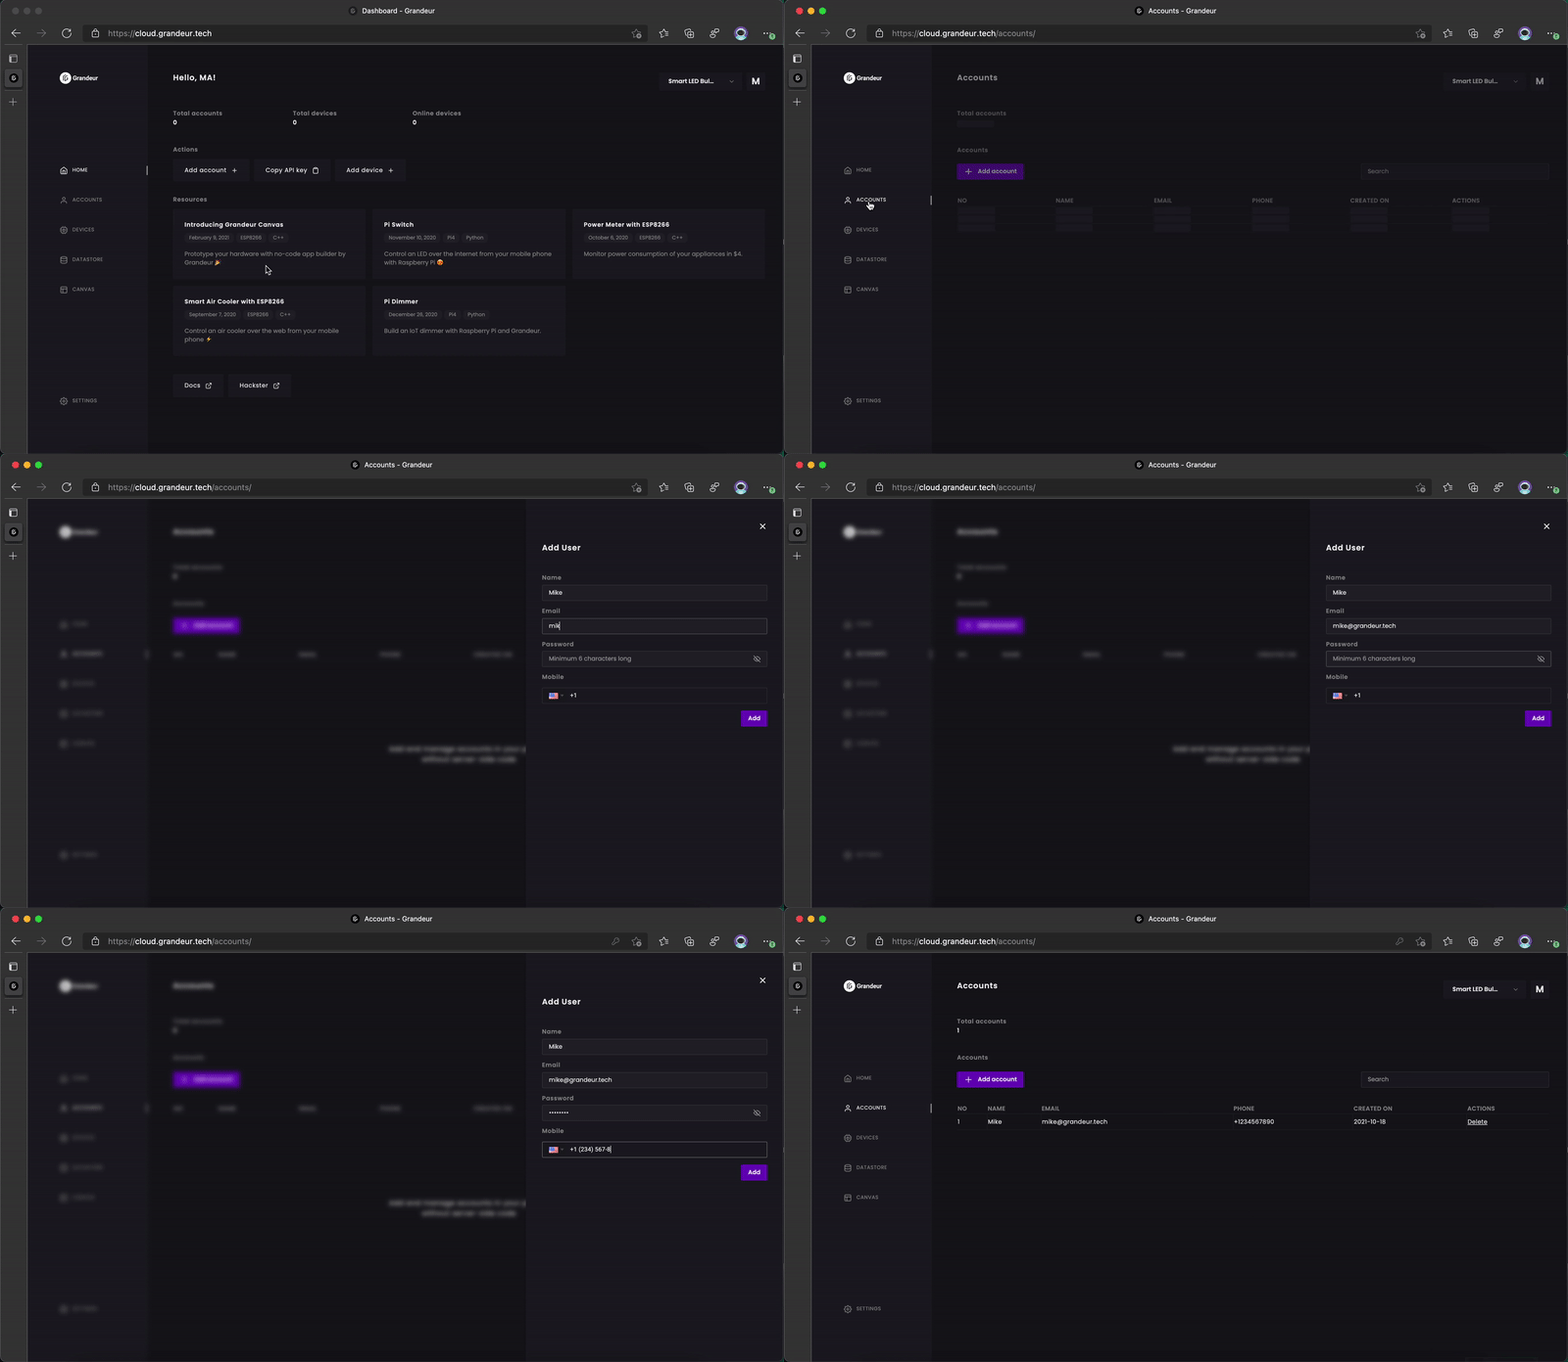
After adding the code to log the user in with credentials that we created, this is how our main.js looks like:
/** main.js
** Initialize the SDK and get a reference to the project
*/

var project = grandeur.init("YOUR-API-KEY", "YOUR-ACCESS-KEY", "YOUR-ACCESS-TOKEN");


/** Function to login user */
async function login() {
    /** Store credentials into variables */
    var email = "test@example.com";
    var password = "test:80";
    /** Set the status to logging in */
    document.getElementById("status").innerText = "Logging in";
    /** Then get a reference to auth class */
    var auth = project.auth();
    /** and in a try catch block */
    try {
        /** Submit request using login function */
        var res = await auth.login(email, password);
        /** Got the response to login handle response */
        switch(res.code) {
            case "AUTH-ACCOUNT-LOGGEDIN":
            case "AUTH-ACCOUNT-ALREADY-LOGGEDIN":
                /** User Authenticated!
                ** Set the status to success
                */
                document.getElementById("status").innerText = "User Authenticated";
                break;
            default:
                /** Logging failed due to invalid data */
                document.getElementById("status").innerText = "Authentication Failed";
        }
    }
    catch(err) {
        /** Error usually got generated when we are not connected to the internet */
        document.getElementById("status").innerText = "Network Error";
    }
}

/** Call login on startup */
login();
Step 5: Register a Device
To send data to our device, we need to have the device in our project in the first place. So, we register it through devices page and get its device id. But every device is registered on a data model which is like a template/schema for its data structure. However, this schema isn't strictly enforced, it is just to initialize data of the device on registration. Plus you create a model once and can register as many devices as you want on the same model. Here is how you create a new model and register your device on it.
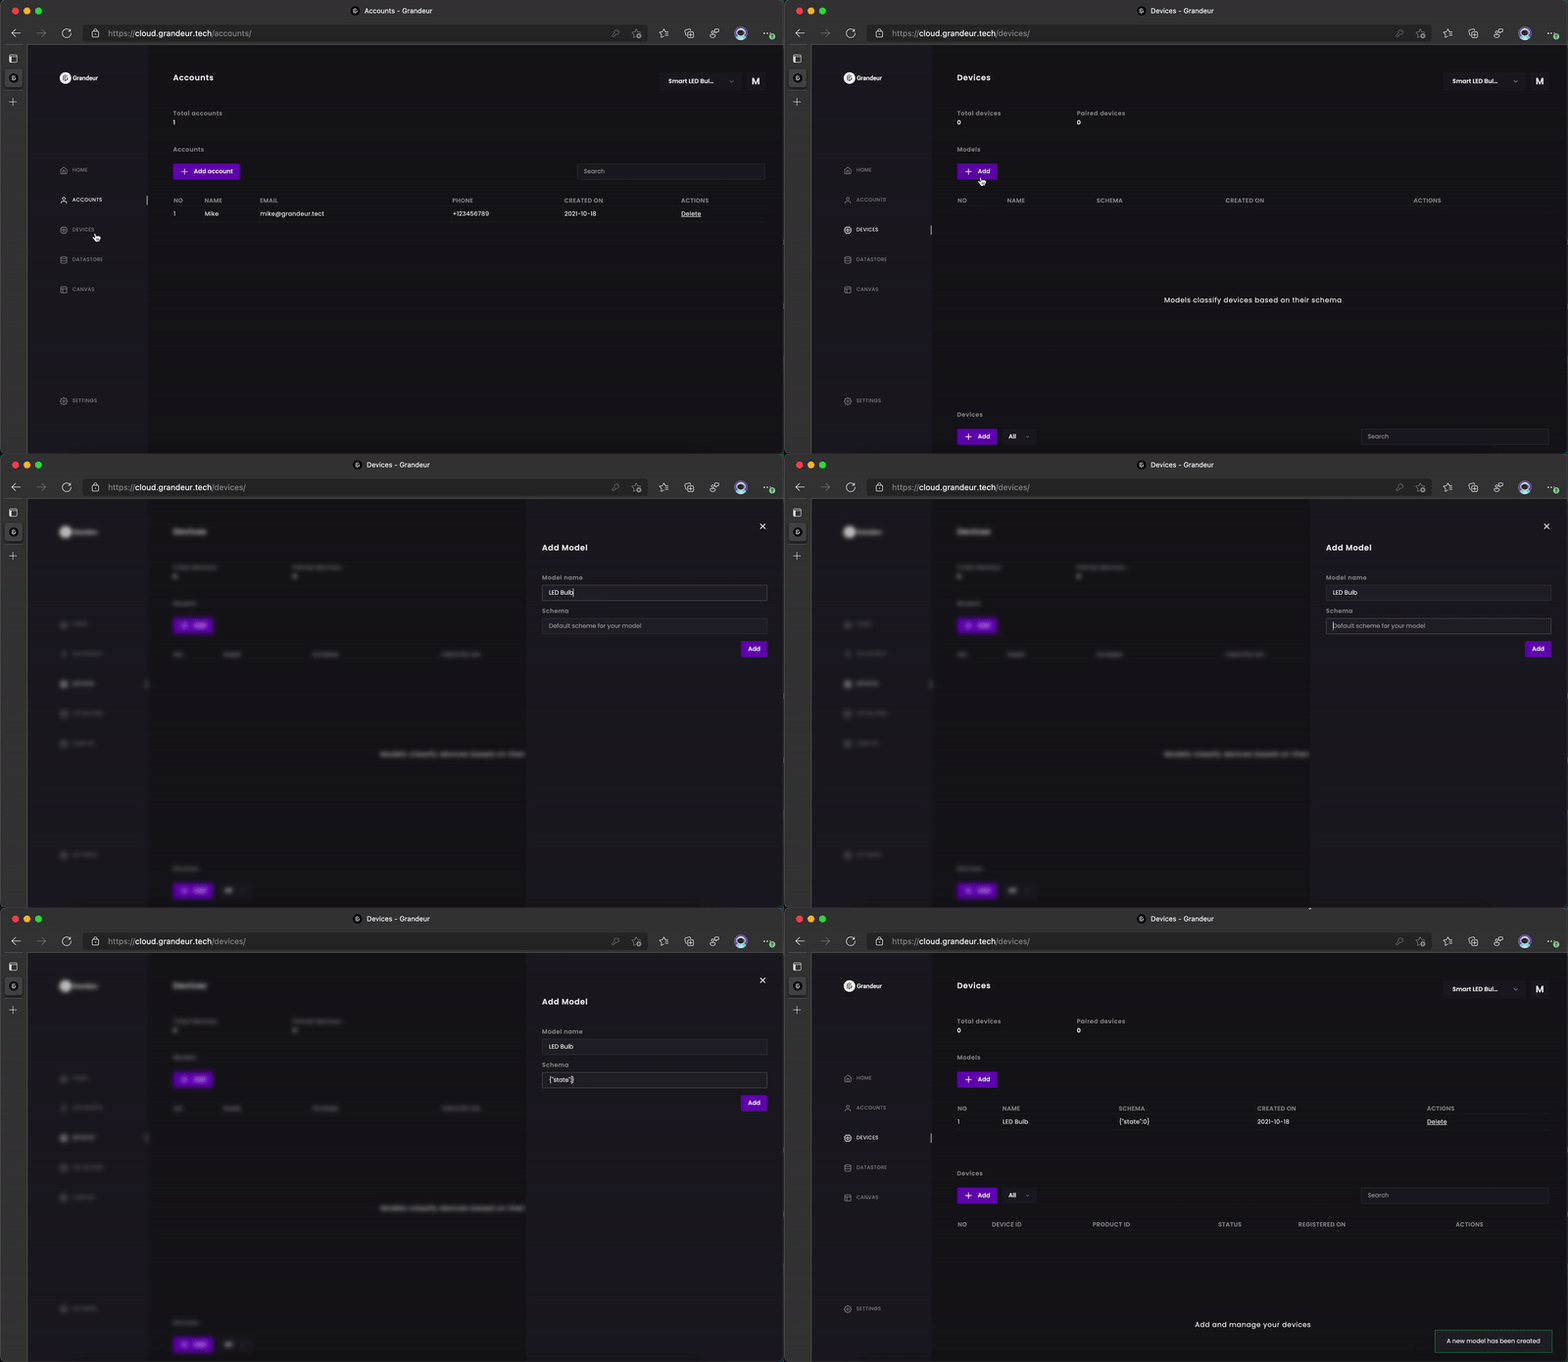
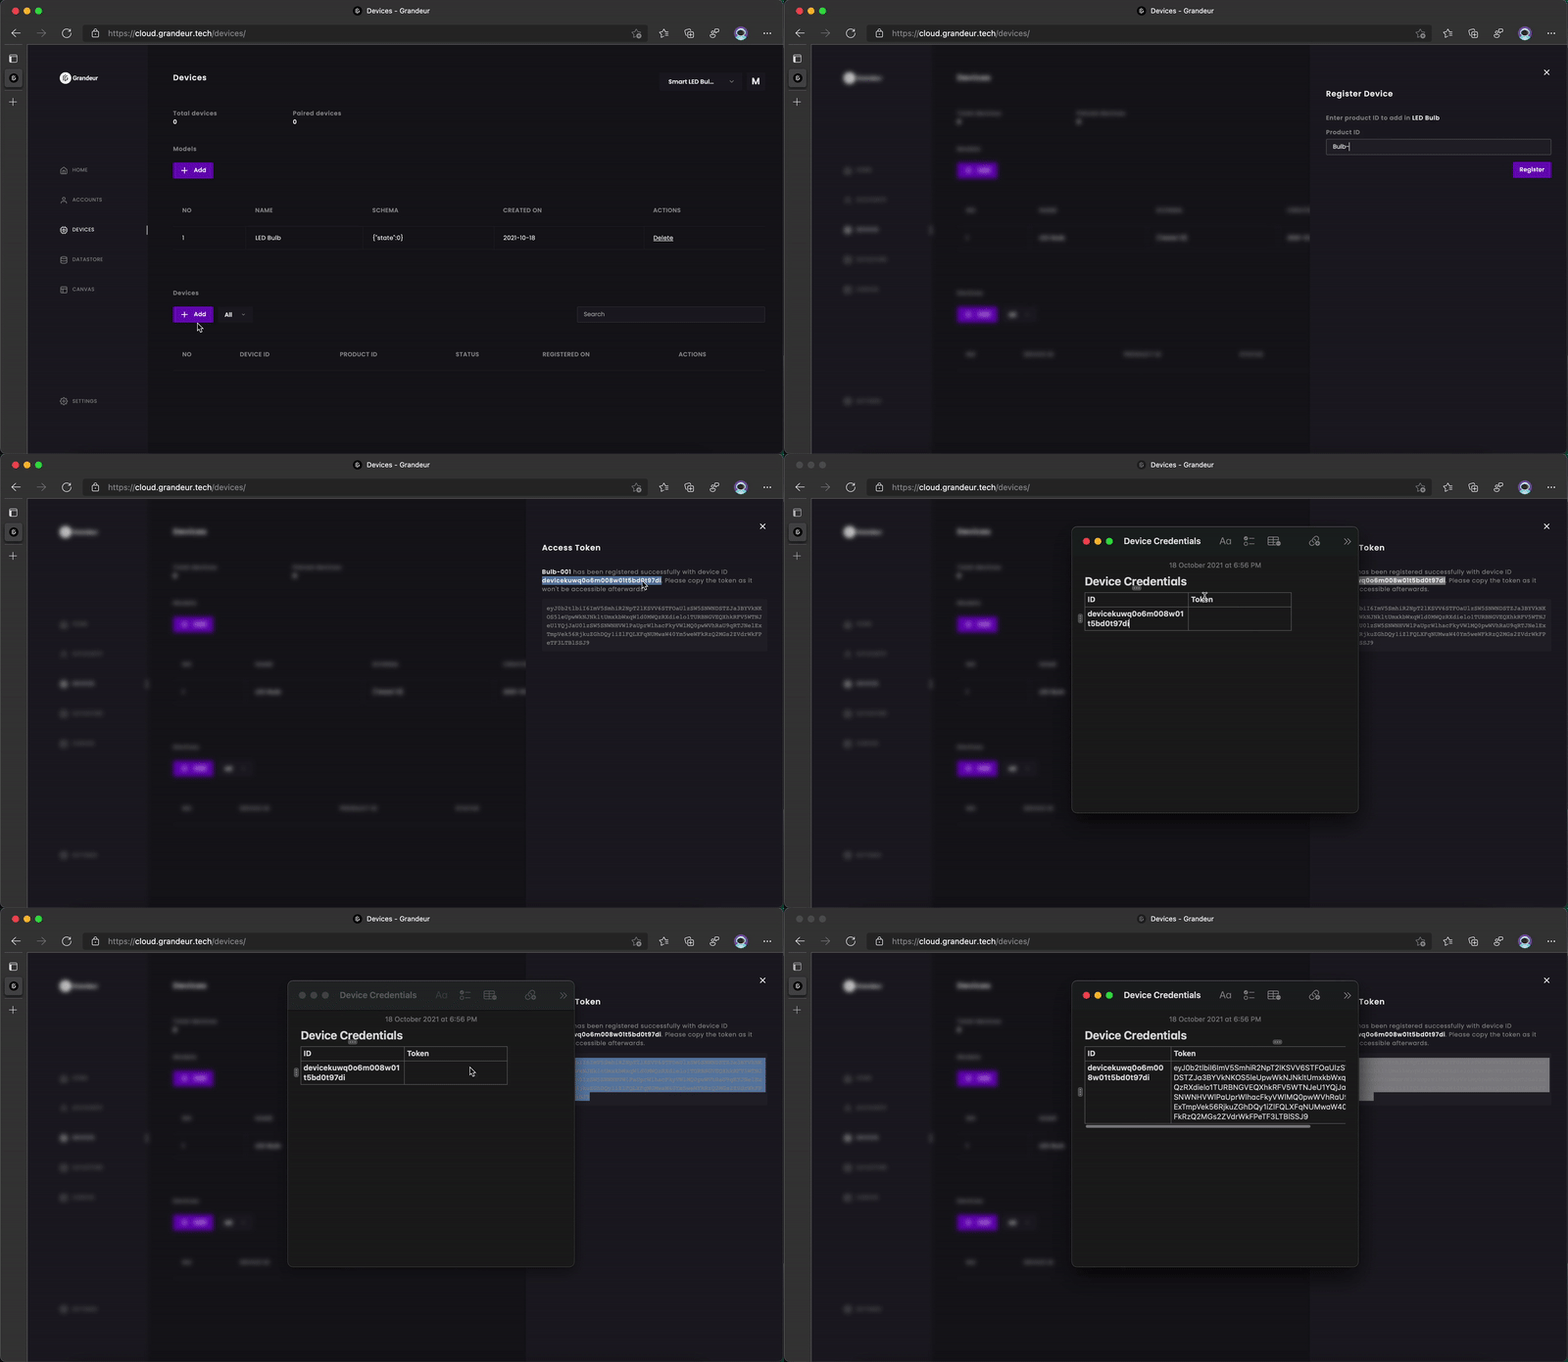
Plus don't forget to copy the access token which the registration operation generates. This token will later be utilized by the device to connect to Grandeur.
Step 6: Send Data from Web
As the user logs into the app, SDK uses its credentials to establish connection to Grandeur and we can start pushing data to our device. Here we wait to receive the CONNECTED event (which is emitted when the app makes a successful connection with Grandeur) and then set up a timer to send a unique data value to our device every five seconds.
/** main.js
** Initialize the SDK and get a reference to the project
*/

var project = grandeur.init("YOUR-API-KEY", "YOUR-ACCESS-KEY", "YOUR-ACCESS-TOKEN");

var timer = null;

/** Setting the connection status update handler */
project.onConnection((status) => {
    /** This callback gets fired whenever the connection status changes. */
    switch(status) {
        case "CONNECTED":
            /** If SDK is connected, we set the status. */
            document.getElementById("status").innerText = "Connected";
            /** Here we set up the timer to update data every 5 seconds. */
            timer = setInterval(async function() {
                /** This function updates the device parameters and set the state to a random string. */
                var deviceID = "YOUR-DEVICE-ID";
                /** Here we use *Date* for a random state value */
                var state = Date.now();
                /** Gets reference to devices class */
                var devices = project.devices();
                /** Updates the device state */
                await devices.device(deviceID).data().set("state", Date.now());
                /** Logs the state to browser's console */
                console.log(state);
            }, 5000);
            break;
        default:
            /** If SDK gets disconnected, we display the status on the app and clear the timer. */
            document.getElementById("status").innerText = "Disconnected";
            /** Clears timer */
            clearInterval(timer);
    }
});

/** Function to login user */
async function login() {
    /** Store credentials into variables */
    var email = "test@example.com";
    var password = "test:80";
    /** Set the status to logging in */
    document.getElementById("status").innerText = "Logging in";
    /** Then get a reference to auth class */
    var auth = project.auth();
    /** and in a try catch block */
    try {
        /** Submit request using login function */
        var res = await auth.login(email, password);
        /** Got the response to login handle response */
        switch(res.code) {
            case "AUTH-ACCOUNT-LOGGEDIN":
            case "AUTH-ACCOUNT-ALREADY-LOGGEDIN":
                /** User Authenticated!
                ** Set the status to success
                */
                document.getElementById("status").innerText = "User Authenticated";
                break;
            default:
                /** Logging failed due to invalid data */
                document.getElementById("status").innerText = "Authentication Failed";
        }
    }
    catch(err) {
        /** Error usually got generated when we are not connected to the internet */
        document.getElementById("status").innerText = "Network Error";
    }
}

/** Call login on startup */
login();
But a user can only send data to devices which are paired with it and only paired devices can connect to Grandeur. You can pair a user with a device directly from the devices page as illustrated below:
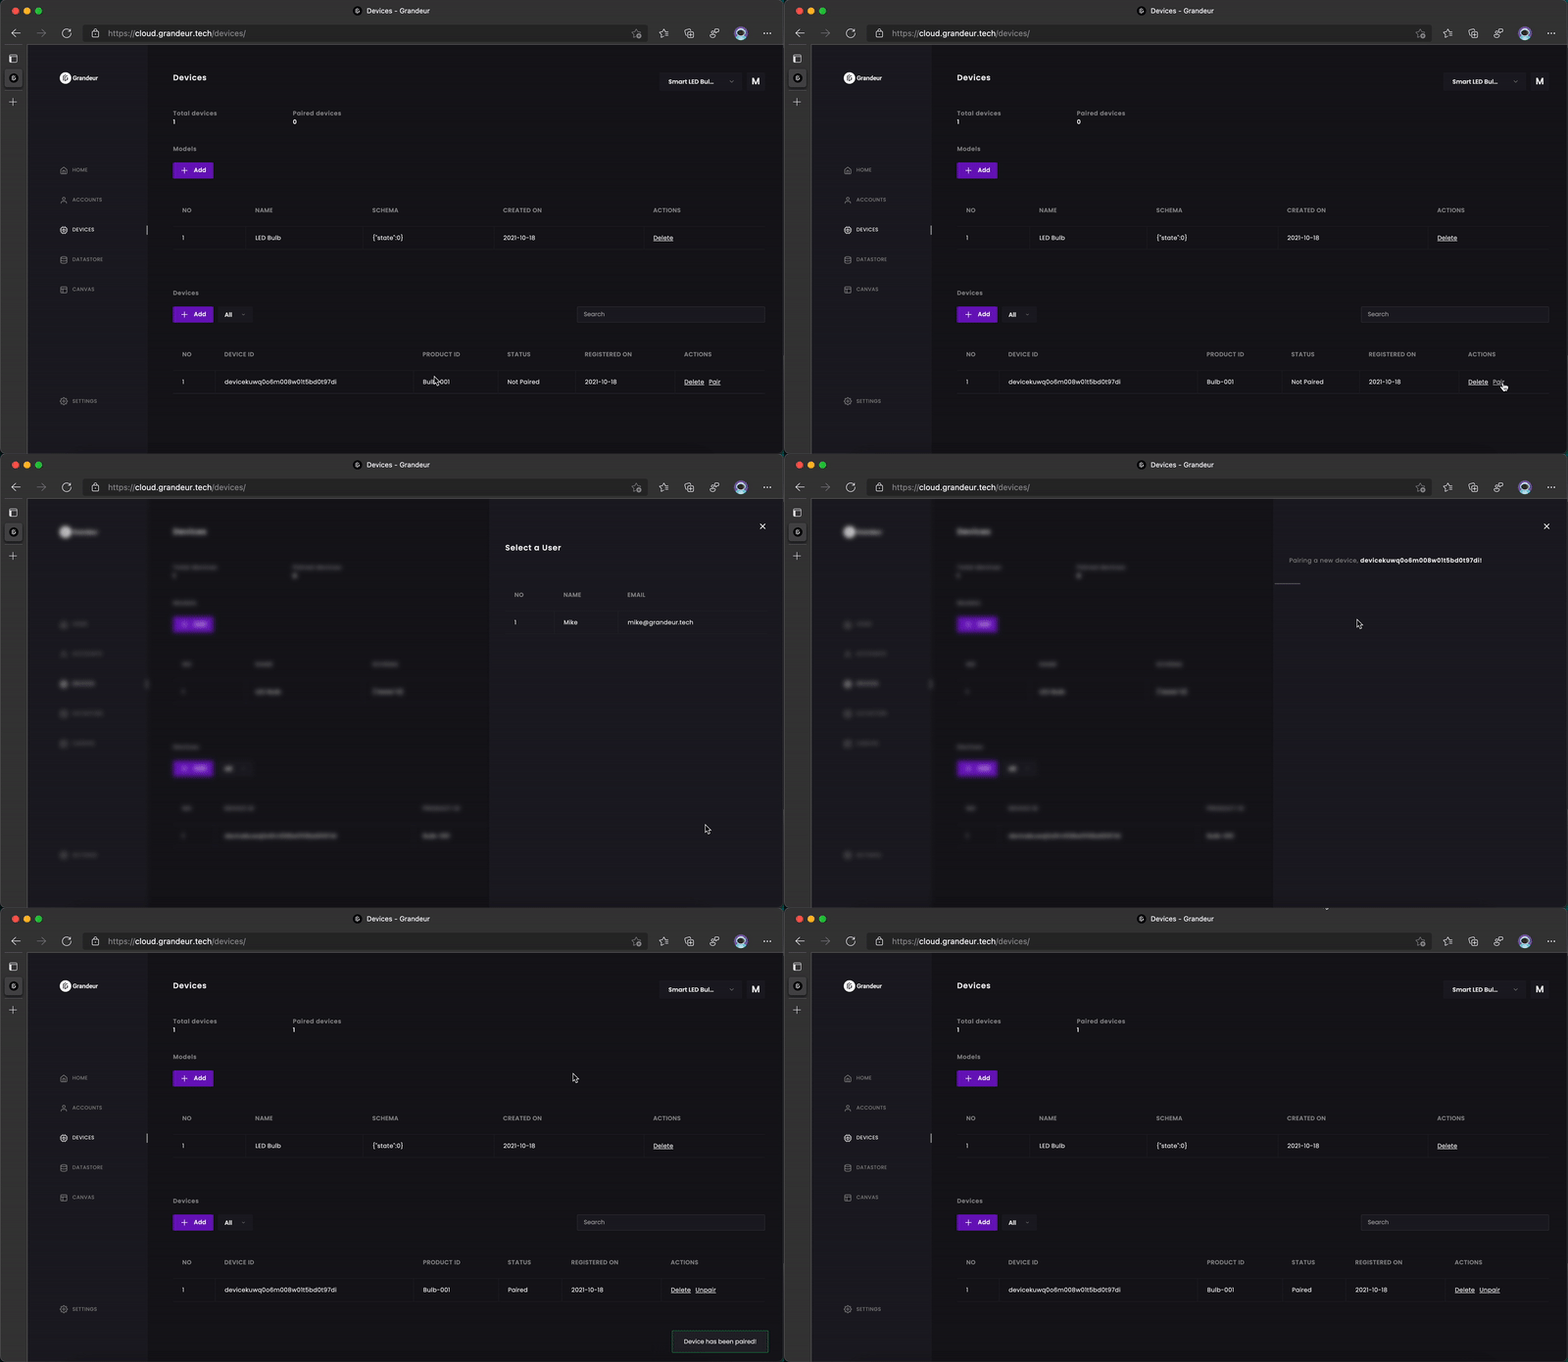
Step 7: Test the App Locally
Now that we are done with developing our app, it is time to test it out locally before making it live through a hosting service. You can run a local http server yourself for this but we recommend a simpler way; use our grandeur cli instead 😁. The Grandeur CLI is hosted on NPM and you can install it with the following command:
npm install grandeur-cli -g
NPM is a package manager and you can get it by installing Nodejs in your computer (we are trying to make it available through a standalone package but till then this is the only way to get it).
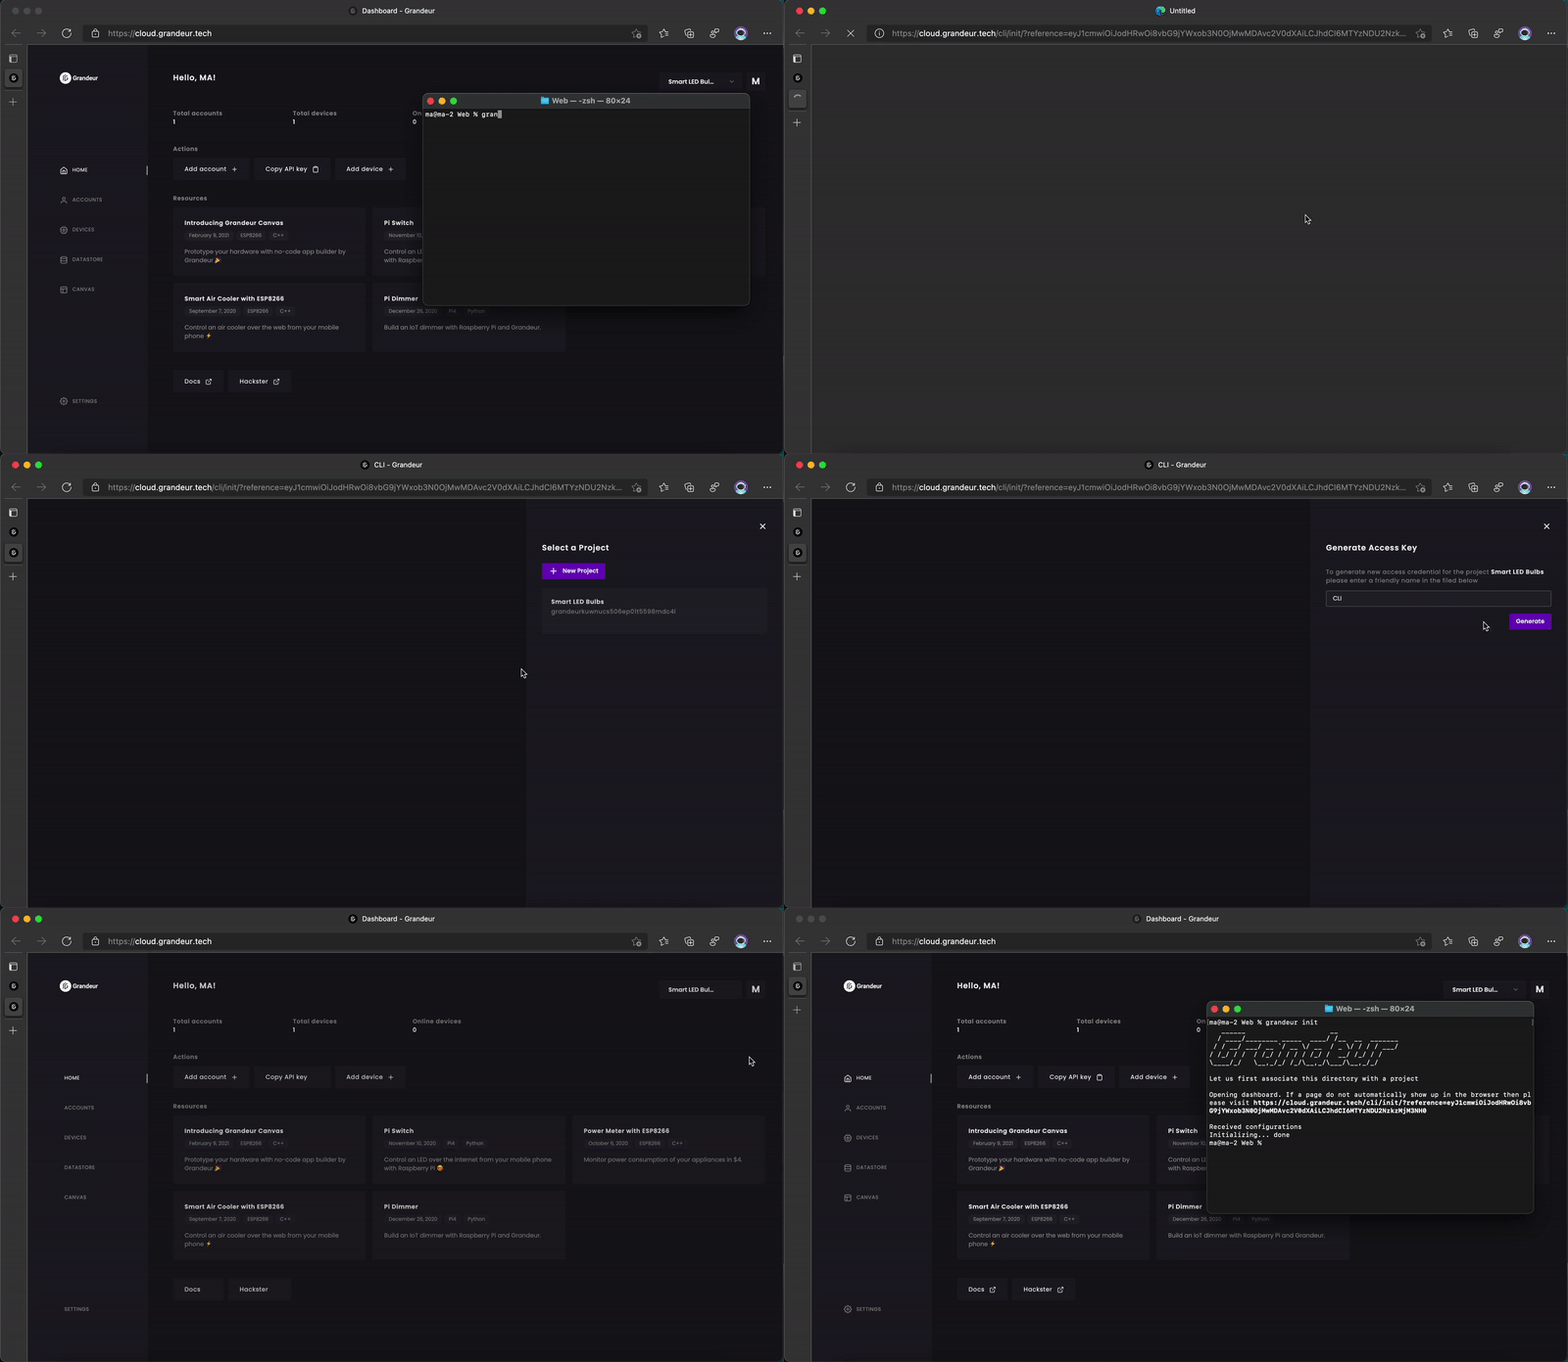
Open a new shell window, change the working directory to your project's folder and run following command:
grandeur init
This associates this directory of yours to your project on Grandeur. This is how it happens.
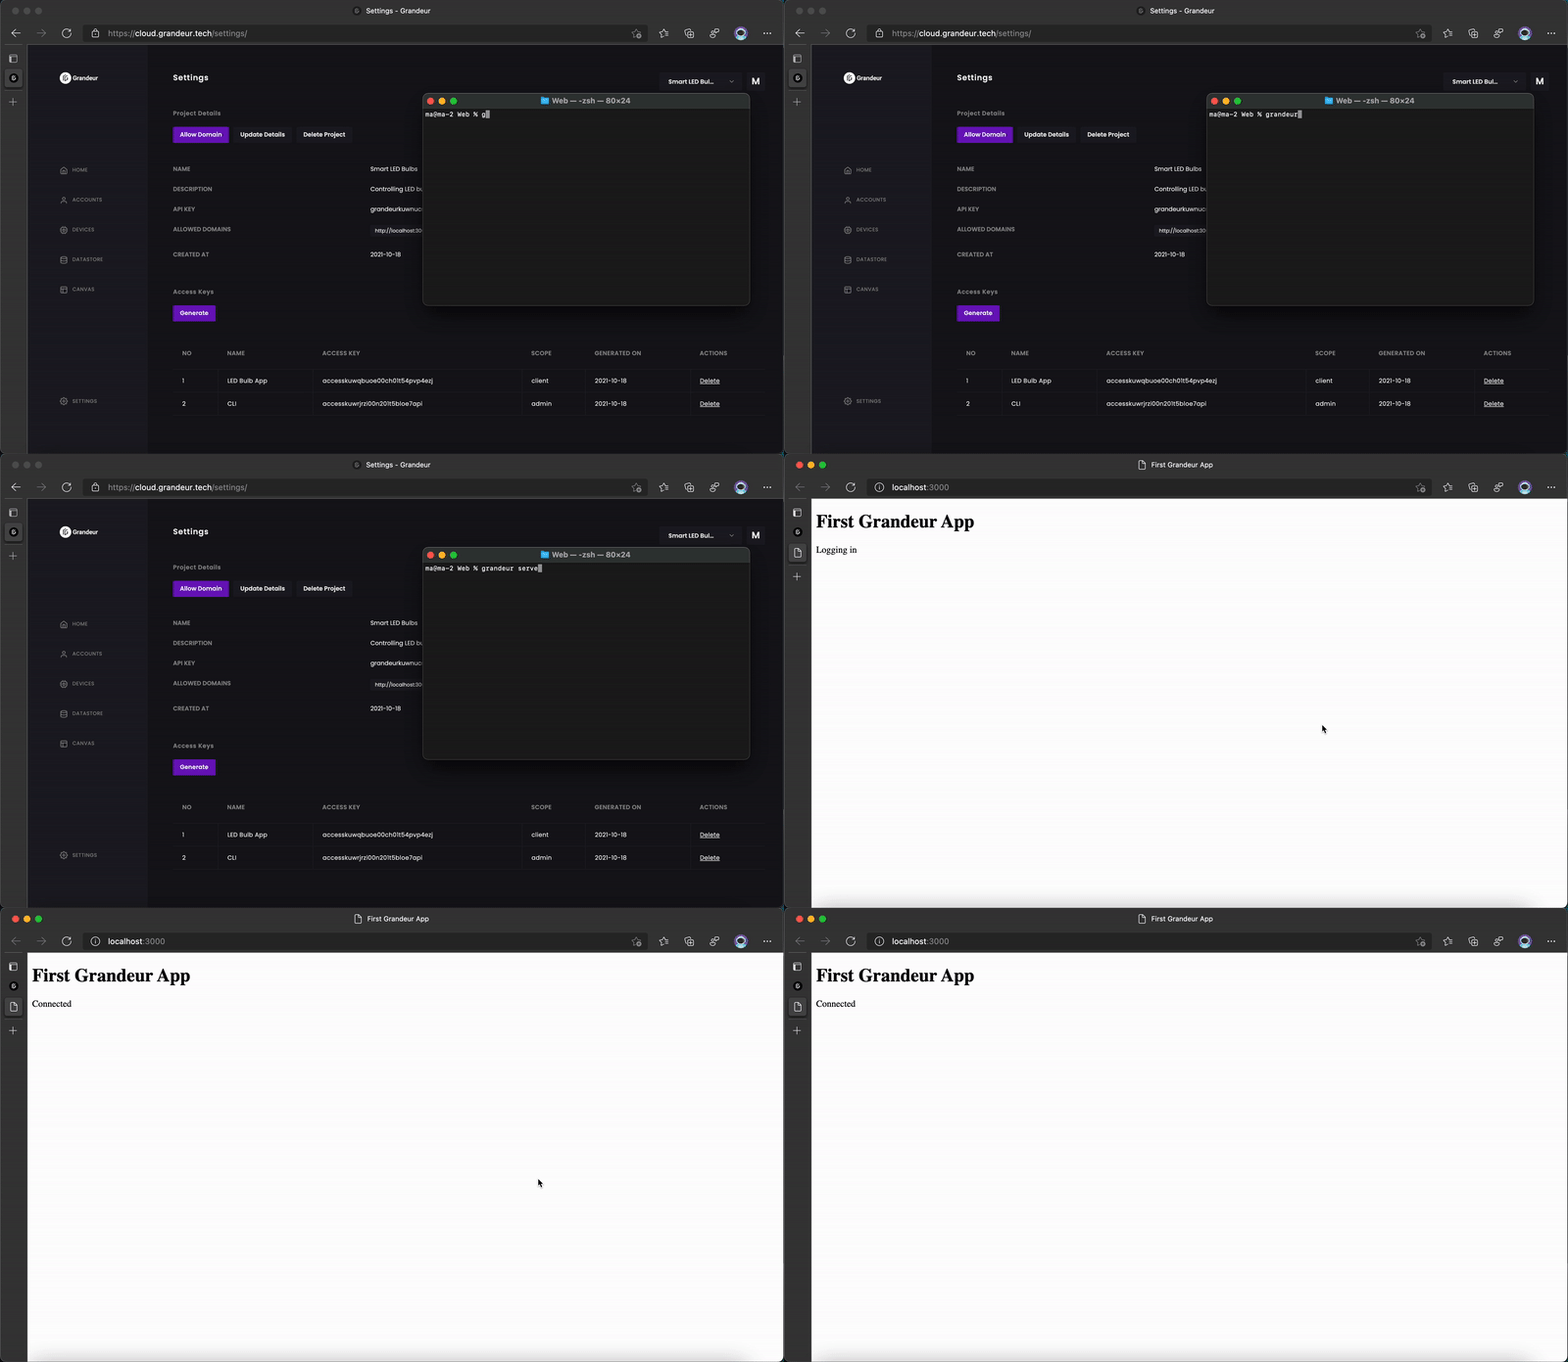
Then use the serve command to start local http server on http://localhost:3000 which has a hot reload feature so your browser tab reloads automatically when you make a change in your project's file.
grandeur serve
Final step is to allow the app to communicate from local server to Grandeur from settings page as illustrated below.
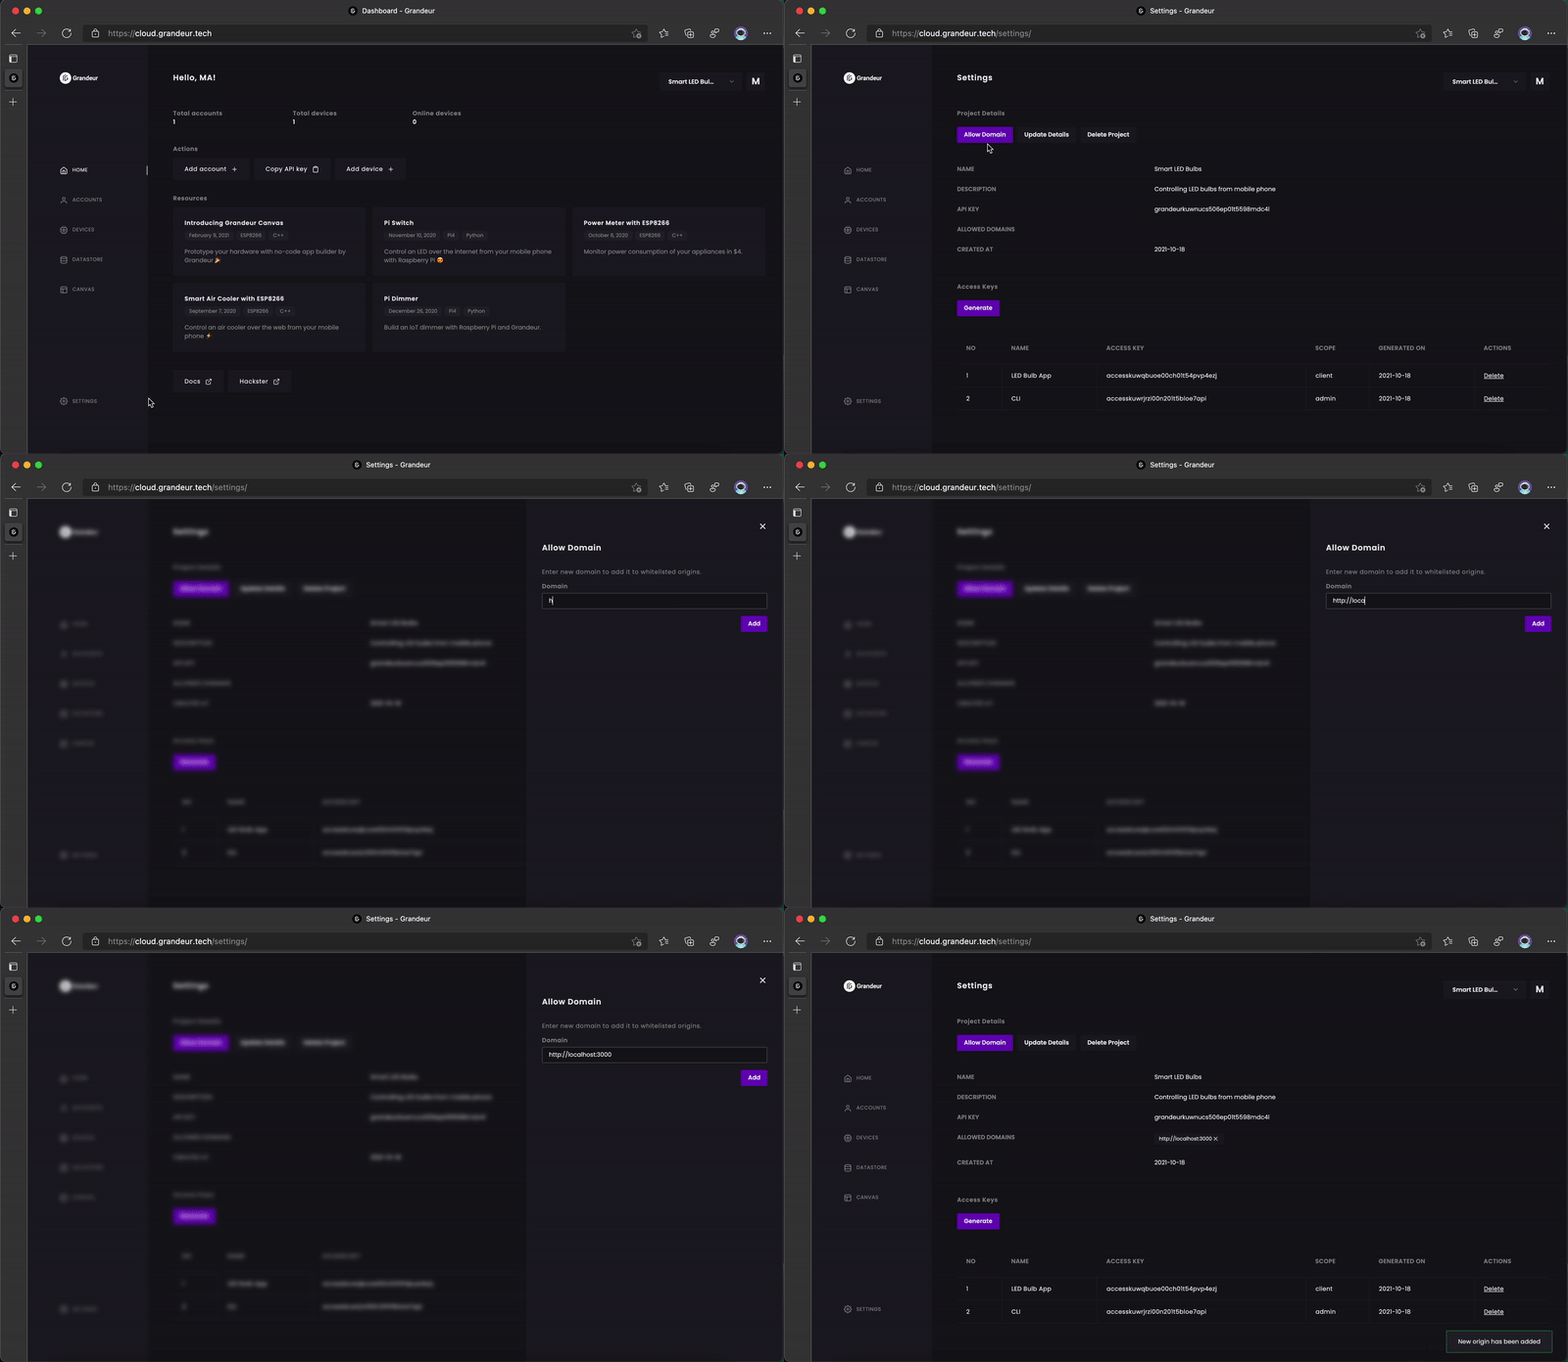
This is an additional security setting called cross origin request protection which prevents apps of unknown sources from interacting with your project and accessing your data. Only you can whitelist your app's url from the Grandeur Dashboard.
Step 8: Get Started on Hardware
This is where things get exciting. We pushed data from our web app to Grandeur and now it is time to receive that data on hardware-end, for which we will use the Arduino SDK to connect our Espressif Wemos D1 Mini module to Grandeur. You can download the repo as zip and follow these instructions to import it into Arduino IDE.
We create a new sketch and include the library. We initialize our configurations (project's api key, our device id, our device's access token which we obtained when we paired it with the user and our WiFi credentials) using the SDK's global object grandeur. This is how our basic sketch looks like 👇🏻.
/** Including the SDK WiFi header */
#include <Grandeur.h>
#include <ESP8266WiFi.h>

/** Configurations */
String deviceID = "YOUR-DEVICE-ID";
String apiKey = "YOUR-APIKEY";
String token = "YOUR-ACCESS-TOKEN";

/** WiFi credentials */
String ssid = "WIFI-SSID";
String password = "WIFI-PASSWORD";

/** Create variable to hold project and device */
Grandeur::Project project;
Grandeur::Project::Device device;

/** Function to connect to WiFi */
void connectWiFi() {
    /** Set mode to station */
    WiFi.mode(WIFI_STA);
    /** Connect using the ssid and password */
    WiFi.begin(ssid, password);
    /** Block till WiFi connected */
    while (WiFi.status() != WL_CONNECTED) {
        delay(500);
        Serial.print(".");
    }
    /** Connected to WiFi so print message */
    Serial.println("");
    Serial.println("WiFi connected");
    /** and IP address */
    Serial.println(WiFi.localIP());
}

/** In setup */
void setup() {
    /** Begin the serial */
    Serial.begin(9600);
    /** Connect to WiFi */
    connectWiFi();
    /** Initializes the global object "grandeur" with your configurations. */
    project = grandeur.init(apiKey, token);
    /** Get reference to device */
    device = project.device(deviceID);
}

/** Loop function */
void loop() {
    /** Synchronizes the SDK with Grandeur */
    project.loop();
}
Step 9: Get Data on Hardware
Finally, we start polling every five seconds for any update to device state as soon as the device connects to Grandeur. This is the final code 👏.
/** Including the SDK WiFi header */
#include <Grandeur.h>
#include <ESP8266WiFi.h>

/** Configurations */
String deviceID = "YOUR-DEVICE-ID";
String apiKey = "YOUR-APIKEY";
String token = "YOUR-ACCESS-TOKEN";

/** WiFi credentials */
String ssid = "WIFI-SSID";
String password = "WIFI-PASSWORD";

/** Create variable to hold project and device */
Grandeur::Project project;
Grandeur::Project::Device device;

/** Variable to store time reference */
unsigned long current;

/** Connection status and device state */
int connected = false;
double state = 0;

/** Function to check device's connection status */
void onConnection(bool status) {
    switch(status) {
        case CONNECTED:
            /** Device connected with Grandeur */
            connected = true;
            /** Takes a snapshot of time for timer */
            current = millis();
            return;
        case DISCONNECTED:
            /** Device disconnected with Grandeur */
            connected = false;
            return;
    }
}

/** Function to handle update in device state */
void handleUpdate(const char* code, Var payload) {
    /** Get state */
    double newState = (double) payload["data"];
    /** Print if got an update */
    if (newState != state) {
        /** Update state */
        state = newState;
        /** Print */
        Serial.println(state);
    }
}

/** Function to connect to WiFi */
void connectWiFi() {
    /** Set mode to station */
    WiFi.mode(WIFI_STA);
    /** Connect using the ssid and password */
    WiFi.begin(ssid, password);
    /** Block till WiFi connected */
    while (WiFi.status() != WL_CONNECTED) {
        delay(500);
        Serial.print(".");
    }
    /** Connected to WiFi so print message */
    Serial.println("");
    Serial.println("WiFi connected");
    /** and IP address */
    Serial.println(WiFi.localIP());
}

/** In setup */
void setup() {
    /** Begin the serial */
    Serial.begin(9600);
    /** Connect to WiFi */
    connectWiFi();
    /** Initializes the global object "grandeur" with your configurations. */
    project = grandeur.init(apiKey, token);
    /** Get reference to device */
    device = project.device(deviceID);
    /** Sets connection state update handler */
    project.onConnection(onConnection);
}
/** Loop function */
void loop() {
    /** Checks device connection status */
    if (connected) {
        /** If device is connected with Grandeur */
        if (millis() - current >= 5000) {
            /** Code in this if-block runs after every 5 seconds */
            Serial.println("Checking for Update...");
            /** Gets new data from Grandeur and passes the them to *handleUpdate* function. */
            device.data().get("state", handleUpdate);
            /** Updates *current* variable */
            current = millis();
        }
    }
    /** Synchronizes the SDK with Grandeur */
    project.loop();
}
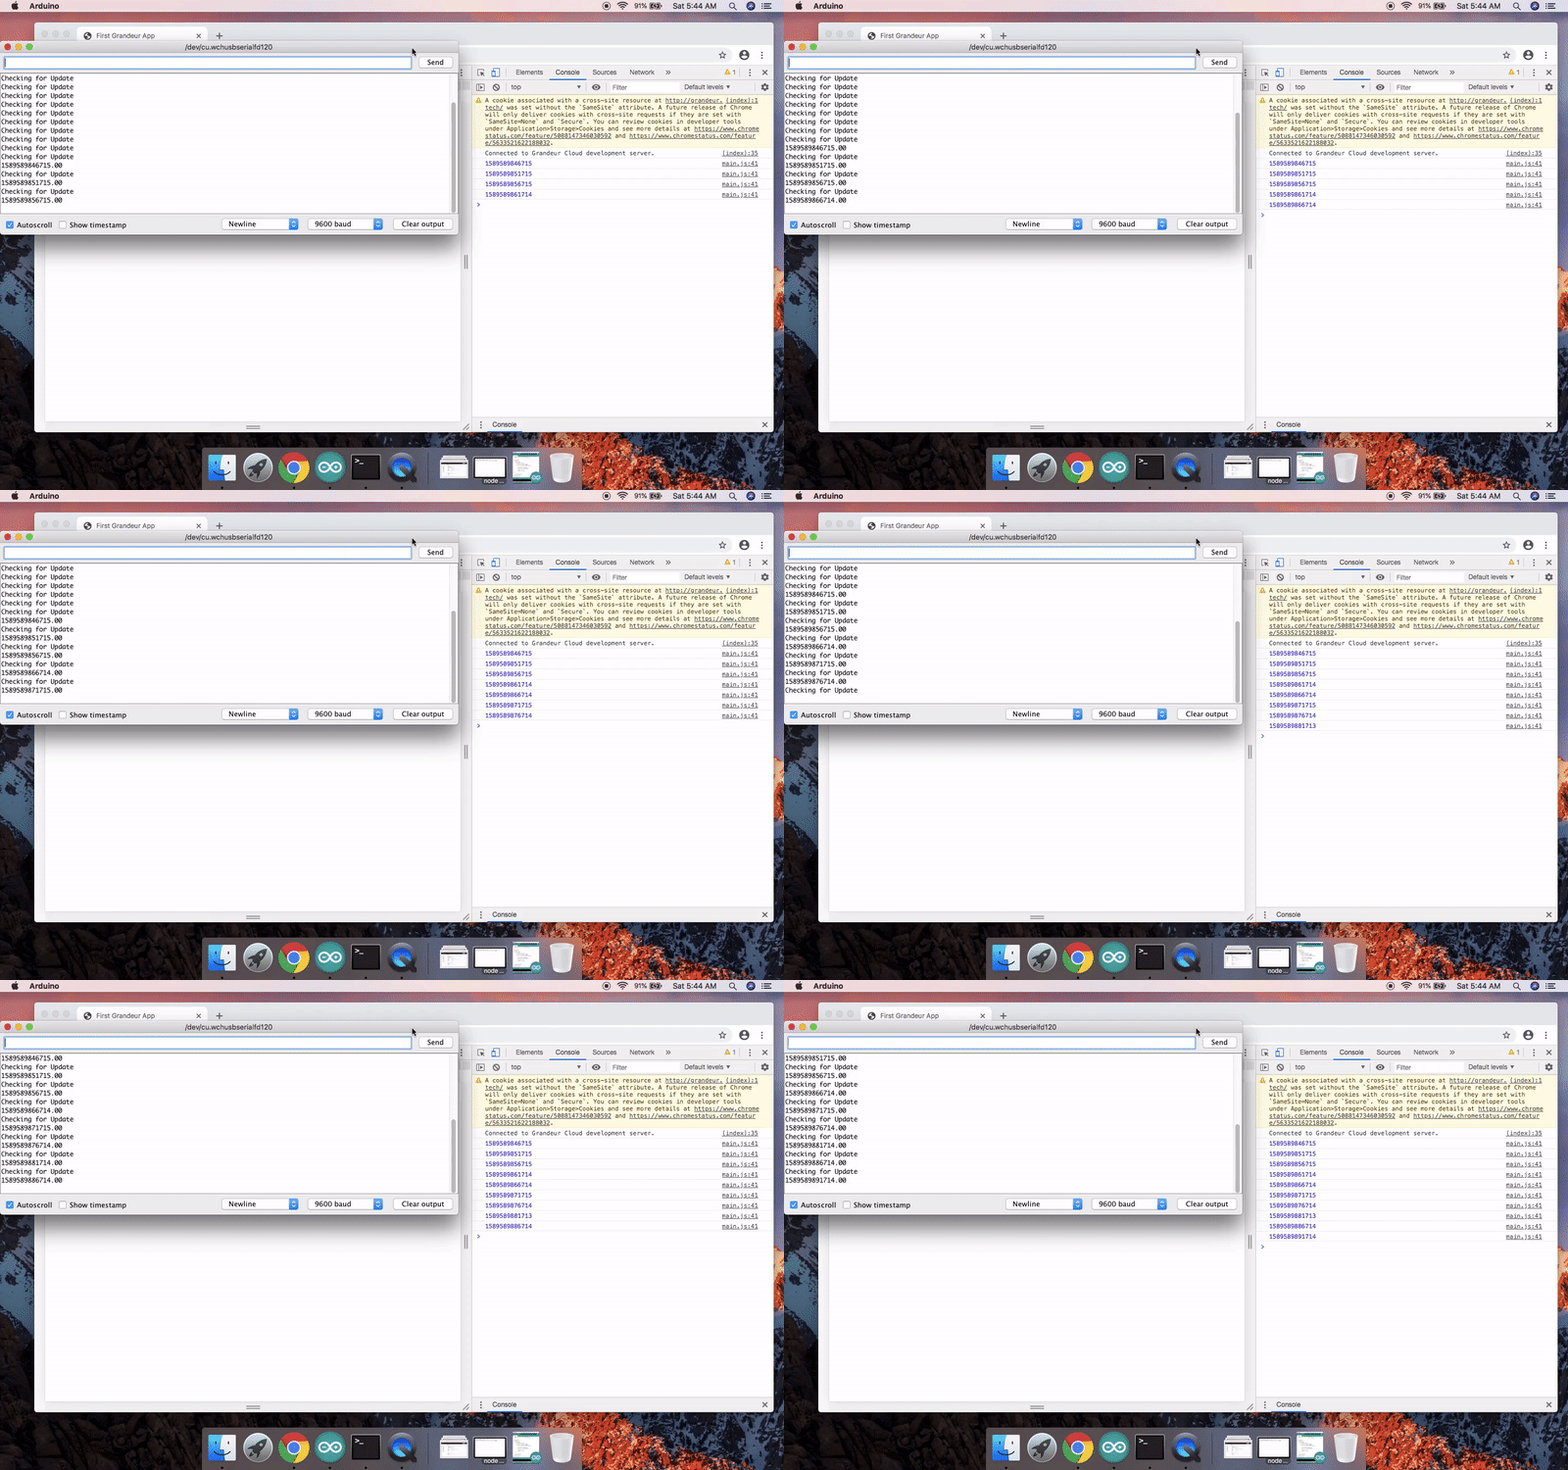
Let's flash it on our ESP module. This is what the Serial Monitor displays side by side with the app running on our browser. 🎉
Conclusion
So this is it. Now you can build your own production grade IoT apps and hardware. Grandeur comes with a decent free tier and we make money only when you make money. This is ideal for an IoT startup just starting out. This tutorial is first in series of many - a quick starting point, and the best is yet to come.
Grandeur is fast but the best thing about it is being event driven. So in next tutorial we will remove the polling technique that we are using now in hardware and replace it with with event handlers.
Ask your questions and give us your feedback on this project or generally on our writing at hi@grandeur.tech. Join us on discord for a direct communication with us. You can go through the docs or checkout our youtube channel to see Grandeur in its full potential.
 Grandeur