kutluhan_aktar
Since Telegram is a cross-platform cloud-based messaging service compatible with iOS and Android, I decided to create a Telegram bot to monitor dust and carbon dioxide density evaluations on several devices easily. In Telegram, it is effortless to create bots with a command list unalike any other messaging application, which are special accounts that do not require an additional phone number to set up. IoT Carbon Dioxide and Dust Monitor, the Telegram bot I created for this project, allows the user to display real-time dust and carbon dioxide density evaluations with these commands:
- /co2_density
- /dust_density
I developed a PHP web application (outgoing) to communicate with my Telegram bot. The application gets updated from the Telegram Bot API, saves dust and carbon dioxide density evaluations generated by the sensors (explained below) to the given MySQL database table, and sends the density evaluations to my Telegram bot when requested.
To elicit the dust density and the carbon dioxide density accurately, I utilized an MH-Z14A NDIR CO2 Sensor and a GP2Y1010AU0F Dust Sensor. I chose to employ an Arduino Nano RP2040 Connect to read evaluations and transfer them to the web application since it is a high-performance development board with the built-in u-blox NINA-W102 radio module. As its name implies, this board is based on the Raspberry Pi Foundation’s RP2040 microcontroller.
To also display evaluations on-device before sending them to the web application, I used an SSD1306 OLED (128x32) screen. Finally, I added a 5mm common anode RGB LED to show the connection status between the device (via Nano RP2040 Connect) and the web application.
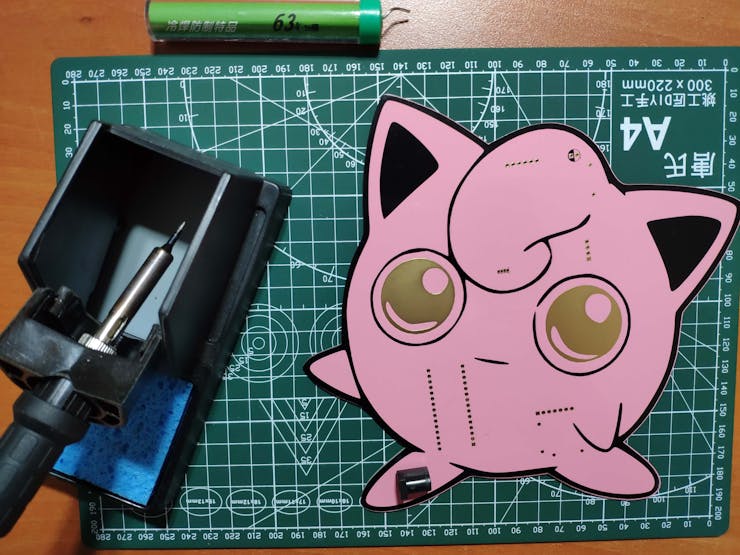
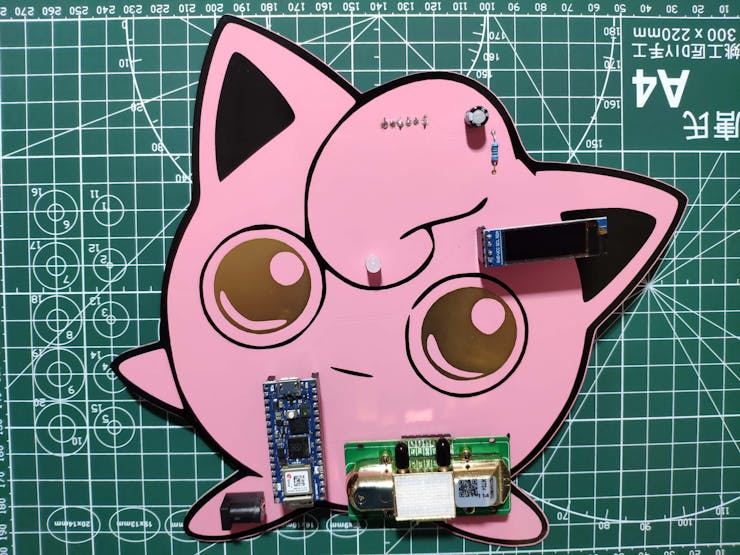
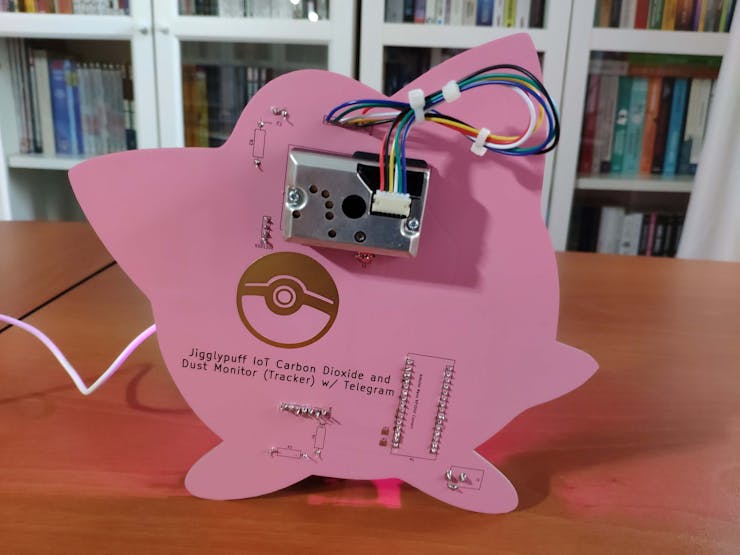
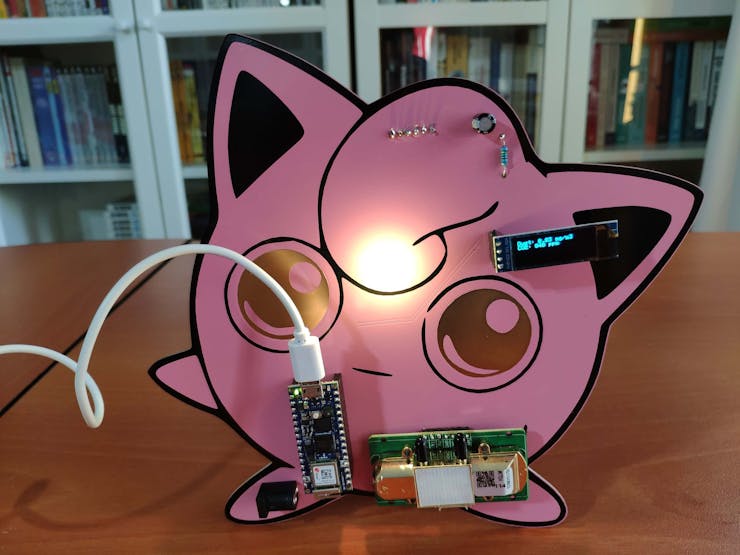
After completing wiring on a breadboard and testing the code, Jigglypuff inspired me to design a PCB for this project. Since Jigglypuff has a notorious sleep attack, I thought it would be cute to design a Jigglypuff PCB for a project which helps me to alleviate my allergy symptoms before sleeping :)
Since pink PCBs are not widespread, you may not have seen the pink solder mask option before. If you want to design a PCB with the pink solder mask option like my PCB, I highly recommend PCBWay. They provide a fast, reliable, and budget-friendly service for unique PCB colors and requirements. You can inspect PCBWay solder mask and silkscreen options from here.
Huge thanks to PCBWay for sponsoring this project.


Step 1: Designing and soldering the Jigglypuff IoT Carbon Dioxide and Dust Monitor PCB
Before prototyping my PCB design, I tested all connections and wiring with the Arduino Nano RP2040 Connect.

Then, I designed the IoT Carbon Dioxide and Dust Monitor PCB by utilizing KiCad - inspired by the adorable and charming Jigglypuff :) I attached the Gerber file of the PCB below. Therefore, if you want, you can order this PCB from PCBWay to create a cute apparatus to track the dust density and the carbon dioxide density anywhere.
Click here to inspect and order this PCB directly on PCBWay.


First of all, by utilizing a soldering iron, I attached headers (female), resistors (150Ω, 2.2K, 3.3K), an MH-Z14A NDIR CO2 Sensor, a GP2Y1010AU0F Dust Sensor, a 5mm common anode RGB LED, a capacitor (220µF), and a power jack.
Component list on the PCB:
A1 (Headers for Arduino Nano RP2040 Connect)
SSD1306 (Headers for SSD1306 OLED (128x32) Screen)
MHZ14 (MH-Z14A NDIR CO2 Sensor)
GP2Y10 (GP2Y1010AU0F Dust Sensor)
D1 (5mm Common Anode RGB LED)
C1 (220µF Capacitor)
R1 (2.2K Resistor)
R2 (3.3K Resistor)
R3 (150Ω Resistor)
J1 (Power Jack)

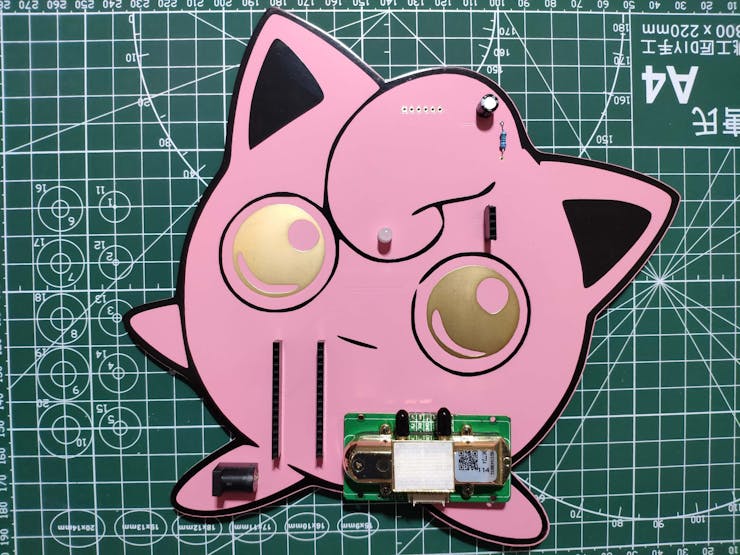
To make my PCB design more refined, I installed the GP2Y1010AU0F Dust Sensor on the back of the PCB and fastened it with a hot glue gun. I also added two solder jumper pads (JP1, JP2) connecting the Nano RP2040 Connect to the MH-Z14A CO2 sensor's UART interface.

Step 2: Building a Telegram bot with BotFather
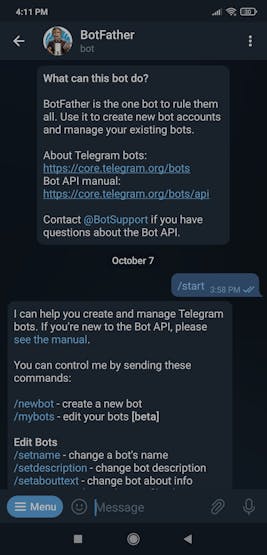
BotFather is a Telegram bot that lets us create and manage bots on Telegram without any coding required.
⭐ First of all, open BotFather on Telegram and enter /start to view the available command list and manuals.
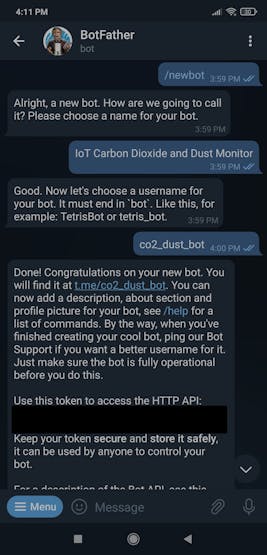
⭐ Use the /newbot command to create a new bot. Enter the name of your bot when BotFather asks you for a name. It is displayed in contact details and elsewhere.
IoT Carbon Dioxide and Dust Monitor
⭐ Then, enter the username of your bot. Usernames are 5-32 characters long and are case insensitive, but may only include Latin characters, numbers, and underscores. They must end in 'bot', e.g. 'tetris_bot' or 'TetrisBot'.
co2_dust_bot
⭐ After these steps, BotFather generates an authorization token for your new bot. The authorization token is a string along the lines of 123456:ABC-DEF1234ghIkl-zyx57W2v1u123ew11 that is required to authorize the bot and send requests to the Telegram Bot API. Keep your token secure and store it safely.
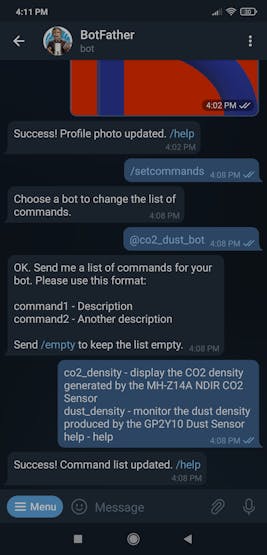
⭐ Also, you can change your bot's profile picture by using the /setuserpic command.

⭐ Finally, enter the /setcommands command to define the list of commands supported by the recently created bot. Users will see these commands as suggestions when they type / in the chat with the bot.
📌 The command list I created for my Telegram bot (IoT Carbon Dioxide and Dust Monitor):
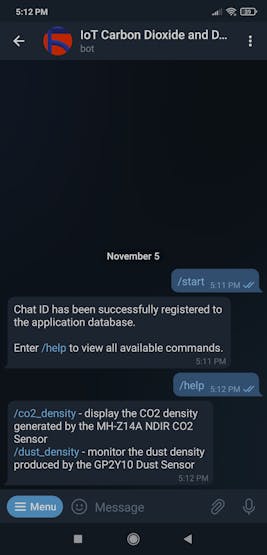
- /co2_density - display the CO2 density generated by the MH-Z14A NDIR CO2 Sensor
- /dust_density - monitor the dust density produced by the GP2Y10 Dust Sensor
- /help - help
Step 3: Developing a web application in PHP to communicate with the bot via the Telegram Bot API
After creating my Telegram bot successfully, I needed to obtain updates from the Telegram Bot API to communicate with my bot. Therefore, I developed a web application in PHP, named telegram_co2_and_dust_monitor, so as to:
- get updates from my Telegram bot (IoT Carbon Dioxide and Dust Monitor) via the Telegram Bot API,
- fetch the dust and carbon dioxide density evaluations transferred by the Nano RP2040 Connect and save them to the given MySQL database table,
- send messages (the dust and carbon dioxide density evaluations) to my Telegram bot when requested.
The application consists of one file - index.php. I created a class named telegram_co2_dust_monitor in the index.php file to save information transferred by the Nano RP2040 Connect to the given MySQL database table and send that information to the given Telegram bot when requested.
⭐ In the __init__ function, the class requires four parameters to execute functions:
- token ➡ authorization token of the given Telegram bot
- web_path ➡ Telegram Bot API request server
- conn ➡ MySQL database connection settings
- table ➡ MySQL database table name
⭐ In the send_message function, the application sends the given text to the given bot via the Telegram Bot API by employing the bot's authorization token.
Syntax: https://api.telegram.org/bot<token>/sendMessage?chat_id=<chat_id>&text=<string>
⭐ In the send_photo function, the application sends the given picture to the given bot via the Telegram Bot API by employing the bot's authorization token.
Syntax: https://api.telegram.org/bot<token>/sendPhoto?chat_id=<chat_id>&photo=<link>&caption=<string>
⭐ In the send_video function, the application sends the given video to the given bot via the Telegram Bot API by employing the bot's authorization token.
Syntax: https://api.telegram.org/bot<token>/sendVideo?chat_id=<chat_id>&video=<link>&caption=<string>
public function __init__($token, $server, $conn, $table){ $this->token = $token; $this->web_path = $server.$token; $this->conn = $conn; $this->table = $table; } // Telegram: public function send_message($id, $string){ $new_message = $this->web_path."/sendMessage?chat_id=".$id."&text=".urlencode($string); file_get_contents($new_message); } public function send_photo($id, $photo, $caption){ $new_photo = $this->web_path."/sendPhoto?chat_id=".$id."&photo=".$photo."&caption=".$caption; file_get_contents($new_photo); } public function send_video($id, $video, $caption){ $new_video = $this->web_path."/sendVideo?chat_id=".$id."&video=".$video."&caption=".$caption; file_get_contents($new_video); }
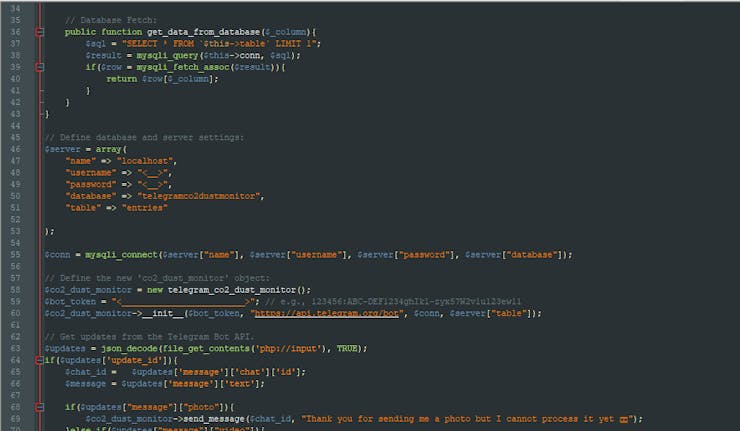
⭐ In the update_database function, save the given information to the given column in the given MySQL database table.
public function update_database($column, $value){ $sql = "UPDATE `$this->table` SET `$column`='$value' LIMIT 1"; mysqli_query($this->conn, $sql); }
⭐ In the get_data_from_database function, obtain and return the requested information from the given column in the given MySQL database table.
public function get_data_from_database($_column){ $sql = "SELECT * FROM `$this->table` LIMIT 1"; $result = mysqli_query($this->conn, $sql); if($row = mysqli_fetch_assoc($result)){ return $row[$_column]; } }
⭐ Define the required MySQL database connection settings and the co2_dust_monitor object with its required parameters.
$server = array( "name" => "localhost", "username" => "<__>", "password" => "<__>", "database" => "telegramco2dustmonitor", "table" => "entries");$conn = mysqli_connect($server["name"], $server["username"], $server["password"], $server["database"]);// Define the new 'co2_dust_monitor' object:$co2_dust_monitor = new telegram_co2_dust_monitor();$bot_token = "<________________________>"; // e.g., 123456:ABC-DEF1234ghIkl-zyx57W2v1u123ew11$co2_dust_monitor->__init__($bot_token, "https://api.telegram.org/bot", $conn, $server["table"]);
⭐ Get updates from the Telegram Bot API.
$updates = json_decode(file_get_contents('php://input'), TRUE);
⭐ If the application receives data from the Telegram Bot API, get the chat ID and the message.
⭐ Depending on the type of the incoming message - photo, video, document, or text - reply to the chat with the elicited chat ID.
⭐ The web application is compatible with these commands from the given Telegram bot:
- /start
- /co2_density
- /dust_density
- /help
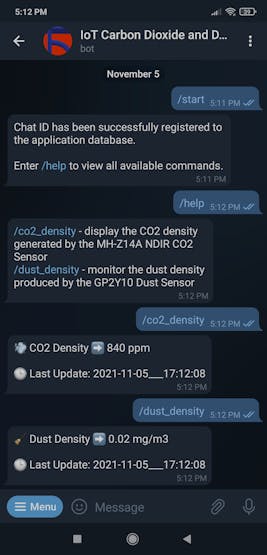
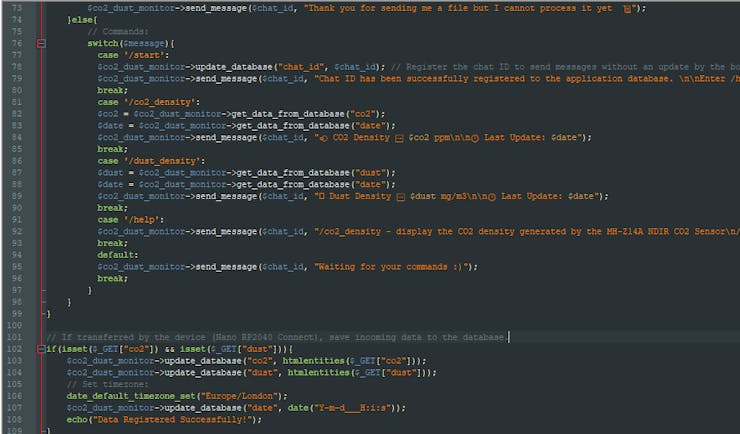
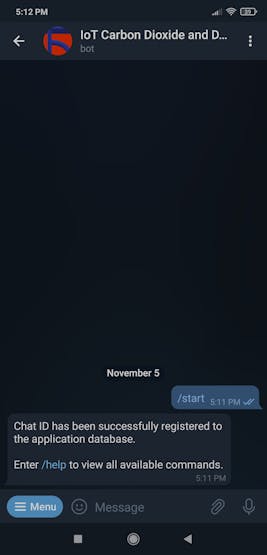
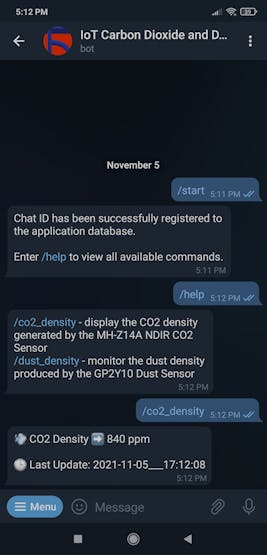
⭐ If the /start command is received, the application registers the chat ID to the given MySQL database table in order to send messages without needing updates from the Telegram Bot API.
⭐ If the /co2_density command is received, the web application sends the latest carbon dioxide density evaluation and the update time stored in the database table to the given Telegram bot.
⭐ If the /dust_density command is received, the web application sends the latest dust density evaluation and the update time stored in the database table to the given Telegram bot.
⭐ If the /help command is received, the web application sends the supported command list with descriptions to the given Telegram bot.
⭐ In default, if not received a supported command but text, the web application sends:
Waiting for your commands :)
if($updates['update_id']){ $chat_id = $updates['message']['chat']['id']; $message = $updates['message']['text']; if($updates["message"]["photo"]){ $co2_dust_monitor->send_message($chat_id, "Thank you for sending me a photo but I cannot process it yet 🎞"); }else if($updates["message"]["video"]){ $co2_dust_monitor->send_message($chat_id, "Thank you for sending me a video but I cannot process it yet 📹"); }else if($updates["message"]["document"]){ $co2_dust_monitor->send_message($chat_id, "Thank you for sending me a file but I cannot process it yet 📜"); }else{ // Commands: switch($message){ case '/start': $co2_dust_monitor->update_database("chat_id", $chat_id); // Register the chat ID to send messages without an update by the bot. $co2_dust_monitor->send_message($chat_id, "Chat ID has been successfully registered to the application database. \n\nEnter /help to view all available commands."); break; case '/co2_density': $co2 = $co2_dust_monitor->get_data_from_database("co2"); $date = $co2_dust_monitor->get_data_from_database("date"); $co2_dust_monitor->send_message($chat_id, "💨 CO2 Density ➡️ $co2 ppm\n\n🕒 Last Update: $date"); break; case '/dust_density': $dust = $co2_dust_monitor->get_data_from_database("dust"); $date = $co2_dust_monitor->get_data_from_database("date"); $co2_dust_monitor->send_message($chat_id, "🧹 Dust Density ➡️ $dust mg/m3\n\n🕒 Last Update: $date"); break; case '/help': $co2_dust_monitor->send_message($chat_id, "/co2_density - display the CO2 density generated by the MH-Z14A NDIR CO2 Sensor\n/dust_density - monitor the dust density produced by the GP2Y10 Dust Sensor"); break; default: $co2_dust_monitor->send_message($chat_id, "Waiting for your commands :)"); break; } }}
⭐ If the Nano RP2040 Connect transfers the dust and carbon dioxide density evaluations to the web application, save them to the given MySQL database table. Then, set the timezone to elicit the latest update time precisely with the date function and save it to the database table as well.
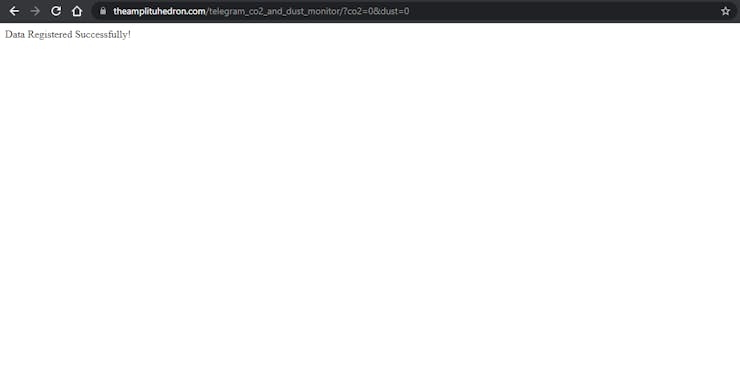
if(isset($_GET["co2"]) && isset($_GET["dust"])){ $co2_dust_monitor->update_database("co2", htmlentities($_GET["co2"])); $co2_dust_monitor->update_database("dust", htmlentities($_GET["dust"])); // Set timezone: date_default_timezone_set("Europe/London"); $co2_dust_monitor->update_database("date", date("Y-m-d___H:i:s")); echo("Data Registered Successfully!");}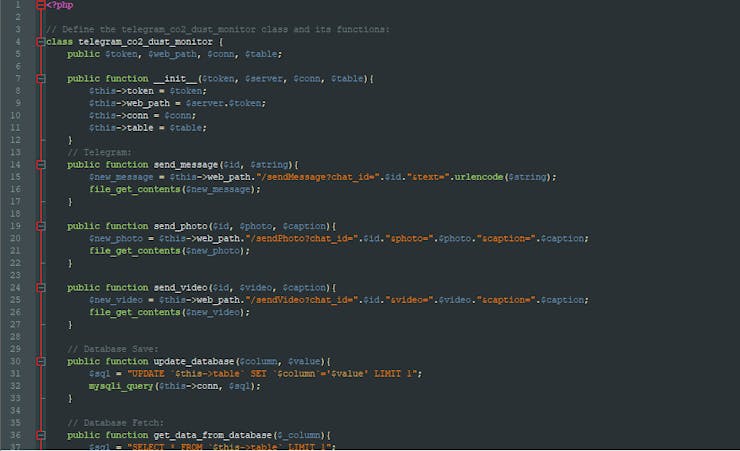
Step 3.1: Creating a MySQL database table and saving updates
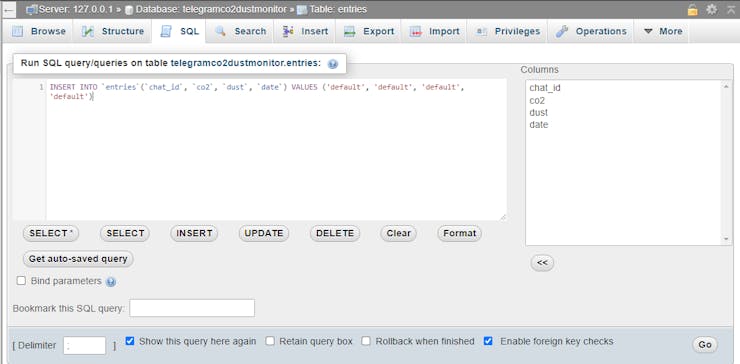
After developing the web application in PHP, I created a new MySQL database (telegramco2dustmonitor) on my server. Then, I created a database table (entries) in the telegramco2dustmonitor database to collect the dust and carbon dioxide density evaluations transferred by the Nano RP2040 Connect. Finally, I inserted default values for each attribute (column) in the entries database table:
telegramco2dustmonitor > entries > attributes:
- chat_id
- co2
- dust
- date
CREATE TABLE `entries`( chat_id varchar(255) PRIMARY KEY NOT NULL, co2 varchar(255) NOT NULL, dust varchar(255) NOT NULL, `date` varchar(255) NOT NULL);INSERT INTO `entries`(`chat_id`, `co2`, `dust`, `date`) VALUES ('default', 'default', 'default', 'default')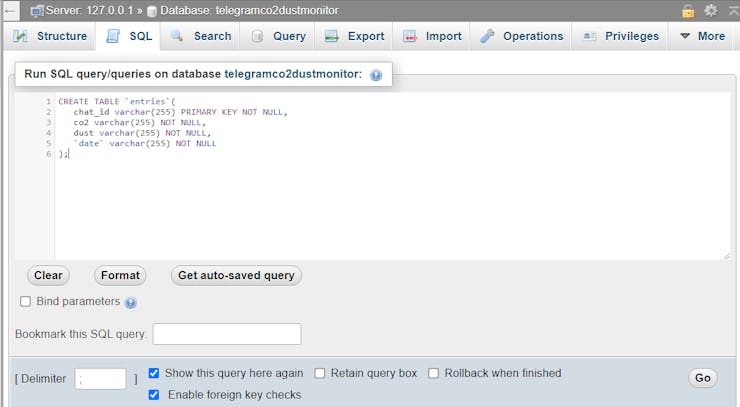
Getting updates from the Telegram Bot API by making requests to https://api.telegram.org/ requires an SSL connection, so I used my website's server to host the web application.
theamplituhedron.com
However, the Telegram Bot API is open-source and available at telegram-bot-api. You can run it locally and send requests to your server instead of https://api.telegram.org.
🖥️ When the web application fetches information and saves that information to the database table successfully, the application prints:
Data Registered Successfully!
Step 3.2: Setting up the web application to communicate with the bot
After developing the web application (outgoing webhook) and creating the MySQL database table, I needed to specify the application URL for my Telegram bot (IoT Carbon Dioxide and Dust Monitor) by utilizing the setWebhook method to receive incoming updates from the Telegram Bot API.
https://api.telegram.org/bot/setWebhook?url=https://www.theamplituhedron.com/telegram_co2_and_dust_monitor/
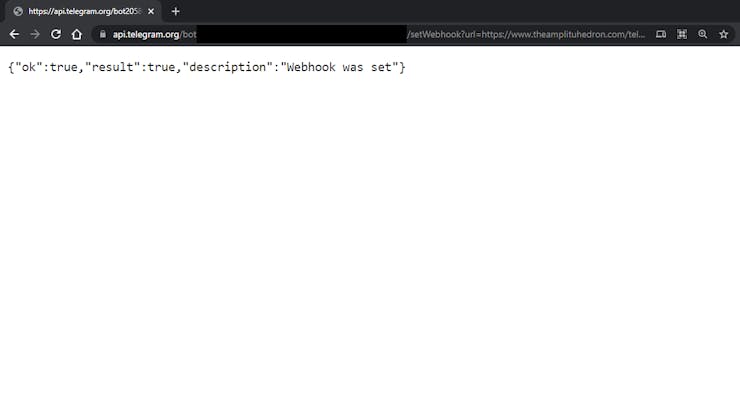
⭐ After specifying the application URL, the Telegram Bot API throws this message: Webhook was set.
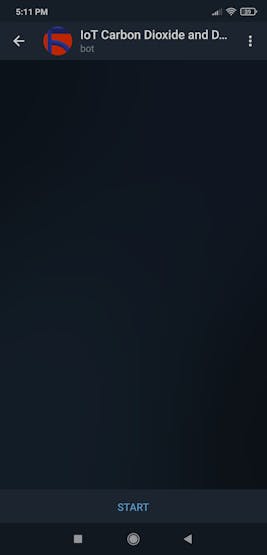
⭐ To check the given Telegram bot functions and register the chat ID to the database table, open the bot and enter /start.
⭐ Enter /help to view the supported command list with descriptions.
Step 4: Installing the Mbed OS core for the Nano RP2040 Connect
Since I decided to utilize the Arduino Nano RP2040 Connect in this project, I needed to install the Mbed OS core into the Arduino IDE.
⭐ On the Arduino IDE, navigate to Tools > Board > Boards Manager.
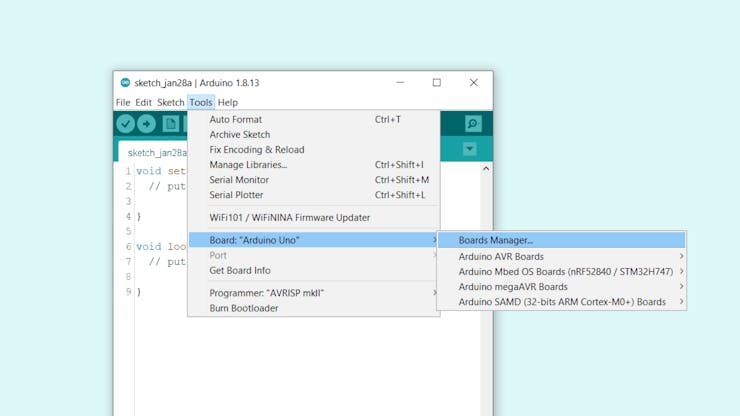
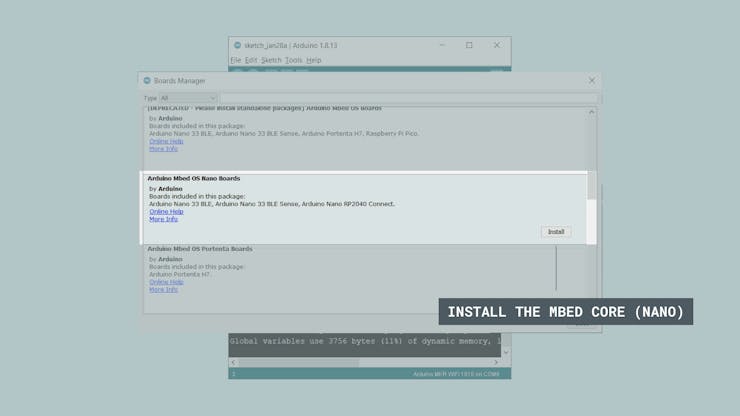
⭐ Then, search for the Arduino Mbed OS Nano Boards core and install it.
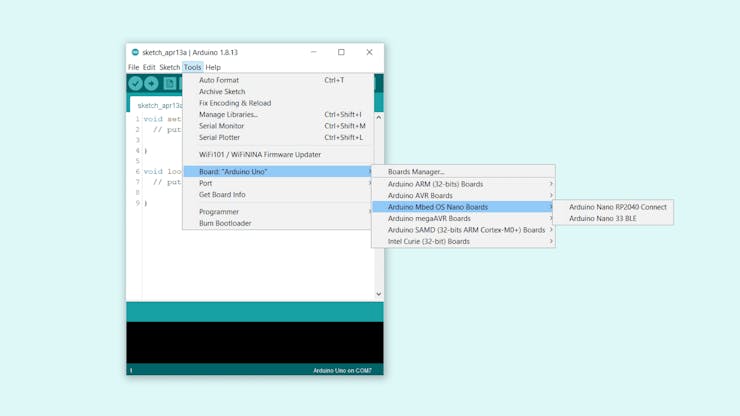
⭐ When the required core is installed successfully, go to Tools > Board > Arduino Mbed OS Nano Boards and select Arduino Nano RP2040 Connect.
Step 5: Adding certificates to the Nano RP2040 Connect
After installing the required core for the Arduino Nano RP2040 Connect on the Arduino IDE, I set up the board in order to connect to my website's server via the SSL connection. Unfortunately, for the Nano RP2040 Connect, it is not as simple as other Arduino IoT boards to connect to a server with the SSL connection. It requires the pre-installation of SSL certificates, which are not included with the board. Therefore, I needed to upload the SSL certificate of my website's server to the Nano RP2040 Connect.
⭐ First of all, to be able to use the Wi-Fi module on the Nano RP2040 Connect, download the WiFiNINA library from here.
⭐ Connect the Nano RP2040 Connect to the PC via USB cable and select the right port and board in Tools > Port and Tools > Board.
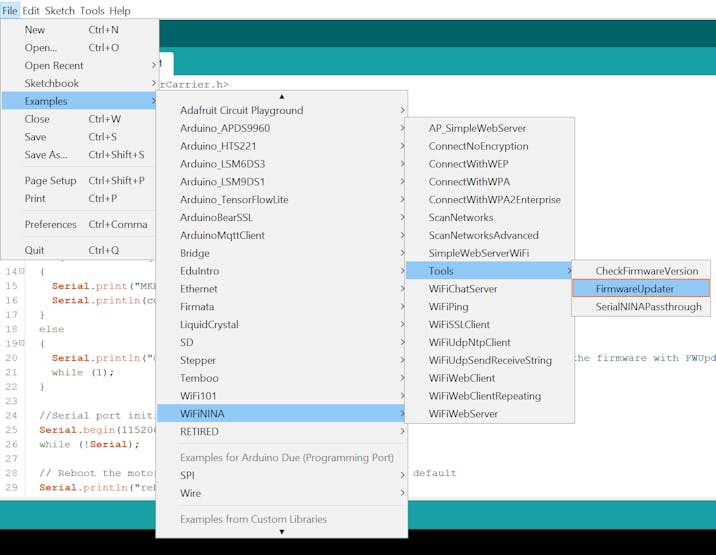
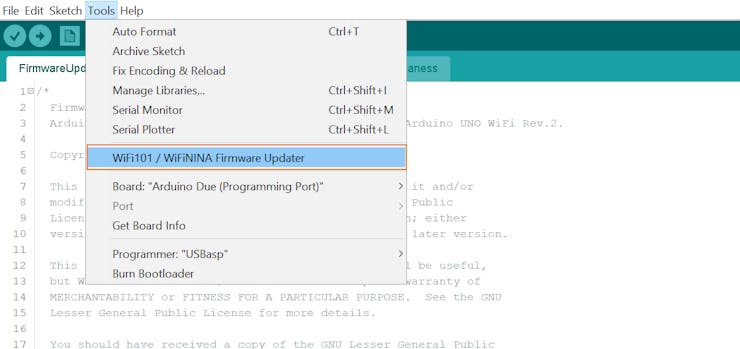
⭐ Search for the Firmware Updater sketch in Example > WiFi101 / WiFiNINA > Tools > Firmware Updater and upload it to the board.
⭐ After the sketch has been uploaded successfully, open Tools > WiFi101 / WiFiNINA Firmware Updater.
⭐ Once the Firmware Updater is launched, select the port of the Wi-Fi module (board). In section 2, select the NINA firmware (1.3.0) (Arduino MKR WiFi 1010, Arduino Nano 33 IoT).
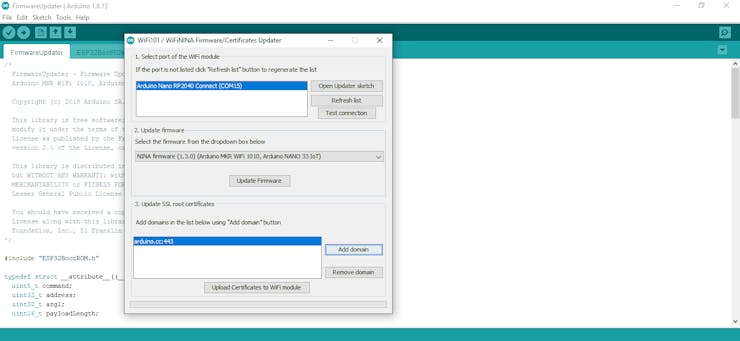
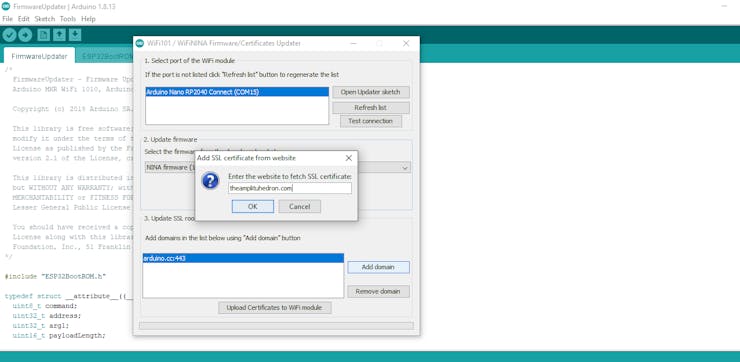
⭐ Then, in section 3, click on Add domain and enter the website to fetch its SSL certificate.
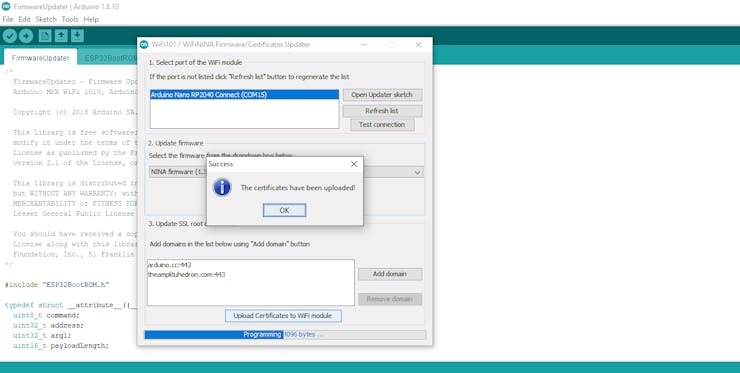
⭐ Finally, select the recently added website in the list and click on Upload Certificates to WiFi module.
Step 6: Programming the Nano RP2040 Connect
After completing all steps above successfully, I programmed the Arduino Nano RP2040 Connect.
⭐ Include the required libraries.
#include <SPI.h>#include <WiFiNINA.h>#include <Adafruit_GFX.h>#include <Adafruit_SSD1306.h>
⭐ Define the required Wi-Fi network connection settings and the web application path.
char ssid[] = "<____>"; // your network SSID (name)char pass[] = "<____>"; // your network password (use for WPA, or use as key for WEP)int keyIndex = 0; // your network key Index number (needed only for WEP)int status = WL_IDLE_STATUS;// Change the server below before running the code.char server[] = "www.theamplituhedron.com";// Define the web application path.String application = "/telegram_co2_and_dust_monitor/";// Initialize the Ethernet client library.WiFiSSLClient client; /* WiFiClient client; */
⭐ Define the SSD1306 OLED (128x32) screen settings.
#define SCREEN_WIDTH 128 // OLED display width, in pixels#define SCREEN_HEIGHT 32 // OLED display height, in pixels#define OLED_RESET -1 // Reset pin # (or -1 if sharing Arduino reset pin)Adafruit_SSD1306 display(SCREEN_WIDTH, SCREEN_HEIGHT, &Wire, OLED_RESET);
⭐ Start the timer and initiate the SSD1306 screen.
heat_timer = millis(); // Initialize the SSD1306 screen: display.begin(SSD1306_SWITCHCAPVCC, 0x3C); display.clearDisplay(); display.setTextSize(2); display.setCursor(0,0); display.setTextColor(SSD1306_WHITE); display.println("Heating &"); display.print("Connecting"); display.display(); delay(1000);
⭐ Check the connection status between the Wi-Fi module and the Wi-Fi network. Turn the RGB LED to blue if the connection is successful.
if (WiFi.status() == WL_NO_MODULE) { adjustColor(255,0,0); while (true); } // Attempt to connect to the WiFi network: while (status != WL_CONNECTED) { // Connect to WPA/WPA2 network. Change this line if using open or WEP network: status = WiFi.begin(ssid, pass); // Wait 10 seconds for connection: delay(10000); } // If connected to the network successfully: adjustColor(0,0,255);
⭐ Wait for 5 minutes until the MH-Z14A NDIR CO2 Sensor heats properly to generate accurate data.
⭐ Turn the RGB LED to purple while collecting data:
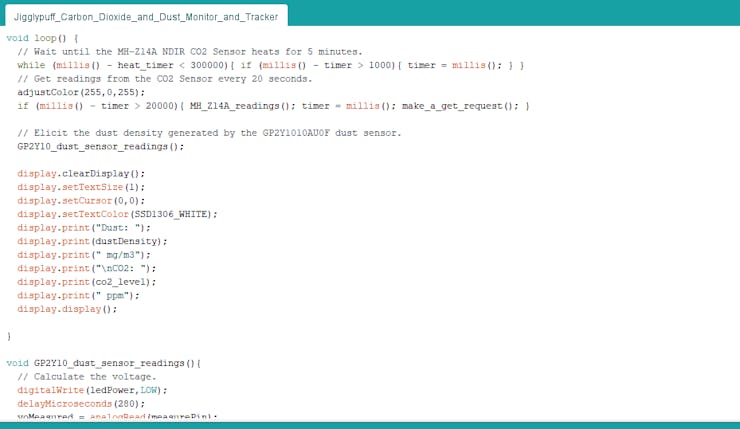
⭐ Get the carbon dioxide density evaluation produced by the MH-Z14A NDIR CO2 Sensor every 20 seconds.
⭐ Elicit the dust density evaluation generated by the GP2Y1010AU0F Dust Sensor.
while (millis() - heat_timer < 300000){ if (millis() - timer > 1000){ timer = millis(); } } // Get readings from the CO2 Sensor every 20 seconds. adjustColor(255,0,255); if (millis() - timer > 20000){ MH_Z14A_readings(); timer = millis(); make_a_get_request(); } // Elicit the dust density generated by the GP2Y1010AU0F dust sensor. GP2Y10_dust_sensor_readings();
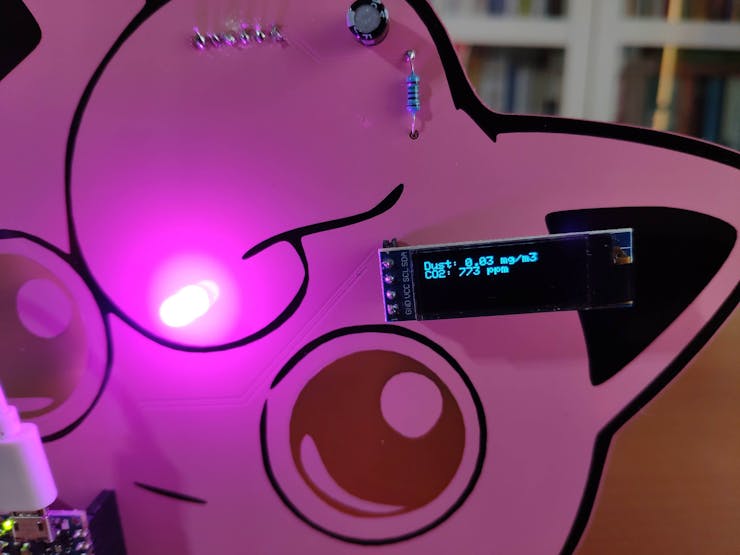
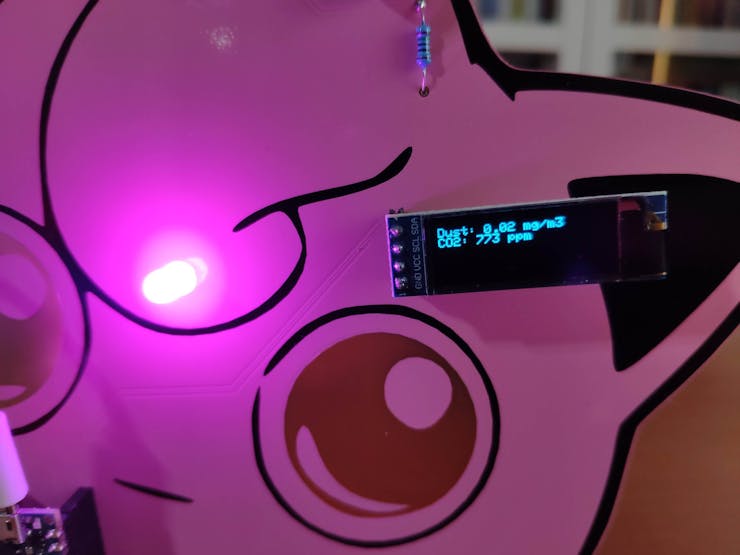
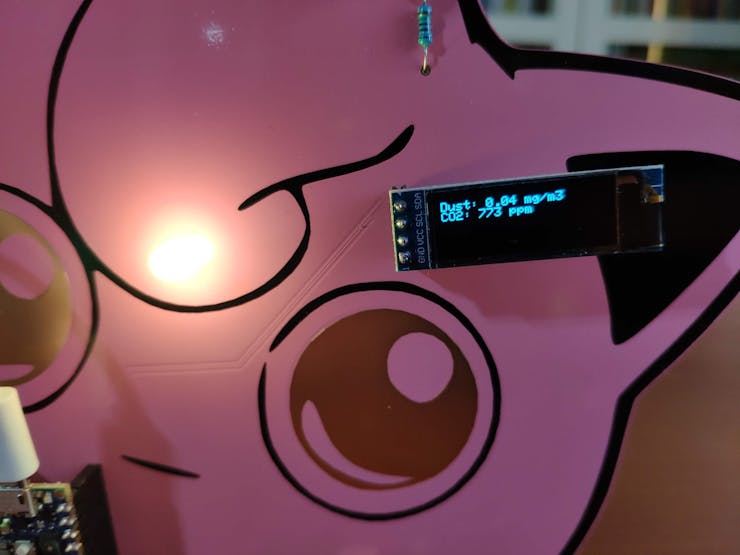
⭐ Print the dust and carbon dioxide density evaluations on the SSD1306 screen.
display.clearDisplay(); display.setTextSize(1); display.setCursor(0,0); display.setTextColor(SSD1306_WHITE); display.print("Dust: "); display.print(dustDensity); display.print(" mg/m3"); display.print("\nCO2: "); display.print(co2_level); display.print(" ppm"); display.display();
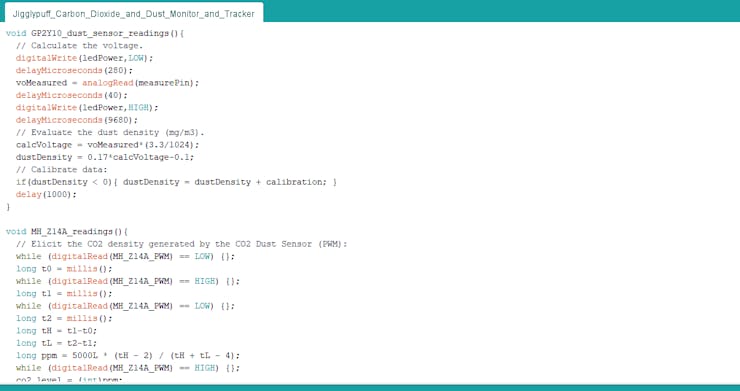
⭐ In the GP2Y10_dust_sensor_readings function, evaluate the dust density (mg/m3) and calibrate the sensor if necessary.
I needed to calibrate my dust sensor's evaluations by 0.05 to get accurate results. You may need to change the calibration value depending on your sensor's evaluations.
calcVoltage = voMeasured*(3.3/1024);
dustDensity = 0.17*calcVoltage-0.1;
void GP2Y10_dust_sensor_readings(){ // Calculate the voltage. digitalWrite(ledPower,LOW); delayMicroseconds(280); voMeasured = analogRead(measurePin); delayMicroseconds(40); digitalWrite(ledPower,HIGH); delayMicroseconds(9680); // Evaluate the dust density (mg/m3). calcVoltage = voMeasured*(3.3/1024); dustDensity = 0.17*calcVoltage-0.1; // Calibrate data: if(dustDensity < 0){ dustDensity = dustDensity + calibration; } delay(1000);}
⭐ In the MH_Z14A_readings function, calculate the carbon dioxide density (ppm) by utilizing the timer and the MH-Z14A CO2 sensor's PWM interface.
long ppm = 5000L * (tH - 2) / (tH + tL - 4);
void MH_Z14A_readings(){ // Elicit the CO2 density generated by the CO2 Dust Sensor (PWM): while (digitalRead(MH_Z14A_PWM) == LOW) {}; long t0 = millis(); while (digitalRead(MH_Z14A_PWM) == HIGH) {}; long t1 = millis(); while (digitalRead(MH_Z14A_PWM) == LOW) {}; long t2 = millis(); long tH = t1-t0; long tL = t2-t1; long ppm = 5000L * (tH - 2) / (tH + tL - 4); while (digitalRead(MH_Z14A_PWM) == HIGH) {}; co2_level = (int)ppm; delay(10);}
⭐ In the make_a_get_request function:
⭐ Connect to the web application named telegram_co2_and_dust_monitor.
⭐ If the connection to the given server is successful, turn the RGB LED to yellow and create the query string, including the dust and carbon dioxide density evaluations. Otherwise, turn the RGB LED to red.
⭐ Then, make a GET request with the query string to send the given parameters to the web application.
⭐ If there are incoming bytes available, get the response from the web application.
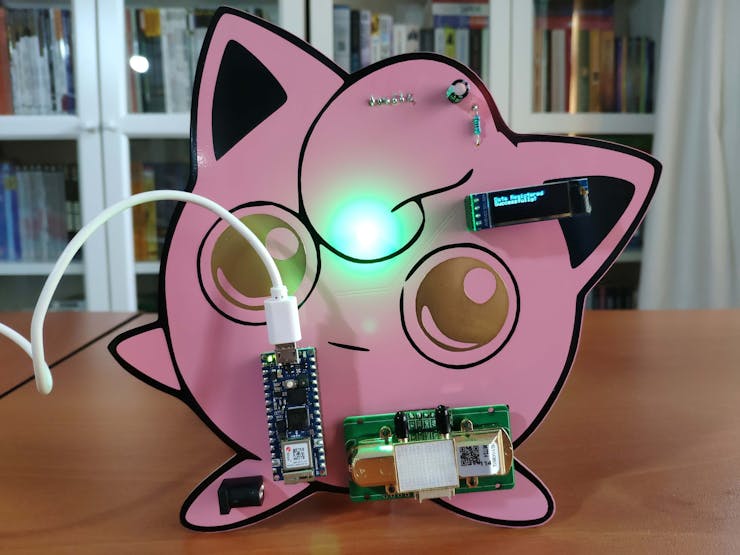
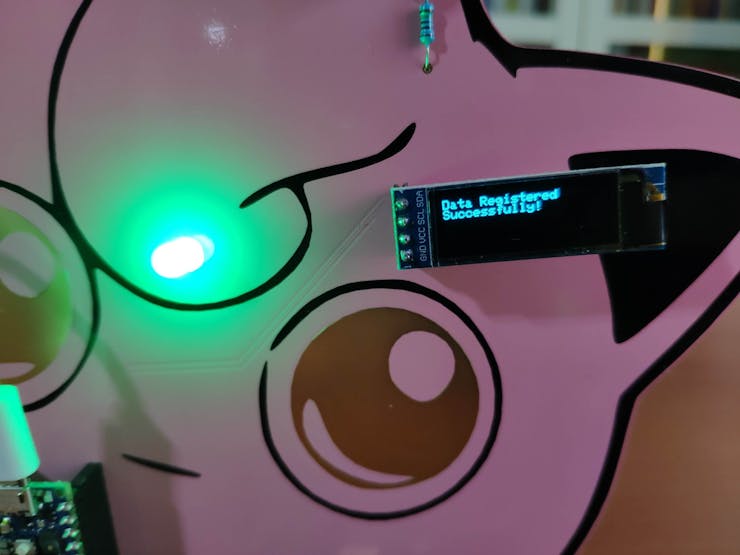
⭐ If the transferred data is stored into the MySQL database table successfully by the web application, turn the RGB LED to green and print Data Registered Successfully! on the SSD1306 screen.
void make_a_get_request(){ // Connect to the web application named telegram_co2_and_dust_monitor. Change '443' with '80' if you are not using SSL connection. if (client.connect(server, 443)){ // If successful: adjustColor(255,255,0); // Create the query string: String query = application + "?co2="+co2_level+"&dust="+dustDensity; // Make an HTTP Get request: client.println("GET " + query + " HTTP/1.1"); client.println("Host: www.theamplituhedron.com"); client.println("Connection: close"); client.println(); }else{ adjustColor(255,0,0); } delay(2000); // Wait 2 seconds after connection... // If there are incoming bytes available, get the response from the web application. String response = ""; while (client.available()) { char c = client.read(); response += c; } if(response != "" && response.indexOf("Data Registered Successfully!") > 0){ adjustColor(0,255,0); display.clearDisplay(); display.setTextSize(1); display.setCursor(0,0); display.setTextColor(SSD1306_WHITE); display.println("Data Registered"); display.println("Successfully!"); display.display(); }}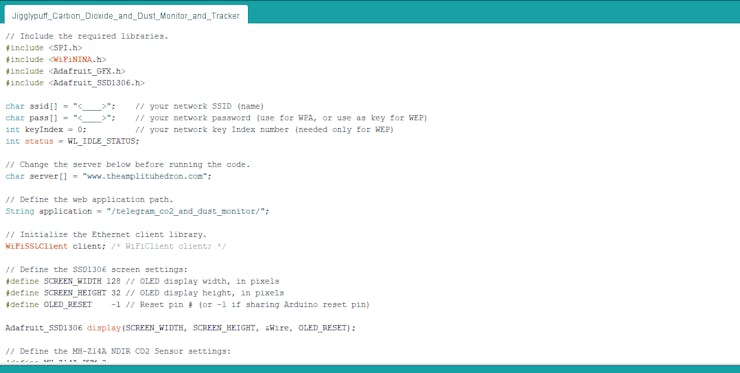


Connections and Adjustments
// Connections
// Arduino Nano RP2040 Connect :
//                                MH-Z14A NDIR CO2 Sensor
// D2  --------------------------- PWM
// RX  --------------------------- TX (Optional)
// TX  --------------------------- RX (Optional)
//                                GP2Y1010AU0F Dust Sensor
// D4  --------------------------- LED
// A0  --------------------------- S
//                                SSD1306 OLED 128x32
// A4  --------------------------- SDA
// A5  --------------------------- SCL
//                                5mm Common Anode RGB LED
// D3  --------------------------- R
// D5  --------------------------- G
// D6  --------------------------- B
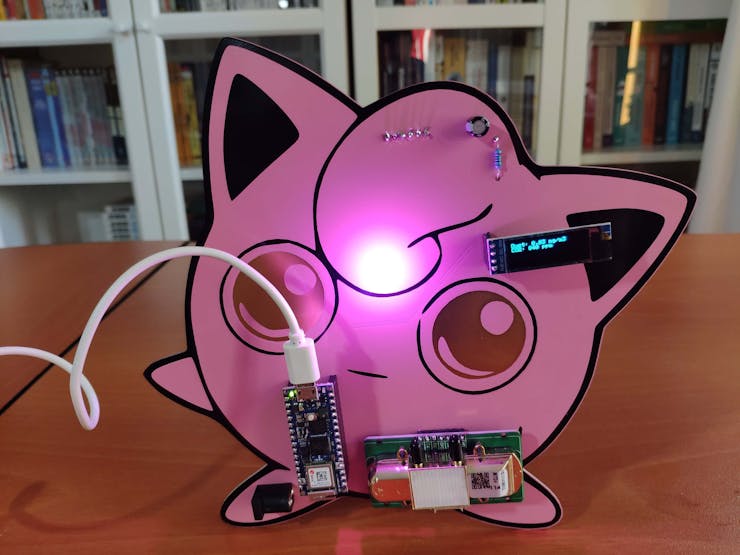
After completing soldering and uploading the code, I attached all remaining components to the PCB via headers - Arduino Nano RP2040 Connect and SSD1306 OLED (128x32) screen.
Since the Nano RP2040 Connect operates at 3.3V and the MH-Z14A NDIR CO2 Sensor requires 4.5V - 5.5V operating voltage, I enabled and used the built-in 5V pin (VUSB) on the Nano RP2040 Connect.
I utilized the MH-Z14A CO2 sensor's PWM interface to elicit the carbon dioxide density evaluations generated by the sensor. However, I added two solder jumper pads (JP1, JP2) connecting the Nano RP2040 Connect to the MH-Z14A CO2 sensor's UART interface. Therefore, the sensor's UART interface is available if needed.
As shown below, I fastened the GP2Y1010AU0F Dust Sensor on the back of the PCB with a hot glue gun.
Modes and Features
🧹🔎 When initiated, the device prints Heating & Connecting on the SSD1306 OLED screen and attempts to connect to the given Wi-Fi network.

🧹🔎 If the connection between the Wi-Fi module and the Wi-Fi network is successful, the device turns the RGB LED to blue and waits for 5 minutes until the MH-Z14A NDIR CO2 Sensor heats properly to generate accurate carbon dioxide density evaluations.

🧹🔎 While collecting the dust and carbon dioxide density evaluations from sensors (GP2Y1010AU0F and MH-Z14A), the device turns the RGB LED to purple and prints the results on the SSD1306 OLED screen.
🧹🔎 If the Wi-Fi module connects to the web application's server successfully, the device turns the RGB LED to yellow. Otherwise, the device turns the RGB LED to red.
🧹🔎 If the web application saves the transferred data successfully to the MySQL database table, the device turns the RGB LED to green and prints Data Registered Successfully! on the SSD1306 OLED screen.
📌 On the Telegram bot (IoT Carbon Dioxide and Dust Monitor):
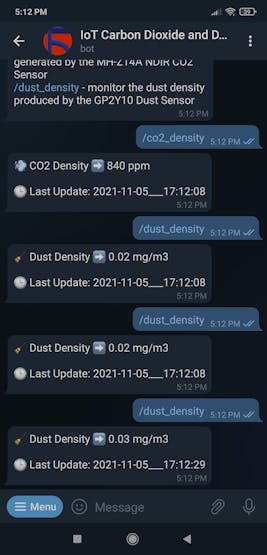
🧹🔎 If the /co2_density command is entered, the bot shows the latest carbon dioxide density evaluation and the update time stored in the MySQL database table.
🧹🔎 If the /dust_density command is entered, the bot shows the latest dust density evaluation and the update time stored in the MySQL database table.