Set overclock values in the config.txt document to give your Raspberry Pi Zero 2 W a speed increase.
The powerful Cortex-A53 quad-core CPU on the Raspberry Pi Zero 2 W runs at a default speed of 1GHz. It's possible to increase the speed to 1.2GHz or even 1.4GHz. The increased performance makes Raspberry Pi OS more responsive, which is important when setting up Zero 2 W projects that are more demanding and might benefit from a boost (such as image processing or retro gaming). However, there's a danger that the Raspberry Pi Zero 2 W will overheat and cut back the CPU, keeping it safe but slowing down Raspberry Pi OS.
It's necessary to think about a cooling solution for the Raspberry Pi, as it is with any overclocking projects. However, overclocking is a lot of fun to play around with. So, let's spruce up Zero 2 W a little.
Zero 2 W should be kept cool.
We'll use a Raspberry Pi Zero Case to house the Raspberry Pi Zero 2 W. The heatsink is the metal casing. Attach a Heatsink for Zero 2 W for a less expensive solution.

|
Raspberry Pi OS must be updated.
Make sure you have the most recent version of Raspberry Pi OS installed. Open a Terminal window and type the following commands:
sudo apt update sudo apt full-upgrade
Restart the computer now.
sudo reboot
Keep an eye on your speed.
Take a look at the default CPU speed before we start overclocking. Enter the following commands in a Terminal window.:
vcgencmd measure_clock arm
Most likely, the terminal will return 600000. The speed in MHz is obtained by multiplying this value by 1000. The basic frequency is 600MHz (or 0.6GHz). The kernel has requested this speed. The real CPU speed may be lower if your Raspberry Pi is throttled due to low voltage or overheating.
|
| Image Credit: TheMagPi |
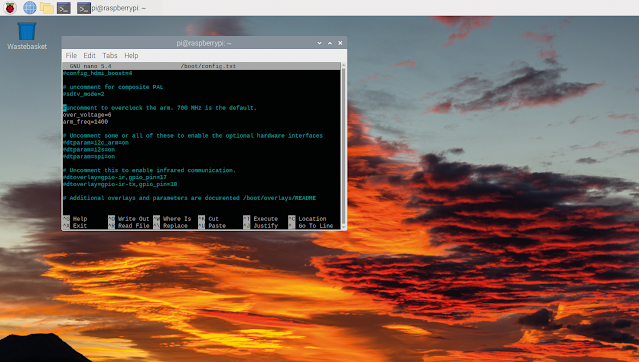
Change the configuration.
The config.txt file will be used to specify a new upper limit for the clock frequency. Create a new Terminal window and type in:
sudo nano /boot/config.txt
Scroll to the bottom of the page to the section labelled:
#uncomment to overclock the arm. 700 MHz is


the default.


#arm_freq=800
Also, modify the options to:
# Overclock settings # over_voltage=6 arm_freq=1200
The over_voltage command changes the core CPU/ GPU voltage and supports values ranging from -16 to 8. 0 is the default value. We've kept over_ voltage commented out for now because the current firmware in Bullseye will try its best to figure out the right voltage for an overclock. Use CTRL+O to save the file (hit RETURN) and CTRL+X to leave.
Restart your Raspberry Pi if it hasn't already.
Restart your computer to use the changed settings.:
sudo reboot
Watch vcgendcmd when the system restarts to see your new, faster clock speed in action.
watch -n 1 vcgencmd measure_clock arm
You'll notice speeds of approximately 1200000000 if you visit a few websites (or 1.20GHz).
Voltage monitoring
For dependable functioning, the supply voltage must be kept above 4.8 V. It's important to keep in mind that the voltage from some USB chargers/power supply might drop as low as 4.2 V. This is due to the fact that they are often built to charge a 3.7 V LiPo battery rather than provide 5 V to a computer.
You'll need a multimeter to measure between the VCC (5 V) and GND pins on the GPIO to monitor the Raspberry Pi's PSU voltage. The Raspberry Pi website has further information on power requirements: magpi.cc/powersupply.
Voltage Parameters
Let's try going a bit quicker this time. The ARM CPU should be set at 1.4GHz. Only by including the over_voltage parameter did we able to get our Zero 2 W to run at this speed. Make changes to the config.txt file.
over_voltage=6


arm_freq=1400


# gpu_freq=700
This is the maximum over_voltage we're going to go. When you reboot the Raspberry Pi, it will operate at 1.4GHz. To observe the new upper limit, run watch -n 1 vcgencmd measure clock arm again. You can also remove the gpu freq remark. Gpu freq is in charge of a number of parameters, including core freq, h264 freq, isp freq, and v3d freq. With higher gpu freq settings, all of the Zero 2 Ws we tested failed to boot.
config.txt
> Language: Bash
001. # Overclock settings


002. over_voltage=6


003. arm_freq=1400


004. #gpu_freq=700
Problems with overclocking
The inability to startup is the most common symptom of overclocking. If this happens, keep the SHIFT key pressed on the next boot. This will turn off any overclocking for the time being, enabling you to successfully boot and then adjust your settings. Remove the microSD card from your Raspberry Pi and install it into another computer as an alternative. You'll be able to modify the settings by accessing the config.txt file. If everything else fails, install a fresh image of Raspberry Pi OS on the microSD card using Raspberry Pi Imager.
"If a Raspberry Pi fails to boot, the gpu freq parameter should be disabled."
Get rid of the black screen
We believe that arm freq=1200 is a good speed increase. The advantages of gpu_freq, according to our engineering staff, are negligible at best, and the gpu_freq parameter should be disabled if a Raspberry Pi fails to run. During overclocking, your Raspberry Pi is likely to fail to boot at some time. For additional information on recovery, see 'Overclocking issues' (above). Otherwise, have fun with your Raspberry Pi Zero 2 W computer and get the most out of it.
Posts You May like:
- The Arduino UNO Mini Limited Edition is Now Available
- Scan QR Codes with Raspberry Pi Pico
- Create Barcodes with Pure Python
- The New Version of Raspberry Pi OS, Debian "Bullseye" is Now Available.
- The Raspberry Pi Zero 2 W Arrives Six Years After The First Pi Zero
- Raspberry Pi 4 Has Been Given Vulkan 1.1 Compliance by Khronos
- The Raspberry Pi Build HAT - Complete Guide
- Raspberry Pi Officialy Announced Build HAT For Raspberry Pi
- Installing Android on a Raspberry Pi 4 with Google Play Store
- Pop OS Linux is Coming to Raspberry Pi and Other ARM Devices Soon
- How to Immediately Upgrade to Windows 11
- A Secret Update for the Raspberry Pi 4 8GB
- Raspberry Pi Introduces a New Documentation Hub
- Quick start with ESP8266 based Pico WiFi HAT
- Capture local Real-Time Air Quality Data with Raspberry Pi Pico