Sumit
SumitIntroduction
Check out how I am going to use Tuya Cloud APIs to visually show what the forecast has in store for me each day at my home’s exact location.
Technology Used:
Based on the Tuya Smart IoT and Cloud platform, such solutions can be developed simply and quickly. This tutorial introduces how to use the Tuya Cloud API and IoT platform to quickly complete a Smart Weather Lamp Prototype. You don't need to have any prior experience with Arduino programming or any soldering for this tutorial, it is purely in simple Python language. If you haven't signed up for the Tuya IoT account, sign up here, c'mon it's free for all developers to Sign up and join the Tuya Developer Arduino Beta Test
Also, I have been preparing several articles for people and hobbyists who are new to the Tuya IoT platform, do visit those for references:
- https://steptostem.com/3553/aquamon-aquaponics-and-fish-tank-monitoring-with-tuya-iot/
- https://steptostem.com/3360/getting-started-with-arduino-iot-control-with-tuya-iot-platform/
- https://steptostem.com/3688/hack-your-own-smart-gadgets-using-tuya-cloud-platform/
What is Tuya IoT and Cloud ?
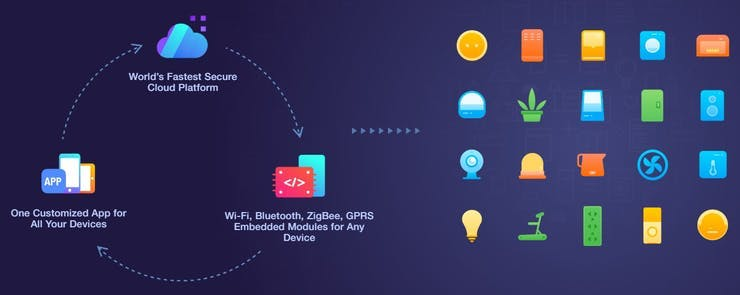
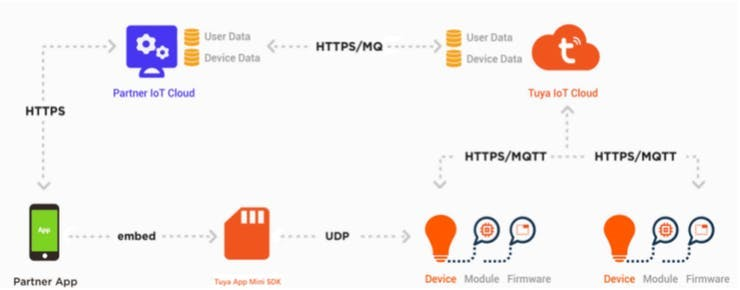
Tuya is a leading global IoT Cloud Platform that connects the intelligent needs of brands, OEMs, developers, and retail chains. The platform provides developers with a one-stop IoT PaaS-level solution that contains hardware development tools, global cloud services, and smart business platform development, Tuya is offering comprehensive ecosystem empowerment from technology to marketing channels to build the world’s leading IoT Cloud Platform. Even you can use the Tuya Cloud platform to connect hardware to the cloud and then use their API to control and monitor these objects.
Let us build it, first, let us start with the Tuya Platform and then we will jump over the hardware.
Step 1: Tuya Cloud and IoT platform Setup
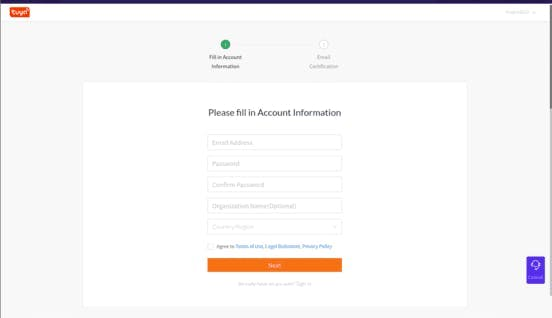
i) Create an account on Tuya Platform, http://iot.tuya.com/?_source=3bb57e086a1738fc4d1ecf7a7f79188e Fill in your details and Sign Up as an Individual Developer.
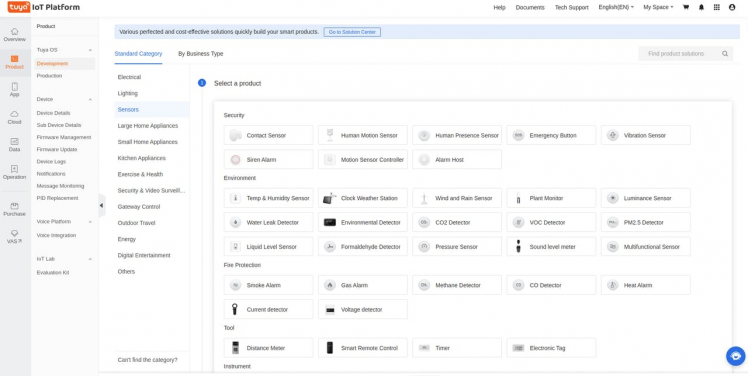
ii) Click on Product > Development > Create from the left navigation bar, you would see a long list of device category would appear( we are going to select Environmental Detector)
iii) After this fill in details of the product and select Wifi connectivity
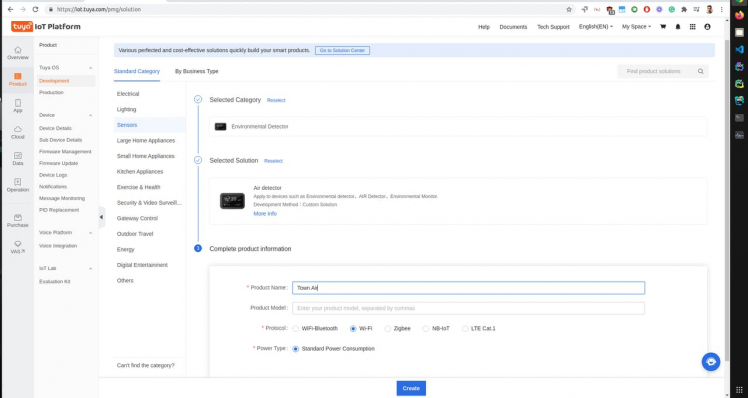
The main reason for doing this is so that you have an app that can update its values with Tuya Cloud API (means this will just be a virtual device for the sake of mobile app but will be controlled by Cloud API, don't be afraid, you need not buy any such sensors)
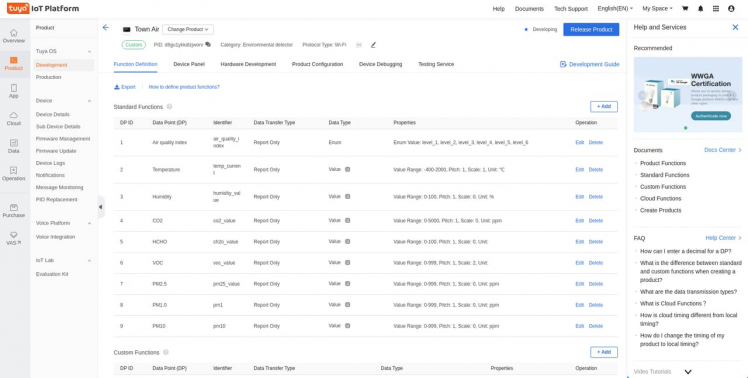
iv) Have all these Standard DP added to our created device (note you can add your own custom DP but Cloud API won't recognise it, it only works with standard DPS)
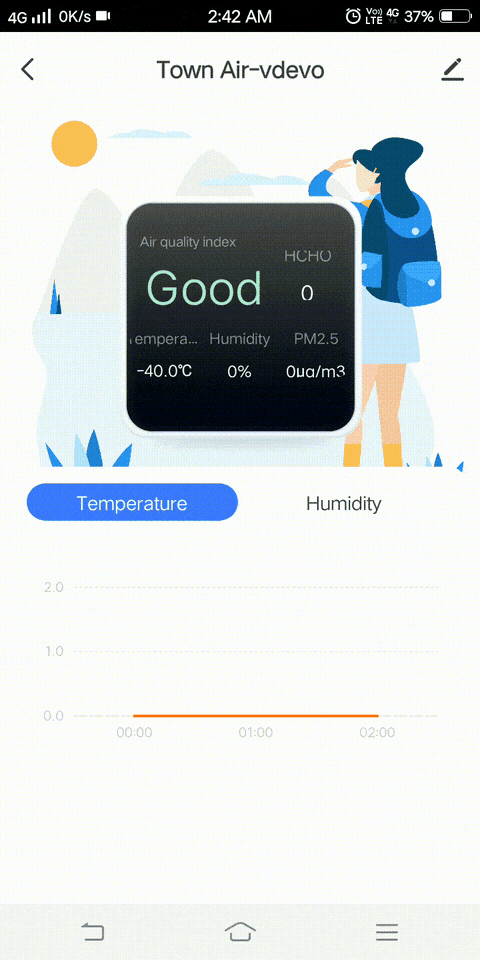
v) You can make the Device Panel interactive and beautiful, we will just modify the default app panel to suit our need (this step is totally optional/ can be done easily)
1 / 2 • Add some background images and charts for your weather and air quality related data

Add some background images and charts for your weather and air quality realted data
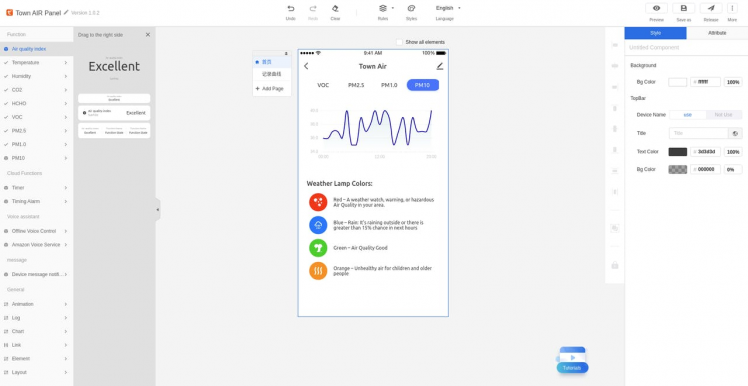
On a mobile screen, it looks like this,
vi) Next click Cloud > Development from the left navigation bar and then select the TRIAL EDITION option:
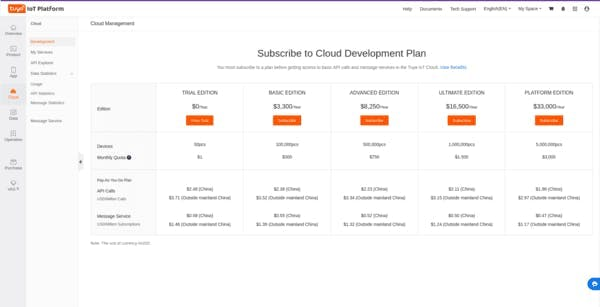
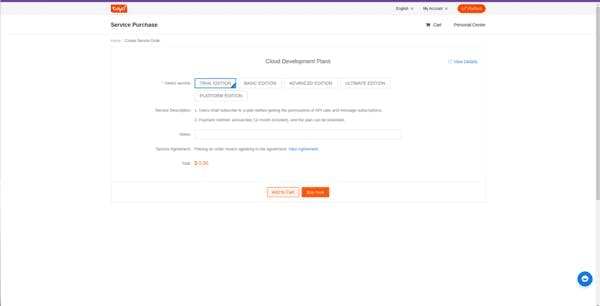
vii) On the next page select TRIAL EDITION and click Buy Now. Don't worry, you don't have to add a credit card, the process is completely free.
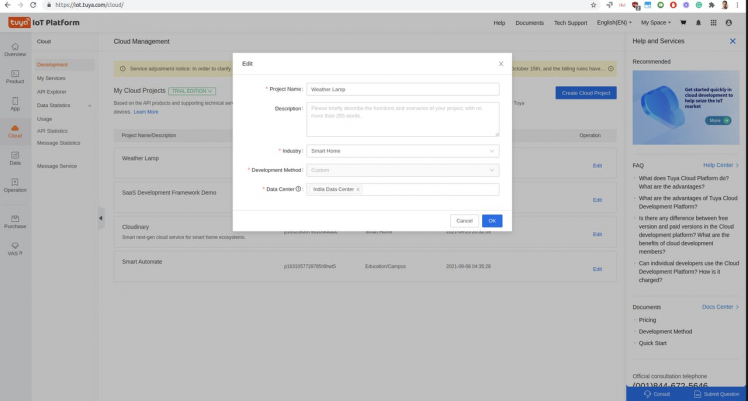
viii) Create a Cloud Development Project
Now we need to create a cloud project. Click Create Cloud Project on the right side of the page. On the dialogue box, fill in the form and click Create.
For Industry select Smart Home, for Development Method select Custom, and for Availability Zone select the server address corresponding to your area. For me it's India Data Center:
On the Authorize API Services page, you can see that there are some APIs services selected by default (on the right) but we also need to add other APIs. The ones that we are looking for are Device Status Notification, Industry Project Client Service, Weather Service, and LBS API. Select them and click Authorize. In fact, you can select all relevant ones for future customizations. After that, you will see the Project Configuration page to create an asset and a user, do remember we will use the same email and password for Cloud SDK and API authentications, even on the mobile app too.
ix) In Cloud App console go to Devices > Add Device and My Products and choose the IoT device which we made in previous steps,
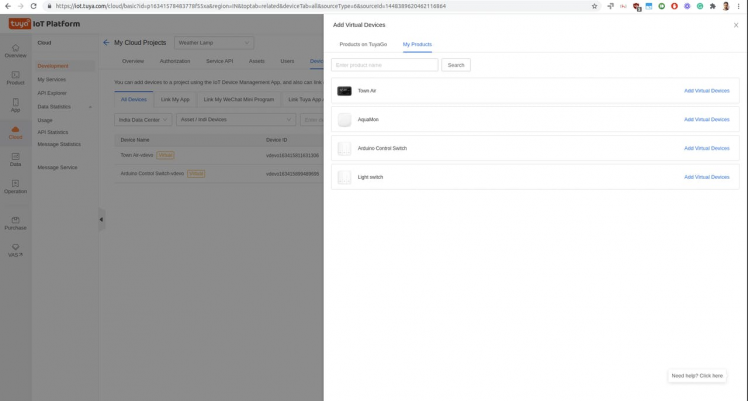
On your installed Tuya Device Management App you can check your device in your asset and would be able to see a mobile app panel like shown in previous steps.
Step 2: Tuya Cloud SDK for Device Control
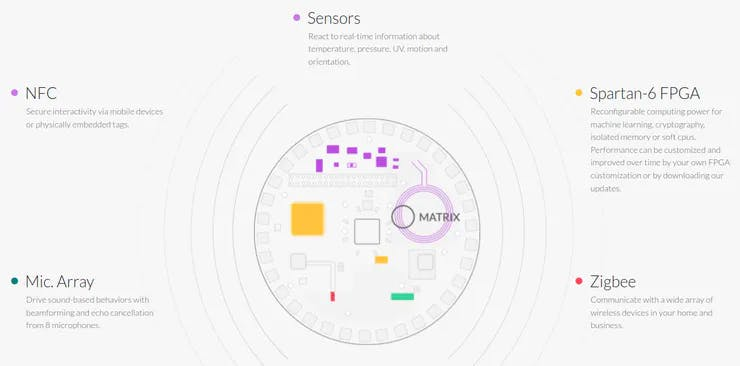
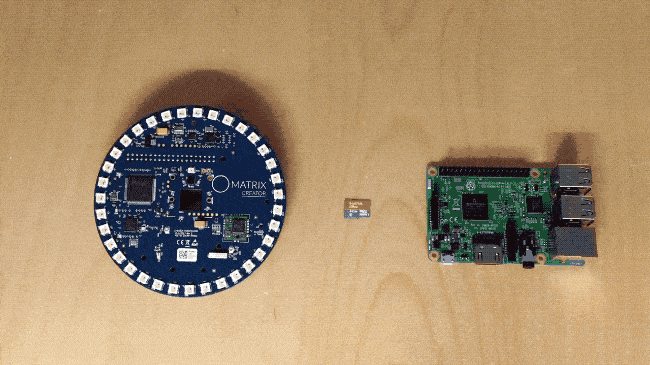
Hardware: we are going to use Raspberry Pi 3B+, you can use any version above it as well, for the LED array I am going to Matrix Creator Board, this board is my favourite of all boards with many on-board sensors and 35 RGBw LEDs.
Recommended 5V 3A Micro USB Power Supply, now use MicroSD Card with the latest version of Raspberry Pi OS installed. Flash and burn the Raspberry OS using Etcher.io for easy flashing.
After OS is flashed, try connecting a monitor for the first time and then later you can access the device remotely through VNC or SSH. Let us install the Matrix Creator device drivers and packages, https://matrix-io.github.io/matrix-documentation/matrix-hal/getting-started/installation-package/
# Add repo and key
curl -L https://apt.matrix.one/doc/apt-key.gpg | sudo apt-key add -
echo "deb https://apt.matrix.one/raspbian $(lsb_release -sc) main" | sudo tee /etc/apt/sources.list.d/matrixlabs.list

# Update repo and packages
sudo apt-get update
sudo apt-get upgrade

# Install MATRIX HAL Packages
sudo apt-get install matrixio-creator-init libmatrixio-creator-hal libmatrixio-creator-hal-dev

# reboot device
sudo reboot
To interface with Matrix device through codes, let us install the Matrix Lite python3 package
python3 -m pip install --user matrix-lite
Here are the exciting parts of this project happening, you write some simple Python-based codes and connect to your device over cloud and control and know its status,
We also need to install the Tuya-iot-python-sdk package. Open a new terminal window and run this command:
pip3 install tuya-iot-py-sdk
The script is very simple to understand, we make Tuya authorization first
from matrix_lite import led
from time import sleep
from tuya_iot import TuyaOpenAPI
import json
import math
from urllib.request import urlopen

# Cloud project authorization info
ACCESS_ID = 'your id'
ACCESS_KEY = 'your key'

# Select an endpoint base on your project availability zone
ENDPOINT = "https://openapi.tuyain.com"

# Project configuration
USERNAME = 'your email'  # email address or phone number
PASSWORD = 'your password'

DEVICE_ID = 'your device id'

# Initialization of tuya openapi
openapi = TuyaOpenAPI(ENDPOINT, ACCESS_ID, ACCESS_KEY)
openapi.login(USERNAME, PASSWORD)
We are going to need our location data in order to use Tuya Weather APIs, sow e will first get our IP address and then find out our coordinates using Tuya LBS service APIs,
# Device IP
url = 'http://ipinfo.io/json'
response = urlopen(url)
data = json.load(response)
IP = data[ 'ip' ]

# Get location of device through IP
location = openapi.get(f'/v1.0/iot-03/locations/ip?ip={IP}')
print(location)
location = location[ 'result' ]
latitude, longitude = location[ 'latitude' ], location[ 'longitude' ]
Now we will get the weather and AIR quality data for our location using weather API
weather_url = f'/v2.0/iot-03/weather/current?lat={latitude}&lon={longitude}'
weather = openapi.get(weather_url)
condition_num = int(weather[ 'result' ][ 'current_weather' ][ 'condition_num' ])
Based upon the result, here weather condition number, we will change the device colour, all-weather condition numbers are between 101 - 146, varying from cloudy to heavy snowfall conditions, check the API details here, https://developer.tuya.com/en/docs/cloud/fcbfc526ea?id=Kaingywuidzs0
# Matrix device python wrappers already have all colour defined which are used # here
def weatherColorStatus(condition_num):    if condition_num == 120:        led.set(color.SUNNY_120)        return True    if condition_num == 146:        led.set(color.CLEAR_146)        return True    if condition_num == 139:        led.set(color.LIGHT_RAIN_139)        return True    if condition_num == 132:        led.set(color.OVERCAST_132)        return True    if condition_num == 141:        led.set(color.MODERATE_RAIN_141)        return True    if condition_num == 101:        led.set(color.HEAVY_RAIN_101)        return True    if condition_num == 129:        led.set(color.PARTLY_CLOUDY_129)        return True    if condition_num == 140:        led.set(color.HAZE_140)        return True    if condition_num == 121:        led.set(color.FOG_121)        return True    if condition_num == 109:        led.set(color.DUST_109)        return True    if condition_num == 103:        led.set(color.SANDSTORM_103)        return True    if condition_num == 105:        led.set(color.SNOW_105)        return True    else:        led.set('black')        return False
Here you go, when you run the script on the device, it should automatically fetch the data using the Cloud APIs and update the status of the lights. You can now try to combine Air Quality Data APIs as well but I feel it would be more useful if we run both APIs scripts separately otherwise the colours would get confusing to understand.
On running the script, all the API repsonse would be visible

On running the script, all the API repsonse would be visible
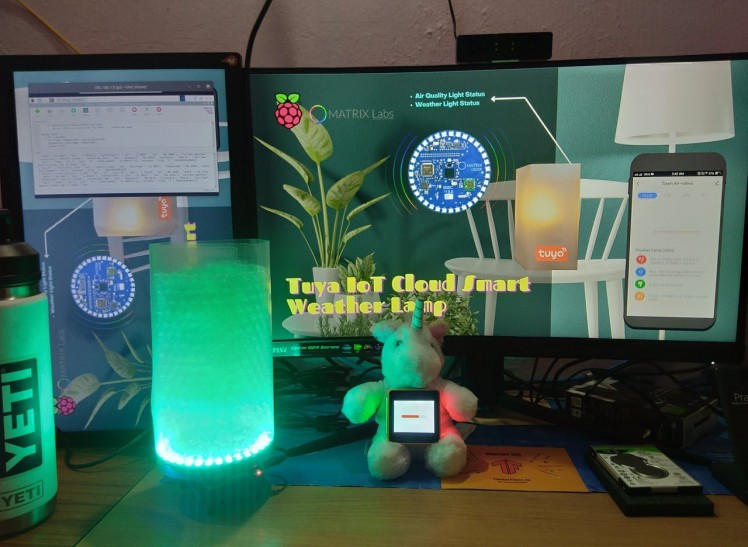
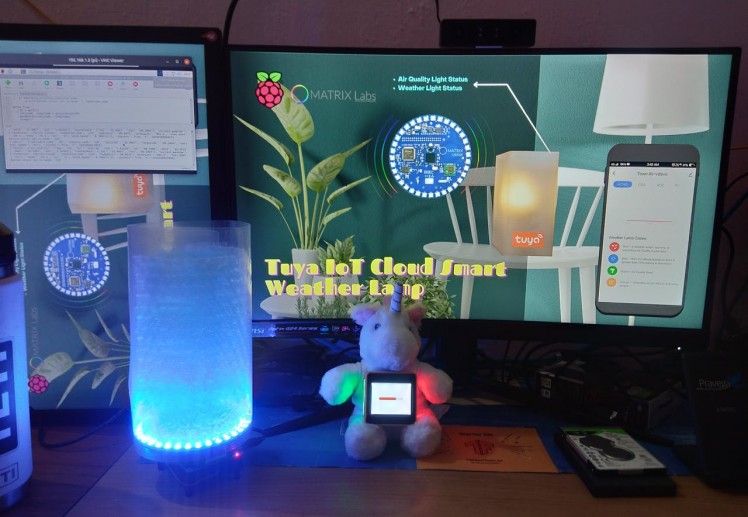
Results:
Now I can use my smart lights to decide and plan better before moving out on a rainy day :)
1 / 2