Design Considerations
If I could redo the project over again with the same constraints, one thing I would focus more on would be the mechanical structure of my device. For example, my cardboard housing makes it difficult to remove any of my electrical components after gluing it closed. This way, it’s very difficult to edit or fix a loose wire after the project is fully assembled.
Another thing that I would do if I could redo the project with the same constraints would be to purchase an OLED LCD display that could connect to my Arduino and display the current soil water concentration of the plant for the user, rather than using my current LED system. This would provide the user with more specific information, and a quick survey of Amazon showed me one that would fit within the required budget.
If I had more time and money to focus on this project, there are a number of ways that I would potentially improve my project. One thing that I think could be beneficial to my device would be to include a way for the user of the device to set the ideal water concentration for their plant. This would be useful because a succulent doesn’t need as high a soil water concentration as a tropical plant, for example. One way that I could’ve implemented this if I had more time would be to use the linear potentiometer from my kit, or to purchase a separate dial online that the user could use to set this concentration.
Operation Instructions
Before using the device, it is important that you calibrate the soil moisture sensor.
code for calibration is linked and more information can be found at the following link: https://www.sigmaelectronica.net/wp-content/uploads/2018/04/sen0193-humedad-de-suelos.p/df .
The calibration process is as follows: connect the sensor to the arduino (black to ground, red to 5V, orange to analog pin 0), upload the linked codeto the Arduino and open the serial monitor to view the sensor output. Hold the sensor in air and record the highest value delivered by the sensor- this will be substituted as the variable AirValue in my code in Appendix D.2. Then submerge the sensor in a cup of over and record the lowest value outputted by the sensor- this will be substituted as the variable WaterValue in my code.
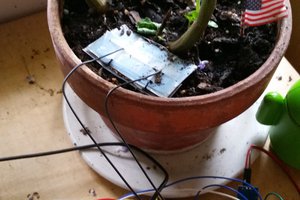
Once the sensor is calibrated and the device is fully assembled, use the usb A to B cable to plug the Arduino into the usb port on your laptop to upload the code from to the Arduino and make sure the battery holder pack is set to on. The device should be placed in soil, such that the stake as well as the soil moisture sensor are submerged in the soil with the main housing of the device exposed to the air. Water can be added to the water bottle through the opening on the bottom of the bottle. Now, the device will automatically water or not water the plant depending on the soil moisture concentration. In order to receive feedback about the soil moisture content, press the button on the open portion of the device. If the green LED lights up, the moisture is low(below 40%), if the red LED lights up then the moisture is high(above 40%), and if neither lights up then it is in an optimal range.

 Jordan Poles
 Jeremy Ruhland
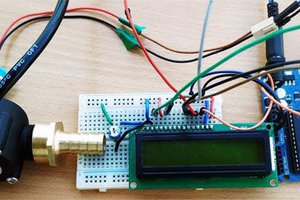
 electronicsworkshops
 pj
pj