Apr 4, 2023 Worked out the issues with ESP32Cam and Google email. Now includes servo to move cam every 5 minutes for much wider views.
For the price of a servo and power supply you could have a bunch of fixed cams @$5 each arranged in a circle instead. Most servos won't give 360 degree views. Program them to send pics at different times. If you buy the cams with the USB shield that's all you need. Trigger the pics based on time from the internet between sunrise and sunset, and/or PIR sensor and/or on demand remotely from a webpage dashboard button in MQTT. For MQTT info go to https://io.adafruit.com/
Sunrise and sunset times depend on which month it is. Year, month, day and time comes from the internet. Corrected for daylight savings time or not. This project shows how to get the time from the internet. https://hackaday.io/project/174577-esp8266-time-and-date-from-internet
It's nice to be able to look around the house and outside while we are away for peanuts cost.
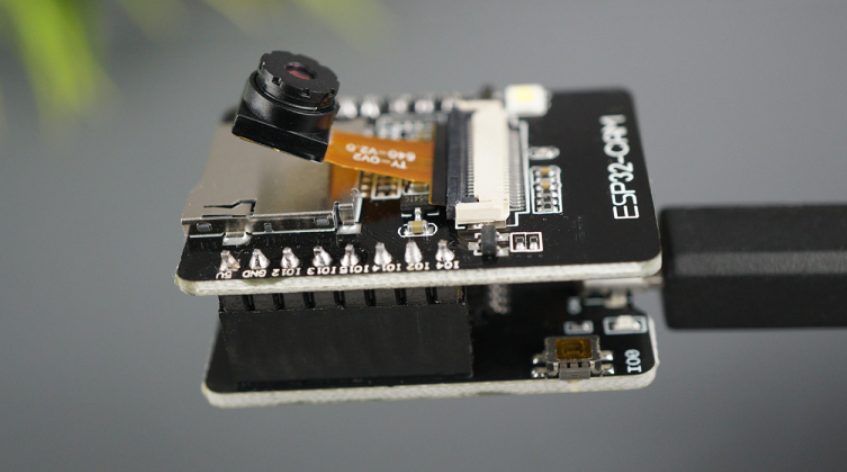
See test rig pic and code in files. The ESP32Cam shield is only needed for easy programming. If the email doesn't show up in Gmail just wait 1/2 hr or so. Once Google decides to accept the email it usually keeps working. Also Gmail stops temporarily if you send more than 500 emails in one day.
Servo version is powered from USB charger and cable with 5 volts split out to power the ESP32Cam. I use orange wires for 5V so it's not mixed up with red 3.3V. Yellow is the PWM command to the servo. The servo is separately powered from a 6V power supply on the white + and blue - wires in the last pic. Grounds connected.
Different wire colours are so I don't mix them up. ESP32Cam is a 3.3V device. 5V on most pins can destroy it.
I could use a number of 3.3V AM312 PIRs to detect which zone has activity, move the cam to that zone and email a pic.
I found the WiFi on ESP boards gives a lot of PIR false triggers if it's mounted nearby so I put an aluminum tube around the base of the PIR to shield it. Side shields are needed for multiple zones as well.
Note!! Jan 2023: There are now many issues with emailing a picture from ESP32 Cam including Google requires 2-step verification and the libraries have changed. Good luck sorting out all the new changes.
Also it seems on ESP32 WiFi and ESPNOW can't coexist. One or the other. I can get time from an existing NodeMCU with a clock. Pic capture and send based on time.
With my ESP8266/NodeMCUs it's not a problem at all. I still prefer NodeMCU over ESP32.
My solution is to only connect to wifi, WiFi.begin("wifi name", "wifi password"); based on time from ESPNOW, capture and send pic then disconnect using WiFi.disconnect(); . This works OK but ESPNOW seems flaky on ESP32.
It's better to use time from the internet instead. Then wifi can remain connected. If you have multiple cameras make sure pics are emailed at different times. See code for this in files. And/or Subscribe to a button on MQTT and trigger a pic and email remotely from anywhere.
https://hackaday.io/project/174577-esp8266-time-and-date-from-internet
The original ESP32 Cam board doesn't have a micro USB socket for programming so many temporary connections are needed to program it. OTA programming should work like it does with NodeMCU but no luck so far. With OTA you don't need the USB socket.
Program it using an Arduino Uno or a FTDI board. Correct wiring is at 1:00.
Or get a ESP32 Cam shield with a micro USB socket. For this one you don't need to hold a button to program.
Much, much easier. The shield can be removed after programming. Or left on and used to power the ESP32-Cam . The cam with the shield is only around a dollar more. Make sure you buy a few cams as they are easily damaged. Don't waste hours trying to get a reluctant board working. Just switch boards and the same code works fine. I use clear silicone to stick the camera to the SD card holder. Silicone sticks to anything but is weak so the cam is easily removed if needed.
https://randomnerdtutorials.com/upload-code-esp32-cam-mb-usb/.
This doesn't allow access to the I/O when connected though. If the pic is triggered using the time from ESPNOW or time from the internet no connections to the I/O are required. This is what I use now. Powered from 2.0 amp USB charger and short micro USB cable. Many ESP32 Cam issues are due to an inadequate power supply.
Once programmed the board can run stand alone with a wired power supply if connections to I/O are needed.
Some newer ESP32 Cam boards do have integrated CH340 USB built in like other microcontrollers. May have to load CH340 drivers if needed. Also easier but I got two of these and the USB connector broke off on both of them.
https://www.ebay.ca/itm/203287736123 See note about holding the Flash button to program.
Also make sure and update your ESP32 software within Arduino IDE. New software recognizes OV5640.
1. Under Preferences, Additional Boards Manager URLs add a comma after existing URL then https://raw.githubusercontent.com/espressif/arduino-esp32/gh-pages/package_esp32_index.json
2. Tools, Board, Boards Manager, search ESP32 and reload. Adds many files.
3. File, Examples, ESP32, Camera, CameraWebServer to load a new version of the software
https://github.com/arduino/Arduino/wiki/Unofficial-list-of-3rd-party-boards-support-urls
Setup Arduinio IDE:
There are a lot of YouTube videos about the ESP32 Cam board. Including pan and tilt with servos.
I will also try a much higher quality camera the OV5640 to replace the OV2640. 2592x1944 max resolution.
So far I cannot get good results from the OV5640 as shown in the video below. Much worse than OV2640.
***SOLVED*** under camera_config change: config.xclk_freq_hz = 6000000; // was 20000000
This also reduces the frame rate.
Still not sure if the 5M higher res and wide angle is worth upgrading from OV2640 to OV5640.
At 1:30 he puts the OV5640 onto a standard ESP32 Cam board. You can buy the OV5640 separately. There is even an auto focus version that can be used like a microscope.
There is a way to get wireless OTA programming on ESP32 boards as well but the default doesn't work. I use OTA programming for all the other NodeMCU microcontrollers. It looks like OTA won't work with ESP32 Cam boards.
The email ESP32 Cam was sometimes sending only a partial or no pic so also added a SPIFFS format statement in the setup to correct this. Sends photo every 1/2 hr if bright enough. Removes photo from SPIFFS after email sent.
Code added to example from : https://randomnerdtutorials.com/esp32-cam-send-photos-email/#comment-715842
Jan 2023:Note there are now many issues with emailing a picture from ESP32 Cam including Google requires 2-step verification and the libraries have changed. Good luck sorting out all the new changes.
This helped. https://microcontrollerslab.com/esp32-cam-take-send-photos-email/
After many days of reworking the code and errors that have nothing to do with the problem it's finally working again.
See updated code in files without photosensor input. Works as of Mar 30, 2023.
bool formatted = SPIFFS.format(); //formats SPIFFS if corrupt and only partial picture
void loop() {
if (digitalRead(2) == LOW) digitalWrite(33, LOW); // turn on built-in red LED if dark
if (digitalRead(2) == HIGH) { digitalWrite(33, HIGH); // if bright enough turn off red LED and send photo
capturePhotoSaveSpiffs(); sendPhoto();
SPIFFS.remove("FILE_PHOTO"); // remove photo after email sent
delay (1800000); // wait 1/2 hour
}
}