Close
0%
0%

Using the Arduino AccelStepper Library

Armed with the info in "The Missing Manual", this tutorial shows how to write sketches!

Similar projects worth following
I have prepared "The Missing Manual" to explain AccelStepper so its use can become much more widespread. This tutorial came about as a result of writing "The Missing Manual". The manual seemed to naturally lead to writing sketches using AccelStepper to control one or more motors. But the approach to writing a suitable program is nowhere explained in the manual! The purpose of this tutorial is to provide that explanation and to supply some tutorial examples. As we go through the first few steps, I will suggest suitable reading from the manual as accompanying material. If you are serious about using AccelStepper, you will likely want to read the entire manual. As you work through the examples, and come up with applications of your own, by all means go back to the manual for any details or explanations you may have missed. If you have questions or comments, don't hesitate to post them here or on the AccelStepper Forum. I will make every effort to respond.

Warning: This is not an introductory tutorial for beginners! I'm assuming you already know what steppers are, have decided they are right for your project, and want to know how to use them better. I assume you are familiar with the Arduino environment and know how to load libraries, how to program, compile, and upload.  You should also have some basic knowledge of Electronics including basic circuit skills and understanding and be familiar with breadboarding. If you lack these skills, take time to learn them, then come back. This isn't difficult, but beginners will be frustrated without an adequate background.

Introduction

There are various types and sizes of stepper motors, and lots of details to understand. A selection of important examples will be examined and discussed in Step 1. For those wanting more details, here are a few of the most useful links I have found.

http://homepage.divms.uiowa.edu/~jones/step/  Classic, academic reference. Lots of good info! Most links are broken, unfortunately.

https://dronebotworkshop.com/stepper-motors-with-arduino/  Good brief intro with example code, ignore the AccelStepper examples - I'll provide those!

https://learn.adafruit.com/all-about-stepper-motors/what-is-a-stepper-motor  Good source of hardware if you need it.

https://hackaday.io/project/183279-accelstepper-the-missing-manual  The "Missing Manual" can be found here. You don't need to read it all right now, just keep it handy as we go on.

To get started, you should add the AccelStepper library to Arduino using the library manager. Pick the library by Patrick Wasp. The Manual is based on Version 1.61, but if there's a later version, you can probably use it.

We will use the elapsedMillis library as well, so load it also if you don't have it.

All the tutorial examples are presented in the Build Instructions below. There are seven of them, be sure to read them all!

I have a few more advanced tutorials that I'll post soon. Questions and comments are most welcome.

ino - 1.76 kB - 01/24/2022 at 20:30

Download

UnoAccelStepperExper_1.ino

File for Step 3

ino - 2.22 kB - 01/24/2022 at 20:32

Download

ino - 2.58 kB - 01/24/2022 at 20:32

Download

ino - 2.05 kB - 01/24/2022 at 20:34

Download

UnoAccelStepperRunDemo.ino

Also for Step 4

ino - 2.66 kB - 01/24/2022 at 20:34

Download

View all 9 files

  • 1
    Step 1 Hardware Hook-Up

    Since our object is to drive an actual stepper motor with an Arduino, we'll need some hardware. Before we jump into the software, we need to connect our motor and driver to the Arduino. I'll also briefly discuss the driver and motor types and their strengths and weaknesses. Here are the most common motor types and the drivers used with them. You can find much more detail in the references above, but I'll try to hit the key points and add some links with details.
    Steppers are either unipolar or bipolar in construction and can usually be identified by how many wires they have. Those with five wires will always be unipolar. Those with four wires are bipolar. A six wire motor may be hooked up as bipolar by leaving the center two wires unconnected, or hooked up as unipolar by connecting the two center wires together and using them as the fifth wire.
    To connect a motor to a driver, you must know which wires are pairs. This is most easily done with a multimeter. The process is described here.
    https://42bots.com/tutorials/stepper-motor-wiring-how-to/  Thorough discussion of identifying 4 and 6 wire motors.
    https://www.circuitspecialists.com/blog/how-to-wire-a-stepper-motor/  Not as good, but adds info about 5 wire motors.

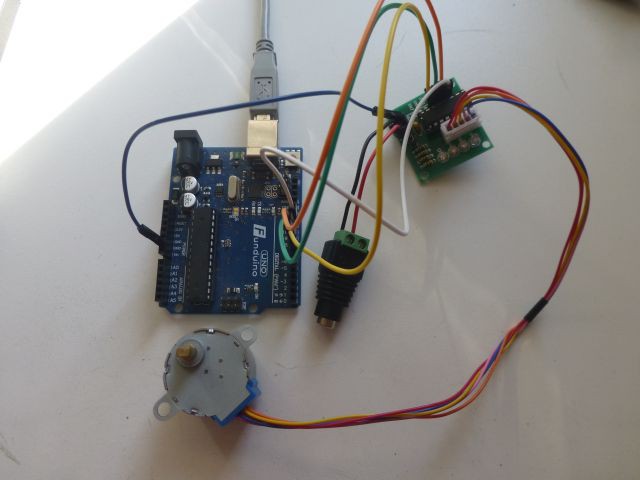
    Drivers are a little harder to characterize. They may be designed for unipolar or bipolar operation, and also provide constant voltage or constant current operation. Unipolar drivers are simply an array of FETs and provide constant voltage operation. The ULN2003 is used to drive small steppers. It is cheap and easy to use. Here's an example.
    https://lastminuteengineers.com/28byj48-stepper-motor-arduino-tutorial/
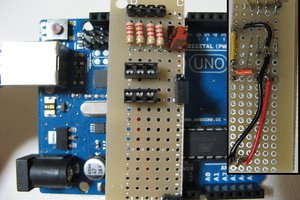
    Here is my setup that I used to test the examples in this tutorial.

    With this simple way to drive a stepper, why limit ourselves to small motors? Can't a six wire stepper be connected as a unipolar? There are two reasons this isn't done. Only 1/2 as much power is available from the motor since only half of each coil is used at a time. Since bipolar drivers are now very inexpensive, unipolar motors and drivers have fallen out of favor. The other reason is that constant current operation is not as easy for these drivers.

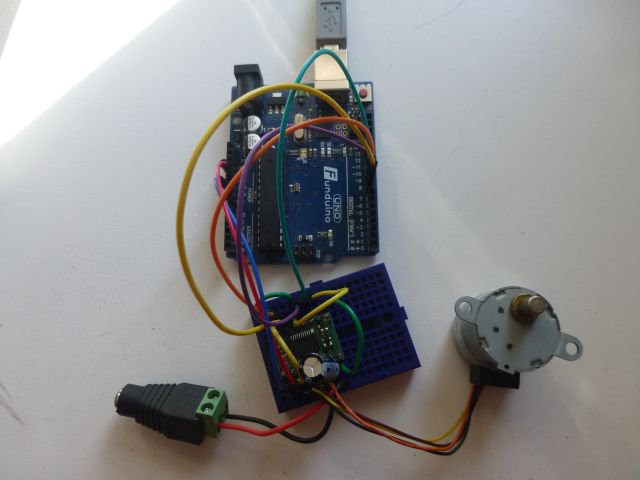
    Bipolar stepper motors must be driven by an HBridge. Examples include the TB6612 or L298 constant voltage HBridge drivers.
    https://learn.adafruit.com/adafruit-tb6612-h-bridge-dc-stepper-motor-driver-breakout/assembly
    https://lastminuteengineers.com/stepper-motor-l298n-arduino-tutorial/
    Here's my setup with a TB6612 from Pololu driving a small bipolar stepper..

    Since these drivers supply a constant voltage to the stepper, the current is limited by the value of the voltage and the resistance of the motor coils. We measured the resistance when we figured out which wires were pairs, so it's easy to calculate current using Ohm's law. if the voltage is 5 volts and the coil resistance is 50 Ohms, then the current is (i = v/r) 100mA. Even small motors can handle that without heating up. But if the voltage supply is 12 volts and the coil resistance is 2 Ohms, then the current is 6A! That's a lot and will heat up even a larger motor. Now, the fact is that we want to use 12 volts to make the motor move quickly, but we don't need all that current. That's where constant current drivers come in. Using a driver like the a4988, we can drive with 12 volts, yet limit current to only 1 Amp. 

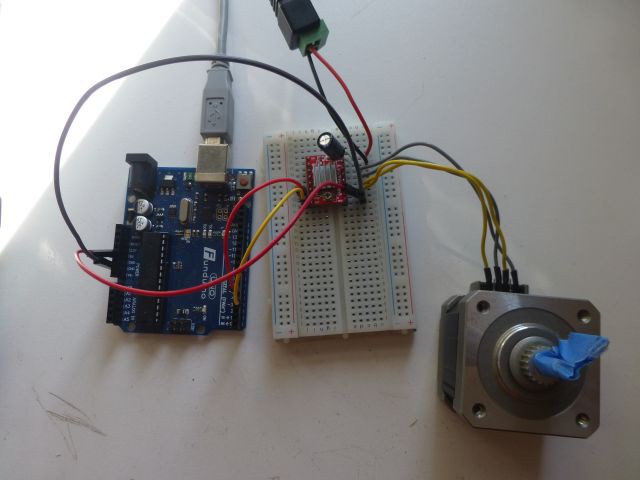
    Constant current drivers typically only require step and direction inputs, using only two wires instead of the four control wires needed by the previous drivers. Due to the popularity of 3D printing, the cost of these drivers has dropped significantly in the last few years. These drivers and motors are usually the best bang for the buck if small, cheap motors don't work.
    https://lastminuteengineers.com/a4988-stepper-motor-driver-arduino-tutorial/
    My a4988 driver/bipolar motor setup.

    There is just a little more information to share about these drivers:
      You must provide a large (100uF) capacitor between Vmot and ground to protect driver from transients.
      Don't connect or disconnect wires to the stepper with Vmot applied! That's true for any driver.
      A lot is written explaining how to adjust the current to your stepper. You are most welcome to try any of these methods, but here's the method I've used on many motors. Adjusting the pot on the driver, turn it all the way down, then increase it slowly until the motor performs properly. If you hear a lot of noise from the motor, try turning the current down.

    One additional topic worth mentioning is microstepping. This means moving the stepper less than a full step per commanded increment. It is a capability built into many drivers like the a4988. The main advantage is smoother motion. the disadvantages are that the top speed is limited and less power is available. Since AccelStepper doesn't care if microstepping is being used or not, I'm not going to discuss it further but leave it for you to experiment with.

  • 2
    Step 2 First AccelStepper Sketch

    Suggested reading: Constructing an AccelStepper Object
    Now that you have learned to connect your motor to a suitable driver, and have it hooked to your Arduino, it's time to start a first sketch. The first one we will look at is really simple. Load the UnoAccelStepper_ConstantSpeed.ino sketch (found in the Files section) into the Arduino IDE and follow along as I break it down.
    Let's look at the start of the sketch. Here are the first two lines.

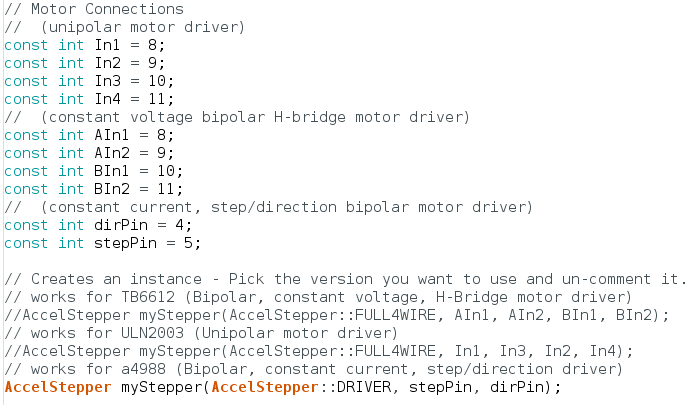
    We must include the AccelStepper header file in our sketch. That's what happens here.
    Next we'll define the pins our driver will use. The details here are explained in the Missing Manual. If you skipped the suggested reading and are feeling lost, by all means stop and read now.

    Consider each of the three driver types examined in Step 1. First the pins are assigned symbolic names, then the AccelStepper object is instantiated. You can ignore or remove any definitions you don't use; alter the others to the pins your driver uses. I like to leave them all in so it's easy to try different drivers and motors. One additional consideration is to keep the interrupt pins available - D2 and D3 on an Uno.
    Here's the setup() routine.

    Since this example simply runs a stepper at constant speed, we only need to set the maximum speed and the desired actual speed.
    Finaly, here's the loop() function.

    The motor will run forever at constant speed.
    If you want the motor to run in the opposite direction, change the value of setSpeed() from 100 to -100. Your stepper will run the other way.

  • 3
    Step 3 Reporting Results

    While the sketch from Step 2 will run a stepper, it would be desirable to have some information reported to the screen. This makes it easy to experiment and build intuition. Let's add some code to report speed and position every second.
    To begin, load the UnoAccelStepperExper_1.ino sketch into the Arduino environment on your computer and follow along. Functionally, this sketch is identical to UnoAccelStepper_ConstantSpeed.ino that we just used. We're going to only look at the changes needed to add reporting code.
    First, include the ElapsedMillis header file.

    Now create an ElapsedMillis object just before the setup() function.

    Note that Serial.begin(115200) is added to the setup() function. This enables writing data over USB quickly.
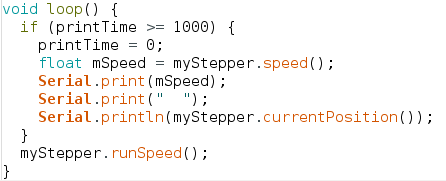
    Finally, use the ElapsedMillis object to trigger a report every second.

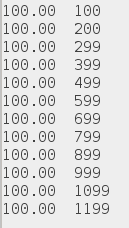
    Here's the results of running this sketch, as reported in the Arduino serial window.

    Experiments to try include setting max speed and speed to very high values and see if your motor will run or stall.

    Let's learn how to use a pot to interact with a stepper. We'll use the pot to vary the speed. Load UnoAccelStepper_speedControl.ino which includes results reporting from above.
    The first part of the sketch is identical to the one we just worked with. A definition for the maximum speed is added, and the initial speed is defined as one fifth of it. The code to report the results is the same. Here's the code added to the loop.


    This takes a pot reading, maps it to the maximum speed range, and limits it to positive values (not really necessary). The setSpeed() function sets this speed as the value runSpeed() will use. We can experiment with speeds and accelerations easily now. Connect a 10K pot between 5V and Ground and the wiper to A0. Then run the sketch to control your stepper. Just be sure to instantiate the correct driver.

View all 7 instructions

Enjoy this project?

Share

Discussions

Similar Projects

Does this project spark your interest?

Become a member to follow this project and never miss any updates